Data loss can happen to any PC and any hard drive. Sometimes, you may need to recover Mac hard drive data. This post from MiniTool Partition Wizard shows you how to do that on macOS and Windows PCs.
Introduction to Mac Hard Drive
In general, a Mac hard drive is used for macOS, an operating system developed and marketed by Apple Inc. It is the primary operating system for Apple’s Mac computers. In addition, devices not made by Apple are not allowed to install macOS.
Within the market of desktop and laptop computers, macOS is the second most widely used desktop OS, after Microsoft Windows and ahead of Linux (including ChromeOS).
Interfaces Used by Mac PCs
The most basic requirement of a Mac hard drive is that it can be connected to the Mac PC. Therefore, you should know about the interfaces used by Mac PCs.
#1. Internal Ports
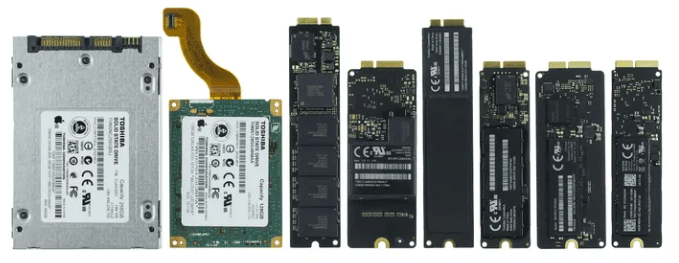
Almost all internal Mac hard drives are specially designed for Mac PCs. These hard drives use the same protocols as other hard drives (SATA, PCIe, etc.), but the physical port and size are different. Moreover, different generations of Mac PCs also use different hard drive ports and sizes.
Therefore, if you want to use a regular SSD to upgrade or replace the Mac SSD, you need an adapter. In addition, the process is also extremely troublesome because you need to deal with the protocol and size issues still.
#2. External Ports
Compared to Mac internal ports, Mac external ports used to connect storage devices are relatively easy to identify. In general, a Mac PC may be equipped with the following physical external hard drive ports: USB-A, Thunderbolt, Thunderbolt 2, USB-C, Thunderbolt 3, USB 4, Thunderbolt 4, and SD card slots.
As long as the port is suitable, you don’t need to worry about the size of the external disk. Additionally, adapters can be used even if the interface is not suitable.
To learn more about external hard drive ports on Mac PCs, you can read the following posts:
- Thunderbolt 3 vs USB C: Look the Same But Differ Greatly
- Thunderbolt vs USB 3.0: What’s the Difference?
- Is Thunderbolt the Same as USB C? Here Is the Answer!
- Thunderbolt 4 vs Thunderbolt 3 vs USB4: What’s the Difference?
- Thunderbolt 2 vs 3: What’s the Difference?
- USB 4 vs USB C: What’s the Difference
File Systems Supported by macOS
If you want to access a hard drive from your Mac PC, the hard drive should be formatted to the file systems supported by the macOS.
When you format a hard drive on macOS, you will be asked to choose the Format (file system) and the Scheme (partition table).
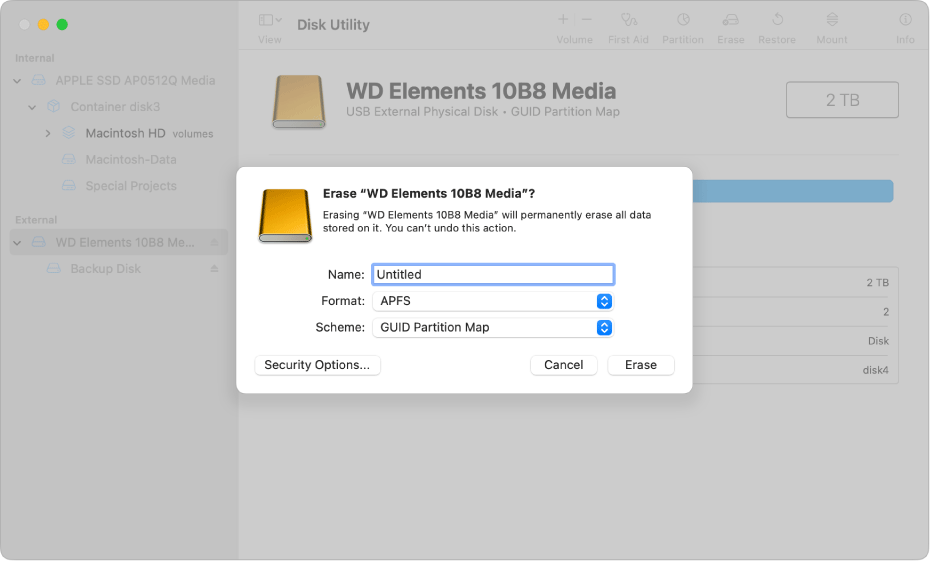
The Format usually includes the following options:
- APFS (Apple File System). This file system is used by macOS 10.13 or later.
- Mac OS Extended (also called HFS+). This file system is used by macOS 10.12 or earlier.
- MS-DOS (FAT).
- ExFAT.
- MS-DOS (FAT32).
The latter three file systems are mainly used for external drives so that users can use the drive on both Mac PCs and Windows PCs.
The Scheme usually includes the following options:
- GUID Partition Map. This option is for all Intel-based and Apple Silicon Mac computers.
- Master Boot Record. This option is mainly used on external drives. Mac OS X systems cannot boot from a hard disk with this partition table style.
- Apple Partition Map. This option is for compatibility with old PowerPC-based Mac computers.
How to Recover Data from Mac Hard Drives
Data loss may occur on any PC including Mac PCs. In this case, you may need to perform Mac hard drive recovery. How to recover data from Mac hard drives? You can refer to the following content.
Recover Mac Hard Drive on macOS
When it comes to Mac hard drive data recovery, in most cases, users want to do the Mac hard drive recovery on a Mac PC. In this case, the following methods can be used.
#1. Use Ctrl + Z
If the file was just deleted on Mac and no other operations were performed, you can directly use “Ctrl + Z” to undo the previous operation to recover the data.
#2. Recover from Trash
When you delete a file on a Mac PC, the file won’t be deleted immediately. It will be moved to Trash first. If you haven’t emptied Trash, you can recover the deleted file from Trash.
#3. Recover from a Time Machine Backup
Time Machine is a backup tool built into MacOS that can regularly back up data on your computer. If you have turned on this feature, you can try this method. Here is the guide:
Step 1: Make sure your Time Machine backup disk is connected and turned on. If your disk is on a network, make sure your Mac is on the same network.
Step 2: Start up your computer in macOS Recovery.
- On a Mac with Apple silicon: Choose Apple menu > Shut Down, press and hold the power button until you see “Loading startup options,” click Options, click Continue, and then follow the on-screen instructions.
- On an Intel-based Mac: Choose Apple menu > Restart, immediately press and hold Command-R until you see the startup screen, and then follow the onscreen instructions.
Step 3: In the Recovery app window, select Reinstall for your macOS release, and then click Continue. Then, follow the on-screen instructions to complete the macOS reinstallation.
Step 4: After macOS finishes installing new system files, Migration Assistant asks if you want to transfer information from another Mac or a Time Machine backup. Select Transfer from a Time Machine Backup, and then click Continue.
Step 5: Enter the name and password you use to connect to your backup disk. Select the date and time of the backup you want to restore, and then follow the onscreen instructions.
#4. Use Third-Party Data Recovery Software
You can also use third-party data recovery to do Mac hard drive data recovery if the above methods can’t help you recover data from Mac hard drives. In this case, Stellar Data Recovery for Mac is recommended.
You can download and install this software on your Mac PC to recover data. Note that do NOT install the software on the partition where data is lost. Otherwise, lost files may be overwritten. In addition, if the Mac PC won’t boot, you need to make a bootable USB to do Mac hard drive recovery.
Recover Mac Hard Drive on Windows
Some people may want to recover Mac hard drive on Windows. As mentioned above, Mac PCs support FAT, FAT32, and exFAT file systems, which are also supported by Windows PCs.
Therefore, some people may format their external hard drives to these file systems so that they can use these external drives to transfer files between Mac PCs and Windows PCs. If they have a Windows PC in hand, they may want to know how to recover Mac hard drive on Windows.
To do Mac hard drive data recovery on a Windows PC, MiniTool Partition Wizard is recommended. This software is available on almost all Windows editions. In addition, it can recover data from NTFS, FAT, FAT32, exFAT, HFS+, and other file systems.
In addition to the data recovery feature, this software also has other features. It can partition hard drives, move/resize and extend partitions, convert MBR to GPT without deleting partitions, recover deleted or lost partitions, clone hard drives, migrate OS, etc.
How to recover Mac hard drive on Windows with MiniTool Partition Wizard? Here is the guide:
MiniTool Partition Wizard DemoClick to Download100%Clean & Safe
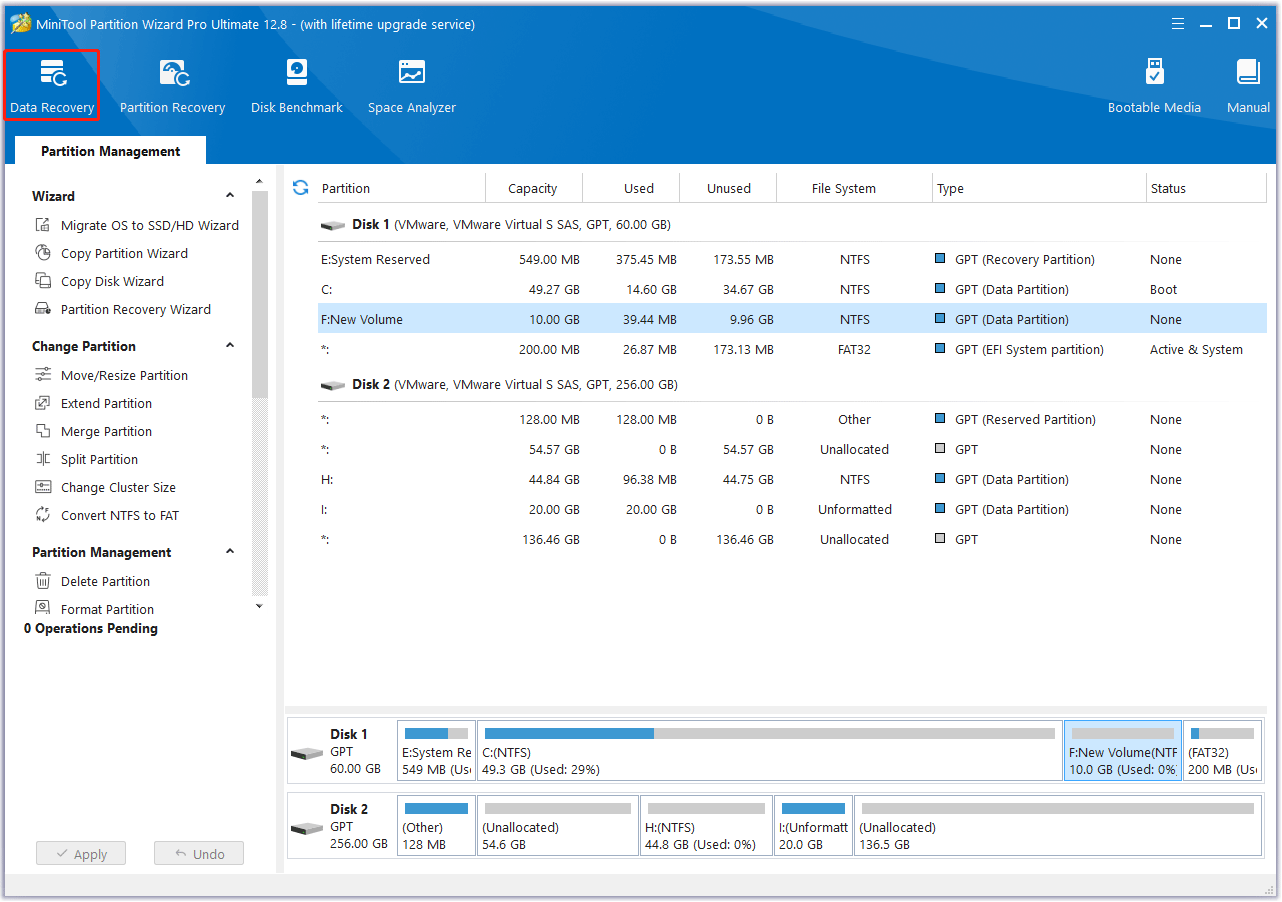
Step 1: Launch MiniTool Partition Wizard and click Data Recovery on its main interface.
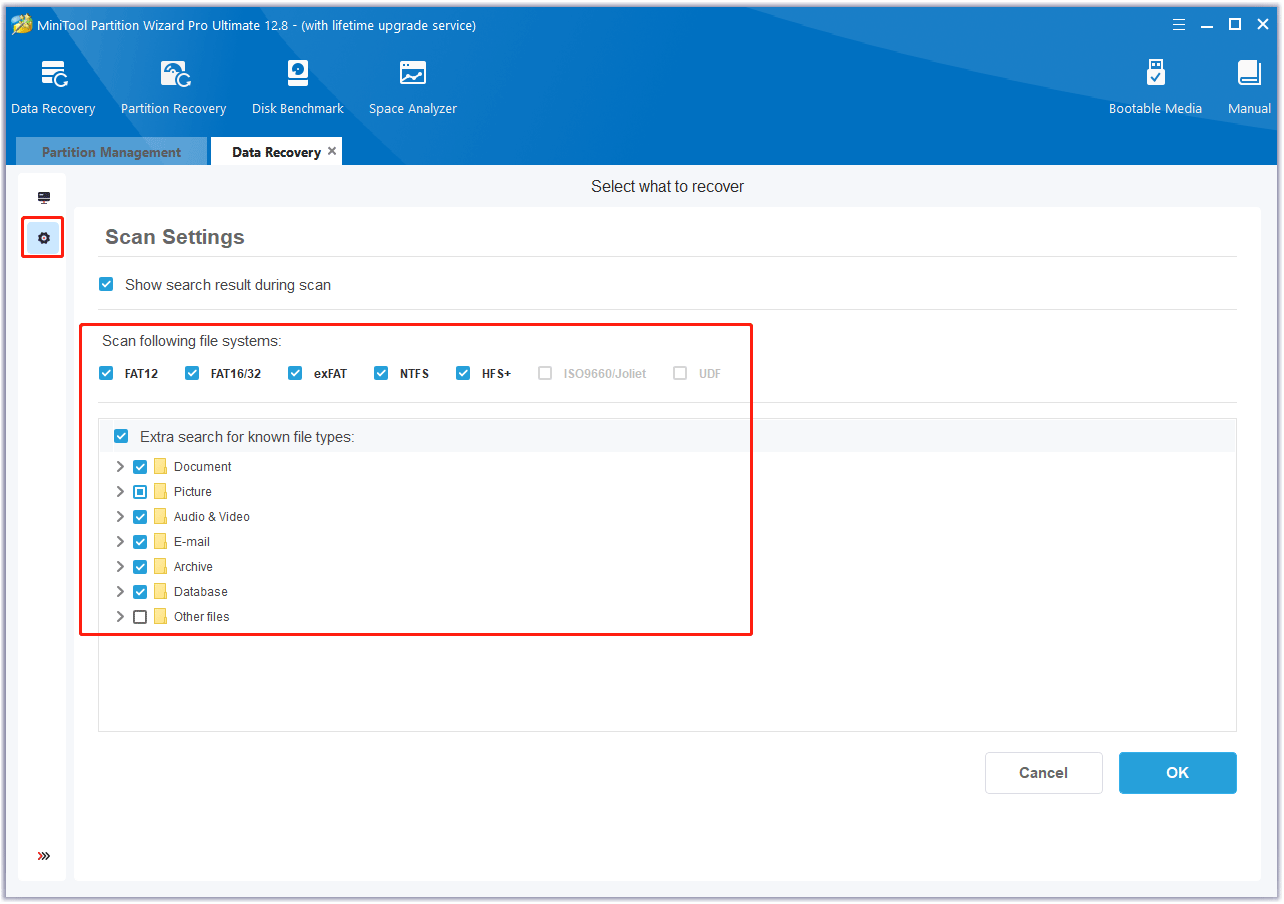
Step 2: Click the Gear icon to check the scan settings. You need to make sure the FAT, FAT16/32, exFAT, and HFS+ file systems are ticked. You can also check if the file types you need are ticked. If all is done, click OK.
Step 3: Select a place and click Scan to recover data from it. The place could be an existing/deleted/lost/unidentified partition, an entire disk, or a specific folder. You can select the place according to your condition.
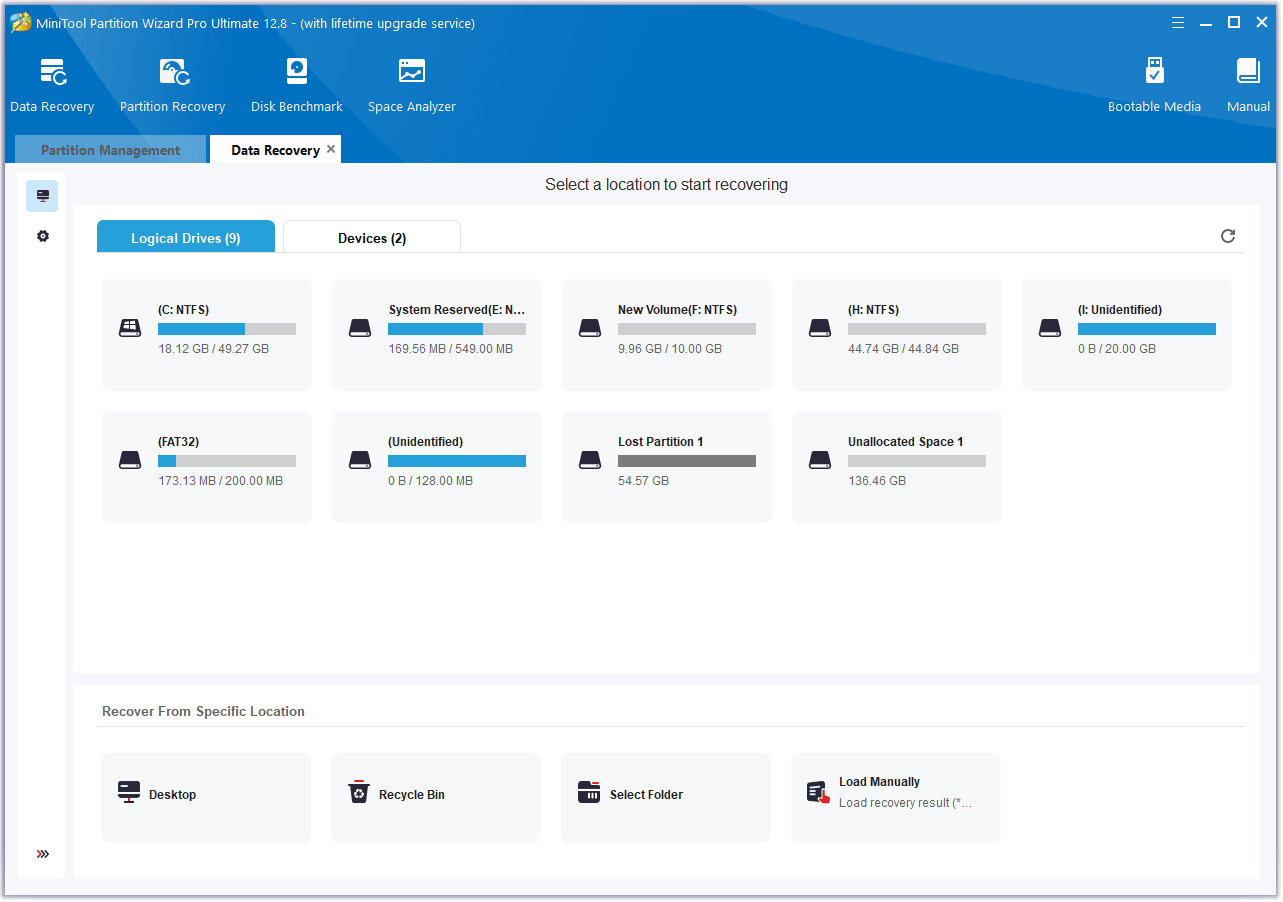
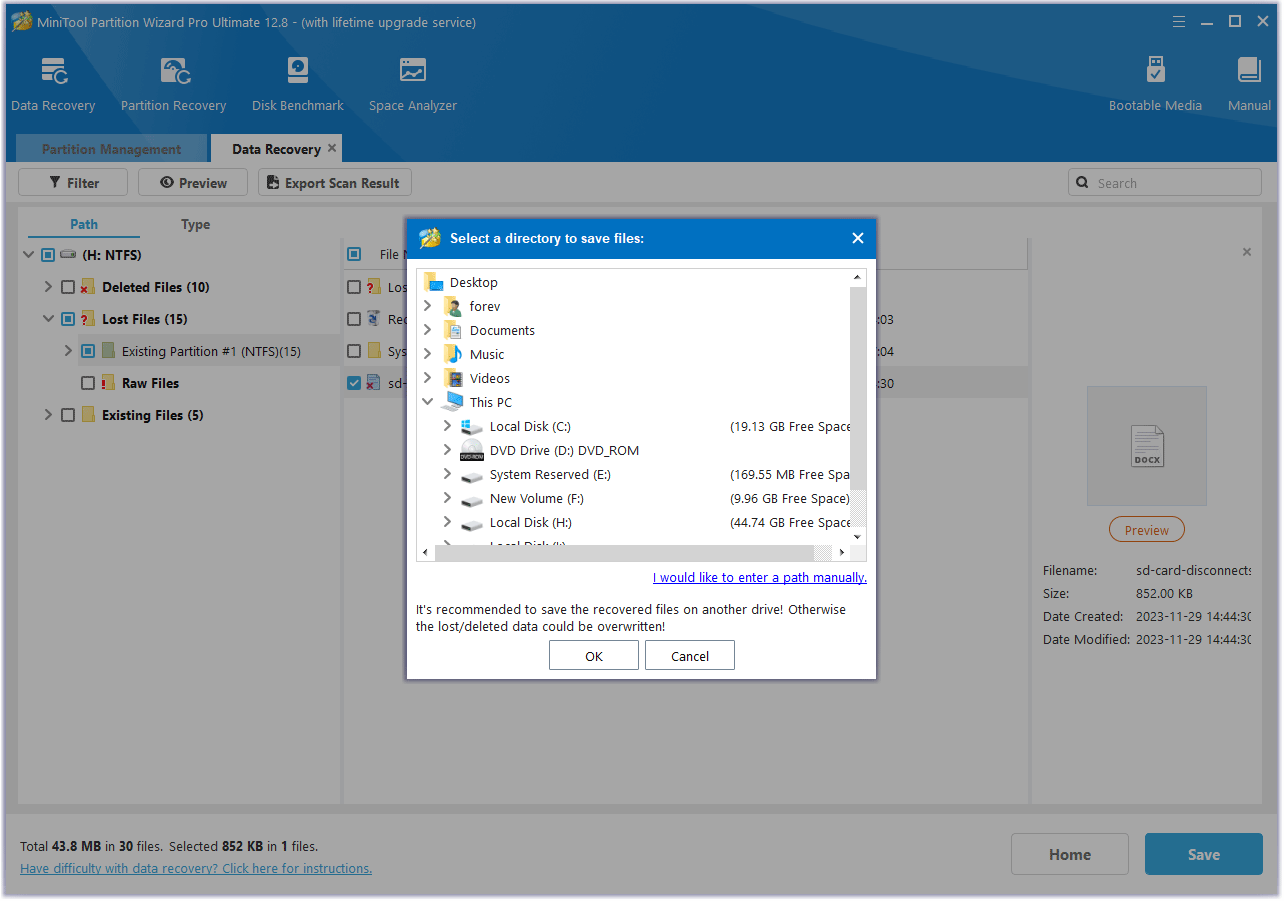
Step 4: Wait until the scanning process is completed. Use the Path, Type, Filter, Search, and Preview features to quickly find the files you want to recover. Select these files and then click Save. Select a safe place to save these recovered files.
- Path: All files that MiniTool Partition Wizard can find on this place are listed by path or directory.
- Type: All files are listed by type.
- Filter: You can filter these files by File Type, Date Modified, File Size, and File Category.
- Search: You can use the file name to look for the file you want to recover.
- Preview: Before the data is saved, you can use this feature to preview the file. It supports previewing 70 file types, but note that the file can’t exceed 100 MB.
How to Prevent Data Loss on Mac
To avoid data loss on your Mac PC, you can take the following measures.
- Perform regular backups. You can use Time Machine or third-party software to do it.
- Sync your data to iCloud. In this way, even if you delete files on your Mac PC, you can still find them in iCloud.
- Keep the antivirus up to date all the way, avoiding data being deleted by viruses.
- Frequently check the disk to make sure it can work well.
- Avoid any physical damage to the Mac PC.
Bottom Line
Do you know other ways to recover data from Mac hard drives on macOS or Windows? Do you know other ways to avoid data loss on Mac? If you have any ideas, you can share them with us in the following comment zone.
In addition, if you encounter problems when using MiniTool Partition Wizard, please feel free to contact us via [email protected]. We will get back to you as soon as possible.

User Comments :