How to recover data from Lenovo laptop? What if the laptop is dead or unbootable? Don’t worry. This post from Partition Magic will walk you through various methods to recover data from Lenovo laptop.
Lenovo is well known for its exquisite laptop series, the most popular of which are ThinkPad and IdeaPad. The data on the Lenovo laptop may be lost due to different reasons.
If your data is lost, then you don’t have to worry. You can recover your data after reading this article. However, before starting to solve your problem, you should learn the reasons.
What Causes Lenovo Laptop Data Loss?
Data on Lenovo laptops can be lost due to a number of reasons. The most common reasons are:
- Accidental deletion: Users often delete files or folders unintentionally.
- Formatting: Formatting a drive can delete all its data.
- Virus/malware attack: Malware can corrupt or delete files.
- Software problems: Software crashes or malfunctions can cause data loss.
- Operating system crashes: Operating system crashes can cause unsaved data to be lost.
- Hard drive damage: Wear and tear can lead to hard drive failure and data loss.
- Partition loss: Accidentally deleting or corrupting a partition can render its data inaccessible.
How to Recover Data from Lenovo Laptop?
Once important files are deleted or lost from the Lenovo laptop, you should immediately stop using the drive and then perform data recovery to retrieve those files. In this section, we have collected several effective data recovery methods. Just choose one according to your preference to recover data.
Way 1. Recover Data from Lenovo Laptop via MiniTool Partition Wizard
MiniTool Partition Wizard is a professional and reliable data recovery tool that enables you to recover deleted or lost data from different storage devices, such as internal/external hard drives, USB flash drives, SD cards, and so on.
Besides, it’s also a comprehensive partition manager with a wide range of features. For instance, you can use this program to partition/resize/clone a hard drive, format USB to FAT32/NTFS/exFAT, convert MBR to GPT and vice versa, migrate OS to SSD/HDD, and more.
MiniTool Partition Wizard DemoClick to Download100%Clean & Safe
Now, you can focus on the following guide to learn how to recover deleted files from Lenovo laptop by using MiniTool Partition Wizard.
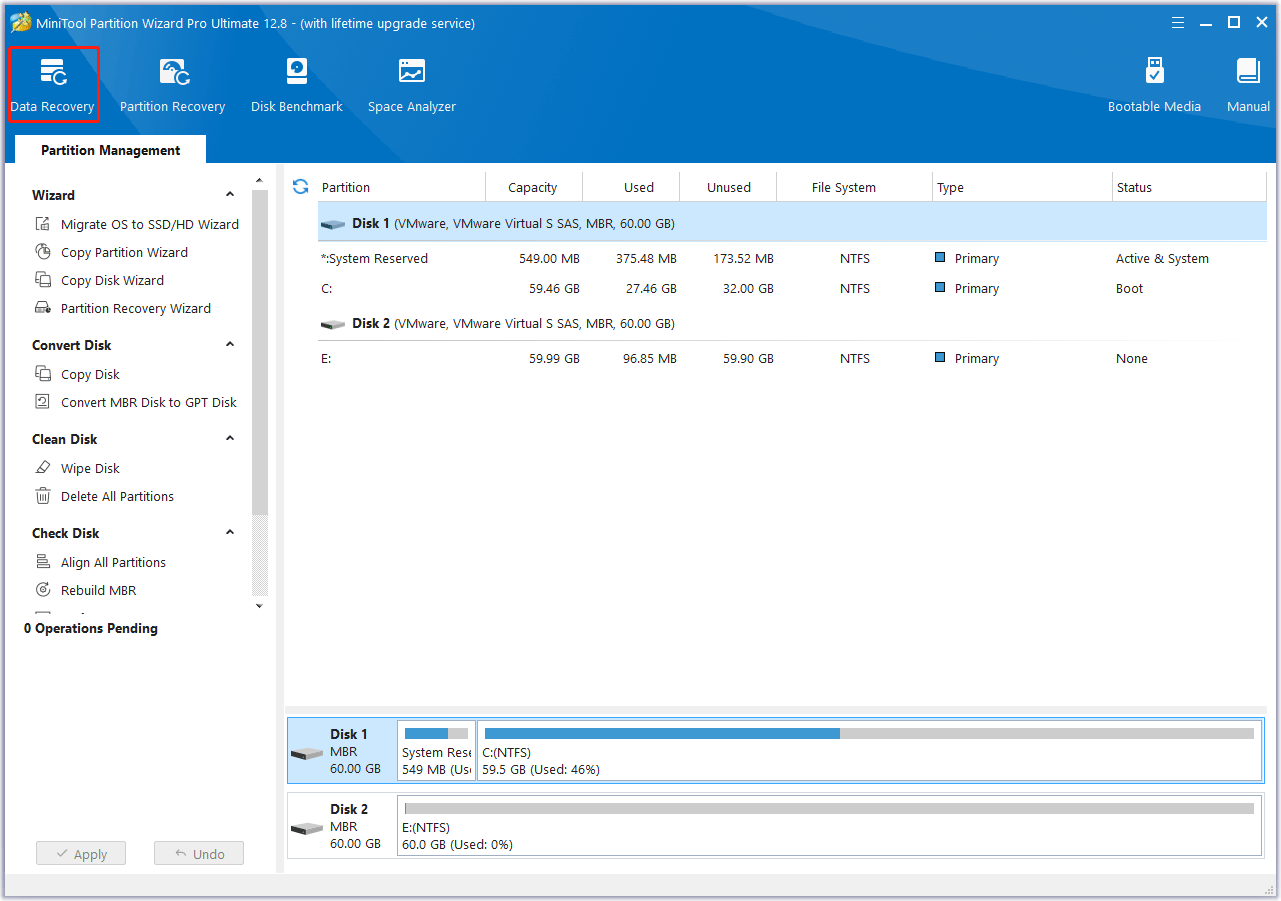
Step 1: Launch MiniTool Partition Wizard on your PC to enter its main interface. Then click on Data Recovery at the top-left corner to continue.
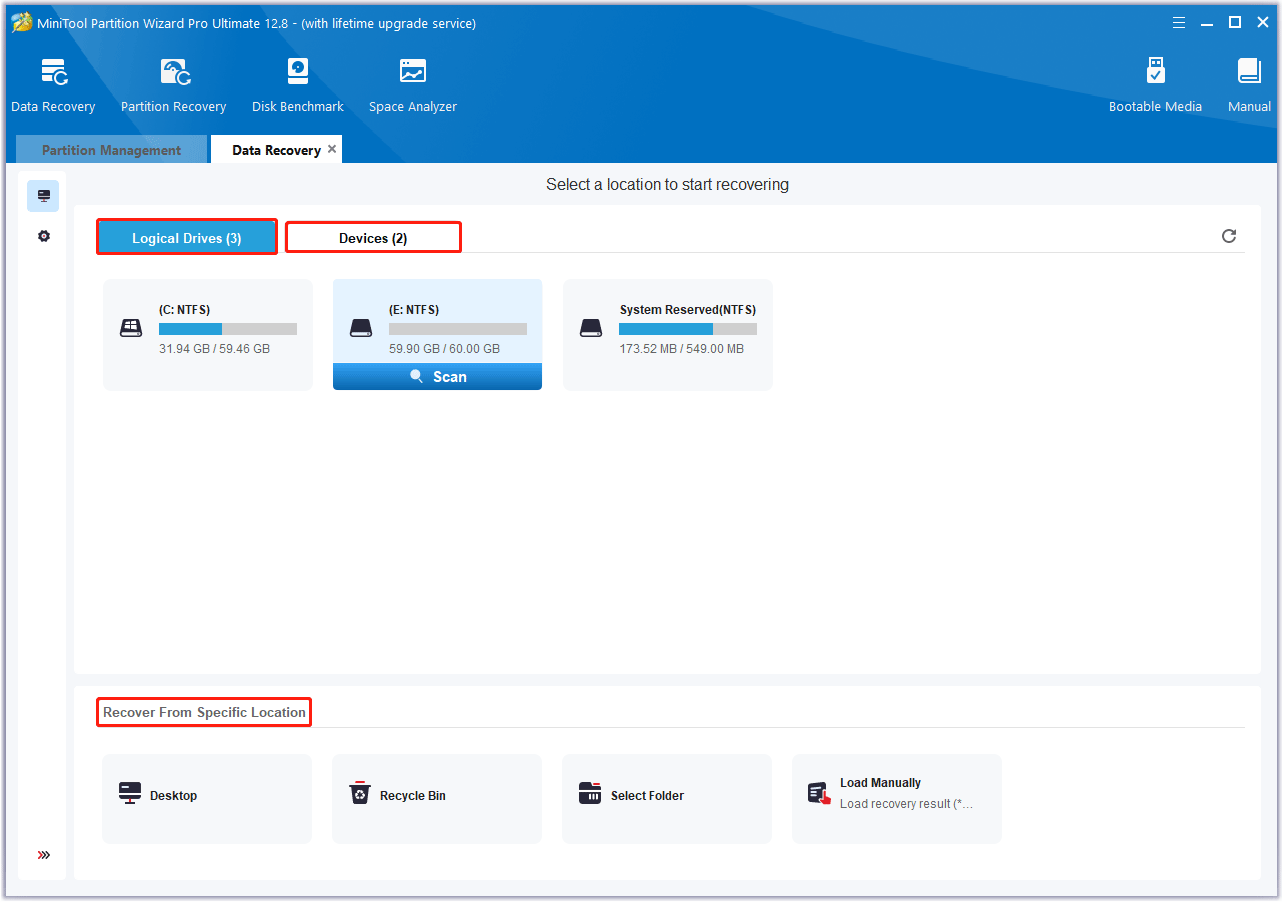
Step 2: In the Data Recovery window, it lists all the detected storage devices on the computer and specific locations for data recovery. Then, move the cursor to a partition and click on Scan.
- Logical Drives: this section shows lost partitions, unallocated space, and all existing partitions on the PC, including removable devices like USB drives.
- Devices: this section lists all hard disks connected to the computer. Users can select a hard disk to scan.
- Recover From Specific Location: this section allows you to scan and recover lost files from three specific locations (Desktop, Recycle Bin, and Select Folder). The Load Manually option allows you to load the last scanning result (a .rss file) to directly check the recovered files without more scans.
Step 3: After that, this data recovery tool will scan the target partition to find the deleted/lost files. You can click the Pause or Stop icon if you have found the needed data. But for the best recovery result, you’d better wait patiently until the full scan finishes.
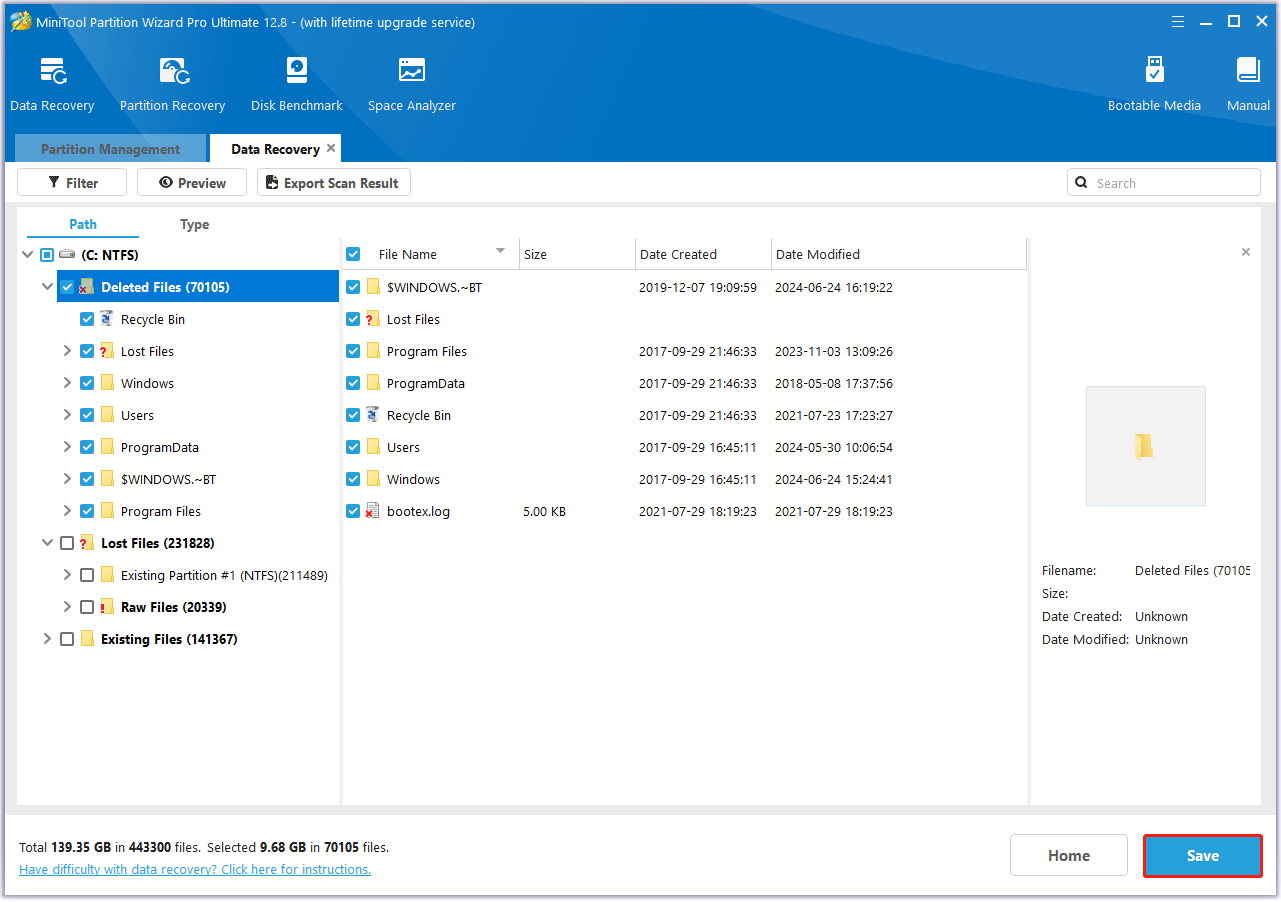
Step 4: After the scan completes, find and check all the files you need. Then click on Save.
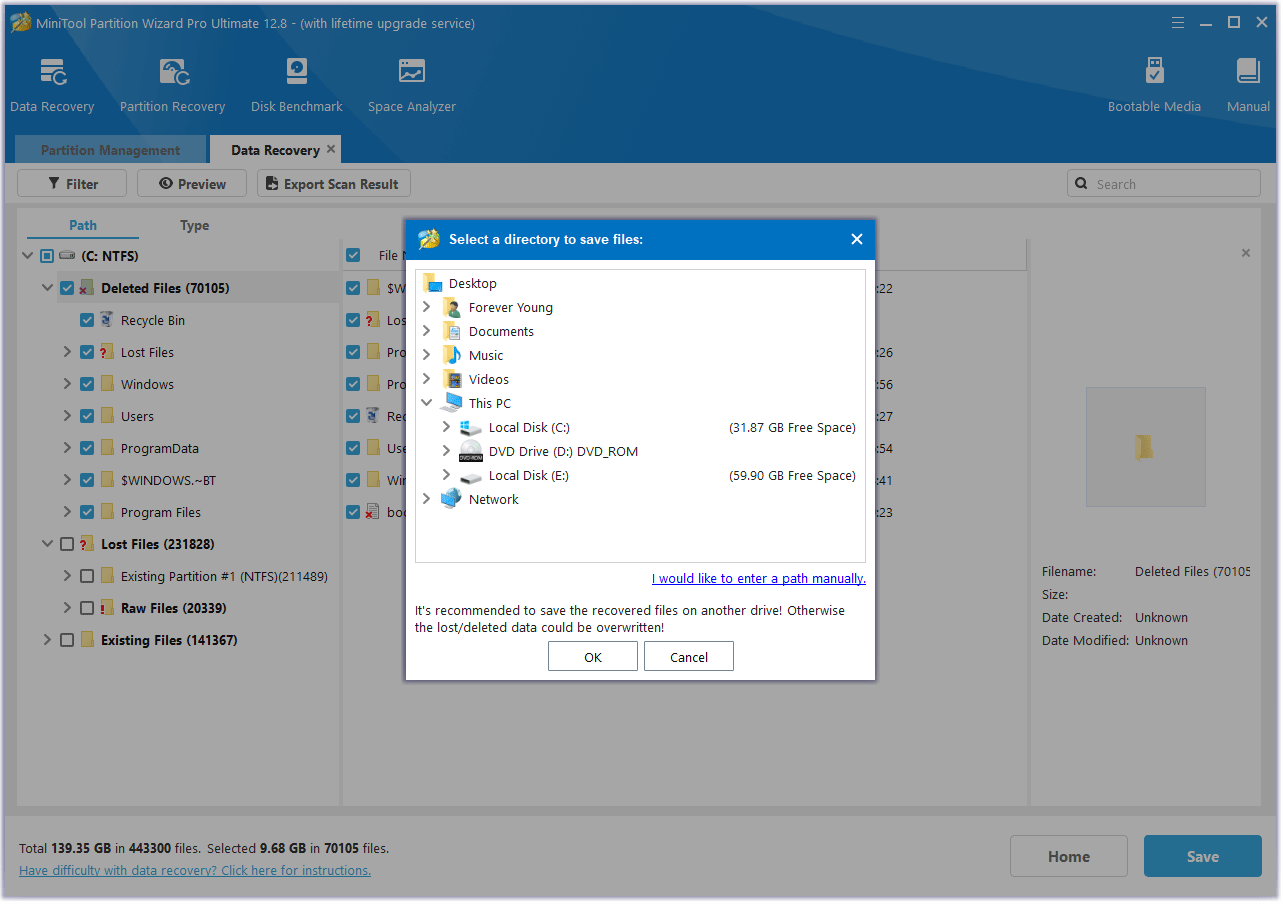
Step 5: In the pop-up window, choose a directory to store the selected files and click on OK. You’d better choose a different drive to save these files. Or, the lost/deleted data could be overwritten.
Way 2. Recover Data from Lenovo Laptop via Recycle Bin
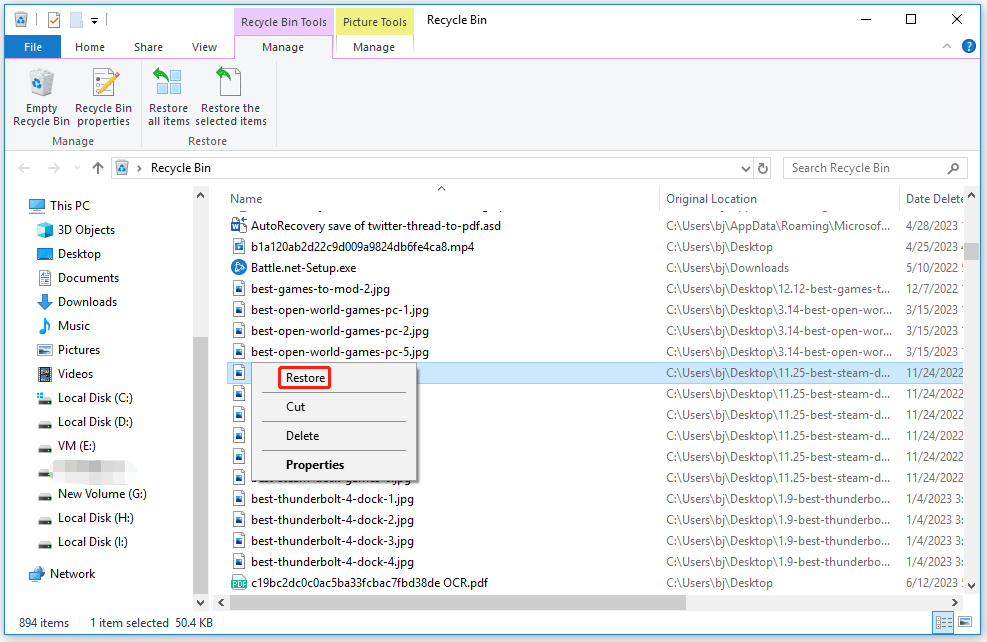
Normally, files that you delete from your computer are moved to the Recycle Bin. Therefore, if you do not empty the Recycle Bin, there is a high chance that you will be able to recover deleted files in it. To do this, follow the steps below.
Step 1: Right-click the Recycle Bin shortcut icon on the desktop. Then select Open.
Step 2: Look for the deleted files you want to restore. You can also type a file name into the Recycle Bin search box to find it directly.
Step 3: Right-click on the files and choose Restore from the context menu. Alternatively, you can also drag the files out of Recycle Bin directly to put them back in their original location.
Way 3. Recover Data from Lenovo Laptop via File History
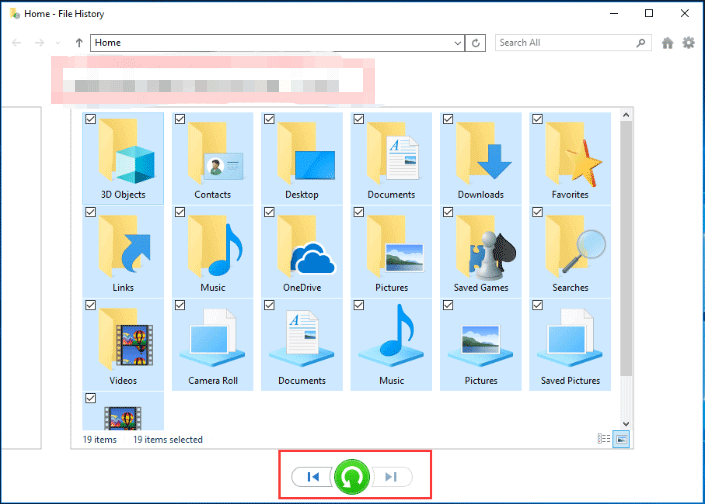
File History is a Windows built-in tool that enables you to create a backup of the selected folders on your computer to another location. If you have backed up deleted files on your PC using File History, you can try to perform Lenovo laptop data recovery using this tool. Here’s how to do it.
Step 1: Type control panel in the Search bar and select Control Panel from the list of results to open Control Panel. Then click File History.
Step 2: In the Control Panel window, go to System and Security > File History > Restore personal files.
Step 3: In the File History backups window, find and select the file or folder you want to restore, and click on the green Restore button to restore the selected file or folder to its original location.
Way 4. Recover Data from Lenovo Laptop via a Previous Version
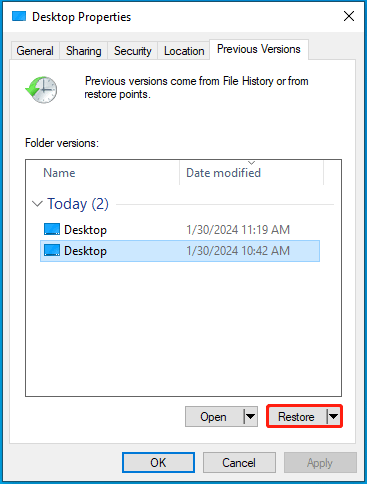
It’s also possible for you to recover data from a previous version. The following are details on how to recover deleted files on Lenovo laptop in this way. It’s worth noting that this way is applicable only when the File History feature is enabled before you delete files.
Step 1: Open File Explorer by pressing the Windows and E keys simultaneously.
Step 2: Navigate to the directory where the deleted files are originally stored.
Step 3: Right-click the directory and select Restore previous versions.
Step 4: After that, choose a version that contains the deleted files and then click Restore.
Way 5. Recover Data from Lenovo Laptop via Windows File Recovery
Windows File Recovery is a command-line utility that comes with Windows 10/11. It also enables you to recover deleted files from Lenovo laptop.
Step 1: Type Windows file recovery in the search box. Then open the program by clicking Windows File Recovery under Best match.
Step 2: After entering the Command Prompt window, type winfr source-drive: destination-drive: [/mode] /n [File Name/Path/Type] and then press Enter, e.g. winfr E: C: /extensive /n *.doc.
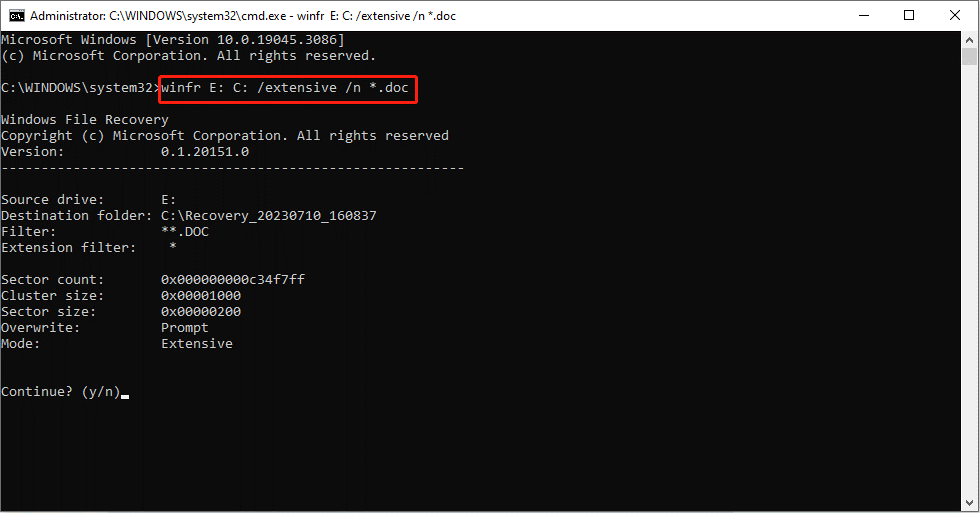
Step 3: Press Y to proceed with the process.
The above commands allow you to recover deleted files efficiently. What if your files are hidden due to virus infection, system crash, or other unknown problems? Don’t worry. CHKDSK and ATTRIB commands will help you recover hidden data in these cases. Let’s get started with the step-by-step guide below.
- Run Command Prompt as an administrator.
- Type chkdsk X: /f and press Enter. This command helps check and repair detected file system errors. You should replace “X” with the drive letter of the target drive. Do the same operation in the next step.
- After the process is completed, type attrib -h -r -s /s /d X:\*.* and press Enter.
Way 6. Recover Data from Lenovo Laptop via System Restore
You can also try to recover data from Lenovo laptop by performing a system restore. By doing so, you can easily restore your system to a previous state. However, you should ensure you have created a proper system restore point before.
Step 1: Open Control Panel again.
Step 2: Find and click Recovery, and then click on Open System Restore.
Step 3: Then, a new window will pop up telling you that the system restore will not affect any of your documents, pictures, or other personal data. However, recently installed programs and drivers may be uninstalled. Just click on Next to continue. The specific steps may vary on different computers.
Step 4: Based on your needs, select a restore point and click on Next.
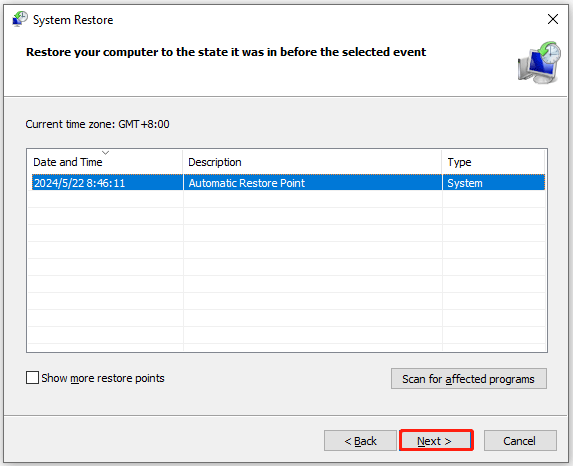
Step 5: In the next window, confirm your restore point and click on the Finish button to save the changes. After some time, your system will be restored to the selected point. Then check whether your Lenovo laptop data is recovered.
How to Recover Data from Dead Lenovo Laptop
How to recover data when your Lenovo laptop is unbootable or dead? You can try booting it with a bootable USB flash drive and then perform data recovery with MiniTool Partition Wizard Bootable Edition. Here are detailed steps:
MiniTool Partition Wizard DemoClick to Download100%Clean & Safe
Step 1: Make a bootable USB drive on a working computer.
- Insert a USB flash drive into another working PC.
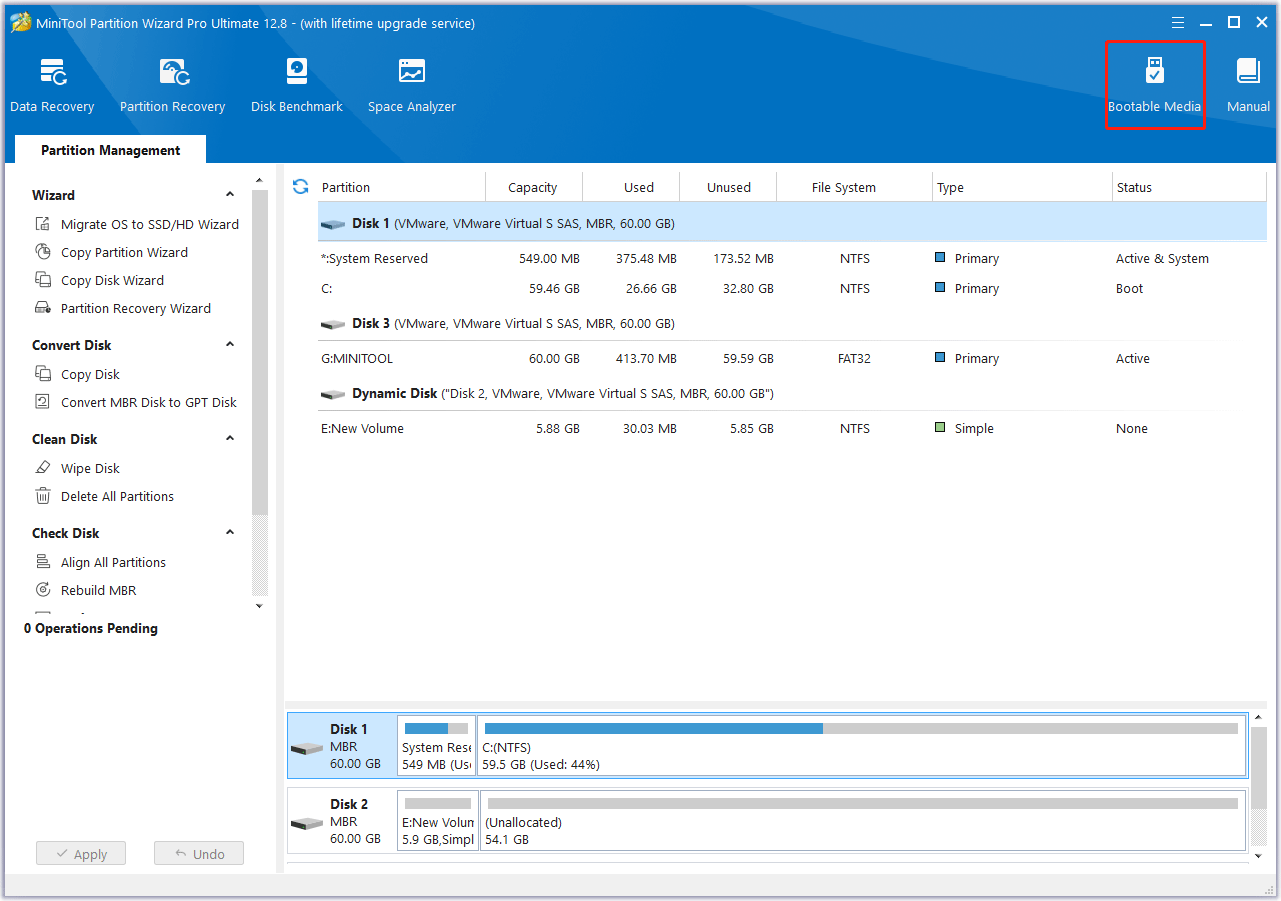
- Launch MiniTool Partition Wizard and click Bootable Media.
- In the pop-up window, click WinPE-based media with MiniTool plug-in.
- Click the USB Flash Disk. You will be warned that the data on the USB disk will be destroyed. Click Yes and then MiniTool Partition Wizard will start to create a bootable drive.
Step 2: Boot your PC from the bootable USB drive.
- Connect the bootable USB drive to your dead computer. Then set the computer to enter BIOS.
- Go to the Boot section and then select the bootable USB drive as the first boot drive with the on-screen instructions.
- Once done, press F10 and Enter to save the changes and exit the BIOS screen. Your computer will restart automatically with a new boot order and enter the main interface of MiniTool Partition Wizard after a while.
Step 3: Recover data from the dead Lenovo laptop.
- In the main interface, click Data Recovery.
- Move the cursor to a target partition and click Scan.
- After completing the scan, check all the needed files and click on Save.
- Choose a directory to store the selected files and click OK.
Bottom Line
This post tells how to recover data from Lenovo laptop in detail. When you get stuck in laptop data loss, try to perform data recovery with the methods mentioned in this post.
If you encounter certain issues while using MiniTool Partition Wizard, you can send us an email via [email protected] to get a quick reply.


User Comments :