Are you using a RAID array for better disk performance? Have you ever seen RAID status degraded? What does it mean? Will you lose data? Can you recover your data? Let’s figure it out in this post from MiniTool Partition Wizard.
What Is RAID
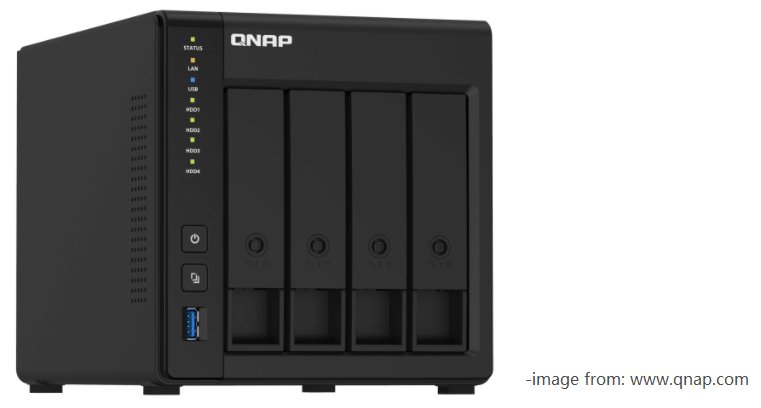
RAID refers to Redundant Array of Inexpensive Disks or Redundant Array of Independent Disks. It is a data storage technology that combines more than one physical disk into one set. RAID is often used for data redundancy, performance improvement, or both.
RAID is divided into two types: software RAID and hardware RAID. Hardware RAID usually has more levels that provide different standards of reliability and performance, including RAID 0, RAID 1, RAID 2, RAID 3, RAID 4, RAID 5, RAID 6, RAID 10, etc. According to these levels, data can be distributed across the installed hard drives in indifferent ways.
The common levels are RAID 0, 1, 5, and 10. You can keep reading to get more information about them.
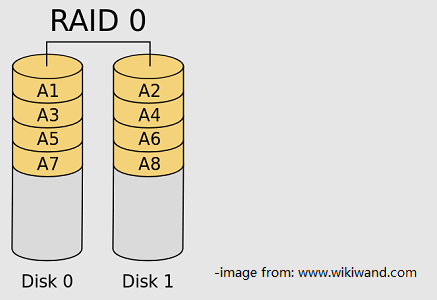
RAID 0 can be built with at least 2 hard drives and it consists of striping volumes. It is the sum of the capacities of the drives in the set.
RAID 0 is popular for the increased read and write performance, as it enables data to be read or written to multiple disks at the same time. The disadvantage is that it doesn’t save a backup for data on the drives. If one of the hard drives is damaged or corrupted, you will lose the entire volume as well as the data on it.
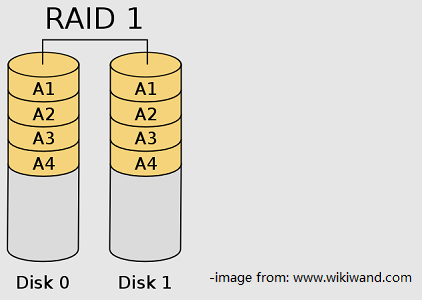
RAID 1 consists of mirroring volumes. It writes the same data to 2 or more hard drives to provide data redundancy and failover.
If one of the hard drives is corrupted, you still have data on the functioning disk(s). In other words, RAID 1 enables you to use half of the disks to back up your data. But in this way, the available storage space would be occupied a lot.
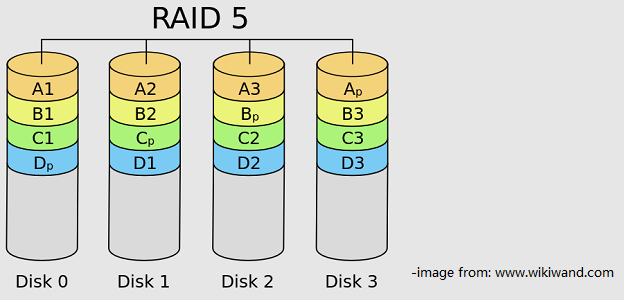
RAID 5 is block-level striping with distributed parity. Parity information is distributed among the disks. If one of the hard drives goes wrong, lost data can be restored by calculating other data and the parity. A RAID 5 array requires at least three hard drives.
RAID 10 is striping and mirroring. It requires at least four hard drives. In this array, both read/write performance and data protection can be realized.
Recommended article: RAID 5 vs RAID 10: What’s the Difference and Which One Is Better?
About RAID Status Degraded
Degraded mode is a status that you might see in a hardware RAID array. Generally, there are 3 main modes of operation in a RAID system:
- Optimal or OK: this means all hard drives in the system are functioning and the RAID array is running properly.
- Degraded or Partially Degraded: this indicates that the hard drive in the RAID system is corrupted or damaged, and the system continues to function but with restrictions in performance.
- Failed: this means that there are serious problems in the RAID array and they prevent the array from working.
As mentioned, when one of the hard drives in the RAID array is falling, the RAID controller will put the array into degraded mode automatically. Hard drive failures usually happen due to bad sectors. If your computer shuts down suddenly because of a power outage or power surge when you are writing data to the RAID array, hard drive corruption could also occur.
What can you do if you see the RAID status becomes degraded? Will you lose data? Can you recover data from the failed hard drive? How to rebuild RAID? Let’s figure them out in the following contents.
How to Fix RAID Status Degraded
When it comes to degraded RAID, you might think of replacing the failed hard drive and rebuilding the degraded RAID volume. However, things could vary depending on levels of RAID if you want to get the lost data back.
For RAID 1/5/10
As you know, RAID 1, RAID 5, and RAID 10 provide fault tolerance via mirroring or parity information, which means you might not lose your data at all. If there is only one problematic hard drive, you can directly remove it, connect a new hard drive, and then rebuild RAID to solve the problem.
If you don’t know how to rebuild a RAID array, you can refer to the following steps.
I need to remind you that hardware RAID contains host-based hardware RAID where all hard drives are connected to the host, and rack-based hardware RAID that uses an external hardware RAID controller. And the detailed steps to rebuild RAID could be different to some degree.
Here I take a QNAP NAS device as an example.
Step 1: Prepare a new hard drive that has at least the same capacity as the failed disk.
Step 2: Remove the problematic disk from the NAS device and replace it with the prepared new hard drive. Make sure the new disk has been connected correctly. For NAS, you will hear a beep for about 1.5 seconds twice and the status LED will change between flashing red and green.
You can check the rebuilding process and progress in the Storage Pool or Static Volume manage window. When the rebuilding process is completed, the status LED will be in green, and the volume status will be changed to Ready automatically, which indicates that your RAID array has been rebuilt successfully.
In some cases, the process doesn’t go automatically. And you might need to rebuild RAID manually to fix RAID degraded status.
Step 1: After replacing the problematic hard drive, you need to log in to your NAS via a web browser.
Step 2: Open the Storage & Snapshots manager and go to Storage>Storage/Snapshots.
Step 3: Select your Storage Pool or Static Volume, and click the Manage button. Then choose the degraded RAID group section and click Manage>Configure Spare Disk.
Step 4: Choose the new hard drive and click the Apply button. Then the RAID system will start rebuilding.
For RAID 0
RAID 0, a basic RAID level, is one of the most popular RAID arrays among users, as it increases the read and write speed.
However, unlike RAID 1, 5, or 10, RAID 0 doesn’t come with data redundancy. Once one of the hard drives is failed, all the data on the RAID 0 array will get lost and become inaccessible. You’d better not try to rebuild RAID 0 immediately in this case, as it might result in data lost forever.
Don’t panic if your RAID 0 status becomes degraded. You should stop writing data on the disk and try data recovery. You can ask a professional disk array data recovery company for help or try data recovery RAID 0 with a professional data recovery tool.
Here I recommend MiniTool Partition Wizard, a reliable and easy-to-use program for disk management and data recovery. It can help you recover lost or deleted files from damaged, formatted, or inaccessible FAT, NTFS, and exFAT drives.
Here are the detailed steps about how to recover data from a degraded RAID disk with MiniTool Partition Wizard.
Step 1: Prepare an external hard drive and connect it to your computer. It will be used to store the recovered data later.
Step 2: Download MiniTool Partition Wizard by clicking the following button. Then install this tool and launch it.
MiniTool Partition Wizard DemoClick to Download100%Clean & Safe
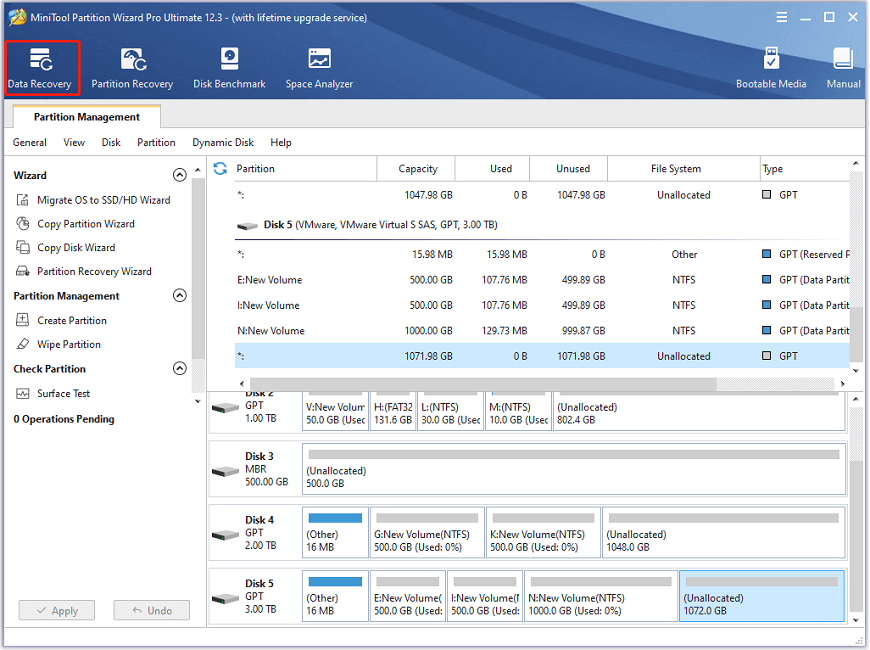
Step 3: When you get the main interface of MiniTool Partition Wizard, click the Data Recovery feature from the top toolbar.
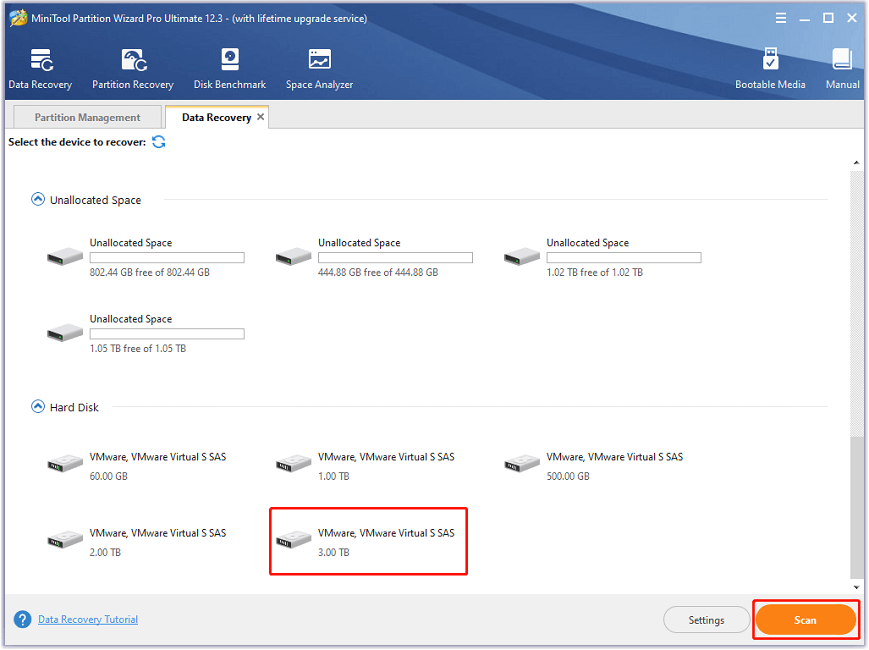
Step 4: In the pop-up window, select the device to recover and click the Scan button. You can select either the volume that stores the lost data under the Logical Drive section or the disk that is marked as degraded under the Hard Disk section.
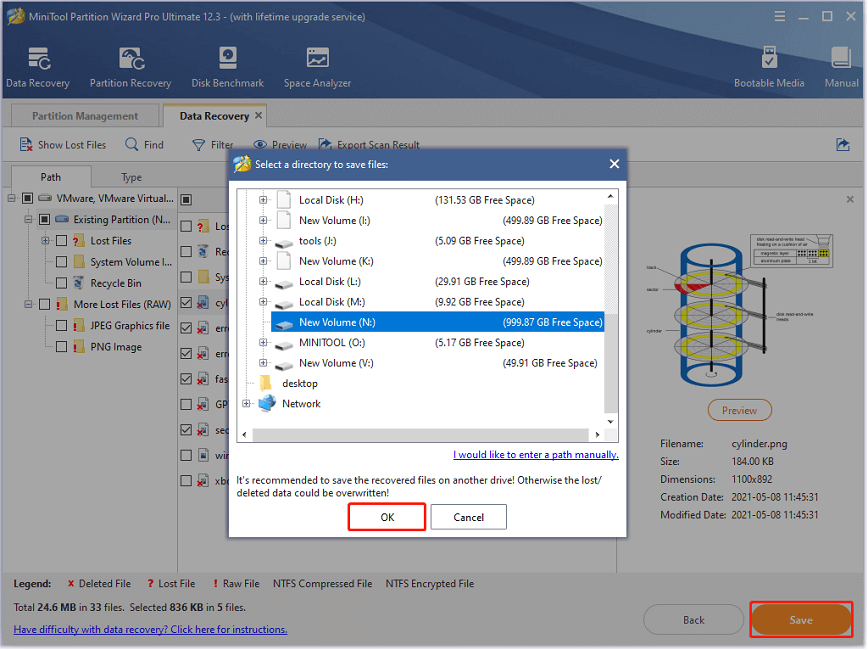
Step 5: Wait until the scanning process is finished. Then find and check needed files or folders. You can select a file and click the Preview button to identify it. After checking all the needed files, click the Save button and select a location on your external hard drive to save them.
After data recovery RAID 0, you can replace the problematic hard drive with a new hard drive and start rebuilding the RAID array. Then you can copy the data back to the RAID array and keep the files on the external hard drive as a backup.
Further Tip: How to Prevent RAID Failure
Generally, RAID array failures result from the following factors:
- Disruptions in the protocols that are used to transfer data to disk.
- Failures of interconnecting devices, such as controllers, power supplies, fans, etc.
- Failures in the hard drives.
Hard drive failures usually are the most common cause of RAID array failures. While using your RAID array, you’d better follow the rules below to help prevent RAID failures and data loss.
- Use disk monitoring technologies such as S.M.A.R.T to spot disk failures. They can help you find potential disk failures as soon as possible.
- Do not ignore any RAID failures warnings and force drives back into service if they have been marked as failed or degraded RAID by your RAID software or controller.
- When RAID fails, please stop using the RAID volumes immediately to prevent further damage. Otherwise, your data could be overwritten and unrecoverable.
- Do not change the disk order in your RAID array when rebuilding the failed or degraded RAID, as you might damage your data.
What is RAID degraded? How to fix RAID status degraded. Here is a detailed tutorial.Click to Tweet
Bottom Line
What can you do to solve the problem when you see RAID status degraded? This post provides a detailed guide for you. You can share your ideas with us by posting them in the comment section below. For any problems with MiniTool Partition Wizard, you can contact us via [email protected].
RAID Status Degraded FAQ
- RAID controller errors
- RAID server crash
- Frequent read or write errors
- RAID partition loss
- Data corruption

User Comments :