Many Microsoft Office users find that there are some WBK files on their computers. What is a WBK file, and how to open WBK files? Well, this post from MiniTool Partition Wizard will tell you what a WBK file is and how to use WBK files to recover Word documents on Windows 10.
What Is a WBK File?
Usually, if you have enabled the Always create backup copy feature in Word, you can see a WBK file when you save a document. So, what is a WBK file? It is a backup copy of a Word document such as a .docx or .doc file. Word documents saved with the WBK extension are also known as word backup files.
What is a WBK file used for? Generally speaking, if you deleted a Word document by mistake, you could use WBK files to restore your files. Please note that you should make sure that the Always create backup copy feature is enabled in Word, and here is how to check whether this feature is turned on:
Step 1: Open a Word document and choose File > Options > Advanced.
Step 2: In Word Options, scroll down to find the Save section. Then, check if the Always create backup copy feature is checked. If this option is turned off, you can tick it and click OK.
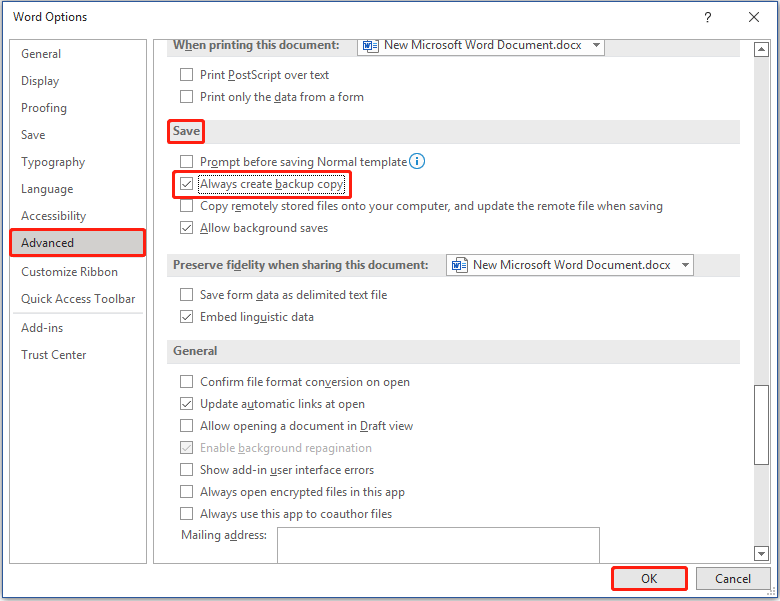
With WBK files, you can recover deleted or corrupted Word documents.
How to Open WBK Files and Recover Documents in Word?
Just as I mentioned above, if your Word documents are lost or deleted, you can find and open WBK files to recover your documents. How to open WBK files and recover documents in Word? Here is the full guide to do that:
Step 1: Press the Win + E keys on the keyboard to open File Explorer on the computer.
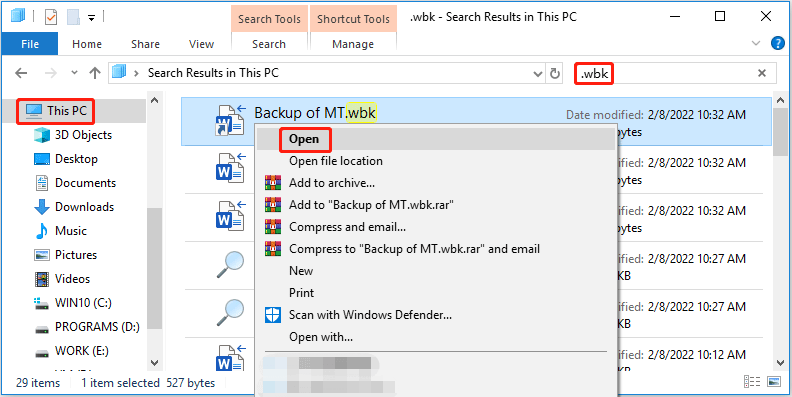
Step 2: Click This PC and type .wbk in the search box of File Explorer. Then, the computer will search all the files with the WBK extension.
Step 3: In the list of results, right-click a WBK file and choose Open from the context menu to open the file in Microsoft Word. (There may be several WBK files. You need to open them one by one to check your content.)
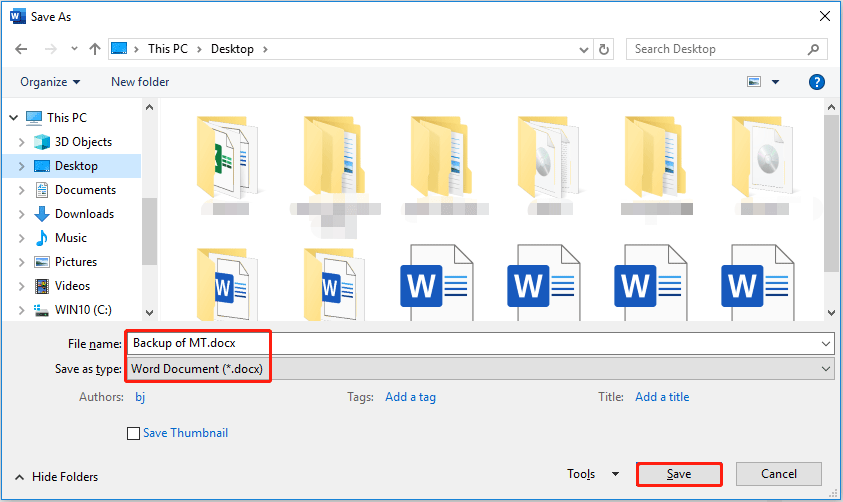
Step 4: Once you open a WBK file, choose File > Save As. Then, choose a location to save and recover your lost or deleted document.
In addition, if you disable the Always create backup copy feature in Word but enable the AutoRecover feature, you can open File Explorer to find .asd files to recover unsaved documents. How to do that? This post “How to Open ASD File? Here Are 3 Applicable Methods” can help you recover unsaved documents.
How to Recover Documents with Professional Software?
However, if you don’t have any WBK files on your computer to recover deleted Word documents, the most effective way is to use professional data recovery software. In this case, you can search for reliable software in your browser, but here I recommend MiniTool Partition Wizard for you.
MiniTool Partition Wizard is a reliable and professional program with the Data Recovery feature. This feature can help you recover lost or deleted documents in simple steps. In addition, MiniTool Partition Wizard can also help you copy/wipe disk, format/extend partition, convert MBR to GPT without data loss, and so on.
So, how to recover deleted Word documents? With the help of MiniTool Partition Wizard, you can recover your lost or deleted documents in simple steps. How to do that? Please download the MiniTool Partition Wizard program, launch it to access its interface, and follow the on-screen instructions to install it on your computer.
MiniTool Partition Wizard DemoClick to Download100%Clean & Safe
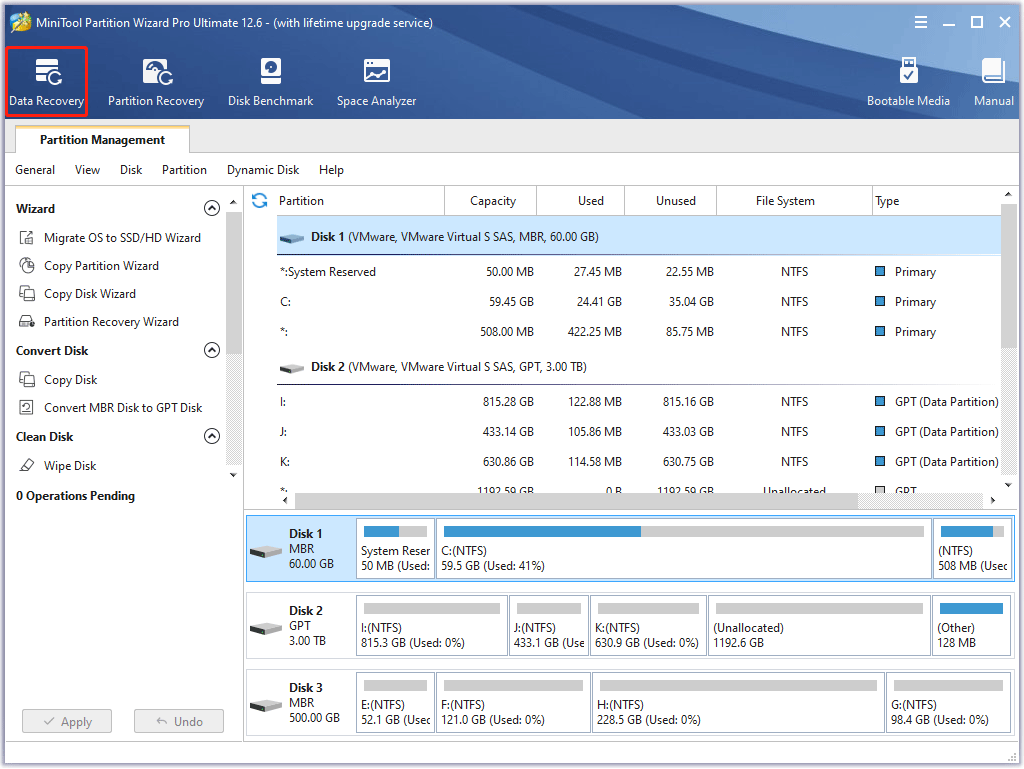
Step 1: Launch MiniTool Partition Wizard to its main interface, and click Data Recovery on the top toolbar.
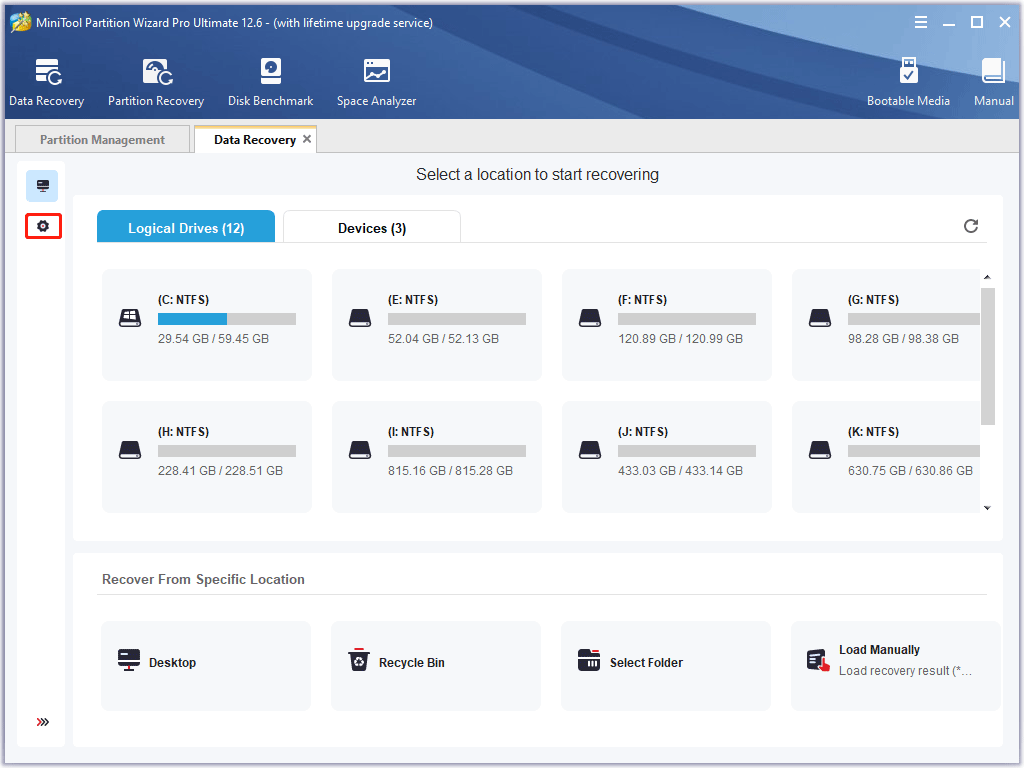
Step 2: Once you are in the Data Recovery interface, you can see all detected storages devices on the computer. Then, click the Scan Settings icon in the upper left corner.
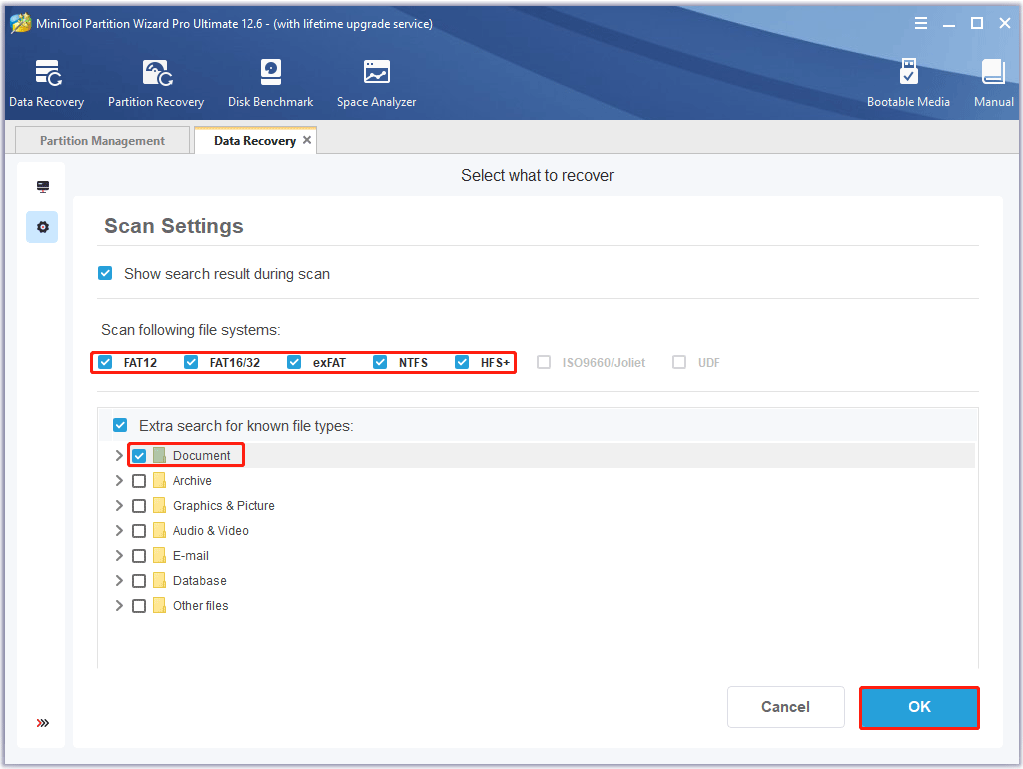
Step 3: In Scan Settings, choose the file system, and only check Document. Then, click OK. To do this, you can save some scanning time. (If you don’t know what the file system of your drive is, you can also choose all.)
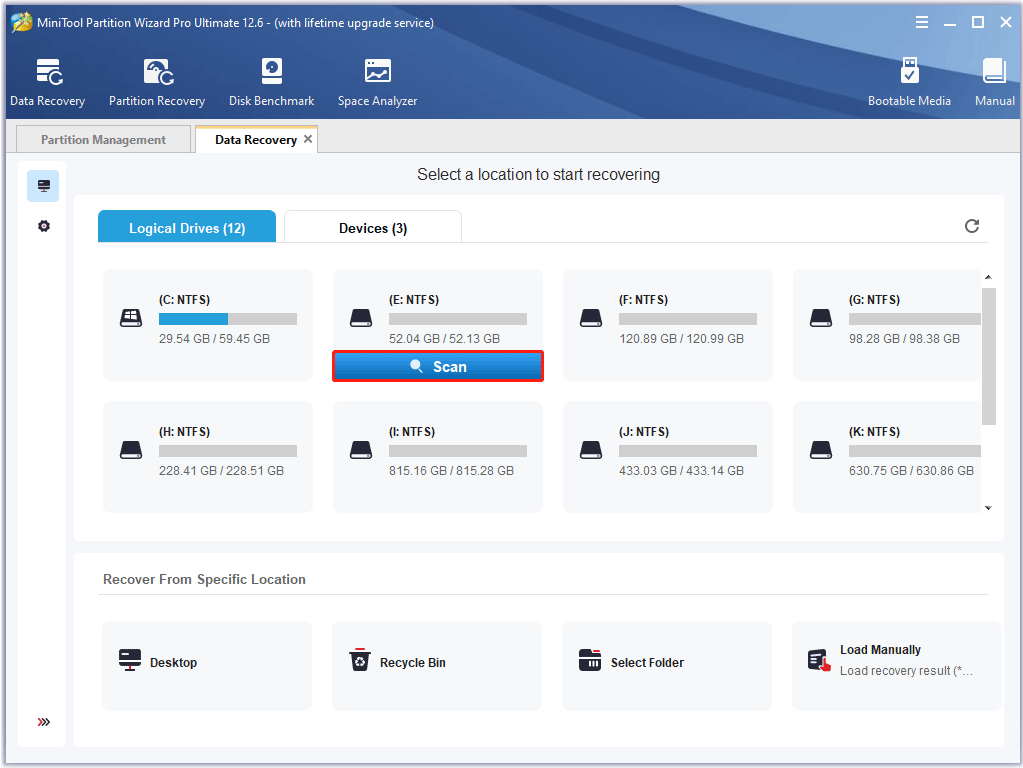
Step 4: Choose the drive where your Word documents are lost or deleted. Then, click Scan and give it a few minutes to scan. (Here I take drive E: as an example)
Step 5: Once the scan is complete, you can preview the files. Then, tick the file that you want to recover, and click the Save button.
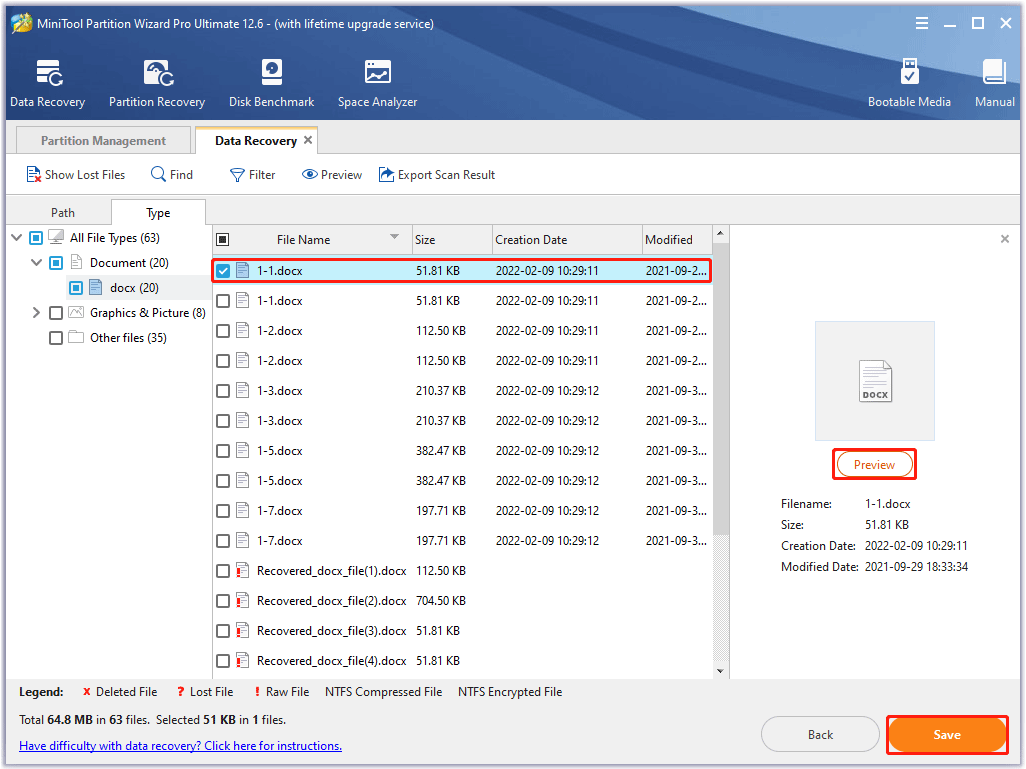
In addition, Data Recovery provides you the following options so that you can quickly find the lost or deleted Word documents.
- Type: All the found files will be displayed by file type. Just unfold the file type and select some items of this type to recover.
- Show Lost Files: Users just need to click the Show Lost Files button to make the software display only the lost files.
- Find: This option allows users to enter a specific file name to quickly find the desired file. Match Case requires users to pay attention to the capital and small letter of the file name. Match Word requires the user to enter the complete file name, including the file extension.
- Filter: This option allows users to search for files by Filename/Extension, Size, Creation or Modification Date. Besides, users can choose to show deleted, lost, or normal files as needed.
Related Information
To protect your documents from being lost or accidentally deleted, you should back up your files regularly. So, when your files are lost or deleted, you can recover them with previous versions.
How to Back up Your Files on Windows 10?
If you want to back up your files on Windows 10, you should turn on the File History feature on your computer. How to do that? Here is the full guide:
Windows 10 vs Windows 11 File History: What’s the Difference?
Step 1: Click the Start button at the lower-left corner of your screen, and then click the Settings icon to open Windows Settings.
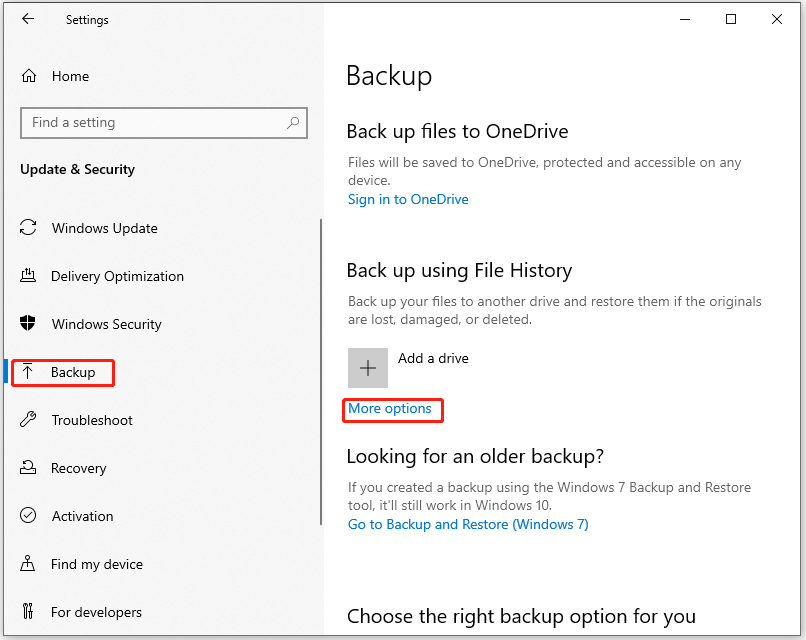
Step 2: In Settings, choose Update & Security. Then, choose Backup in the left pane and click More options. In the next window, click See advanced settings.
Step 3: In the File History window, click Select drive in the left pane. Then, choose a drive from the list to store your backup. (You can also click Add network location to back up your files on another computer on the same network.)
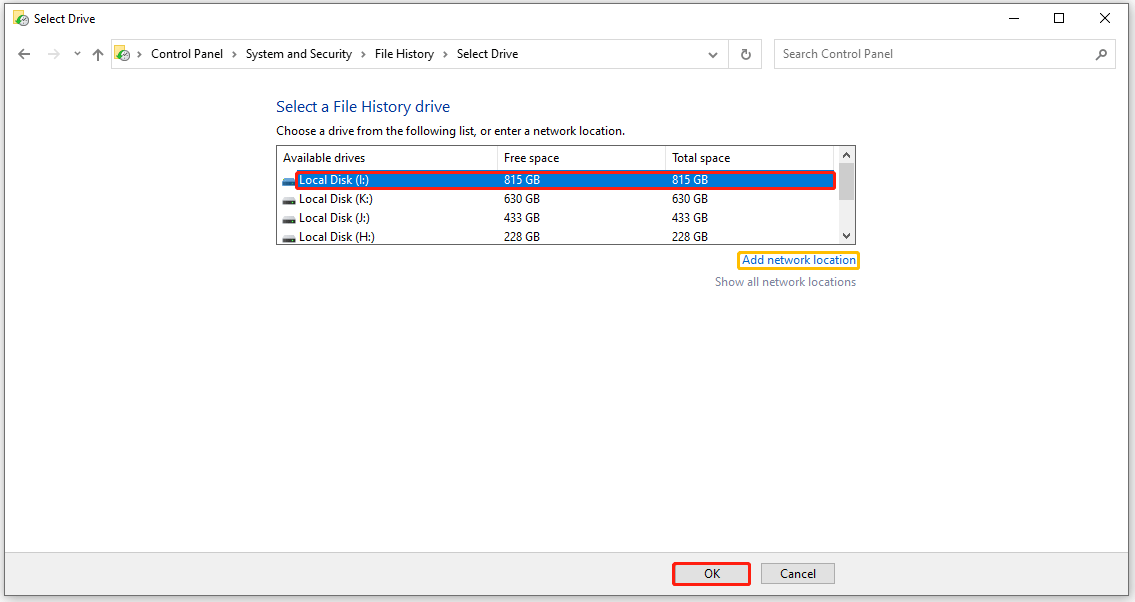
Step 4: After choosing the drive where you want to back up your files, click OK and the File History feature will be turned on. Then, it will automatically save a copy of your file to the specified location.
After that, even if you lose your Word documents or other important files, you can restore them.
How to Restore Files with File History in Windows 10 – 3 Steps
How to Recover Word Documents from Previous Versions
In addition to using .wbk files or using MiniTool Partition Wizard to recover Word documents, you can also recover your files from previous versions. But this method will only work if you enable previous versions on Windows 10. Follow the steps below to recover your Word documents:
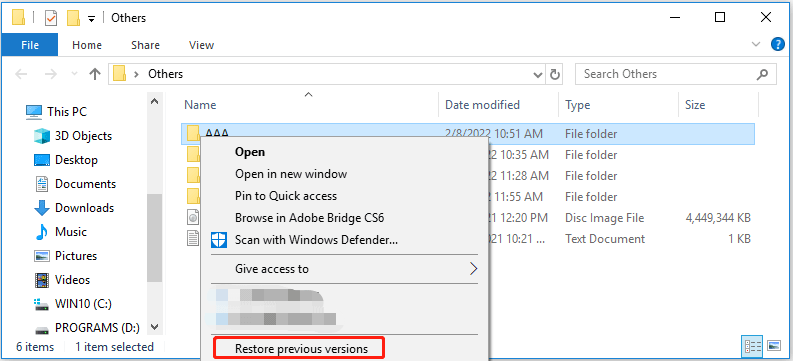
Step 1: Right-click the folder where you want to recover Word documents and then choose Restore previous versions.
Step 2: Under the Previous Versions tab, choose a previous version from the list. Then click the Restore button.
After that, your folder will be restored and a pop-up window will show you the location of your folder. Then, you can open the folder and see documents that have been restored with a previous version.
Bottom Line
After reading this post, you know what a WBK file is and how to open WBK files to recover Word documents. In addition, if you do not enable the Always create backup copy or AutoRecover feature in Word, you can also use the Data Recovery function of MiniTool Partition Wizard to recover deleted Word documents.
If you have any questions about how to recover deleted Word documents, please leave them in the comment zone and we will try our best to answer them. If you need any help when using MiniTool Partition Wizard software, you can contact us via [email protected].

![What Should You Do If Word Keeps Crashing [5 Ways]](https://images.minitool.com/partitionwizard.com/images/uploads/2021/12/word-keeps-crashing-thumbnail.png)

User Comments :