What is hard drive SMART error BIOHD-8? How to fix hard drive SMART error BIOHD-8? If you are curious about the answers to these questions, this post is worth reading. Here, MiniTool Partition Wizard analyzes the causes of the error and shows how to fix it.
Hard Drive SMART Error BIOHD-8
BIOHD-8 often occurs on HP computers. It is a common error message issued by the HP SMART diagnostic tool when it suspects that the hard drive is failing. Here is an example from HP Community:
I do appreciate some help if possible. Have this HP pavilion for a long time. It works great, but in the last 2 weeks gave me an error when I start the computer “BIOHD-8, hard disk error. Do a backup and replace the hard drive”... Can anyone relate to this problem? Can be fixed or do I need a new motherboard...https://h30434.www3.hp.com/t5/Desktops-Archive-Read-Only/Error-code-BIOHD-8-Had-ive-Error-or-Motherboard-problem/td-p/6148890
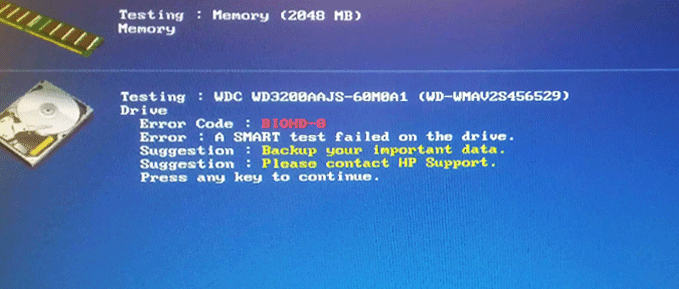
What causes the error code BIOHD-8? After searching extensive user reports and posts, I find that the error can be triggered by reasons like:
- A loose or damaged connection.
- Disk errors or bad sectors on the hard drive.
- Motherboard issues.
- …
Before You Do
When the error code BIOHD-8 shows on your PC, it means that there may be some corruption on your hard drive. So, you’d better recover all your data to another location to avoid data loss during the error-fixing process.
To recover the data on your PC, MiniTool Partition Wizard is a good choice. This professional and multifunctional partition manager can help you do data recovery easily. In addition, it can also help you partition hard drive, convert MBR to GPT, format USB to FAT32, and so on.
Here’s how to use MiniTool Partition Wizard to recover data:
Part 1. Create a USB Bootable Media
MiniTool Partition Wizard DemoClick to Download100%Clean & Safe
- Boot your PC into Safe Mode.
- Download and install MiniTool Partition Wizard on your PC.
- Next, launch this app and connect your USB flash disk to the computer.
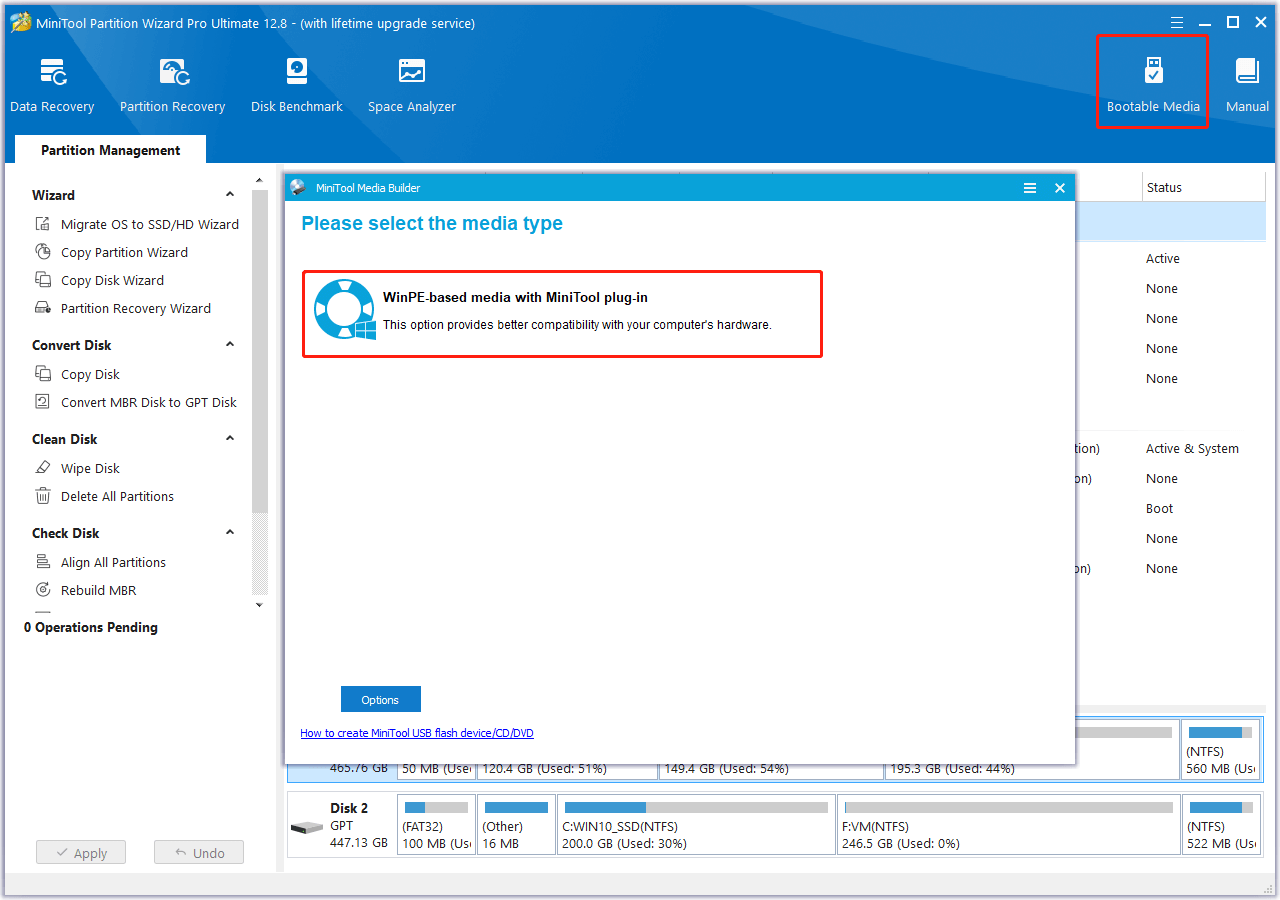
- Click Bootable Media in the top right corner.
- Click WinPE-based media with MiniTool plug-in.
- Then select USB Flash Disk.
- Wait for the process to complete.
Part 2. Do Data Recovery
Step 1. Connect the created bootable media to your computer and then boot the device from it.
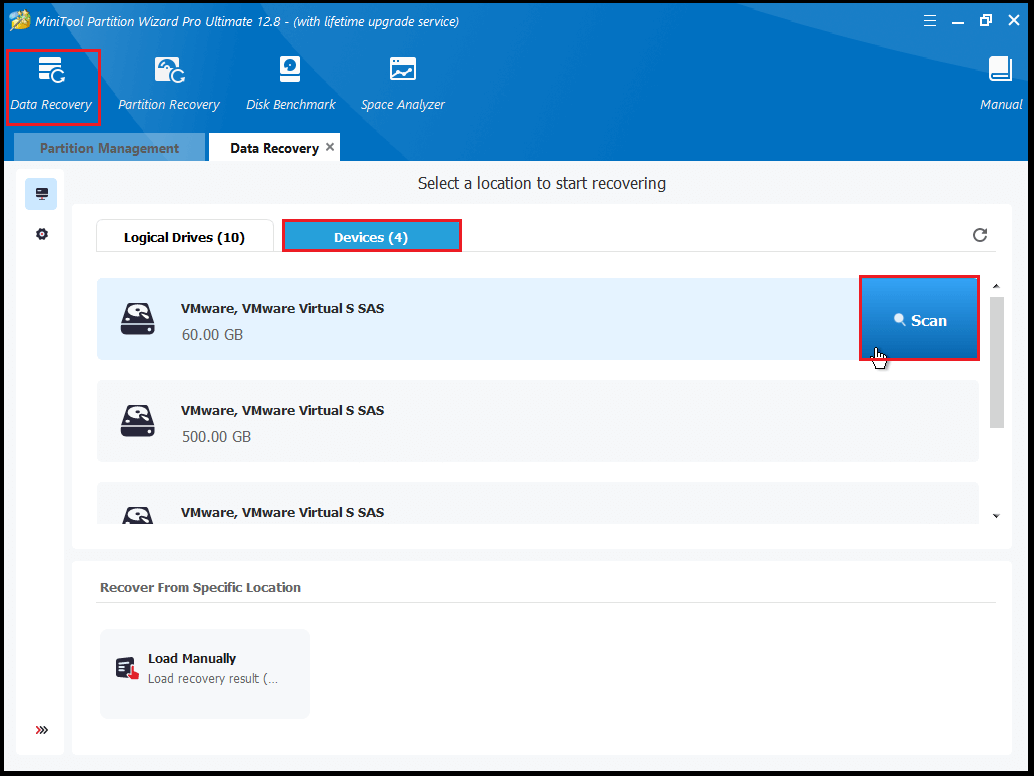
Step 2. Click the Data Recovery option from the top toolbar. Then, select a place to recover data, and then click Scan. Here I select the first disk under the Devices tab.
Step 3. Wait until the scan process ends.
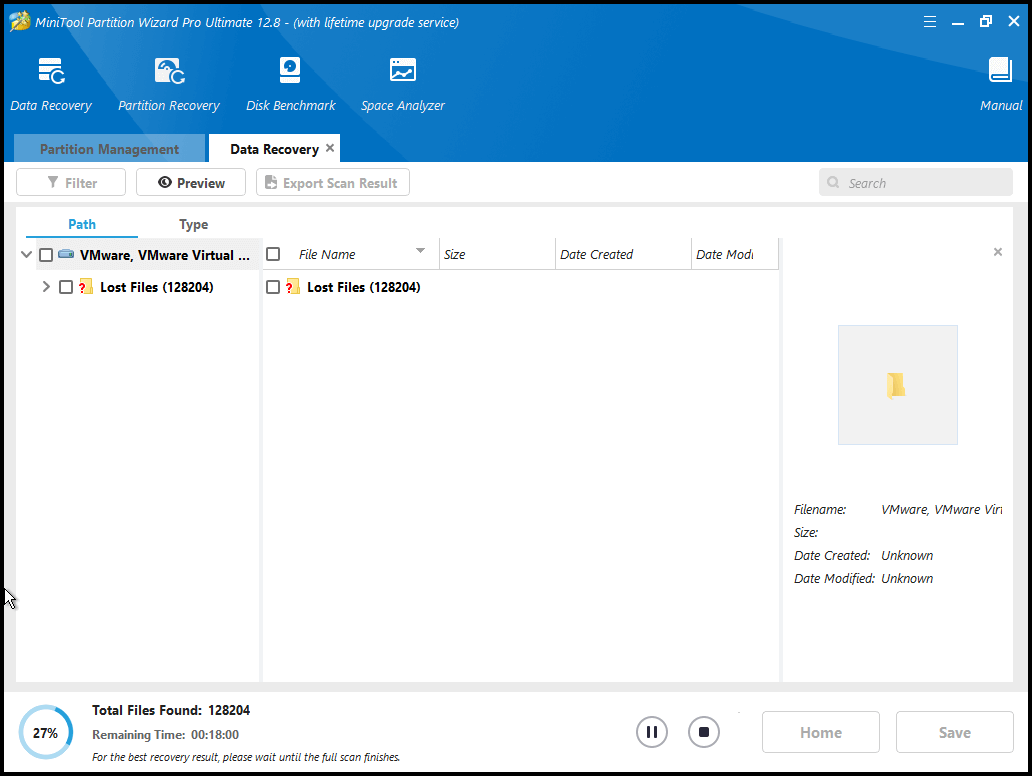
Step 4. Finally, tick all the files you want to recover and then click the Save button on the right bottom.
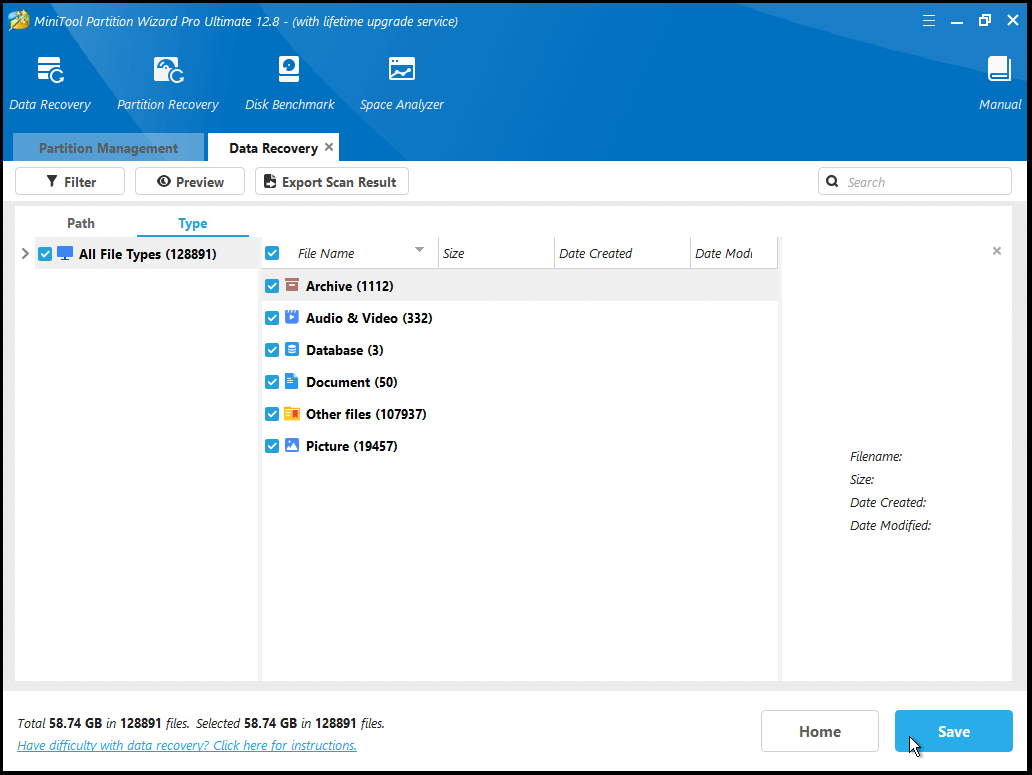
After recovering all the data to another safe location, you can continue to do the following methods to fix the hard drive SMART error BIOHD-8.
How to Fix the Hard Drive SMART Error BIOHD-8?
Method 1. Check the Connection
The first thing you can do to fix the hard drive SMART error BIOHD-8 is to check the connection between your computer and the hard drive. Here’s the way:
- Open the back lid of the laptop or case of the PC.
- Check if the connection between the hard drive and your computer is loose.
- If the connection is firm, disconnect it for a few seconds, and then connect and reset the hard drive.
- Once done, open your PC and check if the error has been resolved.
Method 2. Check Hard Drive Errors
If there are some errors on the hard drive, you can also receive the hard drive error BIOHD 8. In this situation, you can try running CHKDSK to check to fix the error:
- Boot your PC into Safe Mode.
- Press Win + R to open the Run window. Type “cmd” and press Ctrl + Shift + Enter simultaneously to run Command Prompt as administrator.
- Type “chkdsk C: /f /r /x” and press Enter. Then Windows will start to scan the disk.
- Once done, restart your PC and check if the hard drive error BIOHD 8 is fixed.
In addition, you can also use MiniTool Partition Wizard to help you check disk errors. It provides the Check File System feature to help you check and fix disk errors and the Surface Test feature to help you scan and mark the bad sectors.
To use MiniTool Partition Wizard’s Check File System feature, you can do as follows:
MiniTool Partition Wizard FreeClick to Download100%Clean & Safe
- Click the Download button to get the MiniTool Partition Wizard installation package, and then follow the on-screen instructions to install it on your PC.
- Choose the problematic hard drive in the right pane, and then select Check File System from the left pane.
- In the Check File System window, select Check & fix detected errors.
- Then click the Start button on the right bottom of the window.
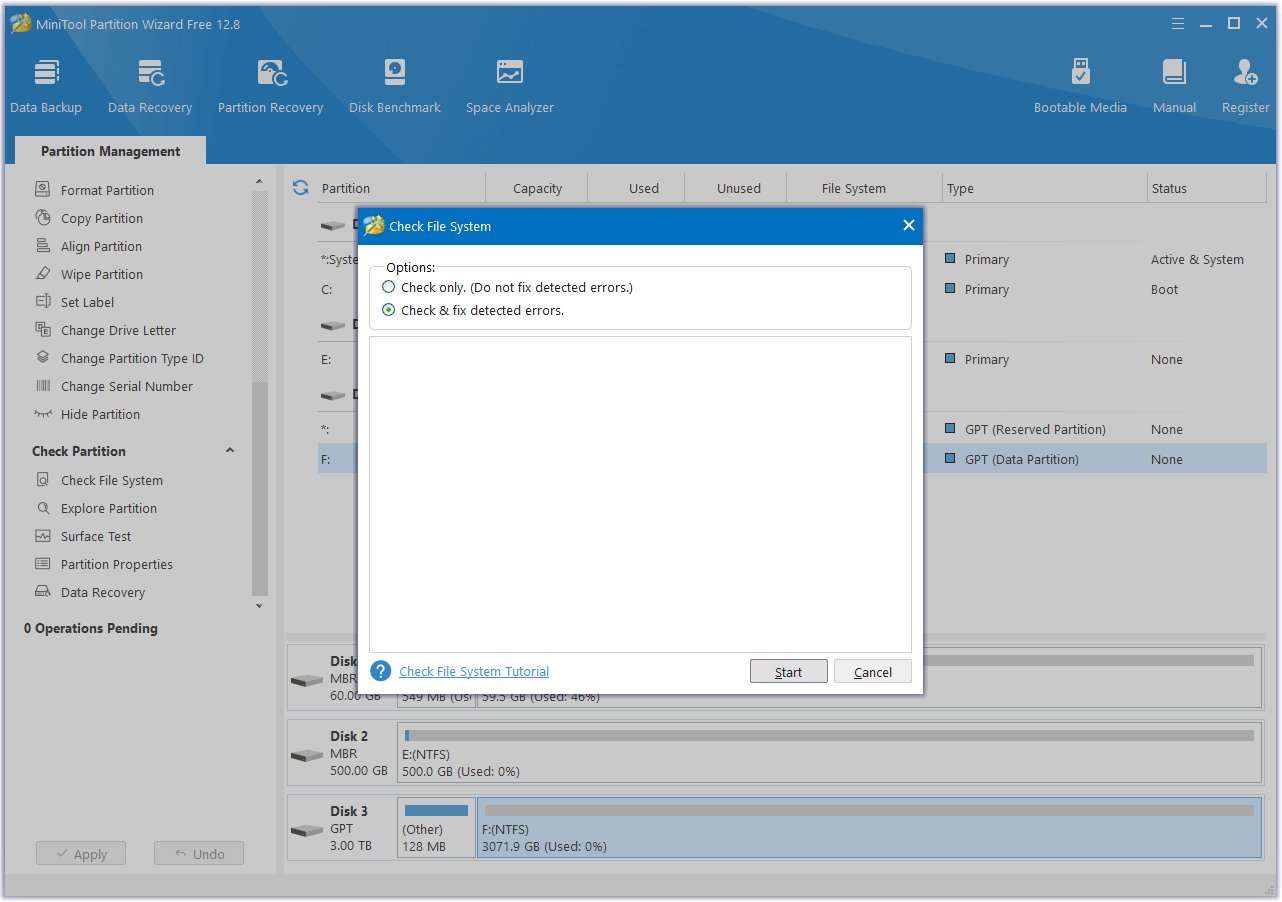
Here are the detailed steps for MiniTool Partition Wizard’s Surface Test feature:
- Launch MiniTool Partition Wizard to its main interface.
- Choose the problematic drive and then select Surface Test from the left pane.
- In the Surface Test window, click the Start now button to start the scanning.
- After scanning, the partition blocks will be color-coded green for no errors and red for errors.
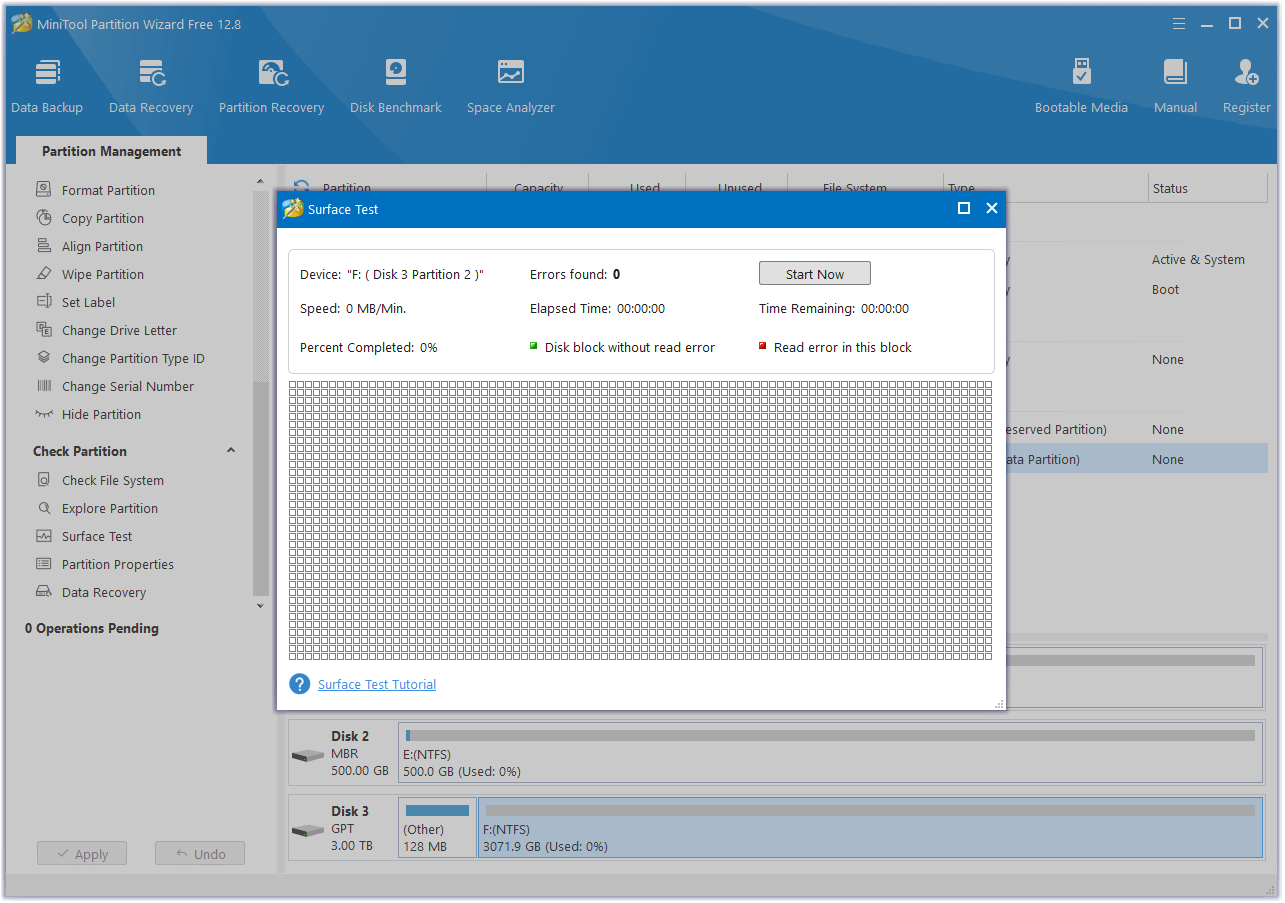
Method 3. Clean Graphics Card Dust
Some people report that they fixed the hard drive error BIOHD 8 successfully after cleaning their graphics card. If you are familiar with computer settings and you haven’t cleaned your graphics card for a long time, you can also have a try. If it doesn’t work, try other methods in the following.
Method 4. Replace the Old Hard Drive
If none of the above methods work for you, then you can only replace the old hard drive with a new one. To replace the old hard drive, you have two choices. One is to replace the old hard drive with the new one directly and then reinstall Windows. The other is to migrate the OS and data to the new disk without reinstalling Windows.
If you don’t want to reinstall Windows again, you can use MiniTool Partition Wizard’s Migrate OS to SSD/HD Wizard to help you replace the hard drive. To do that, you can do the following:
Step 1. Connect the new disk to your HP computer.
Step 2. Launch into MiniTool Partition Wizard’s main interface, select Migrate OS to SSD/HD Wizard from the left pane. Next, select option A to copy all partitions on the system disk to the new hard drive. If you just want to copy the operating system, you can choose the option B. Then click Next.
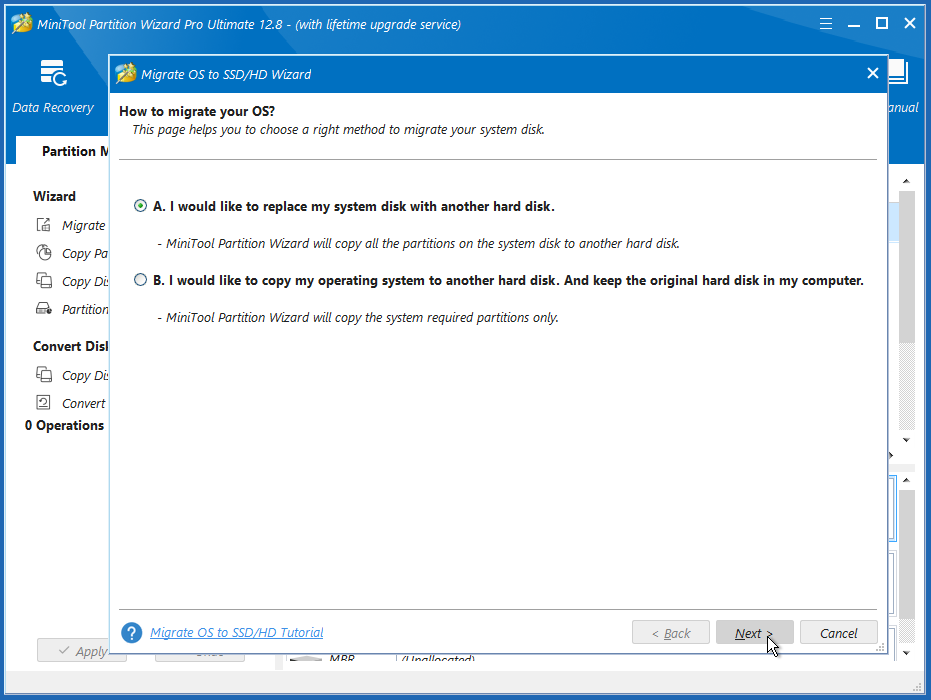
Step 3. Select the destination disk that you want to migrate OS to and click on Next. Then click on Yes to make a confirm.
Step 4. Select a copy option according to your needs and click on Next.
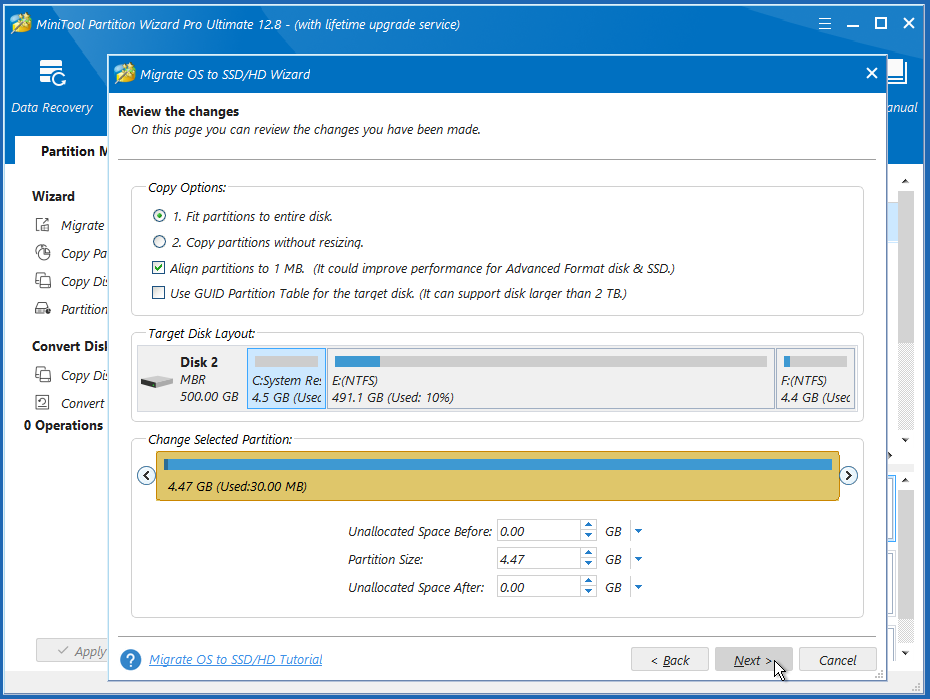
Step 5. Click the Finish button in the next window. Finally, click on Apply to execute the pending operations.
Step 6. Once the migration is complete, you need to enter BIOS and set the new SSD/HHD as the default boot disk.
Method 5. Change the Motherboard
Hard drive SMART error BIOHD 8 can also be caused by motherboard issues. Some people fix the error successfully by replacing their motherboards. If you are familiar with computer knowledge and structures, you can also have a try.
Method 6. Call HP Support
If all the above methods cannot help you fix the hard drive SMART error BIOHD-8, the only thing you can do is to contact HP support. Then you can get some professional troubleshooting fixes from them or be asked to send your HP computer to the store for repair.
Have A Try Now
How to fix the hard drive SMART error BIOHD-8 on HP computers? Now, I believe that you already have known the answer. If you have better solutions to the problem, please share them with us in the following comment zone. Of course, you can send an email to [email protected] when you have difficulty using the MiniTool software.

![[Solved] Secure Boot Can Be Enabled When System in User Mode](https://images.minitool.com/partitionwizard.com/images/uploads/2023/11/secure-boot-can-be-enabled-when-system-in-user-mode-thumbnail.png)
![[7 Methods] How to Fix Corrupted Transcend SD Card?](https://images.minitool.com/partitionwizard.com/images/uploads/2023/11/fix-corrupted-transcend-sd-card-thumbnail.png)
![[Solved] How to Fix Computer Crashing When Watching Videos?](https://images.minitool.com/partitionwizard.com/images/uploads/2023/11/computer-crashes-when-watching-videos-thumbnail.png)
User Comments :