A great many users complained that their USB flash drive/SD card is broken with Etcher. What to do if Etcher broke USB drive? In this post, Partition Magic will help you restore data from the USB and revert it to a working state.
What Is Etcher
Etcher, also known as balenaEtcher, is a free and open-source utility that can burn ISO files into USB flash drives or SD cards. So, it is often used to create bootable media for reinstalling OS. It supports various operating systems, including Microsoft Windows, macOS, and Linux.
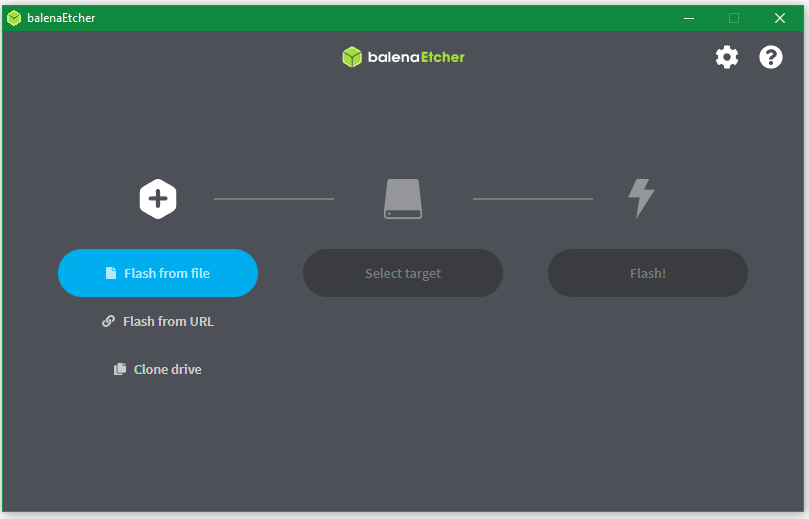
However, sometimes the tool runs into errors such as Etcher missing partition table error, Etcher failed to image SD card, Etcher error something went wrong, and so on. Here I’ll discuss the topic: balenaEtcher destroyed USB drive. Let’s keep reading.
About Etcher Broke USB Drive/SD Card
According to a survey, balenaEtcher destroyed USB drive after flashing an ISO file to the media. This topic has been heatedly discussed by a great many users on the Balena forum, as shown in the report below. The main issue is that Windows can’t recognize the USB after flashing an image file (e.g. Linux) into the drive.
BalenaEtcher destroyed my 3 new USB drives. So, I flashed a Linux distro to 3 brand new different USB drives and each of those drives doesn't work in any way. Windows will not recognize them. I can’t access any files. Please, help.https://forums.balena.io/t/balenaetcher-destroyed-3-new-usb-drives/360608
The reason why Etcher ruined USB drives is still to be explored, but I’m sure that you can’t wait to restore data from the drive and convert it to a normal state. If you have the same needs, pay attention to the following content.
Restore Your Data from the Etcher USB/SD Card
Before fixing the “Etcher killed USB stick” issue, the most important thing is to restore all data from the drive as soon as possible to prevent permanent data loss. How to recover data from a USB drive/SD card? I highly recommend you use MiniTool Partition Wizard because it provides an effective and low-cost data recovery solution for Windows users.
Additionally, the software allows you to preview and filter your needed files after the scanning is complete. Let’s have a try.
MiniTool Partition Wizard DemoClick to Download100%Clean & Safe
Step 1. Insert the Etcher USB drive/SD card into the Windows computer and run MiniTool Partition Wizard to enter its main interface.
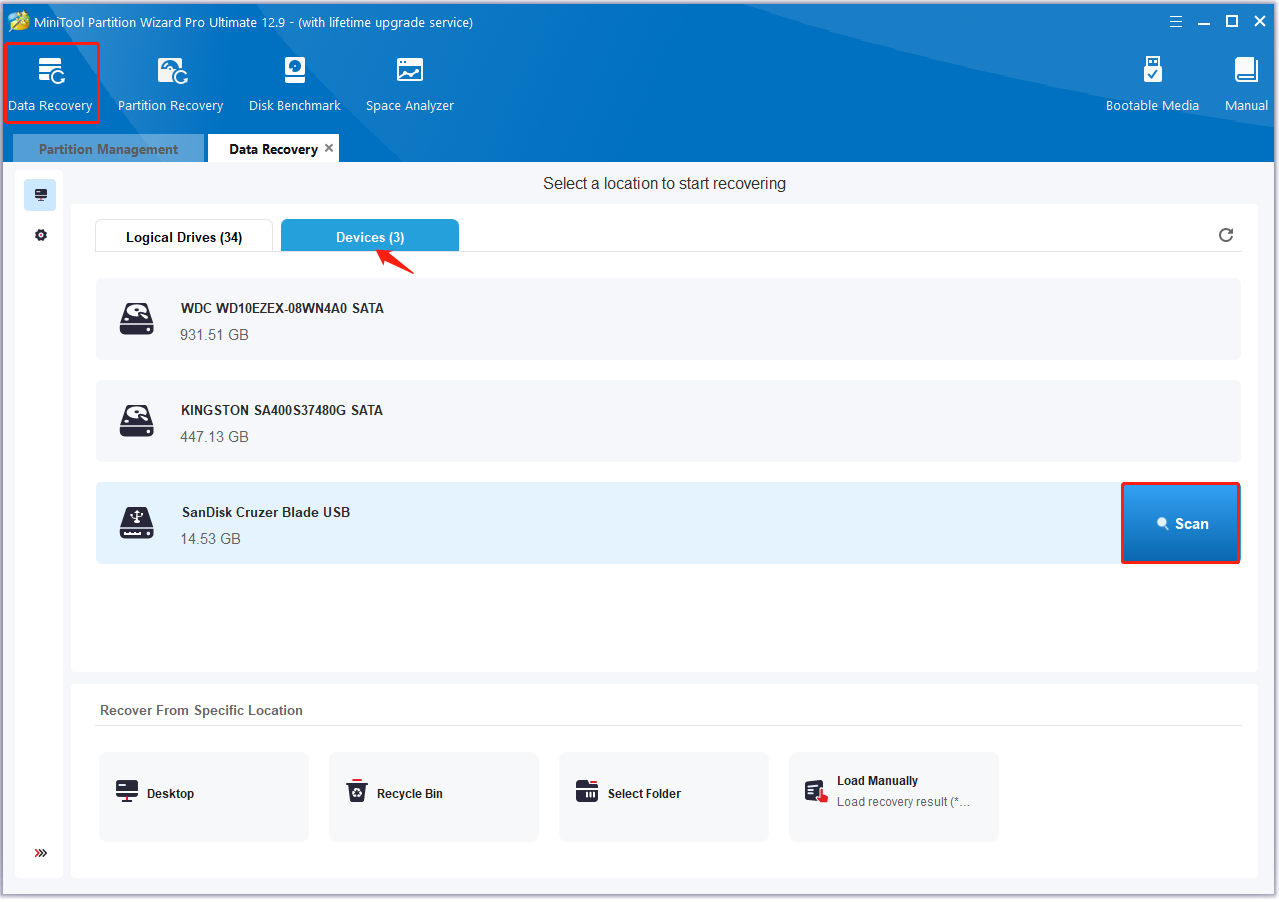
Step 2. Click on Data Recovery from the top menu, and navigate to the Devices tab to show all connected disk drives on the computer. Then click on Scan behind the USB drive.
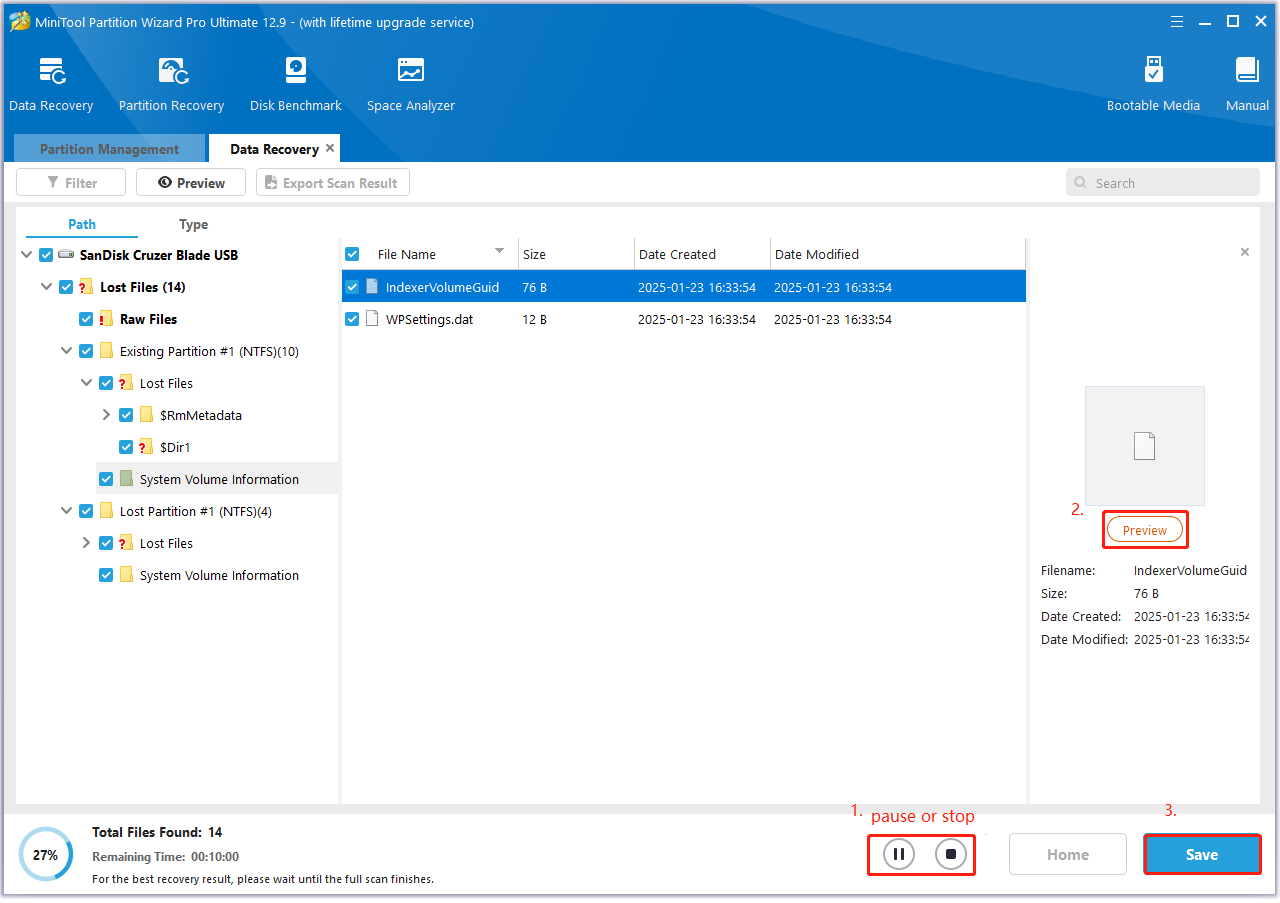
Step 3. If you find your desired files, you can click on Pause or Stop to suspend the scanning process, and click on Save to continue. To find the needed data quickly, you can on Preview to confirm the file or search it according to the file name.
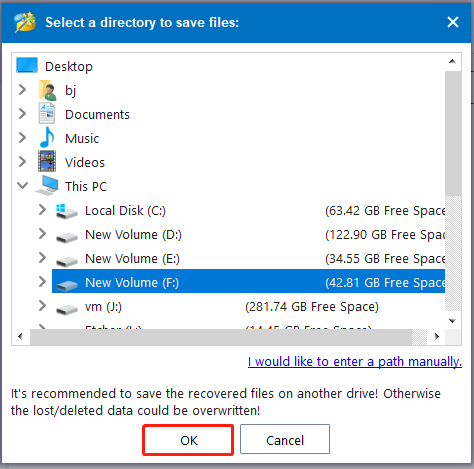
Step 4. In the pop-up window, select another drive for recovered data and click on OK to save the files.
Once done, you can try restoring the Etcher ruined USB drive/SD card to its working state by the following methods.
What to Do If Etcher Broke USB Drive/SD Card on Windows
Here I summarized 5 feasible ways to help you fix the “Etcher broke SD card/USB drive” issue on Windows. You’d better follow them one by one until your storage device reverts to its normal state.
# 1: Repair the USB or SD Card
First of all, you can check if the USB drive or SD card gets bad really using a tool, like CHKDSK. It is a Windows built-in disk check utility that can repair file system errors and mark bad sectors unavailable. Here’s how to use the tool in Command Prompt.
Step 1. Type cmd in the search bar, and then right-click the Command Prompt app and select Run as administrator from the context menu. Then click on Yes in the UAC window to confirm it.
Step 2. In the elevated Command Prompt window, type the following command and hit Enter. Here you need to replace L: with the drive letter of your USB drive.
chkdsk L: /f /r
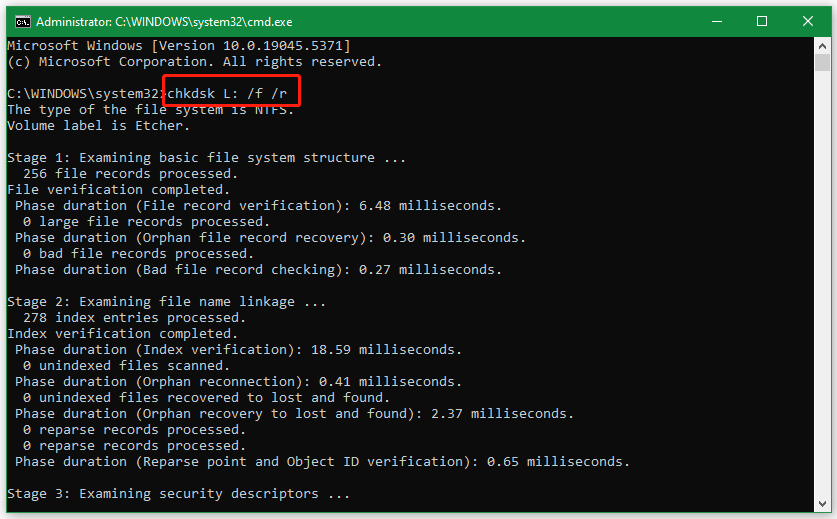
Now, you can check if the “Etcher killed USB stick/memory card can work normally. If not, move down to other solutions.
# 2. Format the USB Drive/SD Card
If Etcher broke flash drives or SD cards after burning a Linux or macOS image file, the drive may not be incompatible with Windows and not show up in File Explorer. In this case, you can try formatting the drive to FAT32/NTFS/exFAT to make it recognizable on Windows.
Here you can use a Windows tool like DiskPart to format the USB to FAT32/NTFS/exFAT. Alternatively, you can use a fantastic SD card/USB formatter – MiniTool Partition Wizard, which can format a drive to FAT16, FAT32, NTFS, exFAT, and Ext2/3/4 without limitations. Let’s choose one based on your needs.
Use the Windows Tool – DiskPart
Step 1. Press the Win + R keys to open the Run dialog box, and then type diskpart in the box and press Enter. Then click on Yes to open the tool in the Command Prompt window.
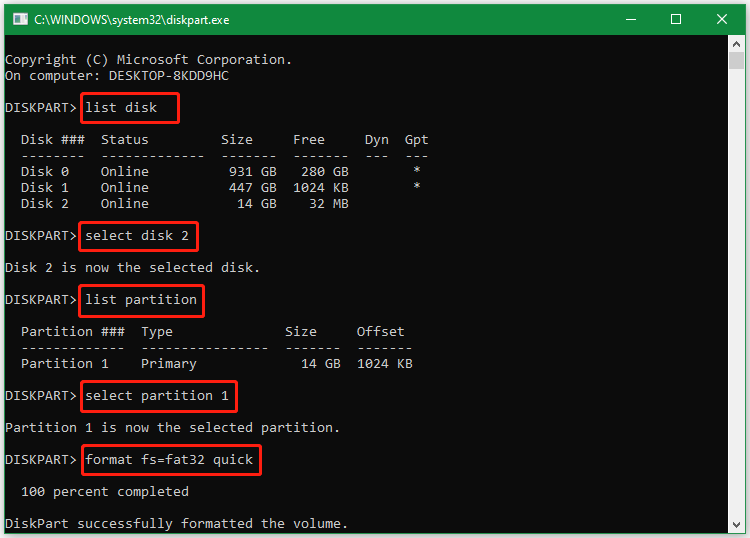
Step 2. In the pop-up window, input the following commands in order and hit Enter after each one to format the drive.
- list disk
- select disk * (* refers to the disk number of the Etcher USB drive)
- list partition
- select partition * (replace * with the partition number of the USB)
- format fs=fat32 quick (Also, you can input format fs=ntfs quick or format fs=exfat quick)
- exit
Use MiniTool Partition Wizard
MiniTool Partition Wizard can not only format the USB to these file systems but also convert FAT32 to NTFS without data loss and vice versa.
MiniTool Partition Wizard FreeClick to Download100%Clean & Safe
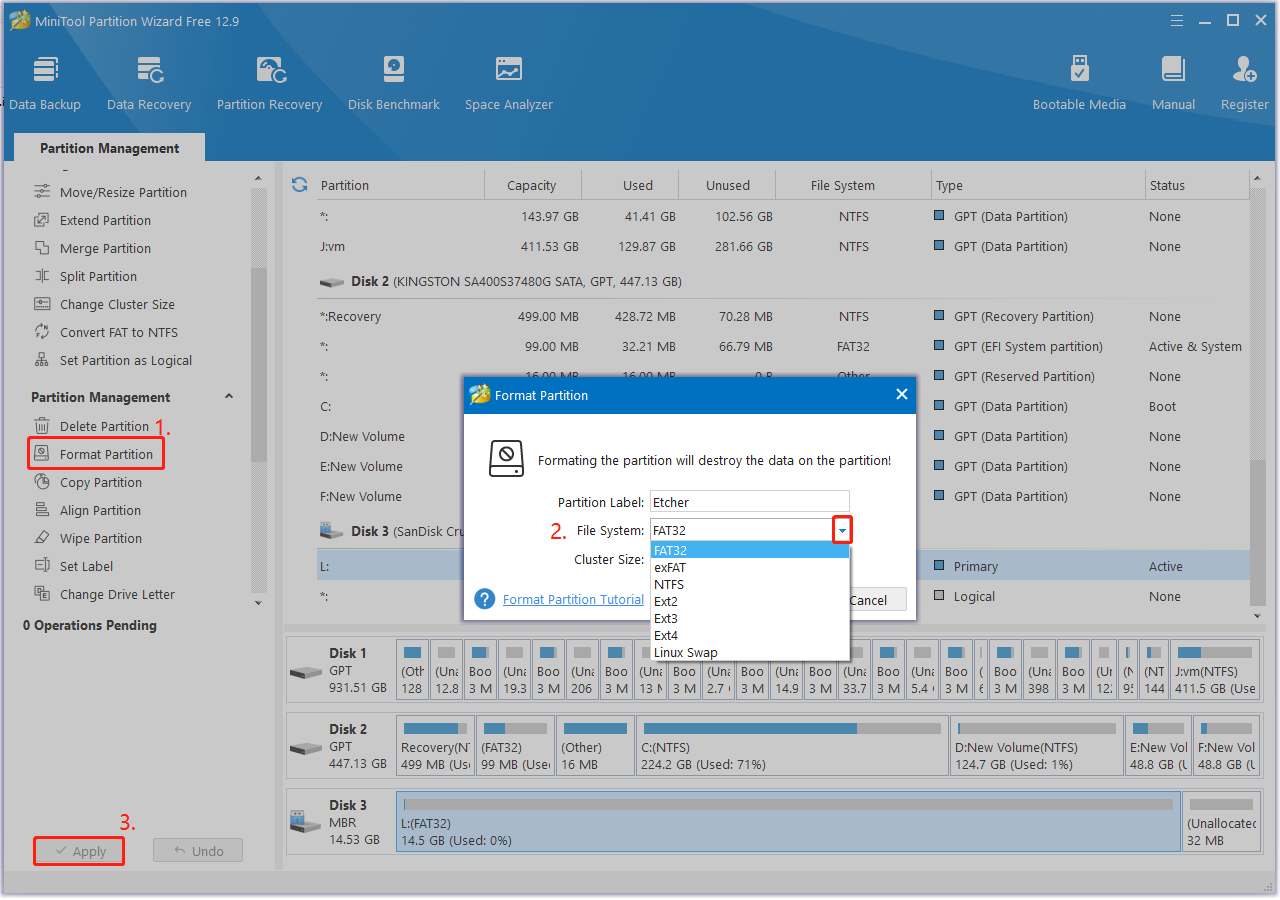
Step 1. In the main interface, select the Etcher USB drive/SD card from the disk map and click on Format Partition from the left navigation panel.
Step 2. Select your preferred file system from the drop-down menu, set the cluster size and partition label, and then click on OK.
Step 3. Click on Apply to execute the formatting operation.
# 3. Clear Read Only
Some users found the “Etcher broke SD card/USB” issue persists even after formatting the drive. This might be caused by the read-only issue. In this case, you can try clear read-only from the drive using DiskPart.
Step 1. Open the DiskPart utility in the Command Prompt window again as we showed above.
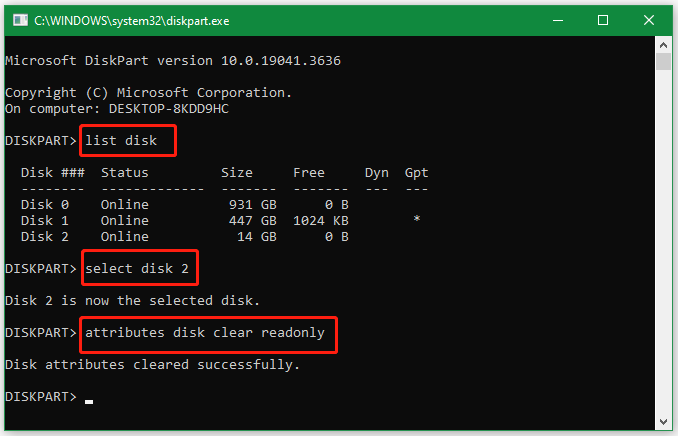
Step 2. Input the following commands one by one and press Enter after each one to clear read-only from the USB. Then you can reconnect the stick and see if it works properly.
- list disk
- select disk * (* refers to the disk number of the USB or SD card)
- attributes disk clear readonly
# 4. Wipe the USB Drive/SD Card and Create a New Partition
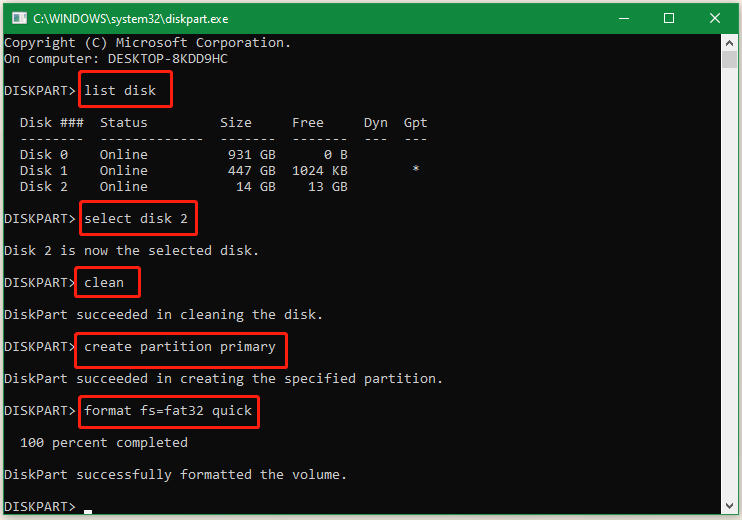
If the “Etcher broke flash drive/memory card” issue still exists, you may have to wipe it and create new partitions. This has been proven by some users to be useful. You can have a try. Here’s how to do that using DiskPart.
Step 1. Run the DiskPart utility again as we just explained above.
Step 2. Type the commands below in order and hit Enter after each one. After that, your USB should be converted to normal.
- list disk
- select disk * (* refers to the disk number of the USB drive)
- clean
- create partition primary
- format fs=fat32 quick
- exit
Additionally, you can use a free disk partition manager – MiniTool Partition Wizard to wipe the Etcher USB and create a new partition on it. The software boasts a higher wiping level and supports many different file systems. More importantly, it is more friendly to beginners than DiskPart.
MiniTool Partition Wizard FreeClick to Download100%Clean & Safe
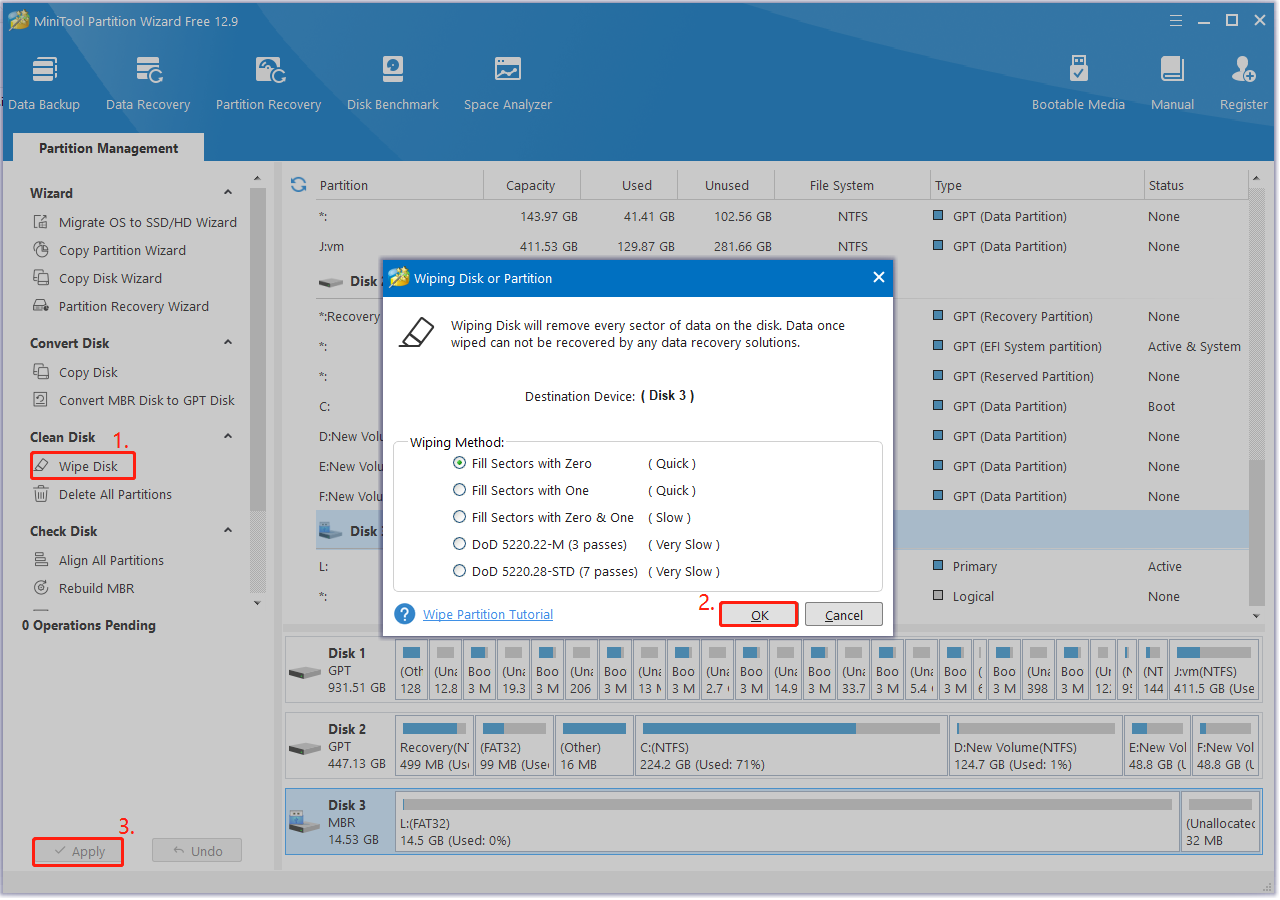
Step 1. In the main interface of the software, select the USB from the disk map and click on Wipe Disk from the left action panel.
Step 2. In the pop-up window, you will see a list of 5 wiping levels. Select your preferred wiping level and click on OK > Apply to execute the operation.
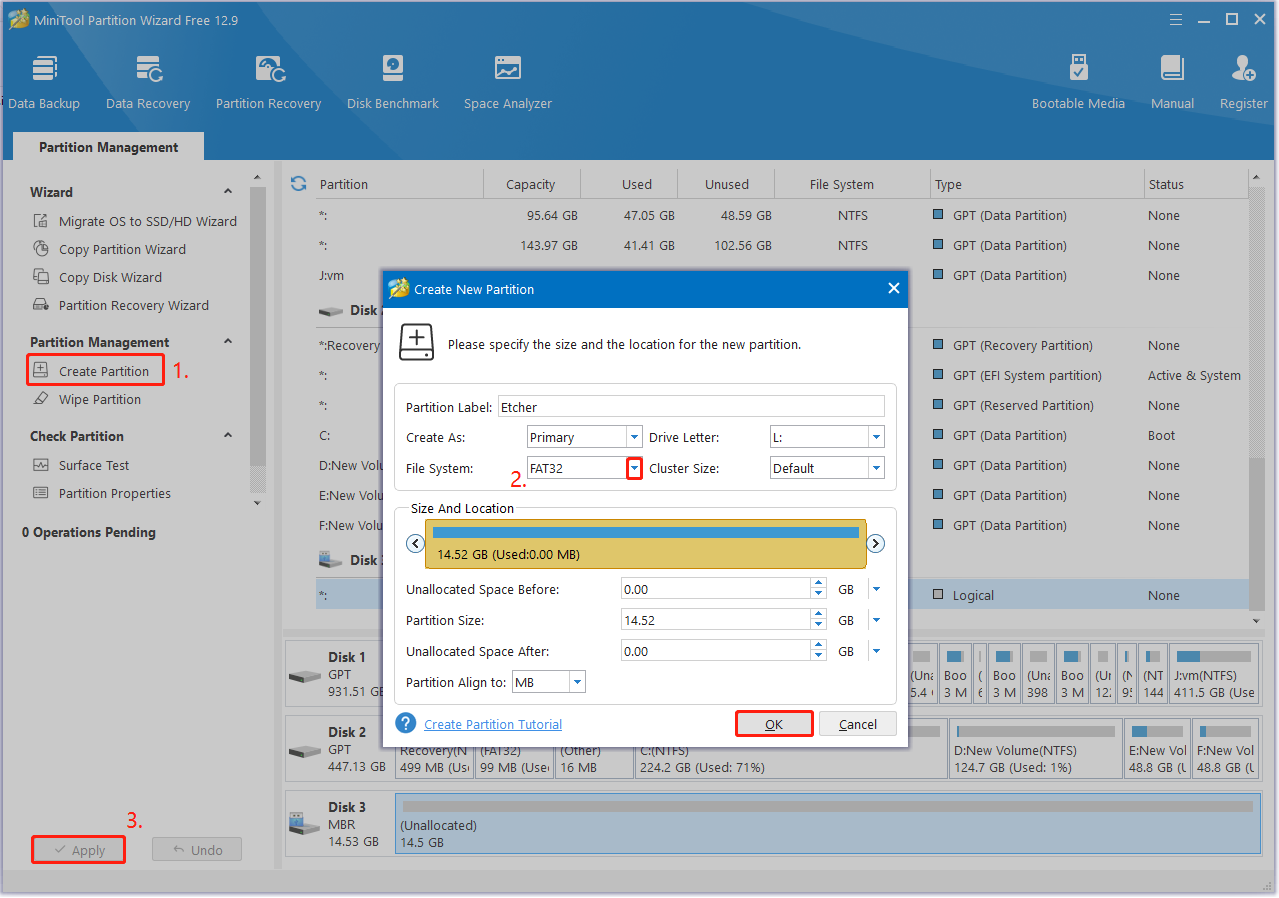
Step 3. Once wiped, select the unallocated space on the USB, click Create Partition, select File System from the drop-down menu, change other parameters based on your needs, and click OK. After that, click Apply to create the partition.
# 5. Use an Alternative to Etcher
The Etcher software has received lots of negative comments due to the broken USB drive issue. So, why not use an alternative if Etcher broke USB drive frequently? There are lots of Etcher alternatives for Windows, such as Rufus, Ventoy, Windows Media Creation Tool, ImageUSB, etc. All these tools can be used to create a bootable USB drive.
If you are looking for the Etcher alternatives for Linux, you can try using UNetbootin, MultiBootUSB, and WoeUSB. For macOS, you can use USBImager, WinDiskWriter, and Raspberry Pi Imager.
Bonus Tip: How to Fix Etcher broke USB Drive on Linux/Mac
Well, if you want to fix the Etcher ruined USB drive problem on Linux or Mac, follow the guide below respectively.
On Linux:
Step 1. Press the Ctrl + Alt + T keys at the same time to open Terminal on Linux.
Step 2. Type df and press Enter to list all mounted partitions on Linux.
Step 3. Run the /dev/sdb1 command to locate the USB drive. Here you need to replace 1 with the USB disk number.
Step 4. Run the sudo umount /dev/[device_name] command to unmount the USB. Replace [device_name] with the USB drive, like Etcher.
Step 5. Run the sudo mkfs.vfat /dev/[device_name] command to form the USB to FAT32. Alternatively, you can run the following command for NTFS or exFAT.
- sudo mkfs.ntfs /dev/[device_name]
- sudo mkfs.exfat /dev/[device_name]
On Mac:
Step 1: Open Finder via the search box and navigate to Applications > Utilities > Terminal.
Step 2. In the Terminal window, type diskutil list and press Enter to display all drives.
Step 3. Type diskutil eraseDisk FAT32 UNTITLED MBRFormat /dev/diskN and press Enter to format the USB to FAT32. Here you need to replace N with the disk number of the USB.
Bottom Line
In a nutshell, this post shows what to do if Etcher broke SD cards or USB drives. You can restore data from the storage device first using MiniTool Partition Wizard, and try the above methods to convert it to normal on Windows, Linux, or Mac.
If you have any questions about MiniTool Partition Wizard, please send us an email via [email protected], and we will reply to you as soon as possible.

User Comments :