There are various blue screen errors with different error codes and messages. And one of them is the error dxgkrnl.sys, which upsets many Windows 10 users. Luckily, this article from MiniTool will show you some reliable fixes to the blue screen error dxgkrnl.sys Windows 10.
You may receive the dxgkrnl.sys BSOD error when you are playing games or watching videos. What causes Windows 10 dxgkrnl.sys BSOD error? How to fix the error? If you are troubled by the dxgkrnl.sys error, you can find out its causes and possible solutions in this post.
What Causes Windows 10 Dxgkrnl.sys BSOD Error
The blue screen error dxgkrnl.sys is related to Microsoft DirectX driver. If you encounter the dxgkrnl.sys BSOD error, it indicates that there are some Graphics display driver issues on your PC. Besides, if there are corrupted system files or other hardware issues on your PC, you can also encounter the blue screen error dxgkrnl.sys.
If you can boot into Windows or enter safe mode after the occurrence of the dxgkrnl.sys BSOD error, you can follow the steps below to solve the dxgkrnl.sys Windows 10 error.
How to Fix Dxgkrnl.sys BSOD Error Windows 10
- Reinstall Graphics Driver
- Run DirectX Diagnostic Tool
- Run System File Checker
- Run DISM Commands
- Check Possible Hardware Failure
Solution 1. Reinstall Graphics Driver
The dxgkrnl.sys could be caused by the incompatibility between the Windows 10 operating system and the Graphics driver. If this is the case, you can reinstall the Graphics driver on your PC to fix the error.
If you haven’t updated driver for a long time, you can uninstall your current Graphics driver and download the latest driver to install. If you have just installed the latest driver, and then the dxgkrnl.sys error occurred, you should remove the newly installed driver and install an older driver instead.
Step 1. Right click Windows Start menu and choose Device Manager from the menu.
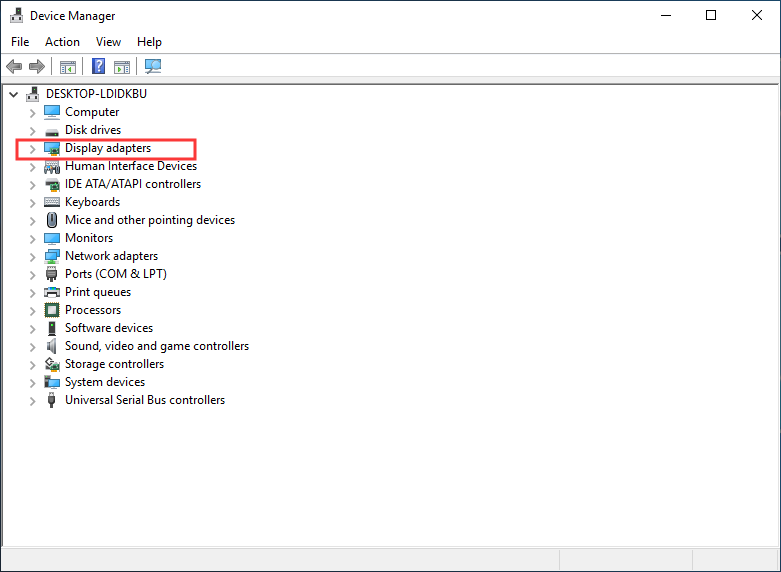
Step 2. Find Display adapters from the list and expand it.
Step 3. Right click the Graphics driver and choose Uninstall device.
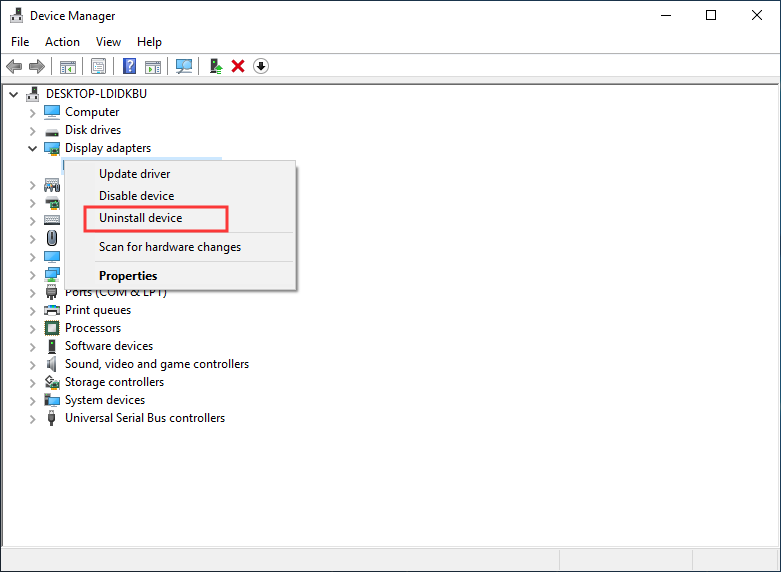
Step 4. Follow the prompts to uninstall the driver.
Step 5. Then go to your graphics card driver download page to download the latest driver. For example, if you are using NVIDIA GPU display driver, you can visit the NVIDIA driver download page.
Step 6. Select the proper driver version and your computer OS version, and then click on the Search button to make a search.

Step 7. Then click Download button to download the driver for your graphics card.

After reinstalling the driver, you can check if Windows 10 dxgkrnl.sys BSOD disappears.
Solution 2. Run DirectX Diagnostic Tool
As mentioned above, this error is related to DirectX Graphics APIs. So, in order to fix the issue, you can try to run the DirectX Diagnostic Tool.
If you don’t know how to run the DirectX Diagnostic Tool on Windows 10, you can refer to the steps below.
Step 1. Choose one method you like from below to launch the DirectX Diagnostic Tool on Windows.
- Press Windows + R keys to get the Run dialog box, then input dxdiag and click OK.
- Open Windows PowerShell via the Start Menu, then type dxdiag and hit Enter.
- Launch Command Prompt Windows 10, then input dxdiag.exe and hit Enter.
- Press Windows + S keys to bring up the Windows search box, then type dxdiag in the box and click the best match.
Step 2. Wait patiently when the DirectX Diagnostic Tool is scanning your system for problems. When it is finished, you can get its main interface shown as below. You can get a lot of system information on this page.
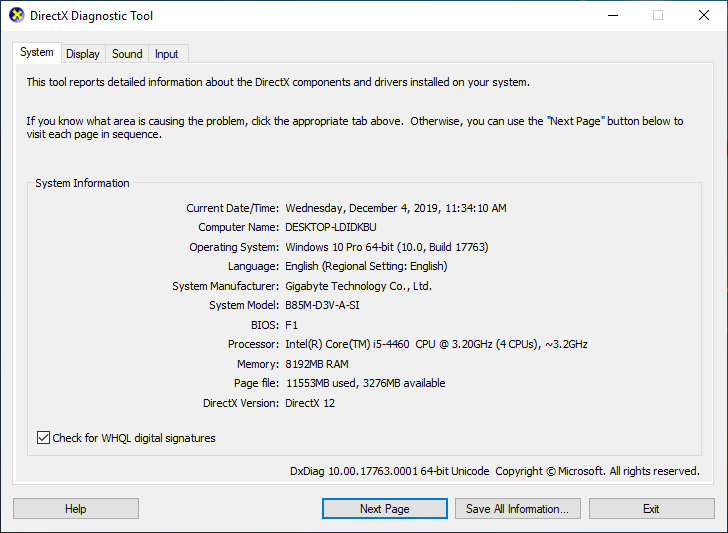
Step 3. Then you can switch to the Display, Sound and Input tabs respectively to check if there is any problem detected. The Notes box will show you some detailed information if there problems with devices and drivers related to the multimedia and audio or video on your PC.
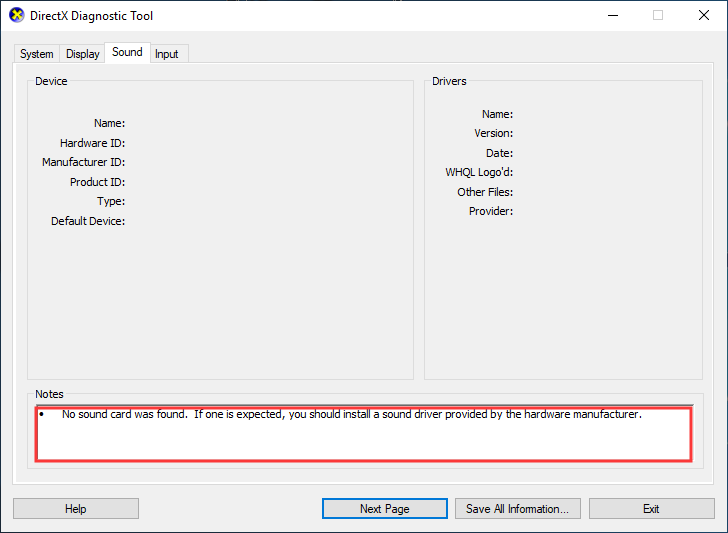
Besides, if you want to share the full report with others for troubleshooting, click the Save All Information… button to save the diagnostic report on your PC directly, which is extremely convenient.
DirectX Diagnostic Tool can help you troubleshoot various hardware problems on your computer and thus fix the dxgkrnl.sys BSOD error. You can run DirectX Diagnostic Tool to see if that works. If this cannot help you get rid of the dxgkrnl.sys error, try the next method.
Solution 3. Run System File Checker
As mentioned before, corrupted system files can lead to dxgkrnl.sys BSOD error. If this is the case, you should scan and fix corrupted system files on your PC by using Windows built-in System File Checker. If you don’t know how to run System File Checker on Windows 10, you can follow the steps below.
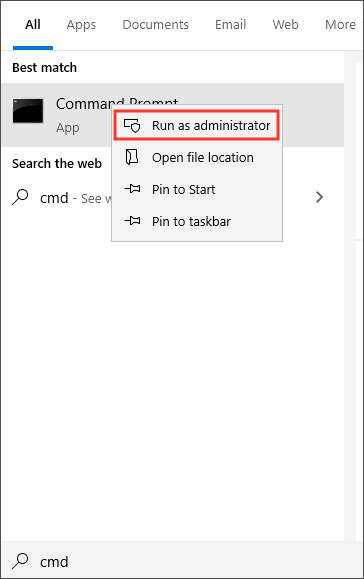
Step 1. Type cmd in the Windows 10 Cortana search box. Right-click the best match Command Prompt and choose Run as administrator.
Step 2. After running Command Prompt as an administrator, type sfc /scannow and hit Enter key to run the tool immediately.
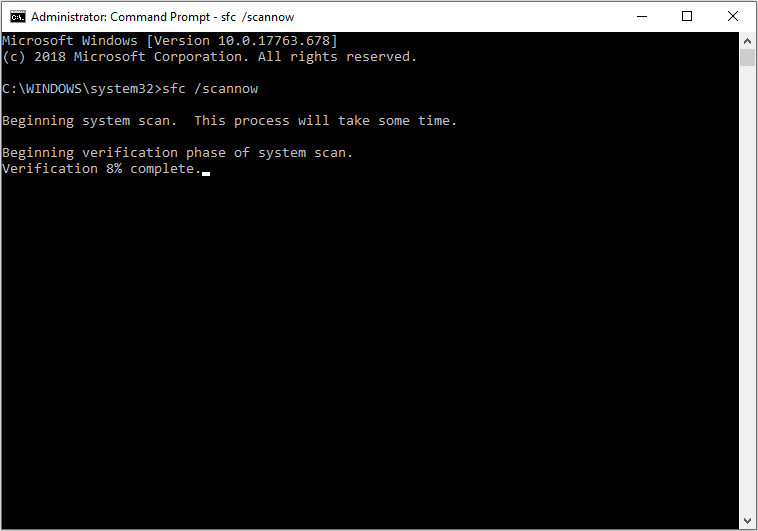
Wait patiently when the tool is scanning and repairing corrupted system files. When it is finished, you can check if the blue screen error dxgkrnl.sys goes away.
Solution 4. Run DISM Commands
DISM can also help you fix these corrupted system files to keep your Windows system away from blue screen errors like dxgkrnl.sys. So if System File Checker cannot help you repair corrupted system files and fix the dxgkrnl.sys issue, you can try using DISM.
Step 1. Press Windows + S keys on the keyboard to bring up the Windows search box.
Step 2. Type cmd in the search box and right-click the best match Command Prompt to choose Run as administrator.
Step 3. In the Command Prompt window, type the following commands one by one and hit Enter after each.
DISM /Online /Cleanup-Image /CheckHealth
DISM /Online /Cleanup-Image /ScanHealth
DISM /Online /Cleanup-Image /RestoreHealth
Then just wait patiently as DISM needs some time to scan and fix the corrupted system files on your PC.
Solution 5. Check Possible Hardware Failure
It is possible that the dxgkrnl.sys BSOD error is caused by some hardware errors such as a faulty motherboard or RAM module. If your PC is under warranty, you’d better take it to the store to check if there is any hardware failure happened. And replace it if they do find failing hardware on your PC.
The above five methods should help you fix the Windows 10 dxgkrnl.sys BSOD error if you can boot into Windows or enter safe mode. However, if you cannot access Windows, what should you do?
Well in this case, you might need to do a clean install of Windows 10. But before that, you need to recover the important files from the unbootable computer first. And the following will show you how to recover the important files when your computer encounters dxgkrnl.sys and fails to boot into Windows.
How to Recover Data from the PC with Dxgkrnl.sys Error
To recover data from the PC with dxgkrnl.sys BSOD error, MiniTool Partition Wizard Pro Ultimate is recommended.
MiniTool Partition Wizard Pro Ultimate is a piece of professional hard drive manager & data recovery software. It can help you not only perform data recovery on HDD, SSD, USB drive, but also it is a good assistant when you want to move/resize partition, extend partition, convert NTFS to FAT32, restore lost partitions and so on.
You can click the following button to get MiniTool Partition Wizard Pro Ultimate and install it on a normal PC since your own computer cannot boot into Windows. Then just follow the step-by-step guide to recover data from the PC with dxgkrnl.sys error.
Step 1. After installing MiniTool Partition Wizard Pro Ultimate successfully, click the Bootable Media button on the main interface to create a bootable USB drive.
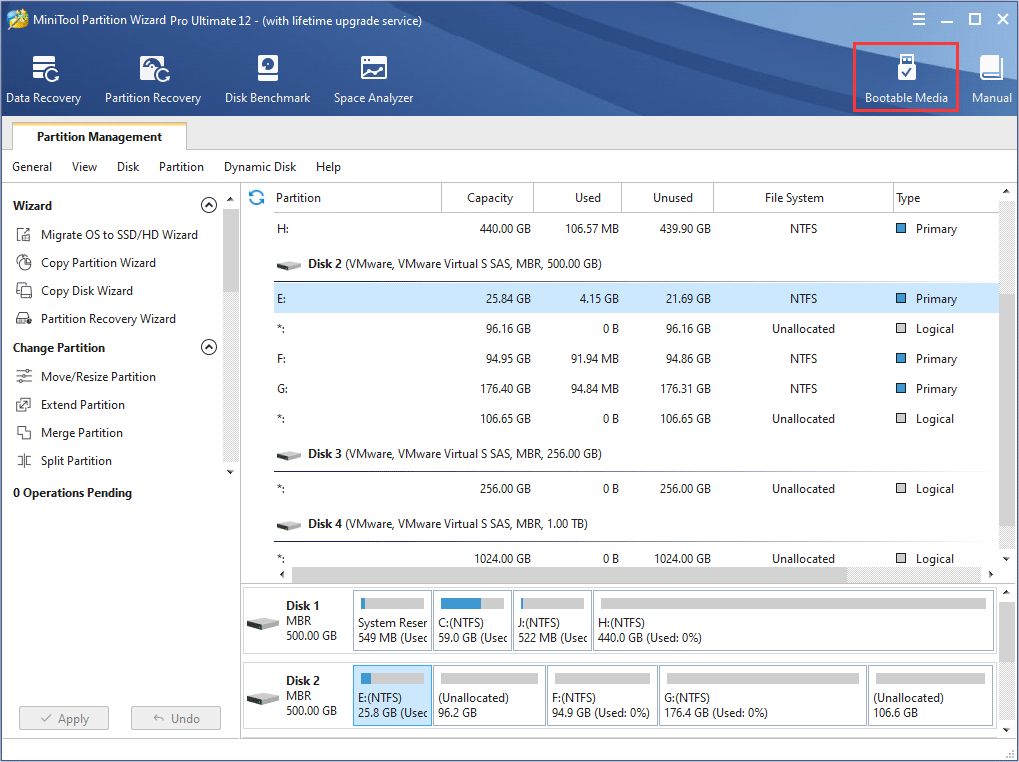
Step 2. After launch Bootable Media, click WinPE-based media with MiniTool plug-in > USB Flash Drive to create a bootable USB drive. After successful burning, click Finish button.
Step 3. Connect the bootable USB drive to your computer with dxgkrnl.sys error. Restart your PC and enter BIOS to set the bootable USB drive as the first boot option. Then boot from the USB drive.
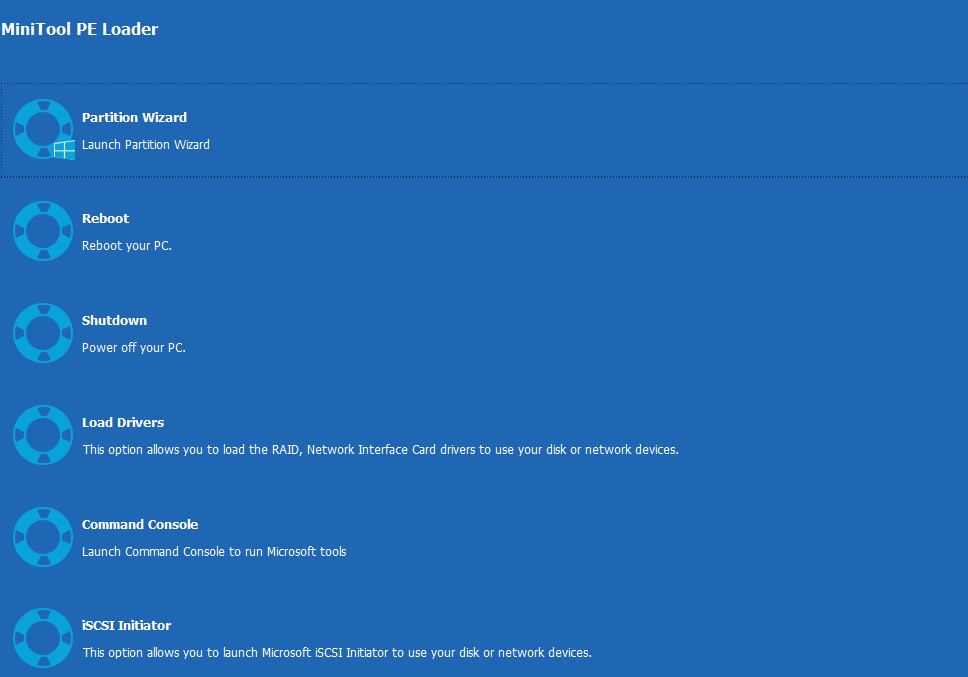
Step 4. Then the MiniTool Partition Wizard Bootable Edition will be loaded automatically. If not, you can click Partition Wizard on the MiniTool PE Loader interface.
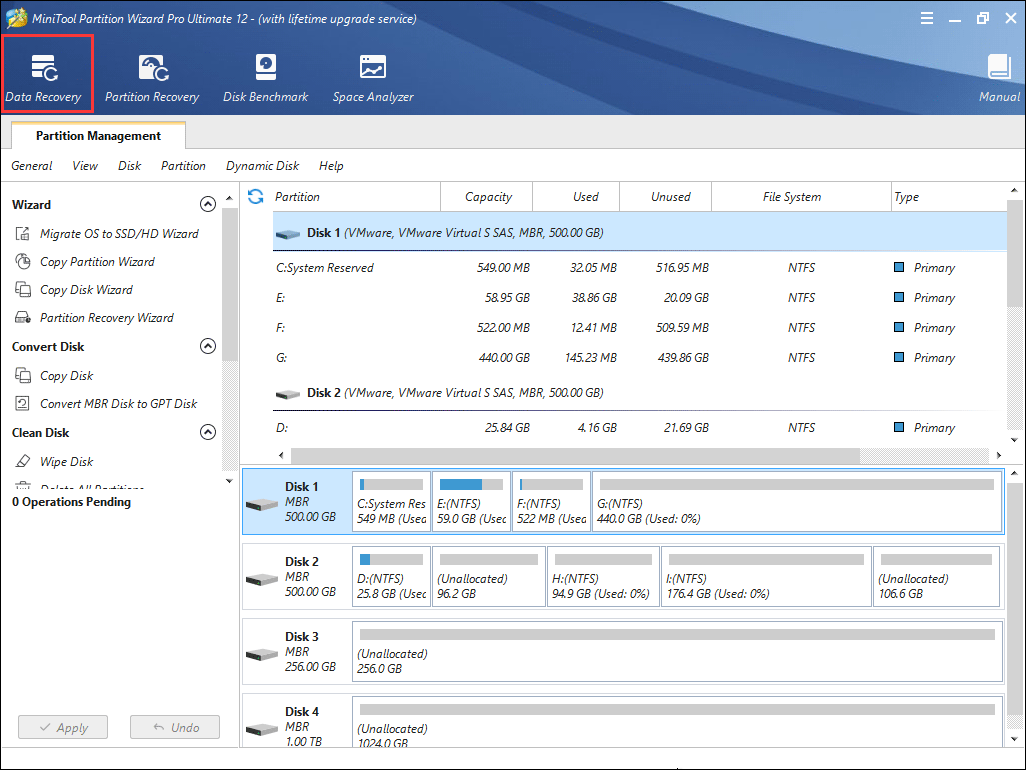
Step 5. Then click the Data Recovery feature on the main interface of MiniTool Partition Wizard Pro Ultimate.
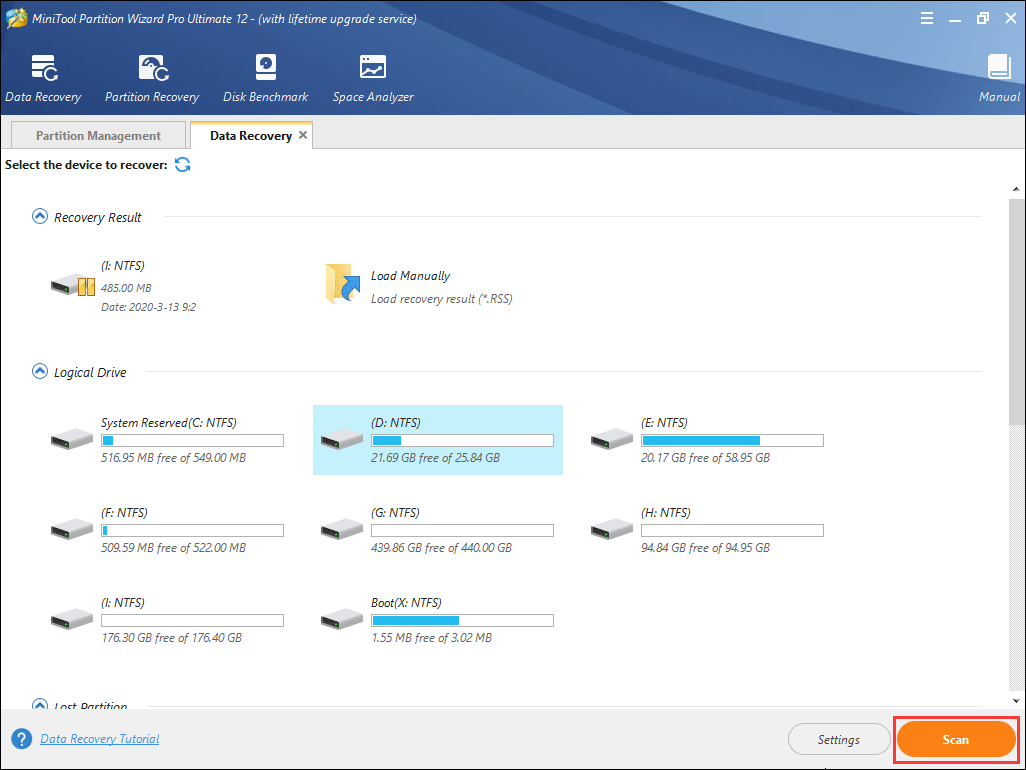
Step 6. On the main interface of Data Recovery, choose the partition which contains important files and click Scan button to scan the partition.
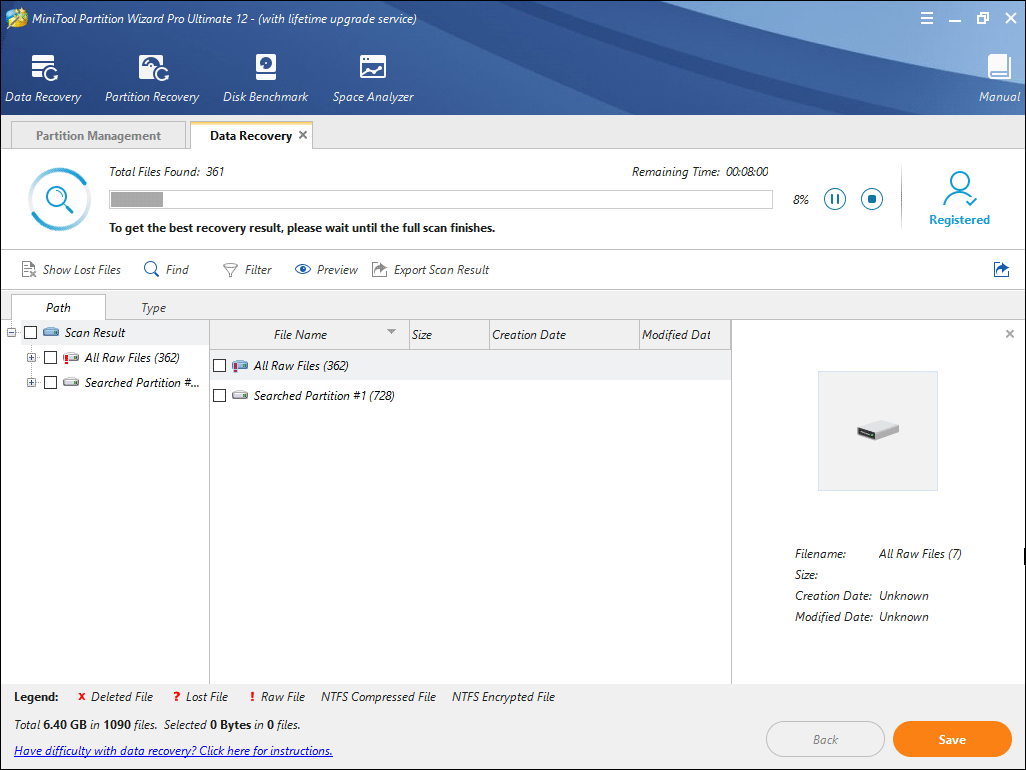
Step 7. During the scanning process, you can pause or stop the scanning by clicking the Pause or Stop button near the progress bar. But I suggest that you should wait for it to finish the scanning.
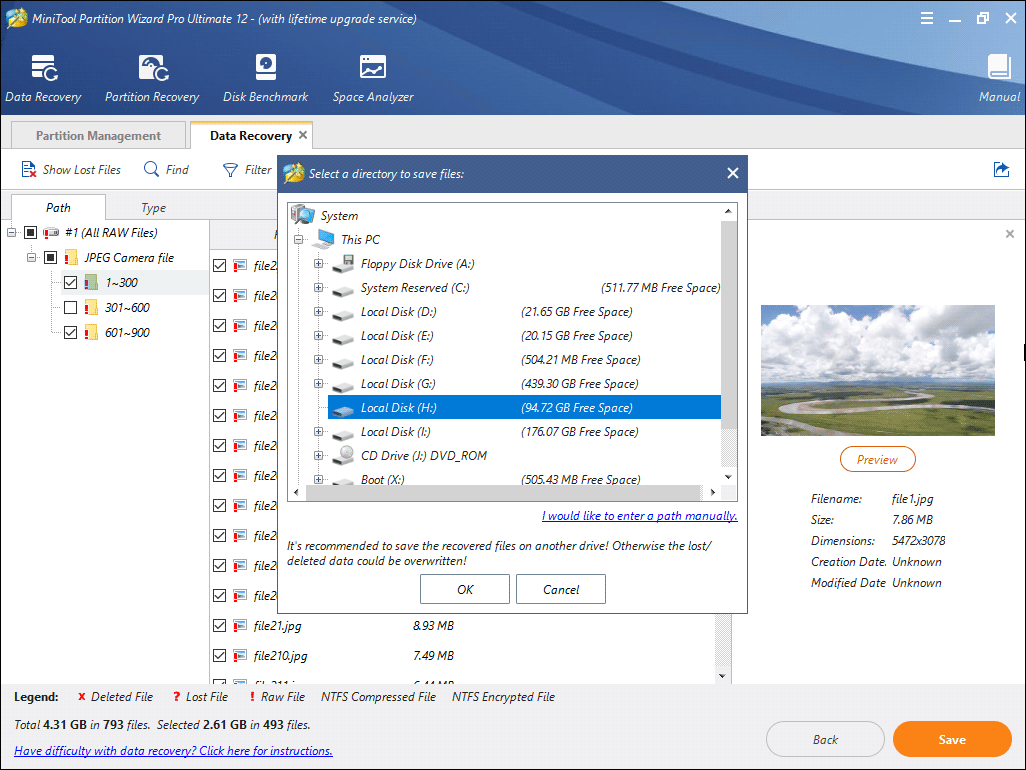
Step 8. When the scanning is finished, you can see all the recovered files. Find and check need files on the list and click the Save button.
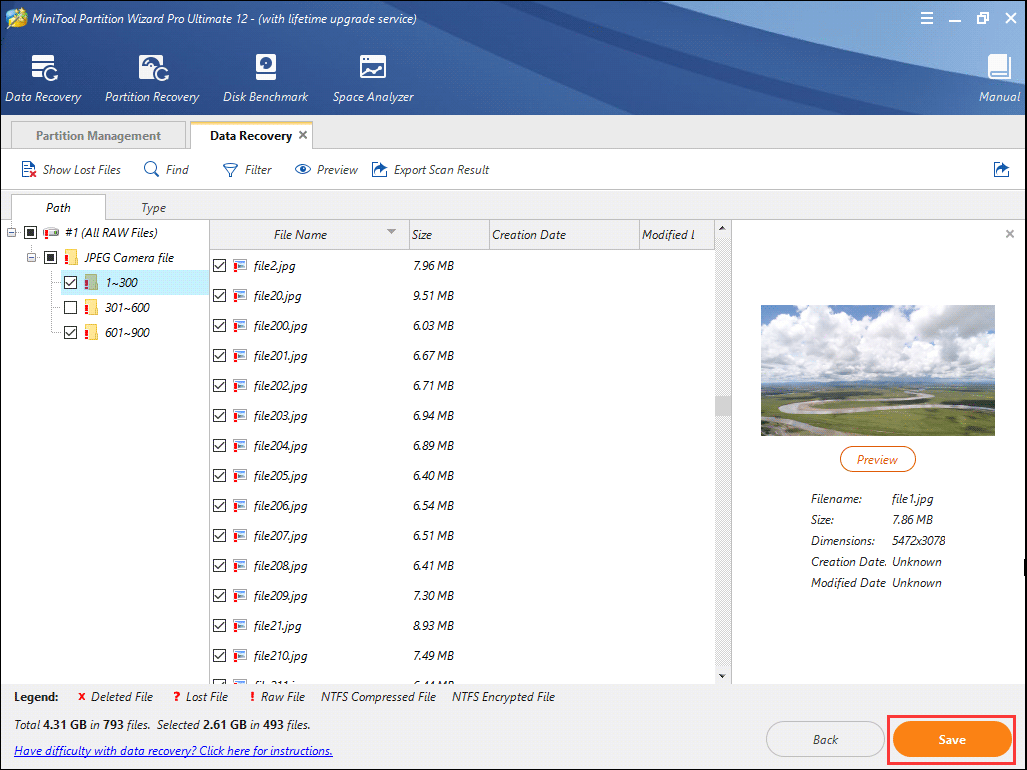
To quickly find needed files, you can utilize to following tools on the tool bar:
- Show Lost Files: this button makes the software only show you the lost files.
- Find: You can click this button to find a file by typing file name and then check Match Caseor Match Word option for a more specific search.
- Filter: You can click this button to search files by filename/extension, file size, creation or modification date.
- Preview: This button allows you to preview 70 kinds of files of which each should be smaller than 100MB.
Step 9. Then, choose a directory to save the selected files. It is recommended to save the recovered files on another drive. Otherwise, the lost/deleted data could be overwritten. You can save the files to an external device.
Conclusion
Now you should know how to fix dxgkrnl.sys BSOD error on Windows 10 as well as how to recover files from the PC with dxgkrnl.sys error. If you just encounter the same error, you can try the above methods to troubleshoot the blue screen error. If you have better solutions, please don’t hesitate to share it with us.
If you have any questions, you can leave a message on the following comment zone and we will reply as soon as possible. If you need any help when using MiniTool software, you may contact us via [email protected].
Dxgkrnl.sys FAQ
- Right click Windows Start menu and choose Device Manager from the menu.
- Find Display adapters from the list and expand it.
- Right click the Graphics driver and choose Uninstall device.
- Go to your graphics card driver download page to download the proper driver version.
- Follow the prompt to reinstall the newly downloaded driver.


User Comments :