When connecting an external drive to Windows PC, many users encounter the “change drive letter and paths greyed out” issue. Why they can’t change drive letter? How to fix it? Now, let’s explore the answers together with MiniTool Partition Wizard.
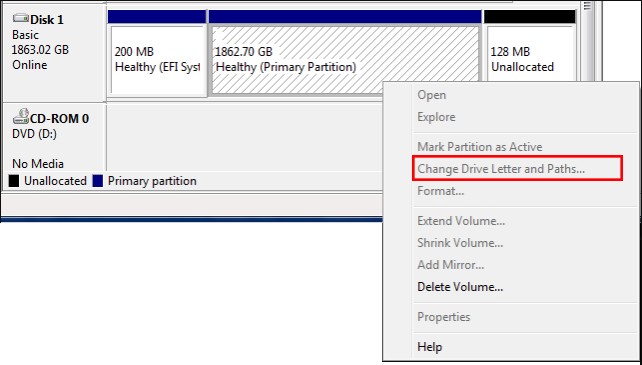
After investigating extensive user reports, we found the “change drive letter and paths greyed out” issue often occurs when they connect an external drive like USB to Windows. Here is a true example from the Microsoft forum:
I have a drive that has a lot of information on it that I need. A user left our company and all of his files are on this drive. When I plug the drive in it loads the drivers and shows up just fine in Disk Management (shown below), but not in Computer. I want to read the drive on the computer. So I think, ok, I’ll just add a drive letter but that option is greyed out. Is there a way to get this drive accessible without formatting?https://social.technet.microsoft.com/Forums
If you are also facing the issue, keep reading the following part.
What Causes the “Change Drive Letter and Paths Greyed Out” Issue
Why you can’t change drive letter and paths Windows 10? According to a survey, the main reason behind the issue is that you are using a Mac formatted drive on Windows. It’s known that the mac hard drive is formatted to an HFS+ file system that can’t be accessed on a Windows PC. Usually, this situation often appears on an external storage device.
On an internal hard drive, the following situations may cause you can’t change drive letter and paths Windows 10.
- You are changing a system partition or a boot partition’s drive letter. Usually, the system partition was assigned with C by default.
- The drive letter you are trying to change might be in use. In this case, you can close all running programs and try again.
- The drive letter has already been used by some external storage device.
Top recommendation: Ext4 vs NTFS vs HFS+: Differences and Which One Should You Use
Before You Do: Recover Data from the Hard Drive
If you are anxious to access the data on the external drive, we highly recommend you use MiniTool Partition Wizard. It is a multifunctional partition manager that focuses on data recovery, file system conversion, disk benchmark, and OS migration. With this powerful tool, you can recover data from a mac formatted drive.
Here’s how to use MiniTool Partition Wizard to recover data from an HFS+ drive.
MiniTool Partition Wizard DemoClick to Download100%Clean & Safe
Step 1. Connect your external drive to the Windows computer.
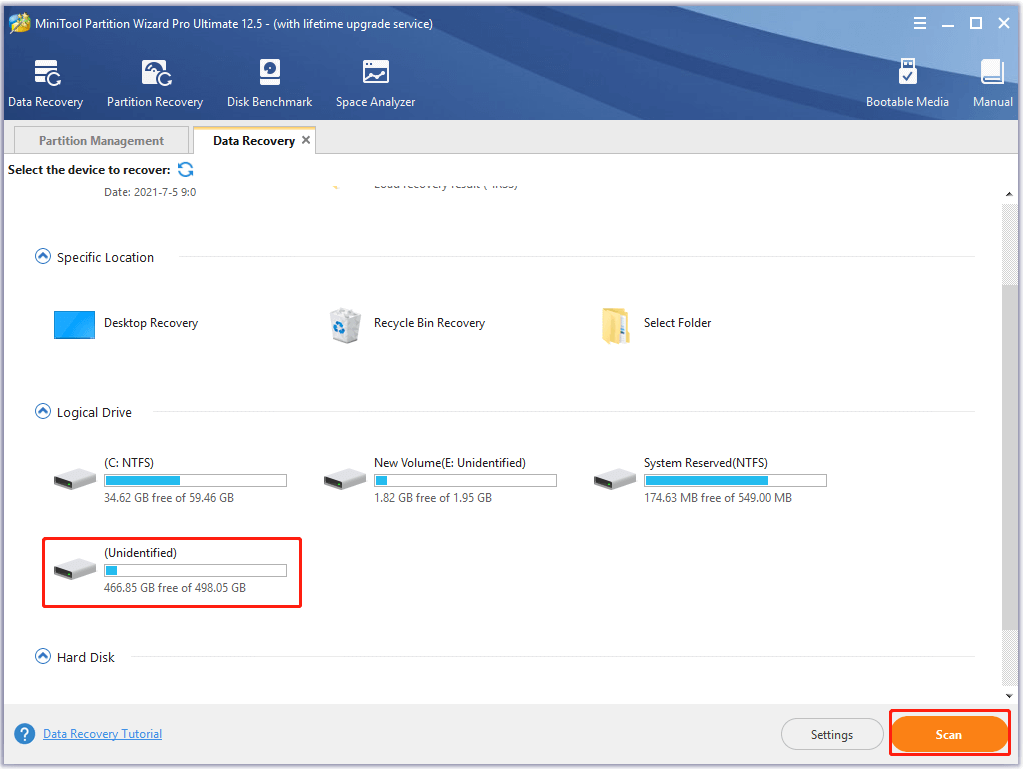
Step 2. Launch the program to enter its main interface, click on Data Recovery on the top toolbar, and select the drive you just connected and click on Scan.
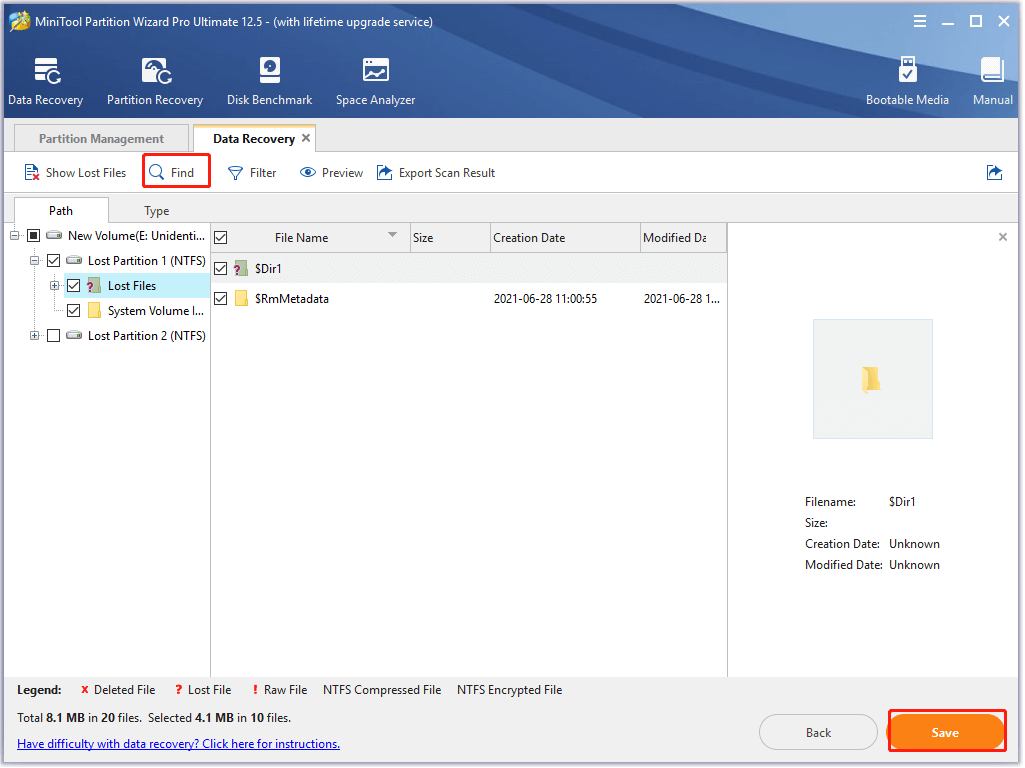
Step 3. Then you need to wait for a while. Once the scan completes, tick the checkboxes next to the needed files and click on the Save button.
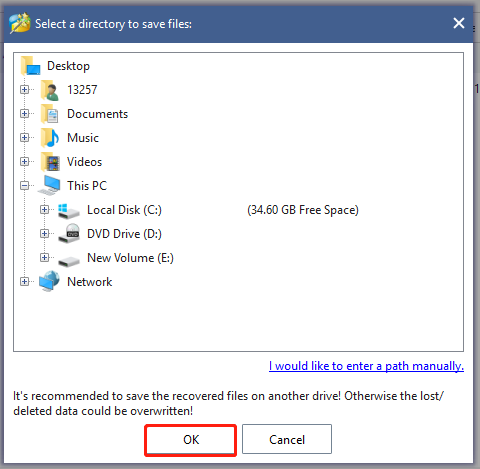
Step 4. Select a directory to save the needed files and click on OK. Here we recommend you save the recovered files to another drive. Or, the unrecovered data could be overwritten.
Now, you can access the data from the mac formatted drive. Here comes another problem: how to do it if you can’t change the drive letter? Let’s go on.
How to Do If You Can’t Change Drive Letter
If you are still troubled by the “change drive letter and paths greyed out Windows 10” issue, you can try the following methods.
Method 1. Connect the Drive to a Supported Operating System
As mentioned above, the main reason for the change drive letter and paths greyed out error is due to an unsupported operating system. So, the easiest and direct way is to use the drive on a Mac or other supported computer. If not, you won’t be able to access its data on Windows unless you use a professional data recovery tool or format it to a supported file system.
Method 2. Format Mac Hard Drive on PC
If you don’t have a Mac computer, then you may consider formatting the drive to NTFS/FAT32 and assign a letter. How to format a Mac hard drive on Windows? Microsoft provides some built-in tools that can be used to format a hard drive, including Diskpart, Disk Management, and File Explorer.
Here we take Diskpart for example:
Using Diskpart:
Step 1. If you are using an external drive, make sure you connected it to the computer.
Step 2. Press Win + R keys to open the Run dialog box, and then type diskpart in the box and hit Enter.
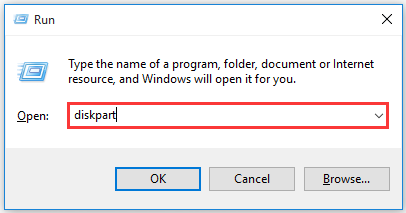
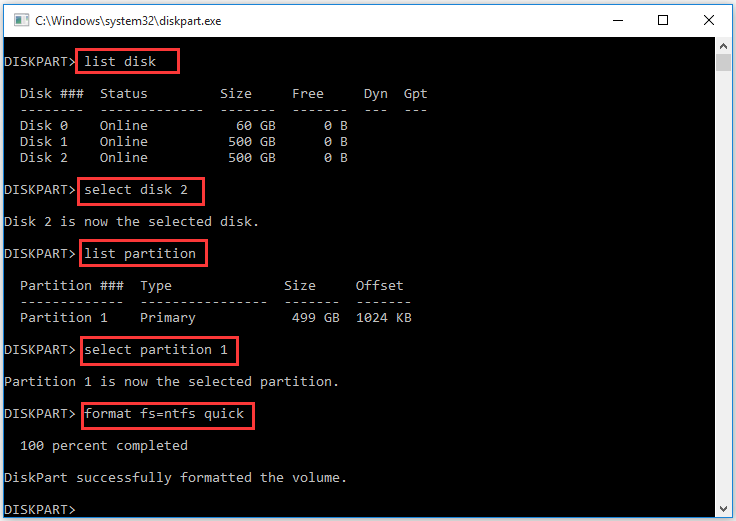
Step 2. In the Diskpart window, type the following commands one by one and hit Enter after each typing. Once you finished the command below, your drive should be formatted to NTFS or FAT32
- list disk
- select disk *(replace * with the number of your connected drive)
- list partition
- select partition 1 (the 1 represents the partition you want to format)
- format fs=ntfs quick or format fs=fat32 quick
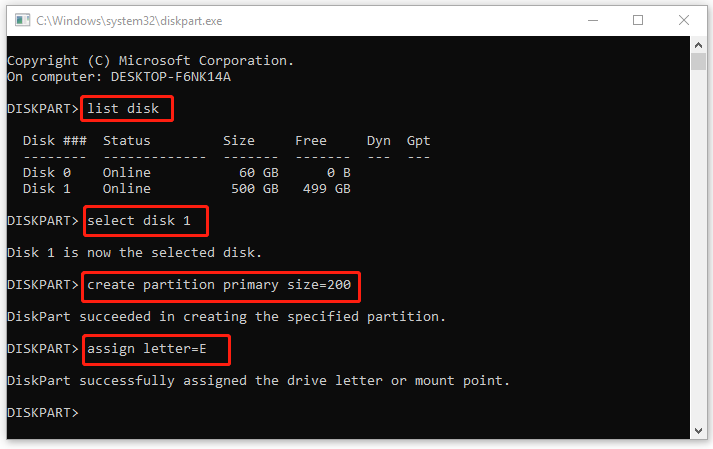
Step 3. Proceed with the following commands if you want to assign a drive letter for the drive.
- list disk
- Select disk 1 (the 1 represents the disk you want to create a partition in)
- create partition primary size=x (x represents the extended partition size in MB)
- assign letter=E (replace E with the letter you want to assign for the drive)
Diskpart helps you format hard drive and create partitions. Sometimes, however, you may encounter the “no usable free extent could be found” and “Virtual Disk Service Error” and while using Diskpart. In addition, this tool can’t help you format a drive larger than 64GB to FAT32. To format a drive quickly and safely, we recommend you use MiniTool Partition Wizard.
Using MiniTool Partition Wizard:
Compared with the Windows built-in tools, MiniTool Partition Wizard makes a great breakthrough on partition management. It can help you format a large drive, change drive letter, change cluster size, etc.
MiniTool Partition Wizard FreeClick to Download100%Clean & Safe
Sep 1. Connect your storage drive to the computer and launch MiniTool Partition Wizard to enter its main interface.
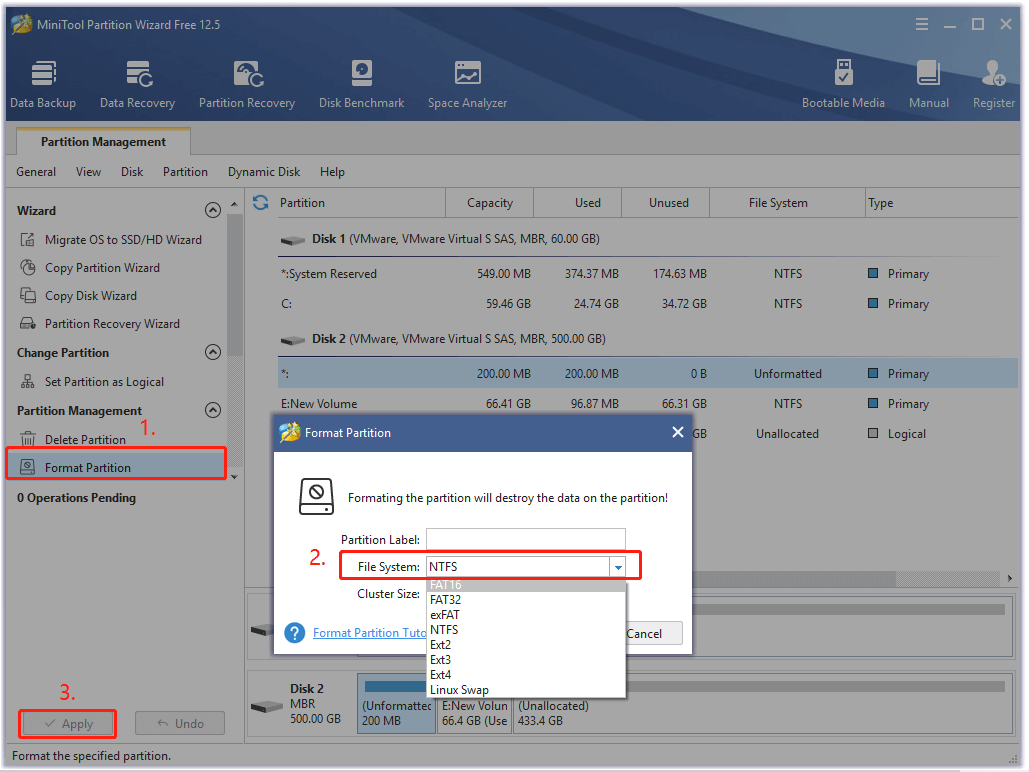
Step 2. Select the connected drive from the disk map and click on Format Partition from the left pane.
Step 3. In the pop-up window, select NTFS/FAT32/exFAT or other file system based on your demands and click on OK.
Step 4. Click on Apply to execute the formatting operation.
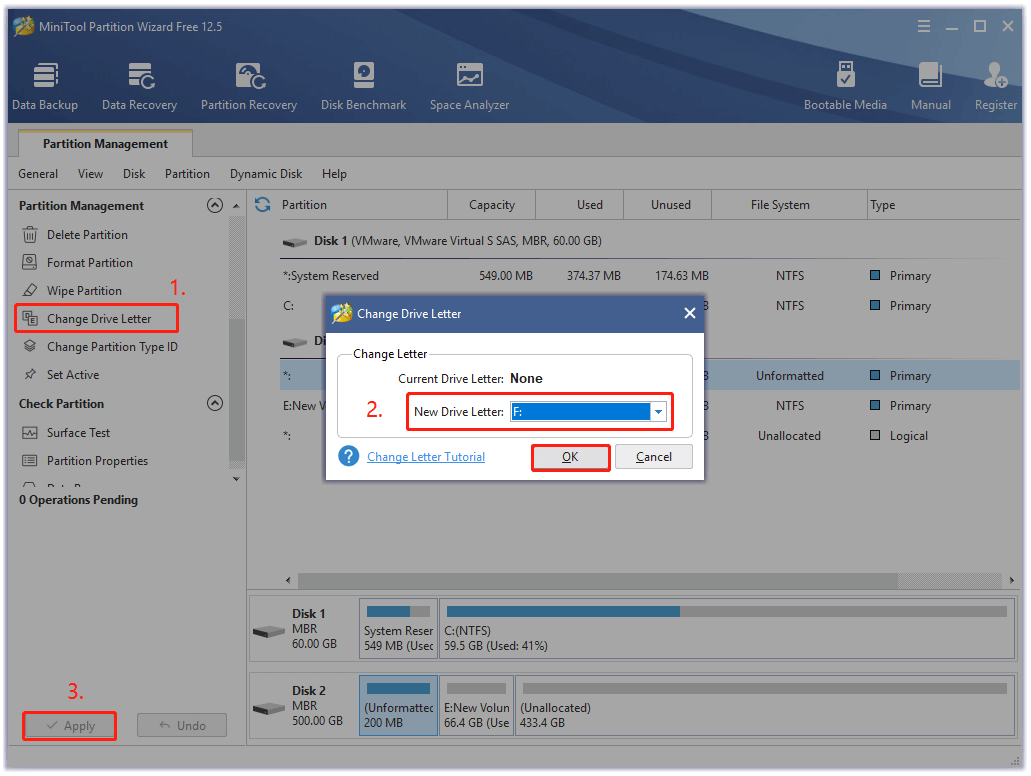
Step 5. If you want to assign a letter to a partition, you can select the drive from the disk map and click on Change Drive Letter.
Step 6. Select a drive letter from the drop-down menu, and click on OK and Apply to execute it.
You may also be interested in how long does it take to format a hard drive.
Method 3. Convert MBR to GPT
On the Microsoft forum, some users reported that they can change drive letters successfully after converting an MBR disk to GPT. Here you may have a try. How to convert MBR to GPT without data loss? MiniTool Partition Wizard can make it!
MiniTool Partition Wizard FreeClick to Download100%Clean & Safe
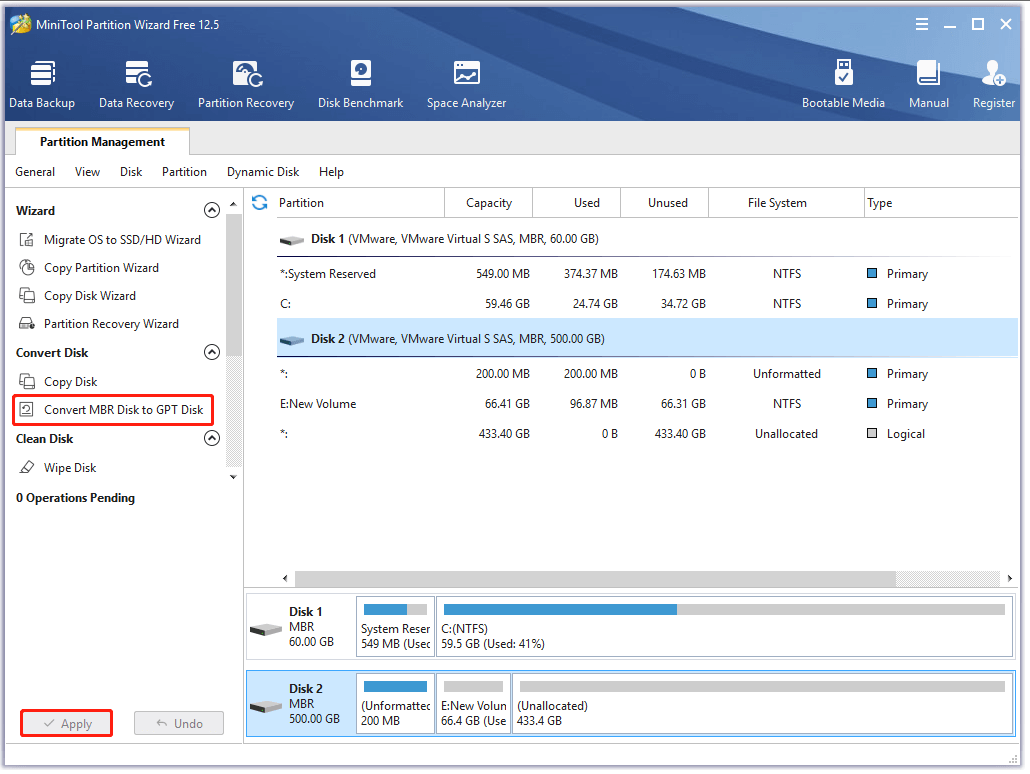
Step 1. In the main interface, select the connected drive from disk map and click on Convert MBR Disk to GPT Disk from the left pane.
Step 2. Click on Apply to execute the pending operation. Once done, you can check if you can change the drive letter.
What’s Your Opinion
Here comes the end of this post. If you are eager to access the data on a Mac formatted drive, you can use MiniTool Partition Wizard first to recover it. In addition, this post also tells you how to format a Mac hard drive on Windows.
If you have better ideas on the “change drive letter and paths greyed out Windows 10” subject, you can write them in the comment area. For any questions or suggestions on the MiniTool program, you send us an email to [email protected]
Change Drive Letter and Paths Greyed Out FAQ
- Press Win + R keys to open the Run dialog box, and then type mscin the text box and click on OK to open Disk Management.
- Right-click the drive and select the Change Drive Letter and Paths
- Click on Change and select a drive letter from the drop-down menu, and click on OK.
- Click on Yes to confirm the operation.
After investigating extensive user reports, we summarize 7 applicable methods to fix the Parameter Is Incorrect error:
- Compress these large files
- Convert FAT32 to NTFS
- Format your storage device to NTFS
- Replace your hard drive with a larger one
- Check file system errors
- Connect your external drive to another different computer
- Update your USB and Disk Drive drivers

User Comments :