What Is the Error Code 0x0000007F?
The error code 0x0000007F is a Blue Screen error. You can see messages as shown in the picture below when this error happens.
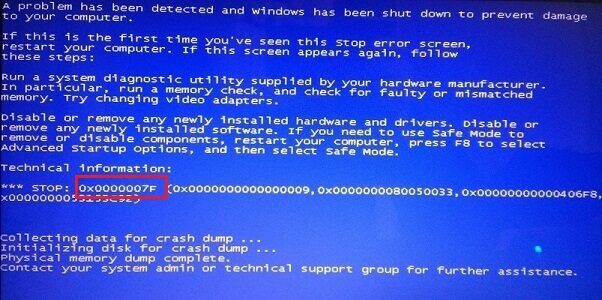
When this error occurs, it will bother you a lot because it stops your Windows OS from working. Here are some systems that can be affected by this error:
- Windows XP Home and Professional
- Windows 2000 Professional, Server, Enterprise, and Datacenter editions
- Windows NT Server, Workstation Editions
What Causes the Blue Screen Error Code 0x0000007F?
Just as the above content shows, Stop 0x0000007F error is always caused by a hardware problem or kernel-mode problem. However, it can also be caused by other reasons in addition to the two listed above. Here are some possible reasons:
- The RAM modules are faulty.
- Installed RAM modules are mismatched.
- The motherboard is damaged.
- The Windows registry has been corrupted.
- The computer has been overclocked.
- There is an incompatibility between the drivers and the computer.
- A temperature spike resulted from the HP utility.
- There is insufficient kernel space in your PC.
- There is system file corruption.
- The looping iaStor.sys kernel file on your PC causes some problems.
- There are some conflicts with the third-party antivirus.
How to Fix the Error Code Stop 0x0000007F on Your PC?
When you encounter the 0x0000007F BSOD on your PC, you can try these solutions to fix it.
Solution 1. Restart Computer
Restarting your computer can free up memory space and clear temporary files that were stored by various pieces of software. So, when you receive the Stop 0x0000007F error on your PC, you can try restarting your computer to fix it. If it doesn’t work for you, just try the other solutions below.
Solution 2. Run Windows Memory Diagnostic Tool
As Stop 0x0000007F error can be caused by RAM problems, you can run a RAM memory test to check whether it works properly. Luckily, there is a built-in RAM test tool called Windows Memory Diagnostic on every Windows computer.
It is a reliable feature that helps you test the RAM, check if everything works properly, and then troubleshoot memory problems. If your computer is unable to boot normally, you need to enter Safe Mode and then run the Windows Memory Diagnostic tool.
To boot into Safe Mode, you can do as follows:
- Hold the Power button for several seconds to force the computer to shut down.
- Press the Power button to turn on the PC. Once you see the Windows logo appear, hold the button again to force the PC to turn off. Repeat this several times until you see the spinning screen with “Preparing Automatic Repair…” or “Diagnosing your PC“.
- After that, it will skip to a blue screen with instruction buttons or a black screen that asks you to use the F8 button.
- Click the Advanced options button or hit the F8 button.
- Next, in the Choose an option screen, click the Troubleshoot option.
- On the Troubleshoot screen, click the Advanced options button.
- Then click the Startup Settings, and then click the Restart button.
- After that, you can see a screen with nine options. Here, you need to press F5 to select the option Enable Safe Mode with Networking. Then you can start repairing your system issues in Safe Mode.
After entering the Safe Mode successfully, you can check the RAM with Windows Memory Diagnostic. Here’s the guide:
- Press the Windows and S keys to open the Search window.
- Type “memory diagnostic” in the search box, and then click Run as administrator on the right panel.
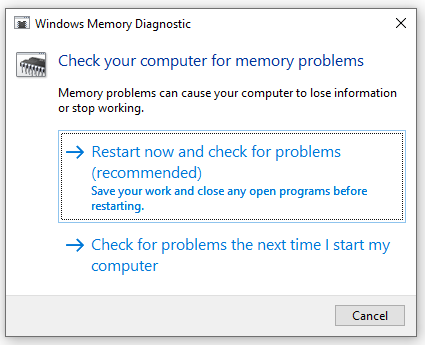
- Next, select the first option: Restart now and check for problems(recommended).
- After that, follow the instructions to begin the diagnostic process.
Also read: Here Are Free RAM Test Programs to Check Your Computer’s RAM
Solution 3. Disable or Remove Any Newly Installed Hardware/Software
Sometimes, the newly installed hardware, drivers, or software on the computer can cause errors because they may be incompatible with the computer’s original settings. In this case, you can try disabling or removing them from your computer, and then restart it.
If the error code 0x0000007F happens after you installed the driver for the new hardware, you can also try updating or disabling drivers to fix it. Here’s the way:
To do this, you also need to make sure your PC can enter Safe Mode.
- Right-click the Start menu icon and then select Device Manager from the menu.
- In the Device Manager window, expand the category that includes your new hardware’s driver.
- Right-click the driver and select the option according to your needs: Update driver, Disable device, or Uninstall device.
Solution 4. Scan for Virus
Some people who are also affected by the error code 0x0000007F report that doing a regular scan and removing some suspicious files and the malicious virus can make the computer work normally again. This way may also work for you. If you want to have a try, you can follow the steps below.
Tip: The third-party antivirus software may cause some errors. So, you’d better disable or uninstall them and then use the built-in Windows Security tool to scan.
- Press the Windows and I keys at the same time to open the Settings window.
- Select the Update & Security option.
- Next, select Windows Security from the left panel.
- Click Virus & threat protection under Protection areas.
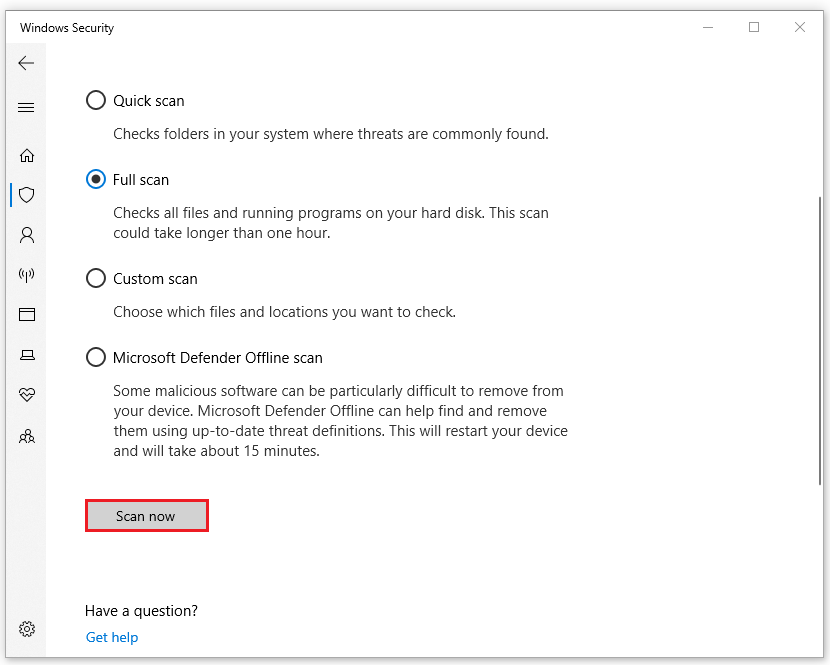
- Click Scan Options, and then select the type that you want to perform.
- After that, click the Scan now Then, your computer will start scanning for viruses.
Solution 5. Uninstall IDE, ATA, or ATAPI Driver
A corrupt file named “iaStor.sys” is likely to cause BSOD along with error code 0x0000007F. According to research, this happens due to an inconsistency with the IDE/ ATA/ATAPI controllers. In this case, you can try uninstalling every IDE, ATA, and ATAPI driver to fix this error. Here are the steps:
- Enter the Safe Mode of your PC.
- Press the Windows and R keys simultaneously to open the Run window.
- Type “devmgmt.msc” in the box and press the Enter key.
- Then you can enter the Device Manager window.
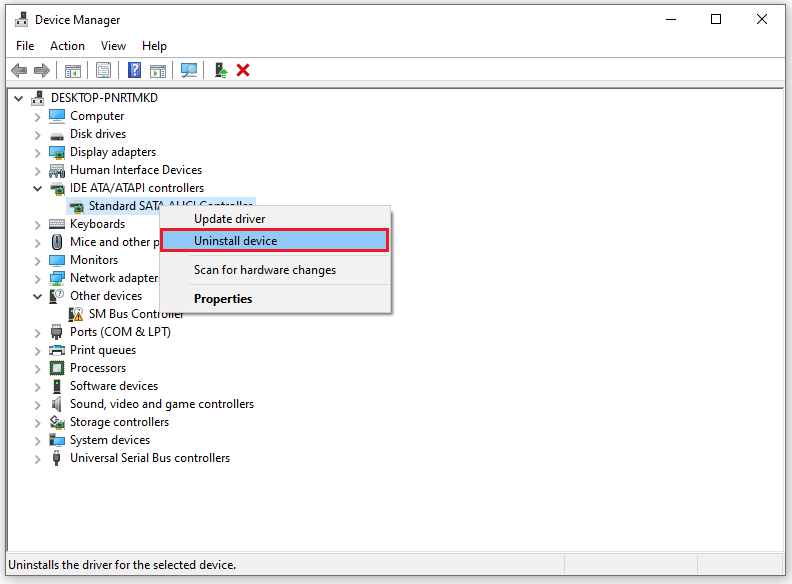
- Expand the IDE ATA/ATAPI controllers category.
- Right-click each controller and select Uninstall device from the menu.
- Once each item under the IDE ATA/ATAPI controller category has been uninstalled, restart your computer.
- After your computer boots up again, it will install the generic equivalent drivers, and then you may not encounter the 0x0000007F blue screen again.
Solution 6. Uninstall HP Credentials Manager
If you use an HP laptop and have previously installed HP Credentials Manager or HP Protect Tools Security Manager Suite, you may encounter an extremely high CPU and GPU temperature issue that results in a Stop 0x0000007F error.
In this situation, you can try uninstalling HP Credentials Manager or HP Protect Tools Security Manager Suite to resolve this error. Here’s how to do it:
- Enter the Safe Mode.
- Open the Run window and type “appwiz.cpl” in the box.
- Next, click the OK button to open the Programs and Features window.
- Scroll down to find HP Credentials Manager or HP Protect Tools Security Manager Suite.
- Right-click it and select Uninstall.
- Follow the on-screen instructions to complete the process.
- Once done, restart your PC and check if the error is fixed.
Solution 7. Add “KStackMinFree” Entry in the Registry
If you see the 0x0000007F BSOD when running Symantec Antivirus or Norton Antivirus, you can suspect that your computer lacks sufficient kernel space to process kernel-more drivers.
In this case, you can fix the error by following the instructions below to create the KStackMinFree value in Registry Editor:
- Boot your computer inro Safe Mode.
- Open the Run window, type “regedit” in the box, and then press the Enter key to open the Registry
- Navigate to this location: HKEY_LOCAL_MACHINESOFTWARESymantecSymantec Endpoint ProtectionAVStoragesFilesystemRealTimeScan
- Select RealTimeScan, and then right-click on an empty space in the right panel and choose New > DWORD (32-bit) Value.
- Name the newly created DWORD entry as KStackMinFree and press Enter to save the changes.
- After you create this value, right-click on it and choose Modify.
- Next, in the Edit DWORD (32-bit) Value window, set the Base to Hexadecimal, then set the Value data to 2200, and press Ok to save the changes.
- Once the modification is complete, save the current changes, and restart your computer in order to allow the changes to take effect.
Solution 8. Try to Change the Hard Drives
If there is anything wrong with your hard drives, you can also receive the 0x0000007F BSOD. In this situation, you can try changing the hard drives to fix it.
Part 1. Back up Data Before You Change the Hard Drive
Before you replace your computer’s hard drive, you need to back up your data on the original hard drive to an external hard drive first, or you may lose your data. Here’s how to back up the data:
Step 1. Download and install MiniTool Partition on a normal working computer.
MiniTool Partition Wizard DemoClick to Download100%Clean & Safe
Step 2. Next, create a bootable USB with MiniTool Partition Wizard’s Bootable Media feature.
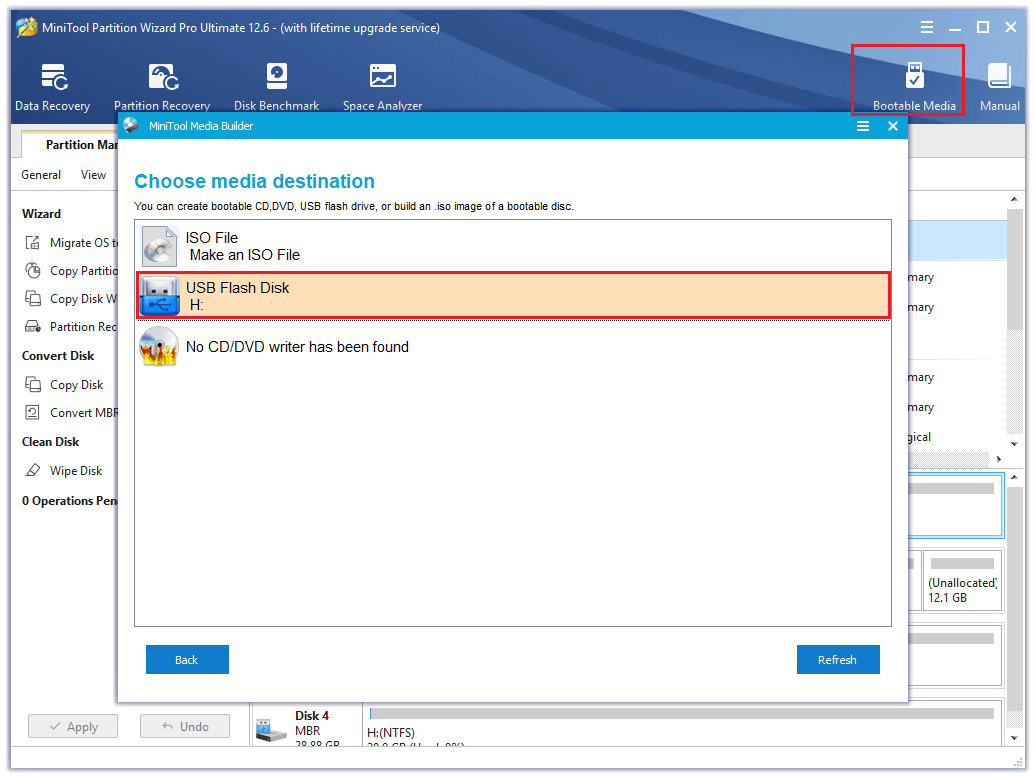
Step 3. Connect the created bootable media to your computer and then boot the device from it. Then follow the on-screen instructions to launch MiniTool Partition Wizard.
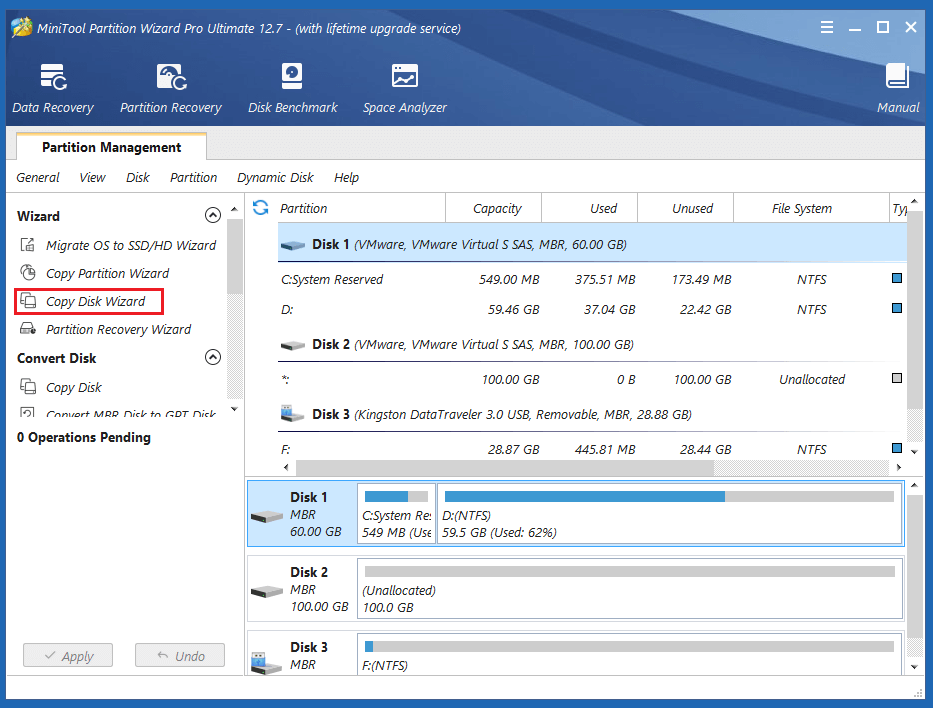
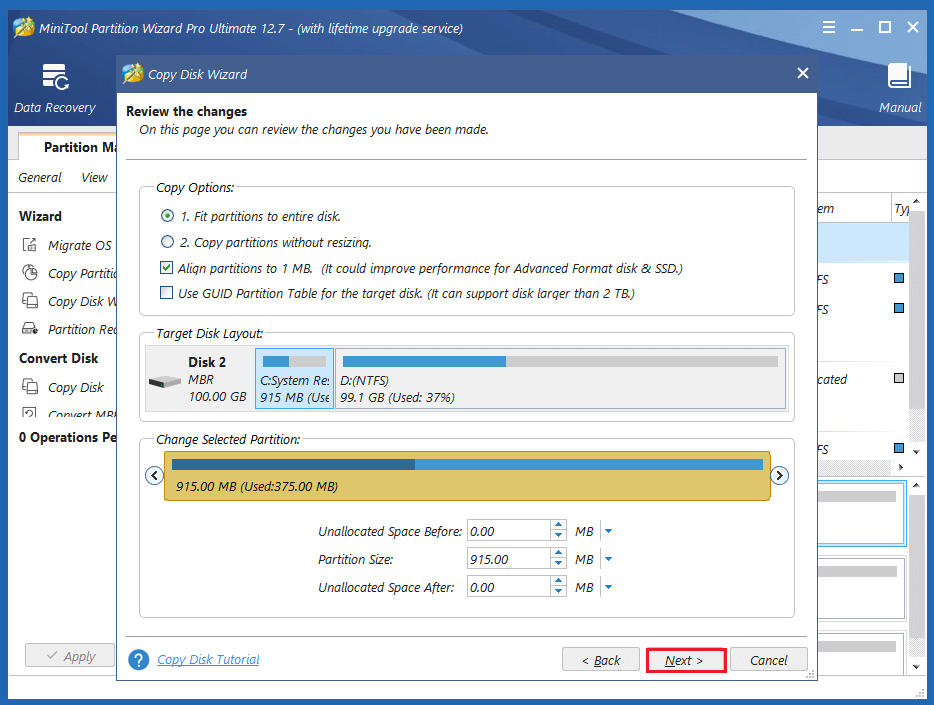
Step 4. Next, connect an external hard drive to your computer, and then select Copy Disk Wizard from the left panel. After that, click the Next button.
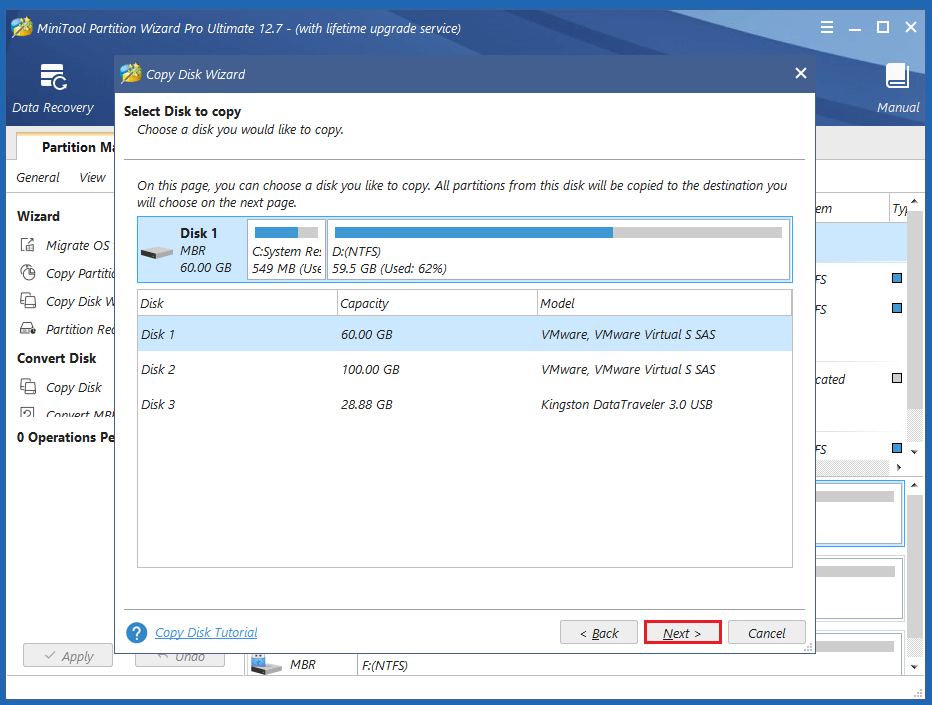
Step 5. Then you will go to the Select Disk to Copy window. Here, I select Disk 1 and click Next.
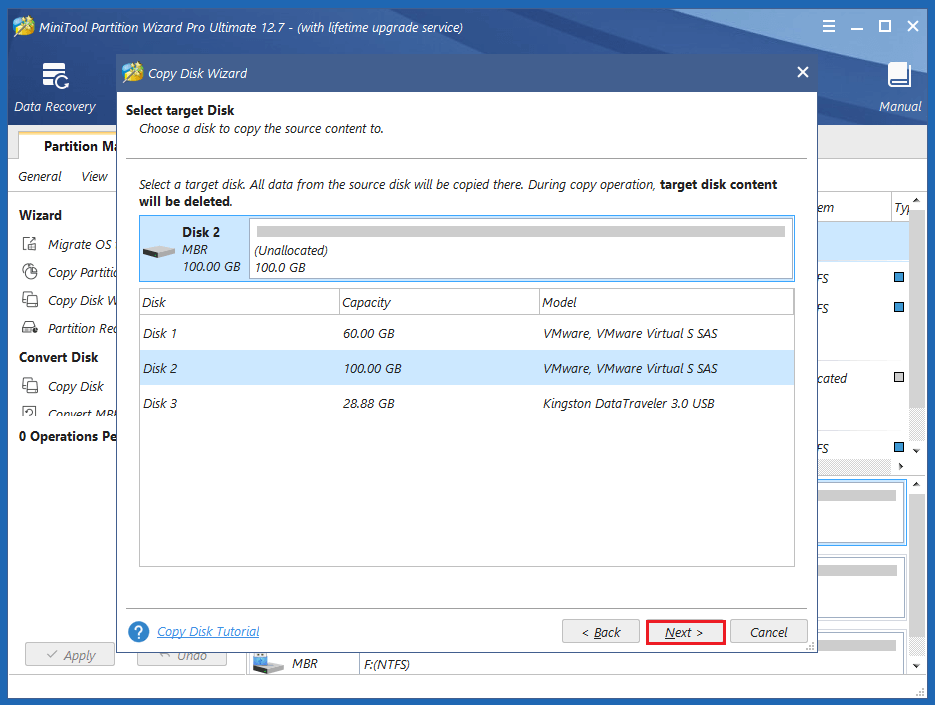
Step 6. Select the destination disk (Disk 2) and click Next.
Step 7. Select the copy options on the new window, and then click Next to continue. After that, click Finish.
Step 8. Click the Apply and Yes buttons to execute all the pending changes.
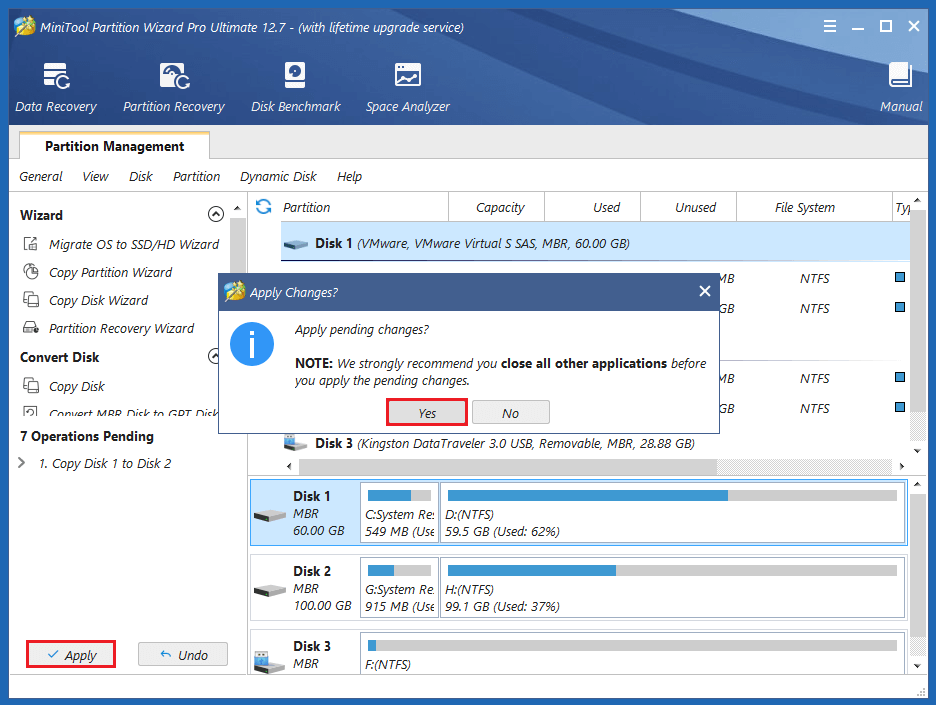
Step 9. Once done, you can successfully copy the data from the original hard drive to the new hard drive.
Part 2. Change the hard drive.
After backing up your data, you can continue to change the hard drive, Here’s the way:
- Create an installation USB drive for your Windows.
- Remove your old hard drive from the laptop and install the new hard drive.
- Use the newly created Installation USB drive to reinstall the Windows 10 operating system.
Once done, restart your PC and then check if the 0x0000007F blue screen has been resolved.
Solution 9. Disable Memory Caching from BIOS
Some users claim that disabling memory caching in BIOS can resolve error code 0x0000007F. You can also try this way. Here are the steps:
- Restart your PC and then press the BIOS key to enter the BIOS menu.
- Navigate to the Advanced menu, and select Cache Memory.
- Make sure it is set as Disabled.
- Press F10 to save the changes.
- Choose Yes to make the confirmation.
- Once done, check if the error is fixed.
How to Recover the Lost Data Caused by Stop 0x0000007F?
If your data is lost after this Stop 0x0000007F error, you can use MiniTool Partition Wizard to recover data.
1. After the data is lost, do not write data to the computer again.
2. You need to create a bootable disk to restore data.
MiniTool Partition Wizard DemoClick to Download100%Clean & Safe
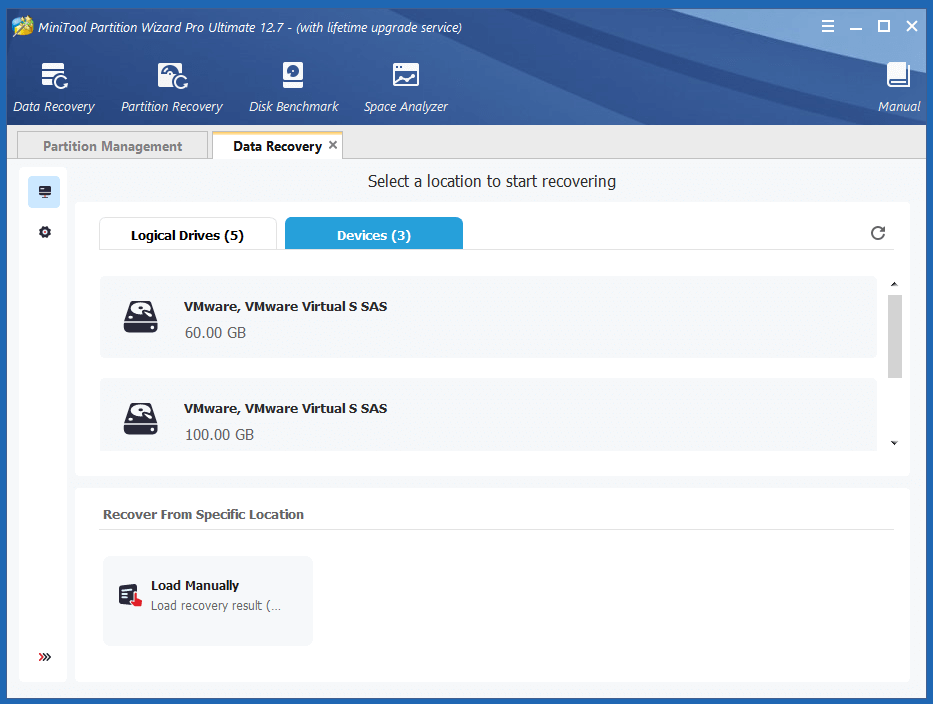
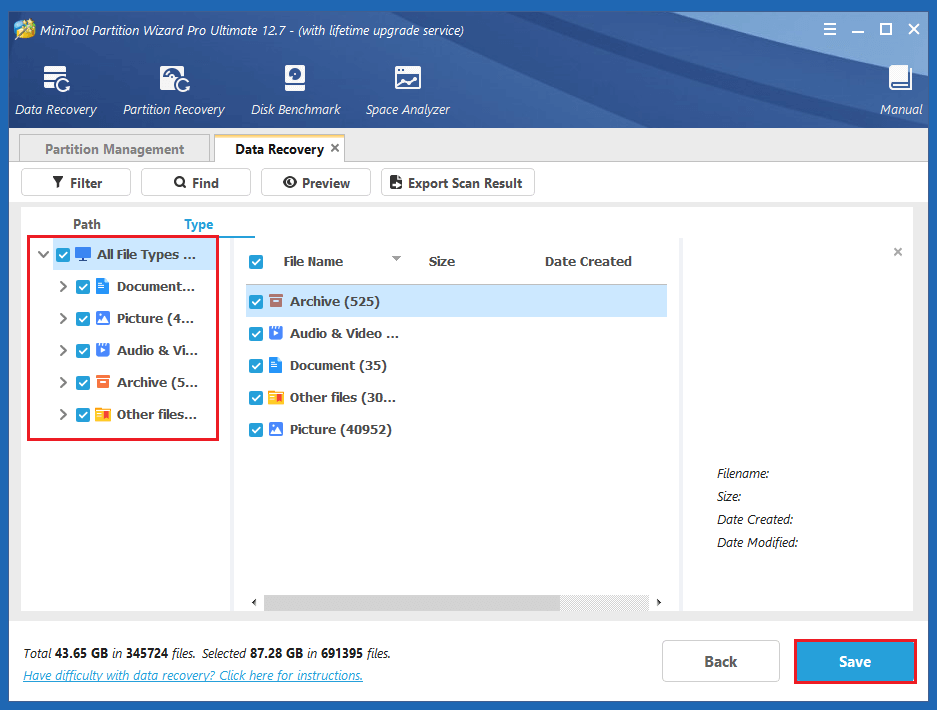
Step 1. Click Data Recovery on the top toolbar. Next, select a place to recover data, and then click Scan. Here I select the first disk under the Devices tab.
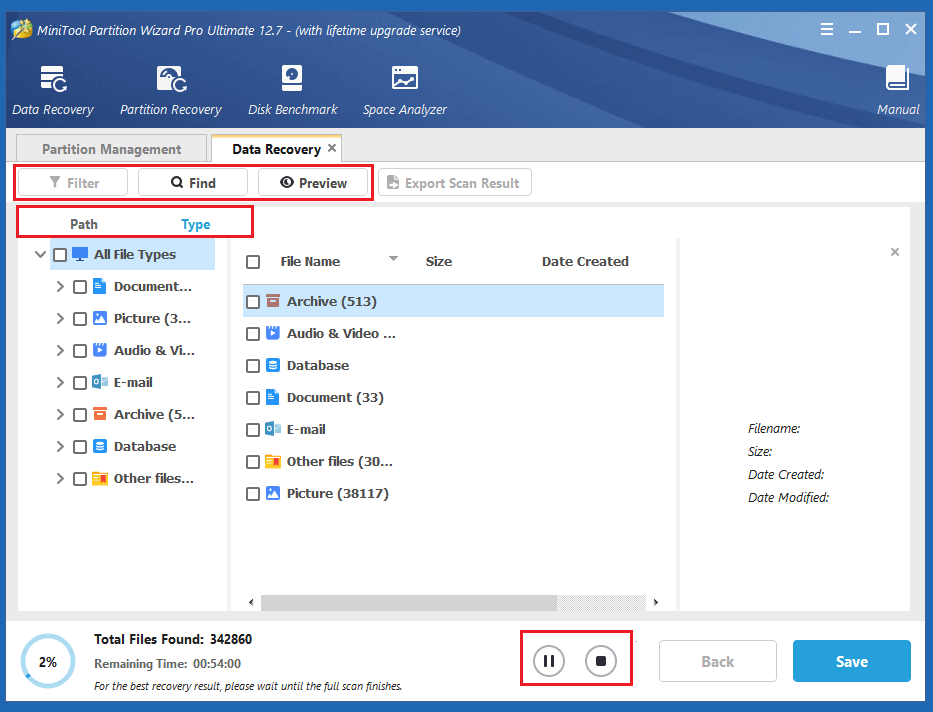
Step 2. Wait until the scan process ends. There are some tools you can choose to use.
- Path: You can see all lost files in the order of directory structure.
- Type: You can see all lost files classified by type.
- Find: You can find files by their names.
- Filter: You can filter the files by filename/extension, size, create date and modify date.
- Preview: You can preview up to 70 types of files, but each of them should be smaller than 100MB.
- Stop & Pause icon: You can also stop or pause the scan process by click these small icons.
Step 3. Check the files you want to recover, and then click Save.
Step 4. Choose a location to save the recovered data. Please make sure the location where you want to save the data is safe enough. Don’t save it on the original hard drive.
Bottom Line
Is this post useful to you? Do you have other solutions to fix the Stop 0x0000007F error? Please share them with us in the following comment zone. In addition, if you encounter problems when using MiniTool Partition Wizard, please feel free to contact us via [email protected]. We will get back to you as soon as possible.

![[Quick Fix]: Windows Cannot Find C:WindowsRegedit.Exe Error](https://images.minitool.com/partitionwizard.com/images/uploads/2022/12/windows-cannot-find-regedit-exe-thumbnail.png)
User Comments :