“Running windows 10, due to some personal reasons want to change my dynamic disk to a basic disk. But the option for the same is grayed out in Disk Management. If anyone posts a guide to accomplish the same I would be really grateful!”
While doing hard drive maintenance, some of you may find your hard disk became dynamic in Windows Disk Management utility. Or you may regret of converting a basic disk to dynamic disk. Anyhow, now you want to convert a dynamic disk to a basic disk, what should you do?
Normally, there are 3 ways to convert disk from dynamic to basic disk. By reading this post, I guess you can find the best one for you.
Way 1: Using MiniTool Partition Wizard
If you want a straight forward and safe way, I guess you will be glad to know MiniTool Partition Wizard – the most popular disk management utility. Why is it popular? Well, this partition manager is able to deal with all kinds of dynamic disk issues, such as move/resize volume, copy volume, check file system, change volume cluster size, convert dynamic disk to basic, etc. As the best dynamic disk converter, MiniTool Partition Wizard offers 2 choices to convert dynamic disks to basic disks.
Want to know the best part? Just move on!
First Choice: Convert Dynamic Disk to Basic Disk
- MiniTool Partition Wizard can only convert dynamic disk containing simple volumes and mirrored volumes to basic disk. If you have other types of volumes on the dynamic disk, you may head down to read Way 2 and Way 3.
- Convert Dynamic Disk to Basic Disk works for both the OS disk and data disk, and is a paid feature in MiniTool Partition Wizard. Hence, you need to pay for a license to activate it. However, you can also download the Trial edition to have an experience first.
MiniTool Partition Wizard DemoClick to Download100%Clean & Safe
Let’s have a look at how it performs when it comes to converting dynamic disk to basic disk.
Step 1. Install and launch this dynamic disk converter. It is easy for you to find the dynamic disk you want to convert.
Step 2. Select the dynamic disk you need to convert, and then choose Convert Dynamic Disk to Basic from the action panel. Or you can right click the dynamic disk and choose Convert Dynamic Disk to Basic Disk from the pop-up menu.
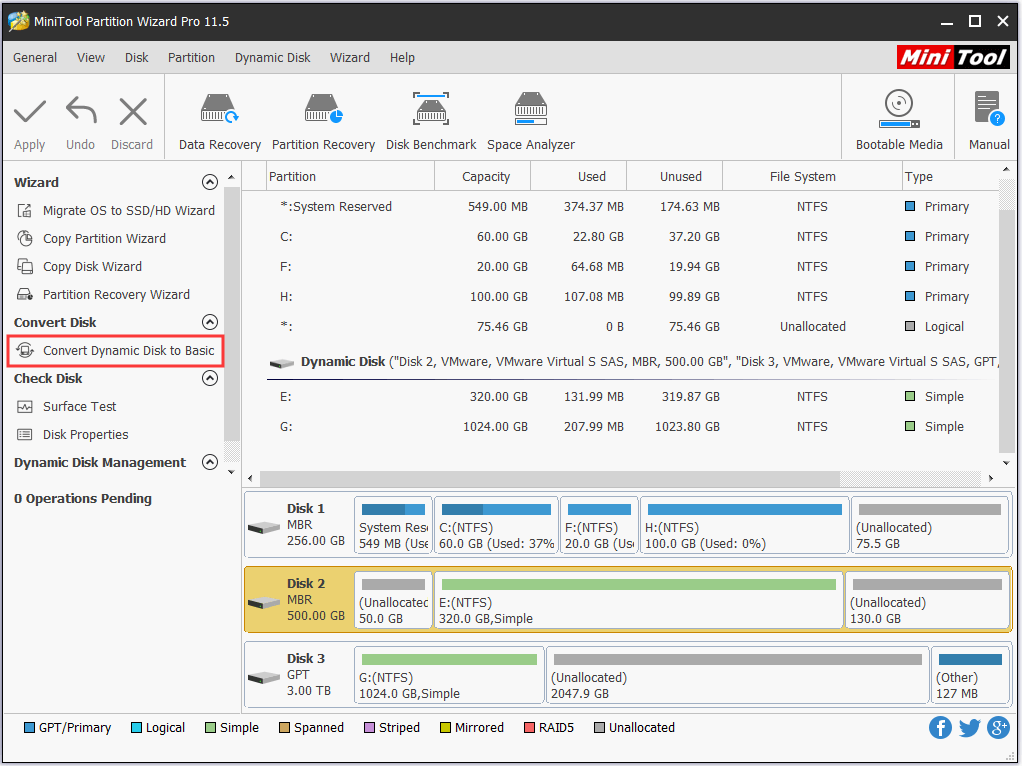
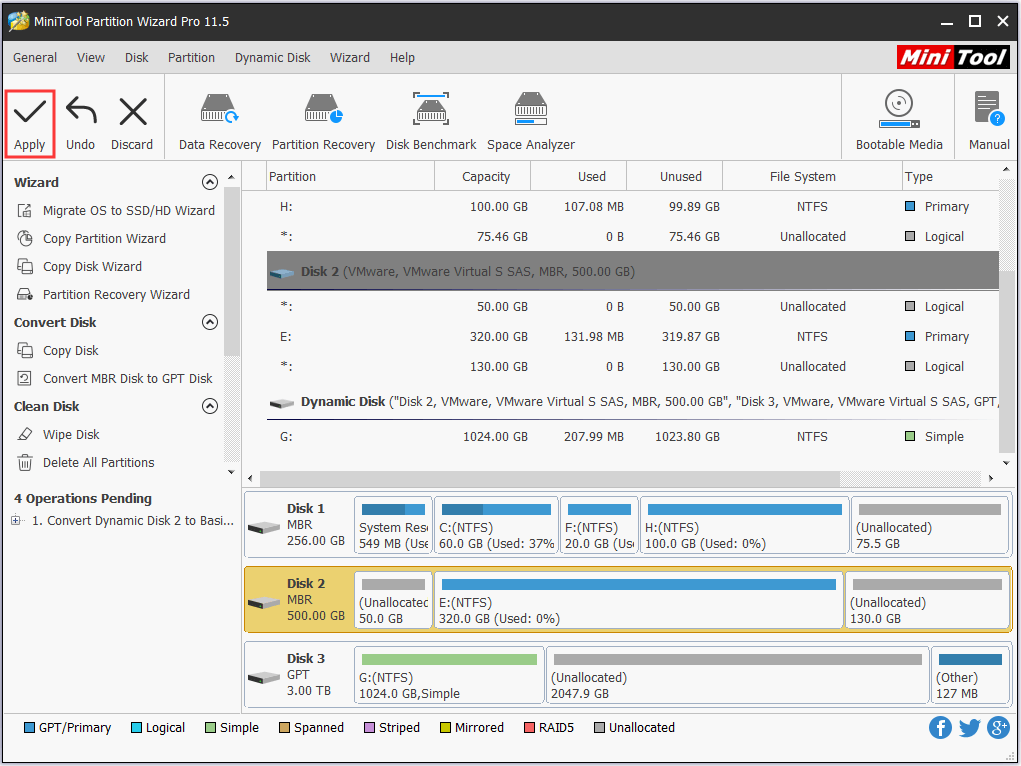
Step 3. Immediately you can see what this dynamic disk will become. In my example, disk 2 becomes basic disk and all simple volumes on it are turned into primary partitions. But this is just a preview. Finally, click Apply to start the conversion.
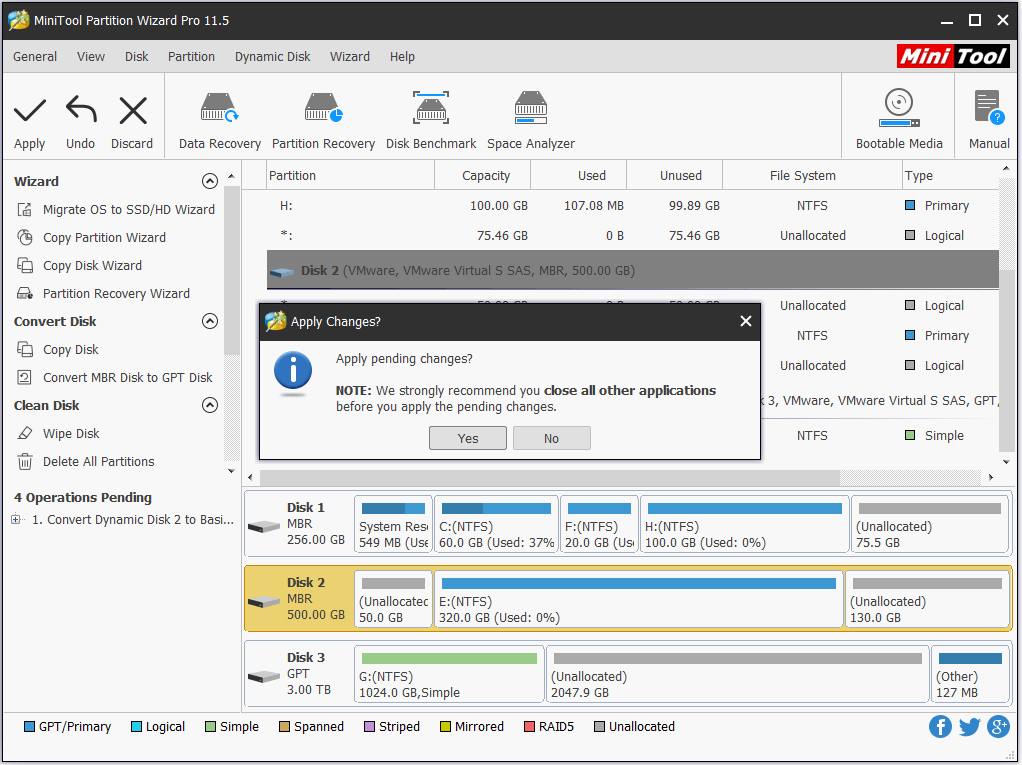
Step 4. MiniTool Partition Wizard is likely to ask you to close all other applications. Please do as your are told to let it finish.
You may also like: How Can I Convert Simple Volumes to Primary Partitions Easily?
Second Choice: Copy Dynamic Disk to Basic Disk
Another suggestion is to use the Copy Disk feature. In short, this feature is very powerful, because it not only clones basic disks (such as clone HDD to SSD) but also copies dynamic disks. Please note that when it copies dynamic disk, the target disk turns into basic disk. Hence, you can use this feature to convert disk from dynamic to basic.
Please follow the step-by-step guide below:
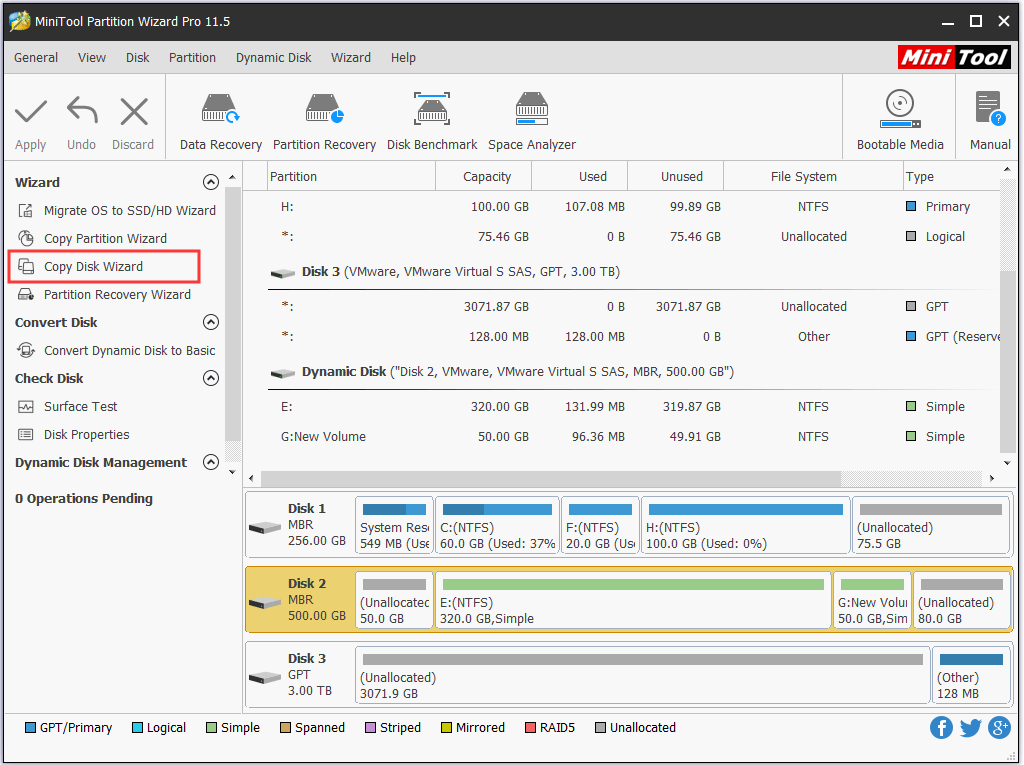
Step 1. Launch MiniTool Partition Wizard and select Copy Disk Wizard from the menu bar.
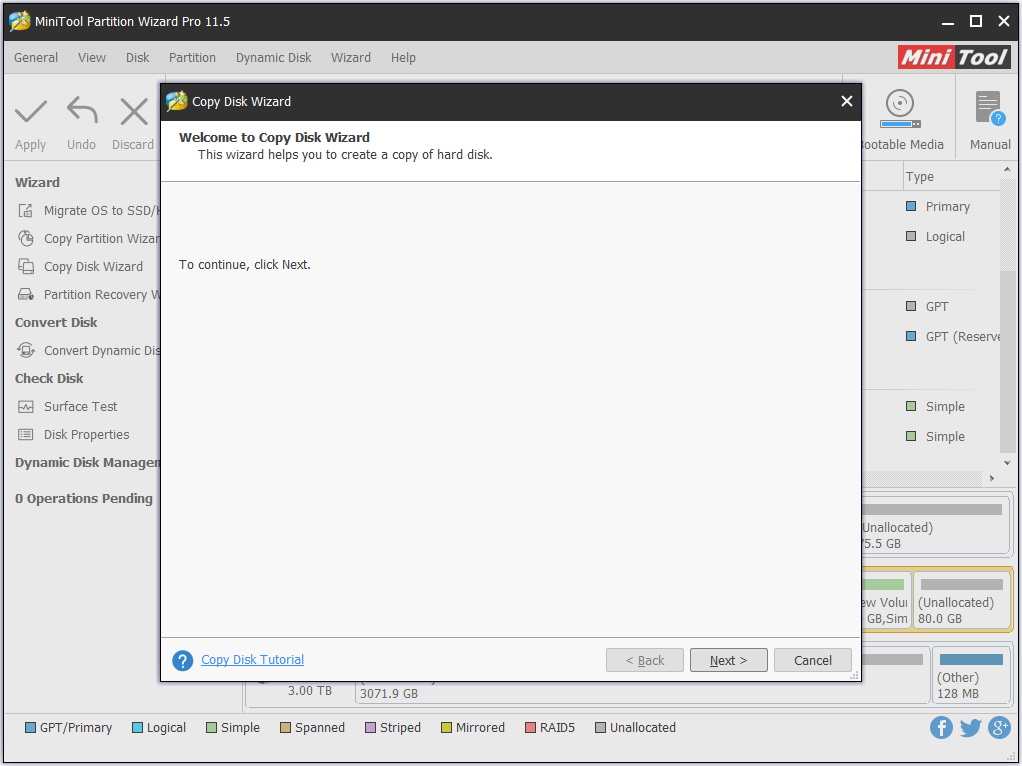
Step 2. Skip the welcome page by clicking Next.
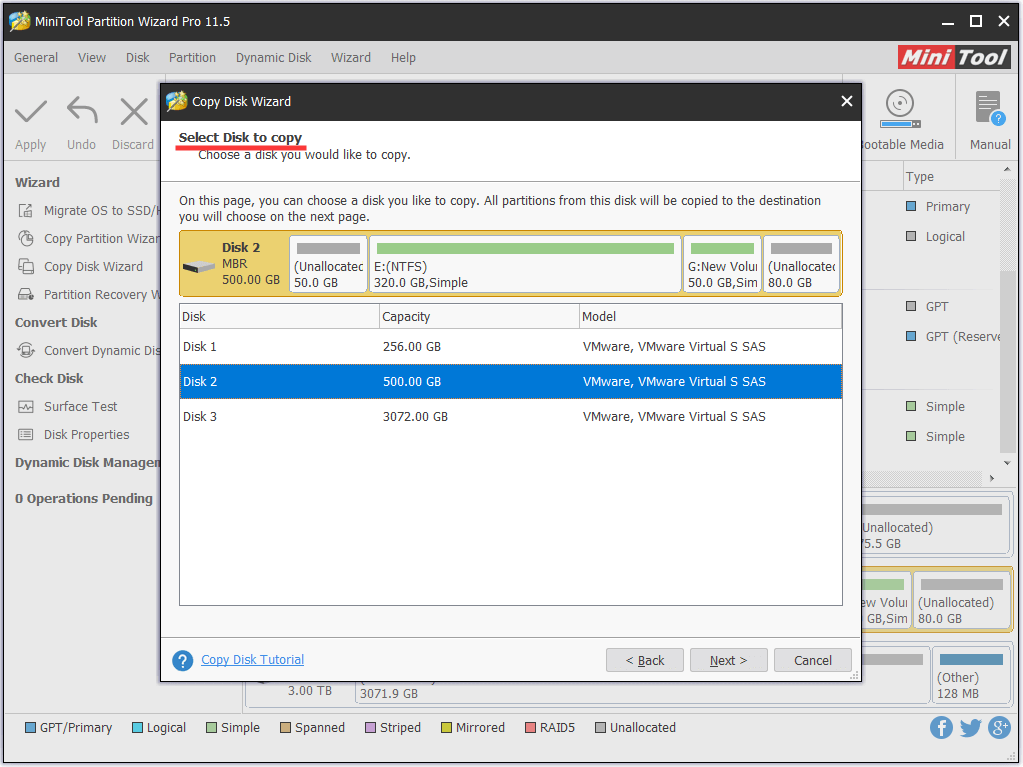
Step 3. Here you need to select the source disk. Just choose the dynamic disk you want to copy and click Next.
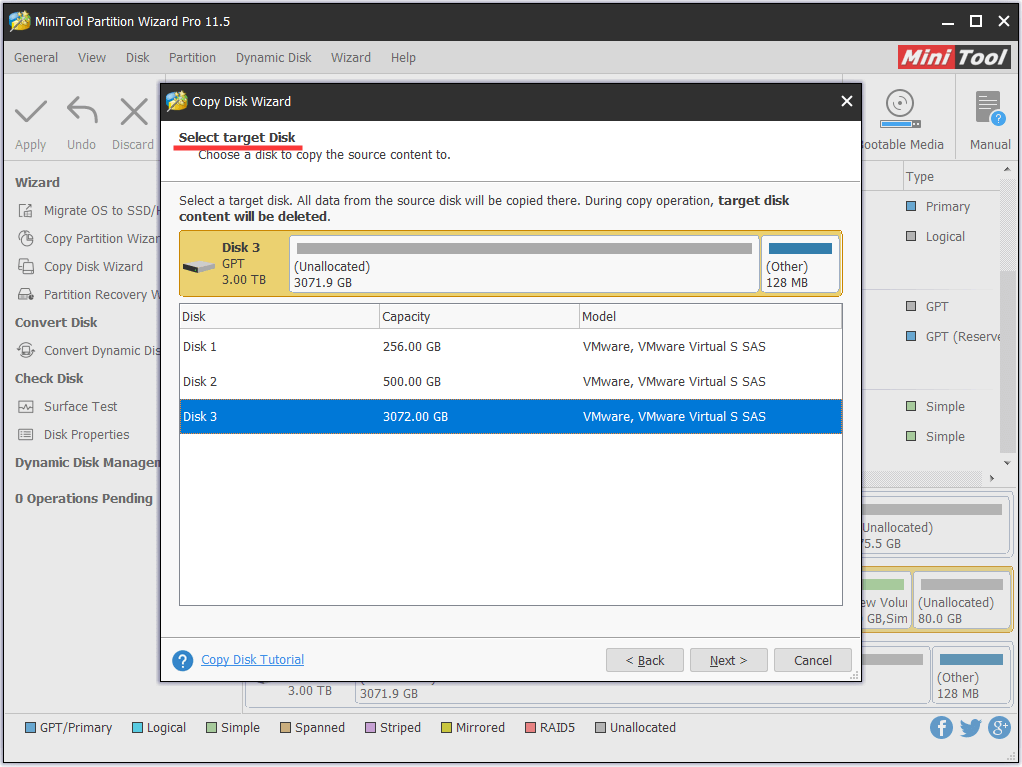
Step 4. Now choose the target disk and confirm your choice. Note that all data on the target disk will be destroyed. Hence make sure it is ready for the copy. Otherwise, make a backup immediately.
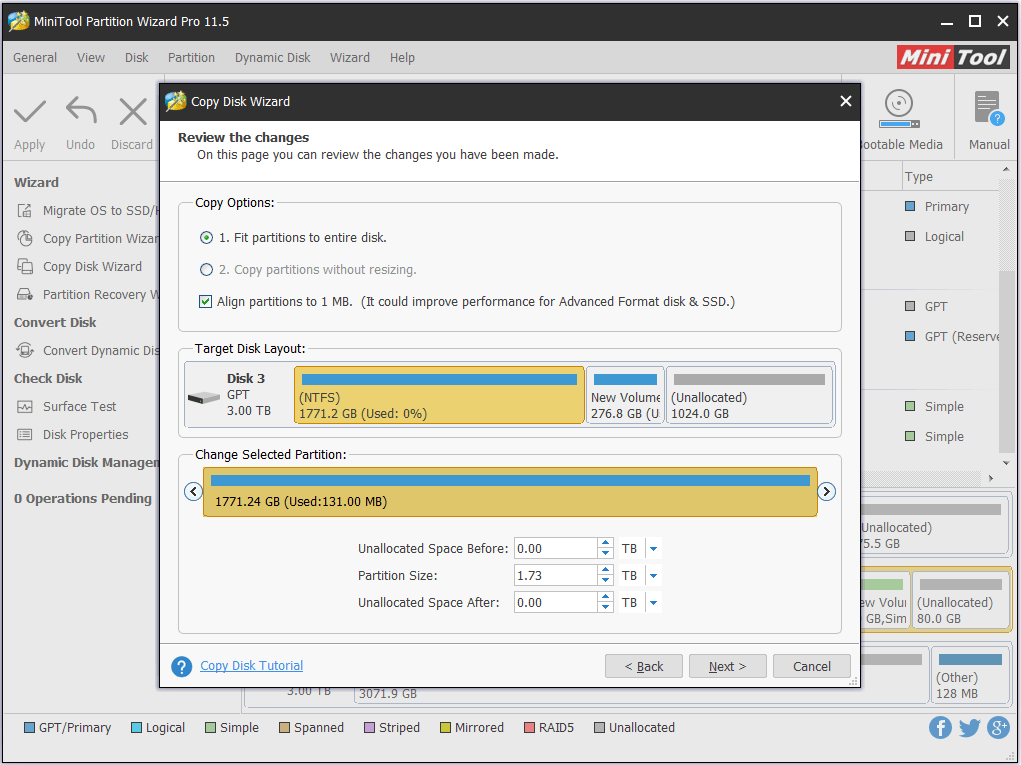
Step 5. At the Review page, you can edit the partition size before you click Next. (Please note that “Copy partitions without resize” is not available while copying a dynamic disk.)
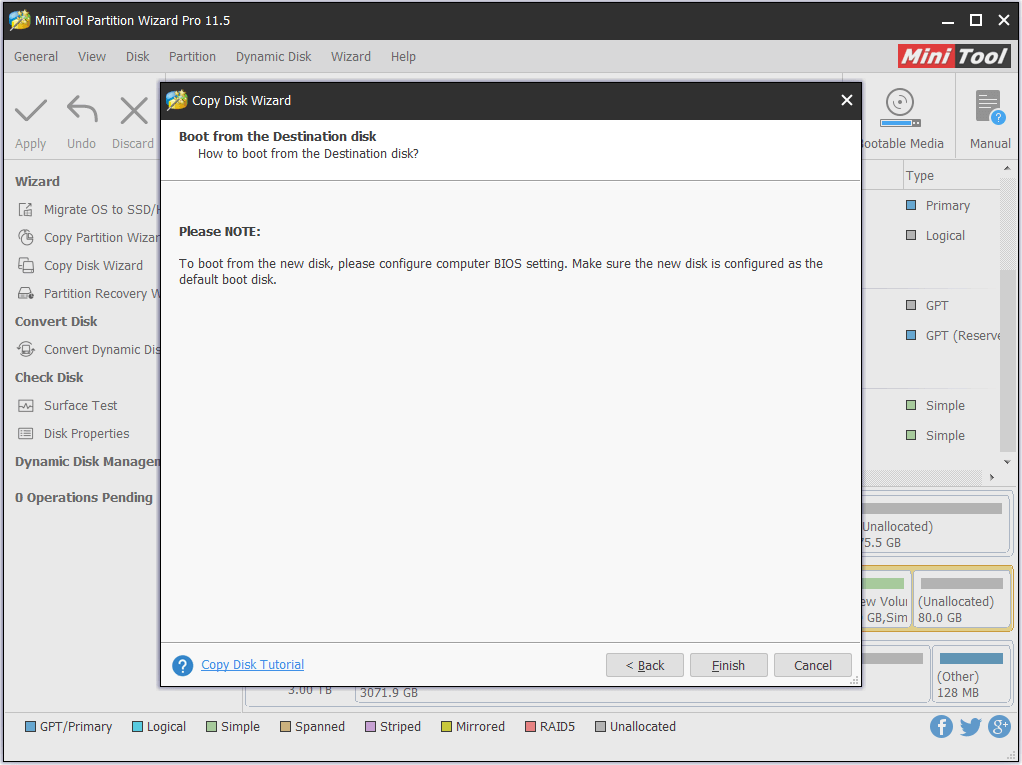
Step 6. Ignore the “how to boot” information (since you are copying non-system disk) and click Finish.
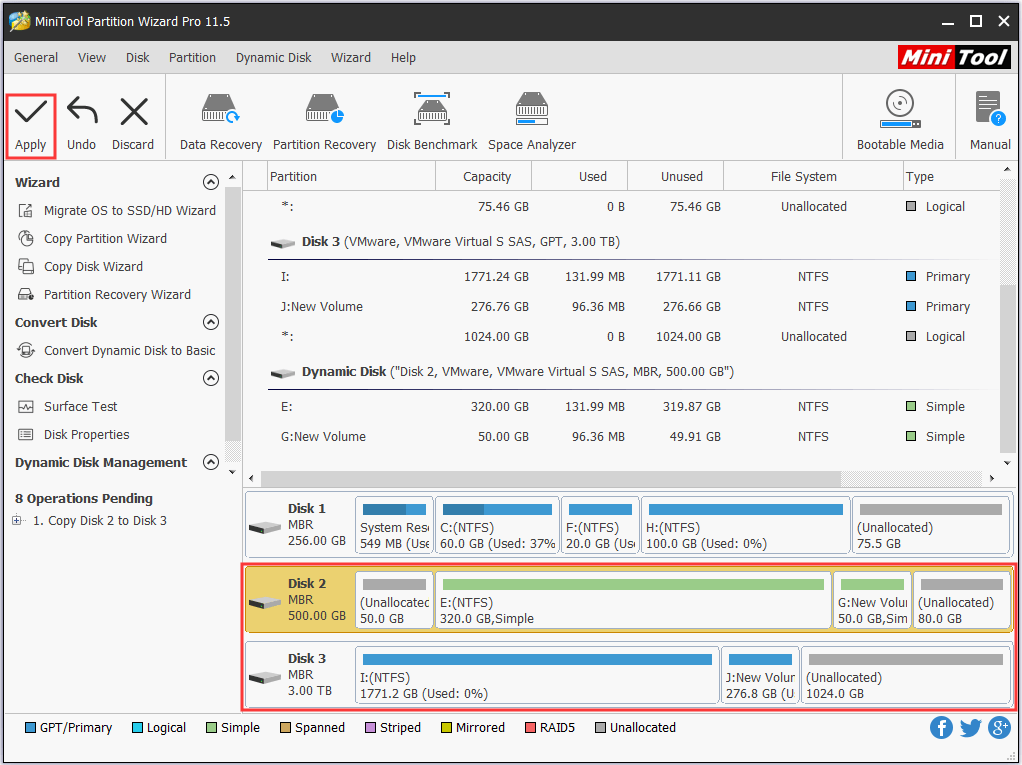
Step 7. See! The target disk will have a copy of the volumes on the dynamic disk. Finally, click Apply to start the cloning. All will be finished quickly.
Way 2: Using the Windows Interface
The second way to convert disk from dynamic to basic is to use Disk Management utility, which can be accessed by running “diskmgmt.msc” at Start menu.
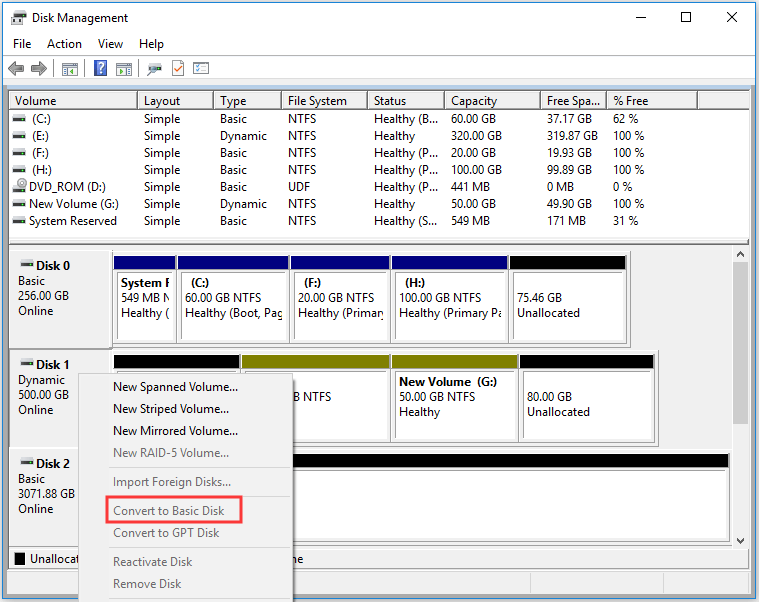
Step 1. Right click a volume on the dynamic disk and choose Delete Volume.
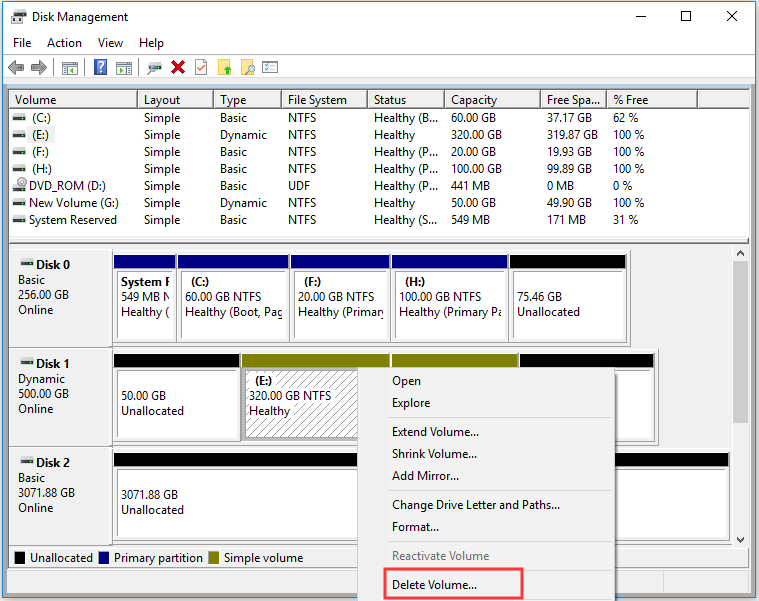
Step 2. On the new window, confirm that you want to delete the simple volume.
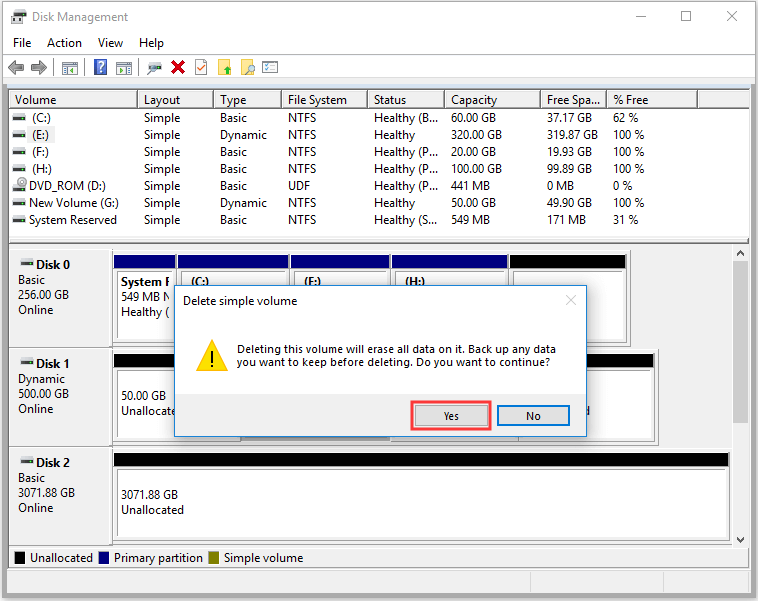
Step 3. The dynamic disk will turn into basic disk automatically if you are converting dynamic disk to basic disk on Windows 10. (For the older operating systems, right click the dynamic disk and choose Convert to Basic Disk which is now available.)
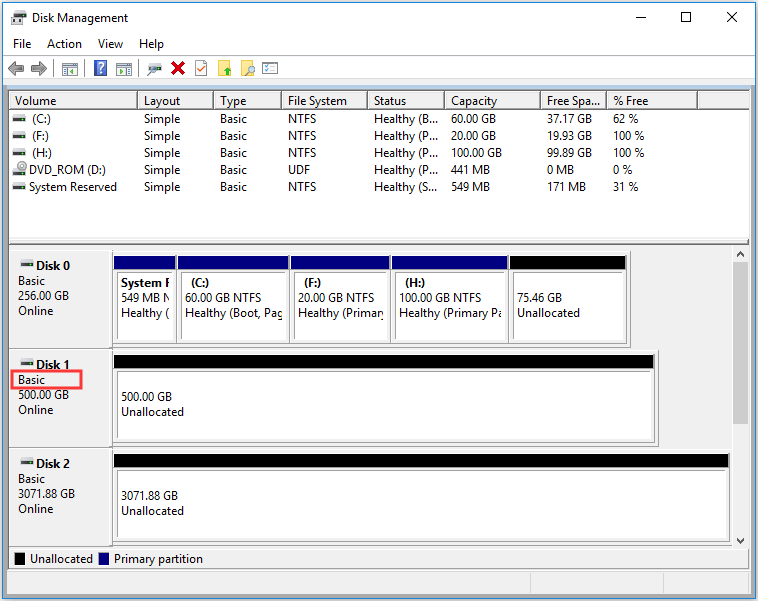
All is done! Now create partitions on the unallocated space, and then save the backup files to the new partitions.
Way 3: Using a Command Line
The third dynamic to basic disk converter I can offer is the command line, which is preferred by numerous of Windows users.
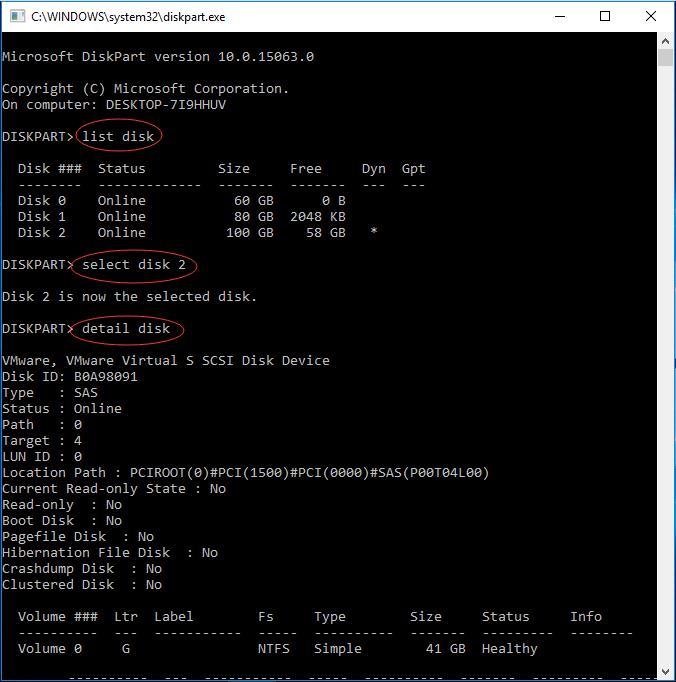
Step 1. Open a command prompt and type diskpart and press Enter.
Step 2. At the DISKPART prompt, type list disk and press Enter. Make note of the disk number you want to convert to basic.
Step 3. At the DISKPART prompt, type select disk <disk number> and press Enter.
Step 4. At the DISKPART prompt, type detail disk and press Enter.
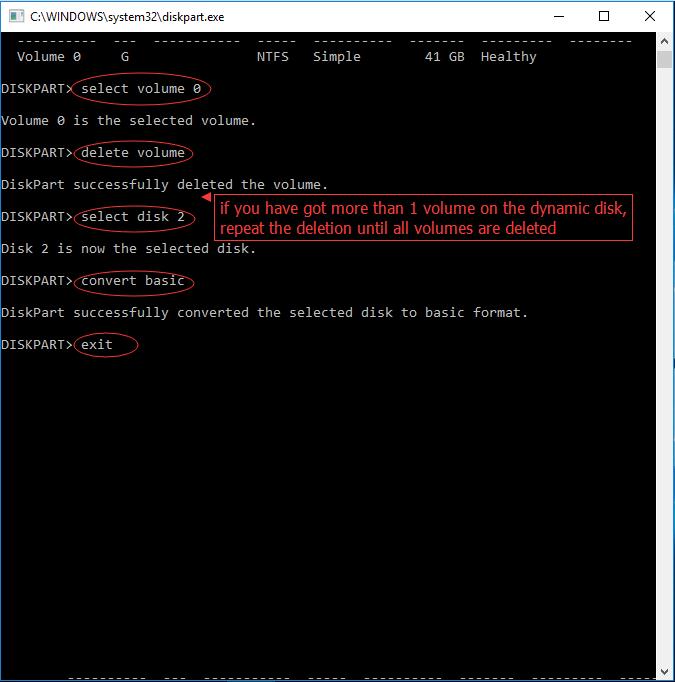
Step 5. At the DISKPART prompt, type select volume <volume number> and execute by pressing Enter. Then type delete volume and hit Enter. Make sure you have deleted all volumes on the disk.
Step 6. At the DISKPART prompt, type select disk <disk number> (should be the one you want to convert to a basic disk) and press Enter.
Step 7. At the DISKPART prompt, type convert basic and hit Enter.
Step 8. At the DISKPART prompt, type exit and press Enter.
Step 9. At the command prompt, type exit and press Enter.
See the following pictures to get a better understanding:
By comparison, I think you know the advantages of using MiniTool Partition Wizard, which does dynamic disk conversion in the real sense. Guess you can make the right choice to change dynamic disk to basic disk.
For Your Info: Dynamic Disk VS. Basic Disk
Knowing how to convert a dynamic disk to basic disk, I want to share the key information about Dynamic Disk VS. Basic Disk with you. Hopefully, the information can help you make out whether you need to change dynamic disk to basic disk.
1. About Basic Disk
In short, basic disks and dynamic disks are two storage types in Windows. Today basic disk is the commonly used storage type, which is supported by DOS and all Windows versions. When you install Windows on a hard drive, it would be initialized to a basic one by default. Basic disk uses a partition table to manage all partitions on the disk, and contains basic volumes, such as primary partitions, extended partition, and all logical partitions are contained in extended partition.
2. About Dynamic Disk
Dynamic disk is a separate form of volume management that allows volumes to have noncontiguous extents on one or more physical disks. Dynamic disk is supported in Windows 2000 and later operating systems. Unlike basic disk, dynamic disk uses a hidden database (LDM) to track information about dynamic volumes or dynamic partitions on the disk. Dynamic disks provide features that basic disks do not, such as the ability to create volumes that span multiple disks (spanned and striped volumes) and the ability to create fault-tolerant volumes (mirrored and RAID-5 volumes).
- Supported OS: Basic disk is supported by MS-DOS and all Windows like Win95/98/Me/NT/2000/XP/2003/2008/2011/2012/XP/Vista/7/8/8.1/10. Dynamic Disk is supported by Win2000 and the later versions but isn’t supported by MSDOS, Win95/98/Me/NT and Windows XP Home Edition.
- Supported Volumes: On a basic MBR disk, all volumes you create are called partitions. You can create at most 4 primary partition, or 3 primary partitions plus 1 extended partition which can be further divided into multiple logical partitions. On a dynamic disk, all volumes you create are called dynamic volumes. With multiple dynamic disks, you can create an unlimited number of volumes which can be simple volume, spanned volume, striped volume, mirrored volume and RAID-5 volume.
- Extend Volume: A dynamic volume can be composed of a set of noncontiguous extents on one or multiple physical disks. By contrast, a volume on a basic disk consists of one set of contiguous extents on a single disk. This means you can add more disk space to existing primary partitions and logical drives, provided that there is adjacent, contiguous unallocated space (for primary partition) or free space (for logical partition) followed on the same disk. But you don’t need to care about the location of the unallocated space when you extend dynamic volume.
- Mutual Conversion: Basic disk can be easily converted to dynamic disk without restarting and losing data. However, to convert a dynamic disk to basic disk, all volumes on the dynamic disk need to be deleted, unless you use third-party tools like MiniTool Partition Wizard to help you.
You may also like: How to Create More Partitions on a MBR Disk without Data Loss?
- Supported File Systems: Both basic disk and dynamic disk support FAT, FAT32, and NTFS file systems. To convert FAT to NTFS, use “convert d: /fs:ntfs” in command line without losing data. To convert NTFS to FAT32, you need to format the partition (volume) with FAT32 file system, or you can use MiniTool Partition Wizard to help you without formatting.
- Label and Drive Letter: On both basic disk and dynamic disk, you can set volume label and assign a drive letter to each partition (volume).
- Resize Volume: Both basic disks and dynamic disks, you can extend and shrink both basic partitions and dynamic volumes on the condition that you are running Windows Vista/2008 and the later versions. Tip: to move a partition/volume location, you may need the help of MiniTool Partition Wizard.
You may also like: Here Is the Free Software to Convert NTFS to FAT32
Summary
Above are the 3 ways that can convert dynamic disk to basic disk. Hope you can benefit something from this article. If you have any questions on the subject of using MiniTool Partition Wizard to change dynamic disk to basic disk, let us know by typing your questions in the comment section below. Or you can contact our support team via [email protected]. All ideas are welcome.

User Comments :