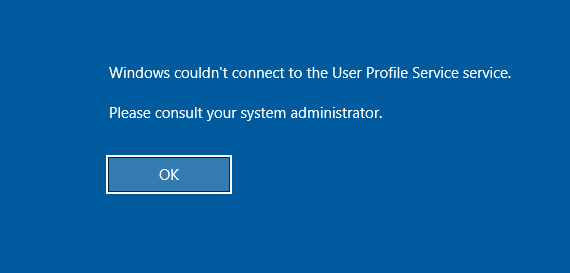
When trying to log in to the computer, many users receive the error message “Windows could not connect to the ProfSvc service” at the login screen. What is ProfSvc? How to fix the issue? Let’s explore the answers together with MiniTool.
What Is ProfSvc
ProfSvc is also known as User Profile Service provided by Microsoft. It is in charge of loading and unloading the user profile. Sometimes, however, the ProfSvc might be blocked or disabled. Consequently, users won’t be able to log in to user profiles and may encounter the “Windows could not connect to the ProfSvc service” error.
Why Windows Could Not Connect to the ProfSvc Service
Usually, the ProfSvc service is running as a local system when the operating system boots. However, you may experience the “Windows couldn’t connect to the ProfSvc service” error when logging in. According to a survey, the error is often related to corrupted or missing profiles. Some other factors like corrupted system files and malware can trigger the error as well.
How to Fix the ProfSvc Failed Connection Issue
How to fix the ProfSvc service failed the sign-in error? Here we summarize 4 applicable fixes. Let’s try them one by one.
As mentioned above, the ProfSvc service failed the sign in error is often related to corrupt profiles. To fix the issue, you need to make sure that your build-in administrator account is enabled first. Once enabled, you can try the following solutions.
Step 1. Boot your computer using a Windows 10 bootable USB and click on Repair your computer at the Windows Setup screen.
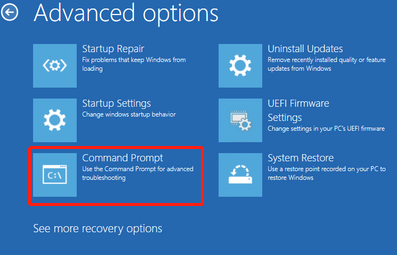
Step 2. Navigate to Troubleshooting > Advanced options > Command Prompt in order.
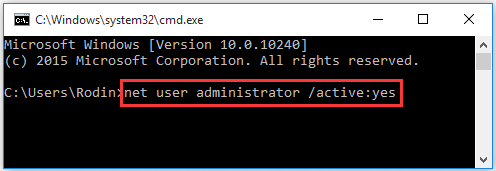
Step 3. In the Command Prompt, type net user administrator /active:yes and hit Enter.
Step 4. Once the process completes successfully, restart your computer and log into your administrator account.
Fix 1. Restore to the Original ProfSvc Service
Many users report that the “Windows couldn’t connect to the ProfSvc service” error is fixed by restoring to the original ProfSvc service from Windows 10. To do so, follow the steps below:
Step 1. Type cmd in the search bar, and then right-click the Command Prompt app and select Run as administrator from the context menu.
Step 2. Execute the following commands one by one:
- sc config ProfSvc start= auto
- sc start ProfSvc
Step 3. Exit the Command Prompt, and then restart your computer and see if the Windows could not connect to the ProfSvc service error persists.
Fix 2. Create a New User Account
If the ProfSvc files are corrupt, then you may have to create a new user account. Here are detailed steps:
Step 1. Make sure your administrator account is enabled and log in to it.
Step 2. Press Win + I keys to open the Settings app and click on Accounts.
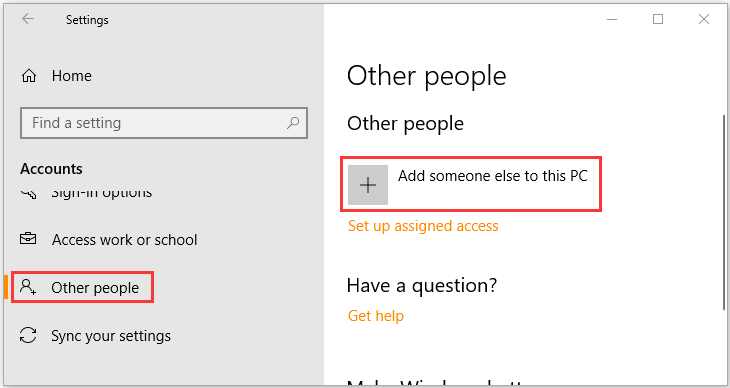
Step 3. Select the Other people option from the left pane and click on Add someone else to this PC from the right-side pane.
Step 4. Click on I don’t have this person’s sign-in information in the pop-up window.
Step 5. Click on Add a user without a Microsoft account. Then Windows will prompt you to create a new Microsoft account. Here you need to enter a user name and assign a password for the new account and click on Next.

Once ends, you can transfer all data from the corrupt one to the new user profile. Then log into the new account and see if the ProfSvc service failed the sign-in error is fixed.
Fix 3. Perform a System Restore
If you can’t enable the built-in administrator account or create a new user account, you can try reverting your system to an earlier date when the ProfSvc service works properly. How to perform a system restore? To know more detailed steps, you can read this post.
Fix 4. Install a Fresh Copy of Windows 10
If none of the methods resolve the ProfSvc service failed the sign in issue, you may consider installing a fresh copy of Windows 10. To get a full guide, you can check out our post on how to install Windows 10.

User Comments :