Windows 8 VS 8.1
Windows 8 and 8.1 are two versions of Windows NT operating systems provided by Microsoft. Windows 8 was released as an upgrade to all Windows 7 users through Windows Update in August 2012. Windows 8.1 was released as the successor to Windows 8 in October 2013.
As the successor, Windows 8.1 has been improved a lot and is quite different from Windows 8 in various aspects.
Windows 8 vs 8.1: Interface
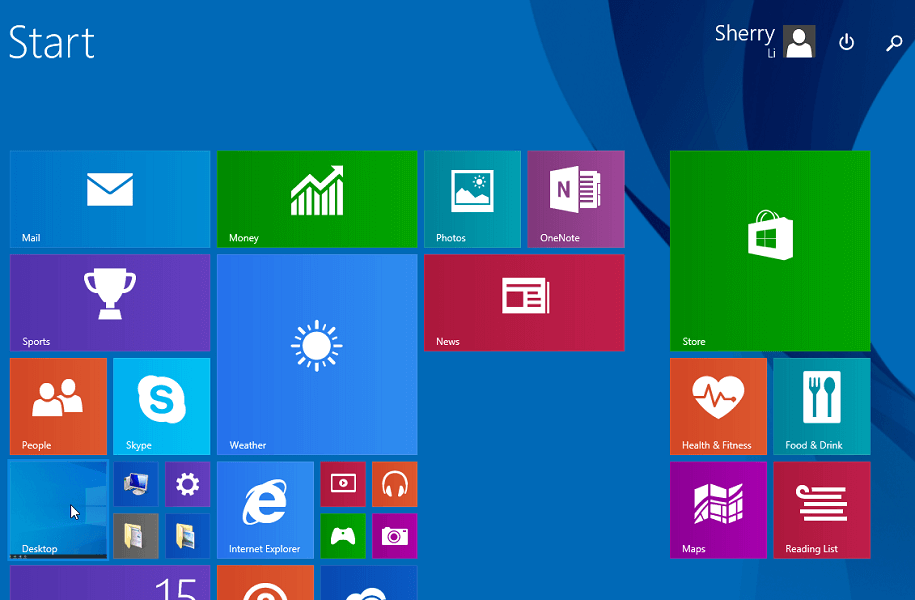
Windows 8.1 has a different outlook from Windows 8. Generally speaking, Windows 8.1 is more in line with user habits.
- Start Screen: The Start Screen of Windows 8.1 looks more beautiful than Windows 8. You can also use the same background with your desktop in Windows 8.1.
- Tile: The Tile layout is also changed in Windows 8.1. On the one hand, Windows 8 supports up to 6 rows of tiles while Windows 8.1 can show up to 9 rows. On the other hand, Windows 8.1 includes four tile sizes: 1×1, 2×2, 4×2, and 4×4.
- Start button: Windows 8.1 also adds a Start button that is missing in Windows 8. With this Start button, you can restart or shut down your computer more quickly.
Windows 8 vs 8.1: File Explorer
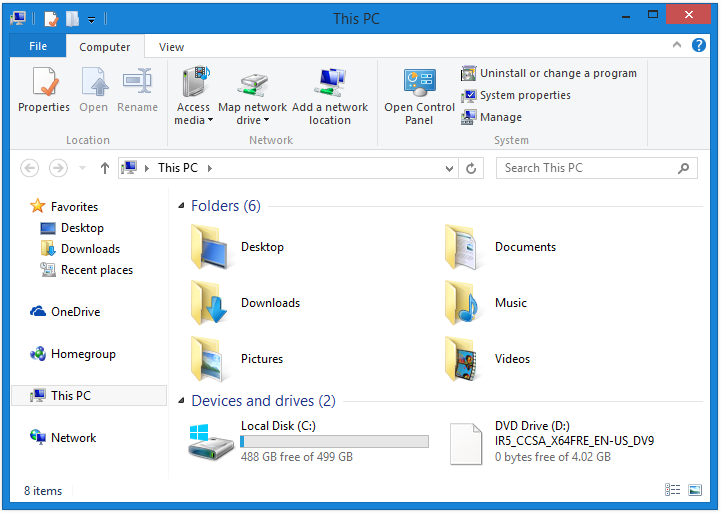
In addition to the outlook, File Explorer also gets some changes. In Windows 8.1, the old “Computer” option is replaced by “This PC”. And the “Libraries” option has been removed.
Windows 8 vs 8.1: Built-in Apps
The following built-in apps are also different in Windows 8 and Windows 8.1.
- SkyDrive: It’s your own choice to download SkyDrive or not in Windows 8. However, Windows 8.1 integrates SkyDrive for all users. And by default, PC settings and data of specific apps will sync among multiple devices. You can also decide which to sync.
- Internet Explorer (IE): In Windows 8, the default web browser is IE 10. In Windows 8, it is upgraded to IE 11, which is better and convenient to use.
- PC Settings: This feature is enhanced in Windows 8.1. It includes more settings and is more user-friendly.
- …
Windows 8 vs 8.1: Microsoft Support
Unfortunately, Microsoft announced that the support of Windows 8 ended in January 2016. It indicates that users cannot receive any new updates since then. And they cannot download any new apps from Microsoft Store but the downloaded apps still work.
According to Microsoft, Windows 8.1 will read the end of support in January 2023. Nowadays, Windows 10 and Windows 11 are both popular operating systems. You might need to upgrade to Windows 10 or 11 in the future.
Windows 8 to 8.1 Upgrade Download
As mentioned, Microsoft has ended the support of Windows 8, which means you can’t get further updates for security, bug solutions, as well as more features if you are using Windows 8.
Therefore, for better user experience, most users choose to upgrade Windows 8 to Windows 8.1. You don’t need to worry about the cost because Windows 8.1 is released as a free update available on Windows 8. You can also download Windows 8.1 ISO from Microsoft for free.
What You Should Do Before Windows 8.1 Upgrade
Before the Windows 8.1 upgrade, you need to do some preparations to make everything goes well.
Back up your important data at first.
Before you upgrade to Windows 8.1, it is recommended to back up your important files and programs to an external hard drive in case of data loss. And this post might help: [Guide] How to Back up Your Computer to an External Drive.
Install the latest Windows Updates.
To receive Windows 8.1 update, you might need to install the latest critical and important updates first. If you don’t see any pending updates, you should check for updates manually.
Disable your third-party antivirus program temporarily.
The Windows 8.1 upgrade might interfere with some antivirus programs. Therefore, if you have installed any third-party antivirus, please disable it before the upgrade.
Make sure there is enough space in your system drive.
To install Windows 8.1, your Windows 8 computer (C drive) must have enough space. If you want to install the 32-bit version of Windows 8.1, there should be 3,000 MB of free space at least. To install the 64-bit version of Windows 8.1, you need more than 2,250 MB of free space.
If your system drive is running out of space, you would fail to upgrade to Windows 8.1. To free up space, you can:
- Free up space using Disk Cleanup.
- Delete unneeded files or uninstall some programs permanently.
MiniTool Partition Wizard FreeClick to Download100%Clean & Safe
Please be careful while deleting files from your system drive. If you delete system files by accident, your system might run into problems. If you are unable to free up disk space, don’t worry. You can extend your system drive by taking space from another logical drive on the disk.
Here are the steps.
MiniTool Partition Wizard FreeClick to Download100%Clean & Safe
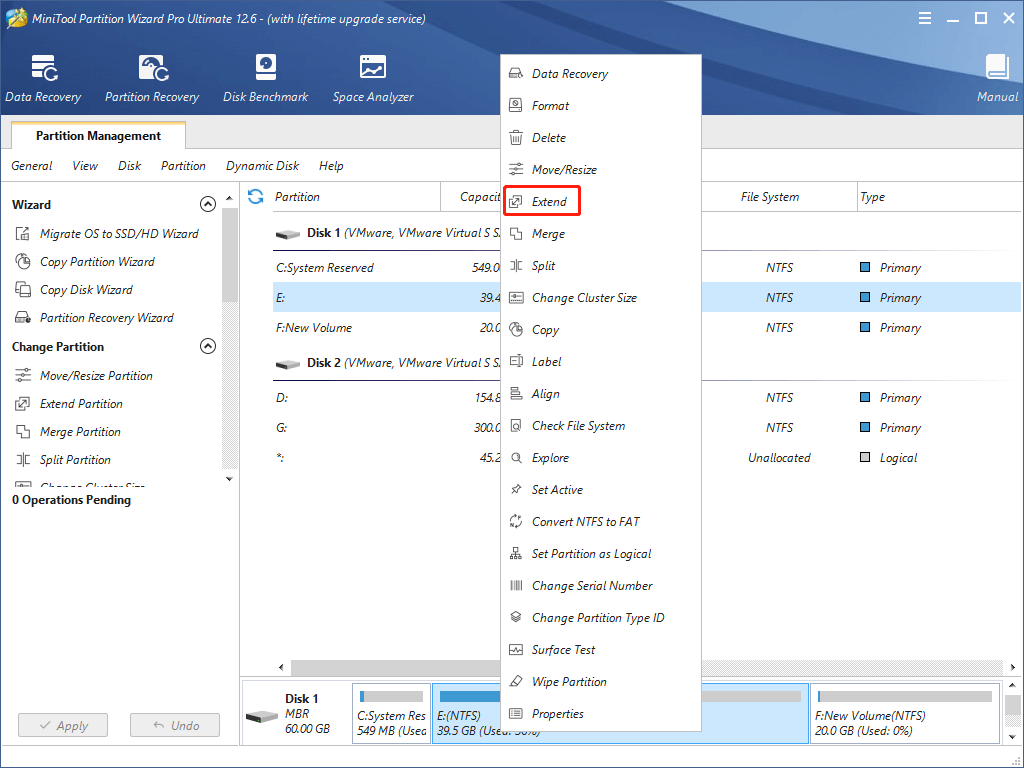
- Download and install MiniTool Partition Wizard. Then launch it.
- Create a bootable USB drive and boot your computer from it.
- Right-click your system drive and select Extend.
- In the pop-up window, select a drive to take free space and drag the slider to choose how much free space to take. Then click OK.
- Click Apply to start extending the system partition.
Note down your product key.
You will need the product key while upgrading Windows 8 to 8.1. If you don’t know your product key, you can follow this post to check it: Use Windows Key Checker To Check Your Product Key.
Make sure your computer is connected to the internet properly.
If you are using a laptop, you should connect to the power cable.
Make sure your laptop won’t power off while upgrading to Windows 8.1. Otherwise, the Windows 8.1 upgrade might fail and you might even lose data.
How to Upgrade to Windows 8.1
After the preparation, you can start to upgrade to Windows 8.1. Do you know where to get the Windows 8 to 8.1 upgrade download? Generally, there are two methods:
- Method 1: Download Windows 8.1 ISO file from Microsoft support page.
- Method 2: Migrate the operating system from another Windows 8.1 computer.
You can choose one according to your situation. And here are more details.
Method 1: Windows 8.1 Upgrade via Windows 8.1 ISO
An easy way to upgrade Windows 8 to 8.1 is to download Windows 8.1 ISO offered by Microsoft. And here is how to upgrade to Windows 8.1.
Step 1: Click this link to visit the Windows 8.1 ISO download page of Microsoft.
Step 2: Scroll down to find the Select edition section. Then click the down arrow, select a Windows 8.1 edition, and click the Confirm button.
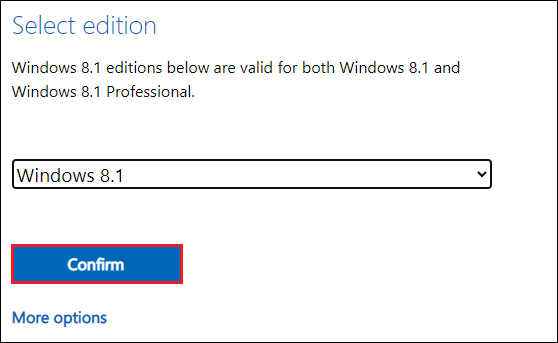
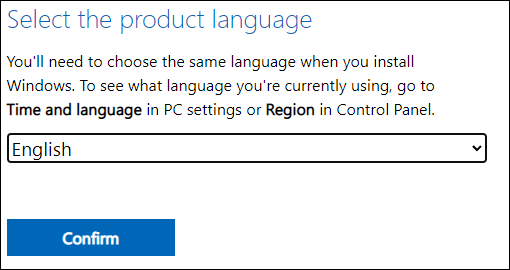
Step 3: Select the product language and click the Confirm window.
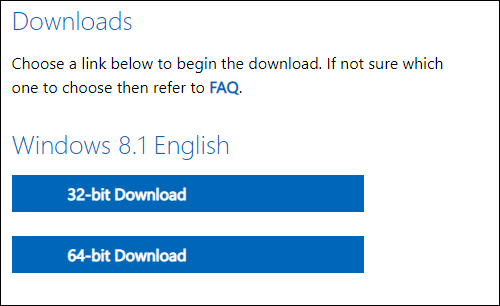
Step 4: Click 32-bit Download or 64-bit Download according to your needs. Then you just need to wait patiently until the ISO file is downloaded successfully.
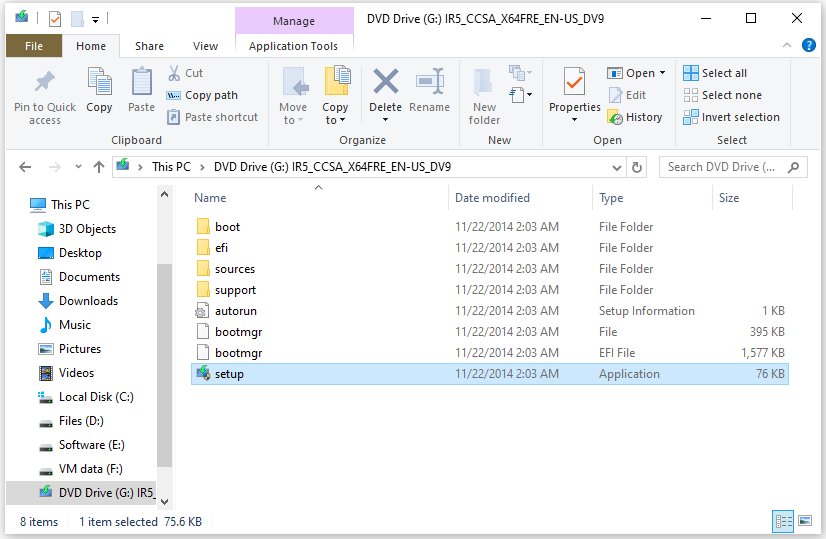
Step 5: Right-click the downloaded Windows 8.1 file in File Explorer and select Mount. Then click This PC and select the DVD Drive to access the mounted files.
Step 6: Double-click the setup file to run the Windows 8.1 setup tool. This setup tool might take some time preparing and you should wait patiently.
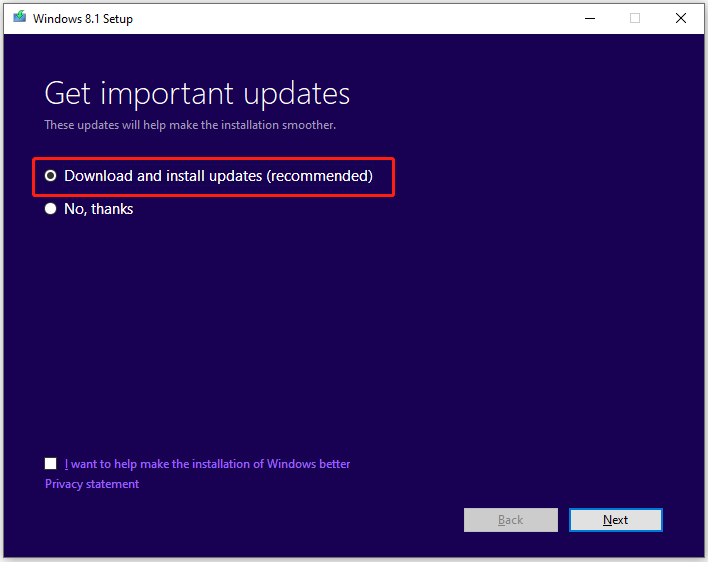
Step 7: Select Download and install updates (recommended) and click Next.
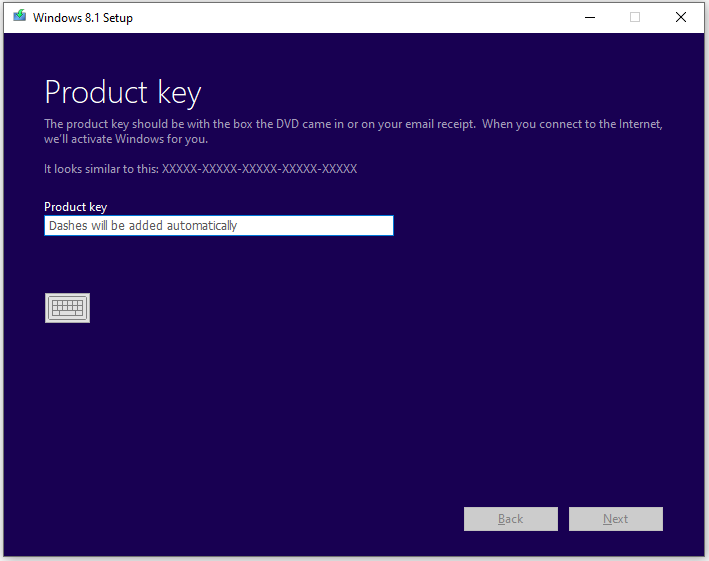
Step 8: On the next page, input your product key and click Next. Then accept the license terms and choose what to keep.
Step 9: When you get to the Ready to install page, confirm your choice and click Install. Then you just need to wait patiently until Windows 8.1 is installed successfully.
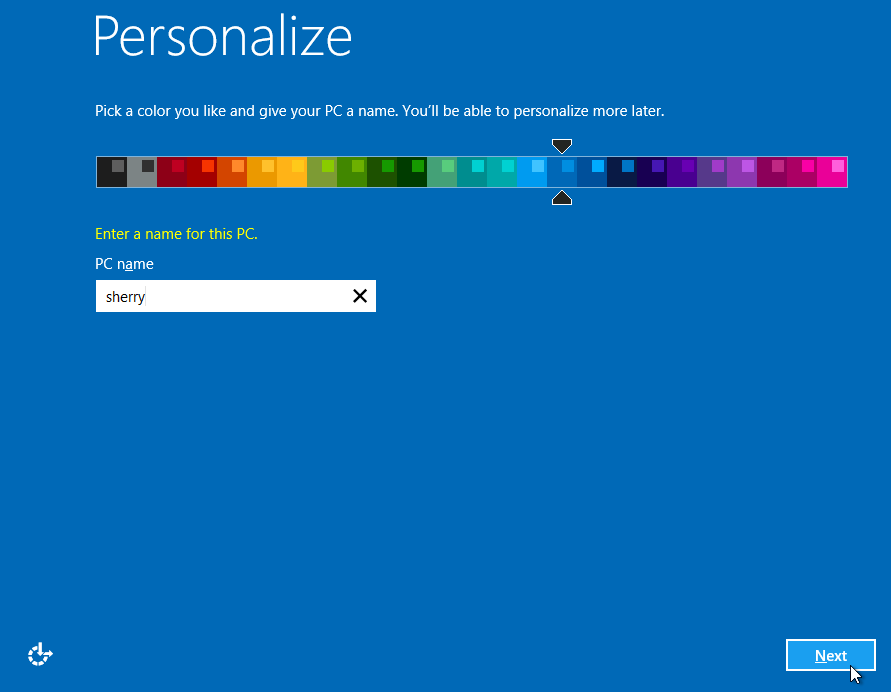
Step 10: Your computer might restart during the process. After that, you need to make some settings configurations for your Windows 8.1. Just follow the on-screen instructions.
After upgrading to Windows 8.1, your personal files and apps will be kept if you select to keep your files in Step 8. However, you need will need to reinstall the apps you downloaded from Microsoft Store. And you can go to Microsoft Store > Account > My apps to install them.
Method 2: Migrate Windows 8.1 from Another Computer
If there is another computer with Windows 8.1 installed next to you, you can copy the operating system from that computer to upgrade your Windows 8 easily.
Before the operation, please note that all the data on your computer will be deleted if you use this method. Therefore, please back up your computer at first.
Step 1: Remove the hard drive on your computer and connect it to another computer that installs Windows 8.1.
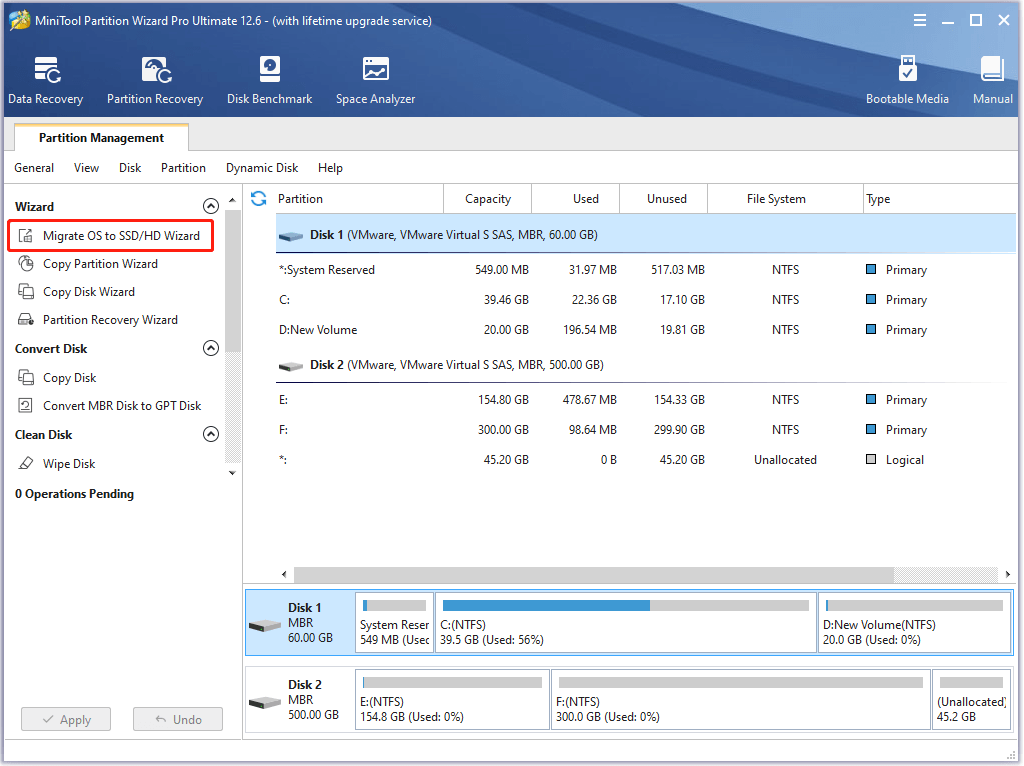
Step 2: Launch MiniTool Partition Wizard. When you get the main interface, click the Migrate OS to SSD/HD Wizard feature from the left action panel.
MiniTool Partition Wizard DemoClick to Download100%Clean & Safe
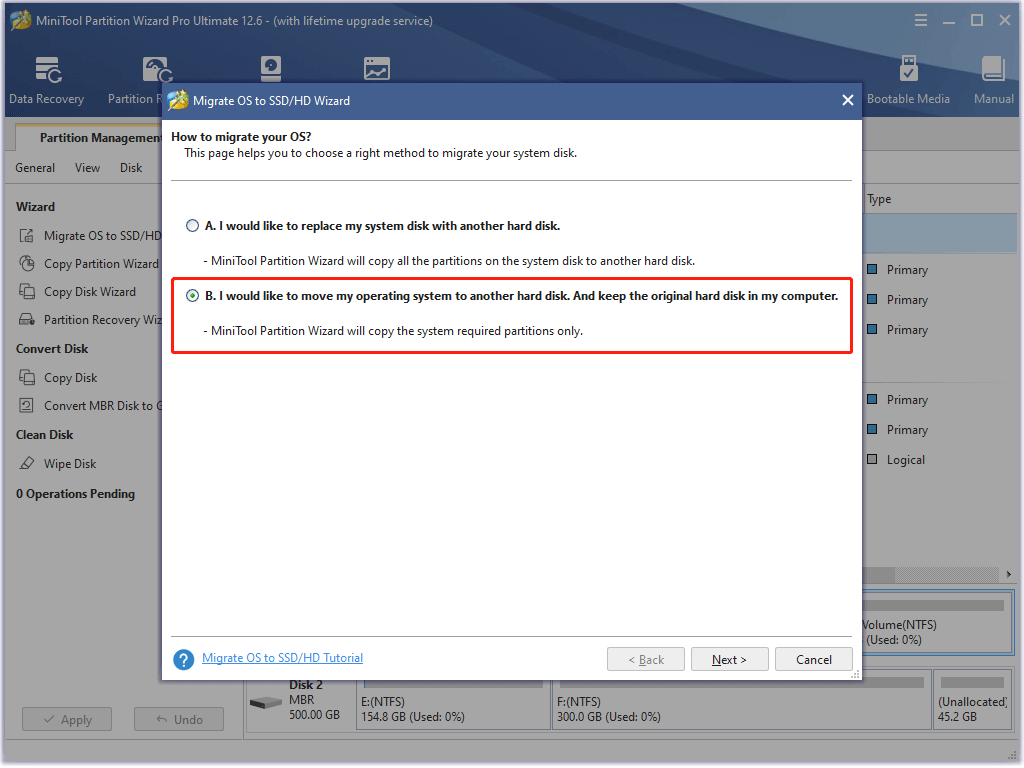
Step 3: In the pop-up window, select option B and click Next.
Step 4: Select the hard drive including Windows 8 as the destination disk and click Next. In the pop-up window, click Yes to confirm the operation.
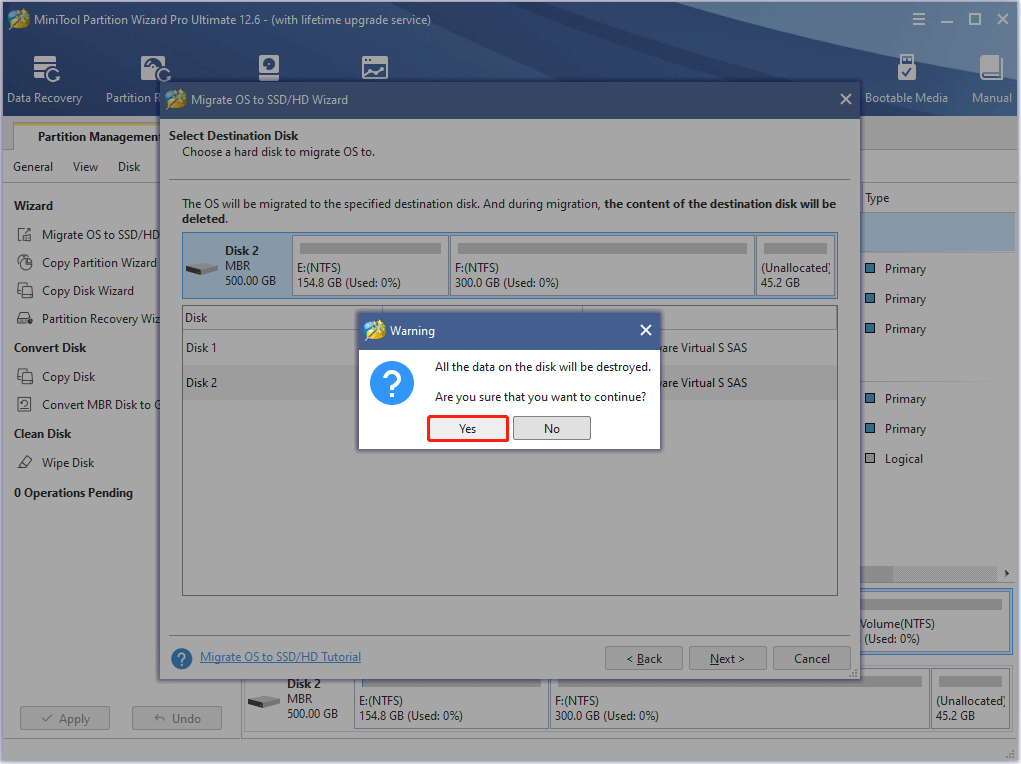
Step 5: Configure the copy options and destination disk layout according to your needs. Then click Next.
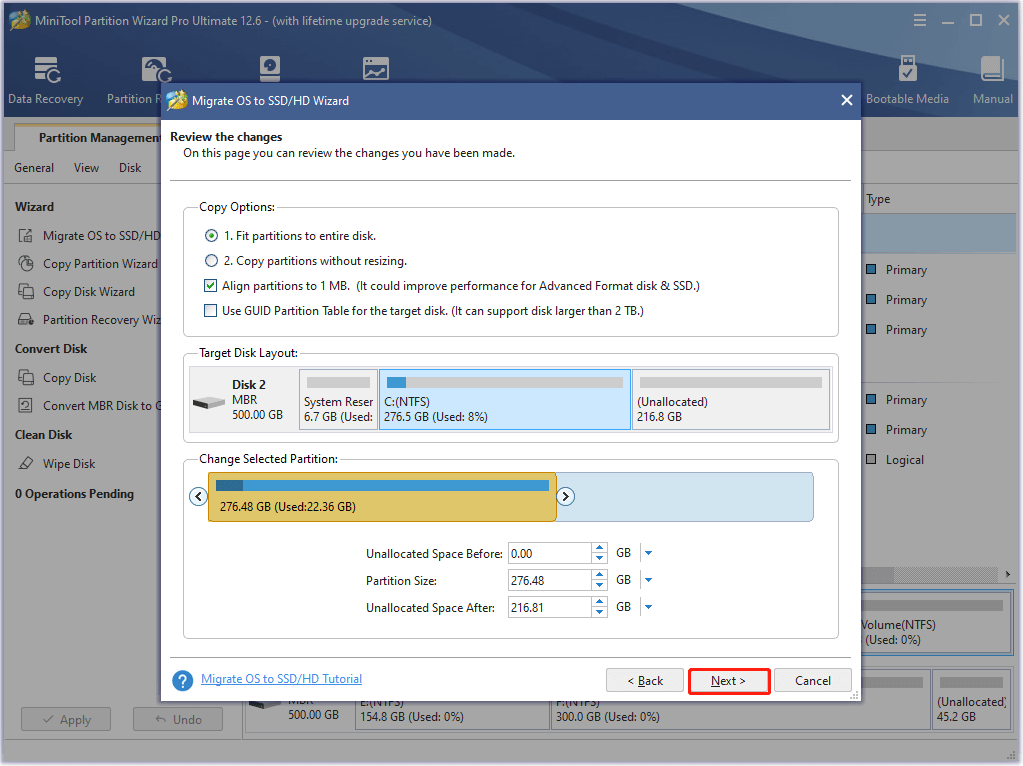
Step 6: Read the note carefully and click Finish. Then click the Apply button located at the bottom left corner.
Step 7: When the migrating process finishes, disconnect your hard drive properly and put it back to your computer.
Bottom Line
What are the differences between Windows 8 and 8.1? Should you upgrade to Windows 8.1? How to upgrade to Windows 8.1? Read this post and you can know the answers.
You can share your ideas with us in the following comment zone. As for any problems with MiniTool Partition Wizard, you can contact our support team via [email protected].

User Comments :