A lot of users complain that Windows 11 Memory integrity is off. What causes the problem? How to fix Memory integrity greyed out on Windows 11? Now, let's explore the answers together with MiniTool.
Memory integrity, also known as Hypervisor-protected code integrity, is used to protect your system from malicious code attacks. In addition, it helps ensure that all device drivers installed on the OS are trustworthy. This feature is enabled by default in Windows Security for all new Windows 11 devices.
However, many users reported that Memory integrity is off Windows 11 and cannot be turned on. Here’s a true example from the answers.
Windows 11 Memory integrity cannot be turned on. In Windows security, I got a message that memory integrity in windows security is off. But I can't turn it on. Every time I try to turn it on but I get a message that it can't turn on. Please help me to resolve my problem.
https://answers.microsoft.com/en-us/windows/forum/all/memory-integrity-cannot-be-turned-on/d70bd05f-0f00-40a5-9d68-cdd963b174fc
What Causes the Windows 11 Memory Integrity Not Turning on
What causes the Memory integrity greyed out on Windows 11? After investigating extensive user reports, we find the problem is often related to incompatible drivers. Besides, some other factors like outdated systems, corrupted system files, and conflicting software are also responsible for the problem. Don’t worry. Here we summarize several corresponding fixes.
How to Fix Windows 11 Memory Integrity Is Off
How to fix it if Windows 11 Memory integrity can’t turn on? Here we summarize 6 proven ways. Let’s try them in order until the problem gets solved.
# 1. Check All Incompatible Drivers
As discussed above, the main reason for the Windows 11 Memory integrity not turning on issue is outdated or incompatible drivers. So, you’d better check the incompatible drivers as follows:
If you have installed any third-party drivers recently and encountered the Memory integrity greyed out on Windows 11, you can uninstall them.
Step 1. Type security in the Search box, and then select Windows Security and click on the Device security tab from the right panel.
Step 2. Click on Core isolation details and enable Memory integrity.
Step 3. If you receive an error saying “Resolve any driver incompatibilities and scan again”, click on Review incompatible drivers.
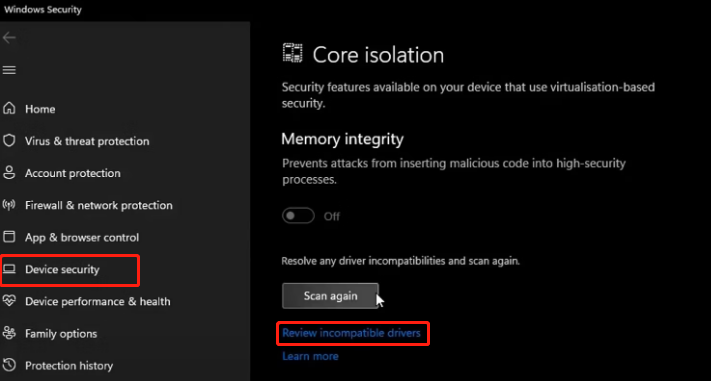
Step 4. Now, you need to note down all drivers that cause the “Memory integrity is off Windows 11” error. Then you can proceed with the following steps to fix the driver issues.
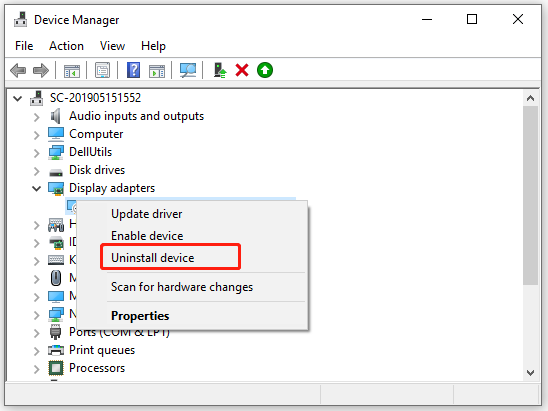
Step 5. Right-click the Start button from the left bottom and select Device Manager, click on View, and select Show hidden devices.
Step 6. Right-click the problematic driver and select Uninstall device and follow the on-screen prompt to complete the process. If it still doesn’t work, you can select Update driver and keep the driver up to date.
# 2. Remove All Incompatible Drivers
If the Device Manager can’t help you uninstall the incompatible drivers, you can try using some tools like Autoruns or Command Prompt. This method has been proven by some answers.microsoft.com users to be helpful. Let’s have a try.
Method 1. Uninstall Incompatible Drivers Using Autoruns
1. Click here to download Autoruns for Windows and follow the on-screen instructions to install the app.
2. Run the Autorun as an administrator and navigate to the Drivers
3. The problematic drivers will be highlighted. Untick the checkbox next to the incompatible drivers to disable them.
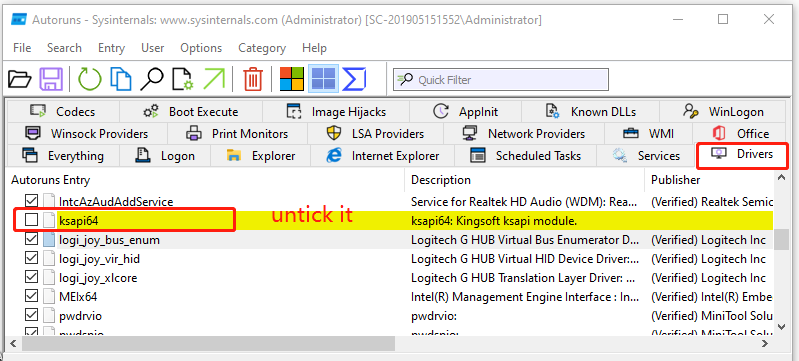
4. Exit the app and restart your computer to see if the “Windows 11 Memory integrity is greyed out” issue gets fixed.
5. If you still can’t turn on Memory integrity Windows 11, right-click the incompatible driver and select Delete.
Method 2. Uninstall Incompatible Drivers Using CMD
1. Type cmd in the search box, and then right-click the Command Prompt app and select Run as administrator. Click on Yes to confirm it.
2. In the elevated Command Prompt window, type the following command and hit Enter to list all third-party drivers on Windows 11. Note down the problematic drivers.
dism /online /get-drivers /format:table
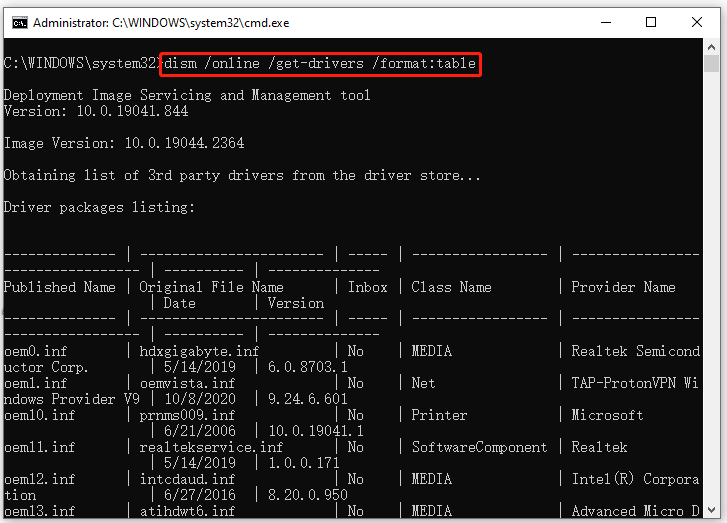
3. To uninstall the drive that causes “Windows 11 Memory integrity is off”, you can run the following command. For example, to uninstall the inf driver, you can run pnputil /delete-driver oem0.inf /uninstall /force.
pnputil /delete-driver (driver’s published name) /uninstall /force
Make sure you enter the correct published driver’s name. Or, you may end up deleting a working driver and causing other problems.
# 3. Check for Windows Updates
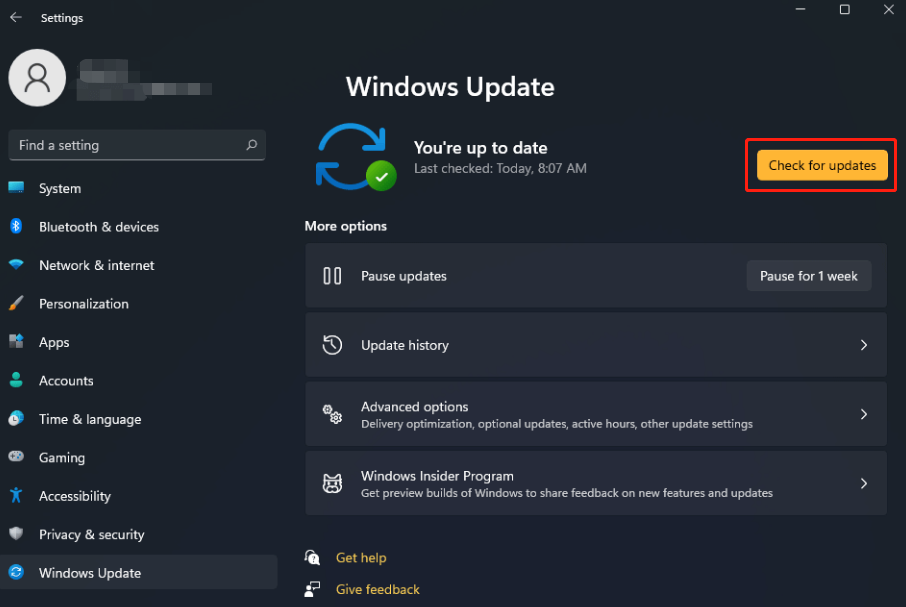
Some users reported that the “Windows 11 Memory integrity cannot be turned on” issue can be solved simply by updating the Windows system. To do this work, press Win + I keys to open the Settings window, select Windows Update from the left panel and click on Check for updates from the right panel.
# 4. Perform a Clean Boot
Sometimes, Windows 11 Memory integrity can’t turn on just because of conflicting third-party drivers and software. To rule out this factor, you can try performing a clean boot. Once you found the conflicting software, you can uninstall the program on Windows 11.
# 5. Repair the System Files
If some important system files get corrupted or broken, you may encounter the “Windows 11 Memory integrity is greyed out” error. To ensure that your system files are intact, you can run an SFC scan on Windows 11.
Step 1. Open the elevated Command Prompt window as we explained above.
Step 2. Type the sfc /scannow command and hit Enter. This process may take you much time to scan, so please wait patiently.

# 6. Force Enable Memory Integrity via Registry Editor
If you still can’t turn on Memory integrity Windows 11 after trying all the above methods, you can try enabling the whole Virtualization-based security that Memory integrity depends on. To do this work, you need to use Registry Editor.
The Registry Editor is a powerful Windows built-in tool, and improper operation could lead to your system being unstable or even inoperable. So, we highly recommend you back up the Registry in case anything goes wrong.
Step 1. Press the Win + R keys to open the Run dialog box, and then type regedit in it and hit Enter. Then click on Yes in the UAC window.
Step 2. In the Registry Editor window, locate the following path via the left navigation panel.
ComputerHKEY_LOCAL_MACHINESYSTEMCurrentControlSetControlDeviceGuardScenariosHypervisorEnforcedCodeIntegrity
Step 3. With the HypervisorEnforcedCodeIntegrity folder selected from the left panel, double-click the Enabled key from the right panel. Set the Value data from 0 to 1 and click on OK to save the change.
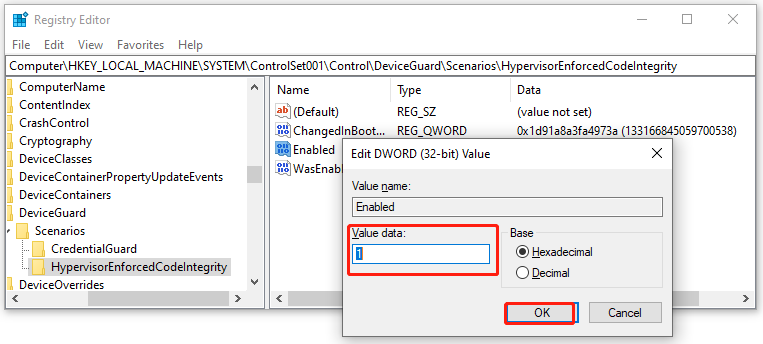
Once done, you can exit the Registry Editor and reboot your PC to see if the “Memory integrity in Windows Security is off” issue disappears.
MiniTool System Booster TrialClick to Download100%Clean & Safe
Further reading: If you enter some issues like file system corruption and low disk space on Windows 11, don’t worry. MiniTool Partition Wizard can help you fix them easily by checking file system errors, extending/resizing partitions, analyzing disk space, upgrading to a larger hard disk, etc.

![Windows 11 Cumulative Update Not Downloading/Installing? [Fixed]](https://images.minitool.com/partitionwizard.com/images/uploads/2023/05/windows-11-cumulative-update-not-downloading-installing-thumbnail.jpg)
User Comments :