Many users want to create a Windows 11 bootable USB drive and install it on a different PC. How to make Windows 11 bootable USB drive? This post of MiniTool will walk you through a full guide.
Windows 11 is the next version of the Microsoft Windows 10 operating system that was revealed on June 24, 2021. This new version brings many advanced features and improvements. You can utilize the PC Health Check application to check if your computer is eligible to upgrade to Windows 11. If it is, you can install Windows 11 on your PC. But what to do if you want to make bootable Windows 11 USB drive and install it on a different PC? Let’s keep reading.
Basic System Requirements
To make a Windows 11 bootable USB drive successfully, you need to prepare a USB flash drive that has 8GB capacity or larger. In addition, make sure your computer meets the basic requirements below to install Windows 11.
- Processor: 64-bit at 1 gigahertz (GHz) or faster with 2 or more cores
- RAM: 4GB or more
- Hard drive: 64GB or larger
- Graphics card: DirectX 12 compatible or later with a WDDM 2.x driver
- Display: > 9″ with HD Resolution (720p)
- Internet connection
Now, let’s see how to create Windows 11 bootable USB drive.
How to Make Windows 11 Bootable USB Drive
There are 2 main parts to make a bootable Windows 11 USB drive.
# 1. Download Windows 11 ISO File
The first thing you must do is download the Windows 11 ISO file. Here the best way is to visit the official Microsoft website since it is the only safe and credible source for the Windows 11 ISO file, but you need to wait for the Preview ISO file to be available on the website. Well, if you want to get the Windows 10 ISO file freely, you can download it from a trusted third-party source.
# 2. Make Bootable Windows 11 USB Drive
Once you got the Windows 11 ISO file, you can use Rufus to make a bootable Windows 11 USB drive. Here are detailed steps for you.
Step 1. Click here to download Rufus on your computer and launch it.
Step 2. Plug your USB flash drive into your computer.
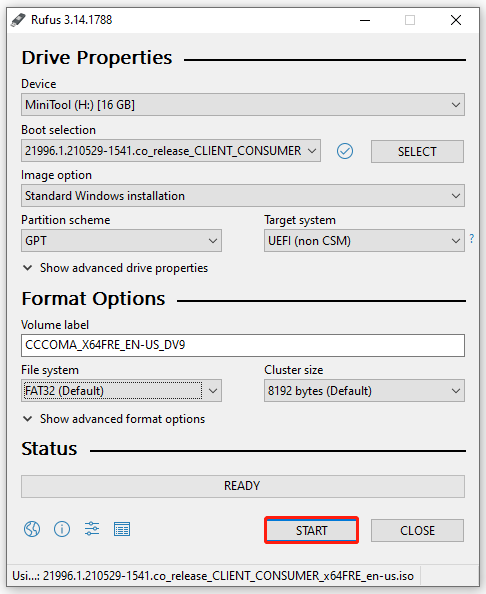
Step 3. In the main interface of Rufus, select your USB from the Device drop-down menu.
Step 4. Click on the Select button to open your File Explorer, and then you can choose the Windows 11 ISO file you just downloaded.
Step 5. Select GPT from the Partition Scheme section based on your needs, and then select target system UEFI. Then leave the File System and Cluster Size options as default.
Step 6. Click on the Start button to start creating the Windows 11 bootable USB. Wait for the process to complete. Once done, click on the Close button to exit Rufus and safely eject the USB flash drive.

After that, you can connect the bootable Windows 11 USB to a computer where you want to install Windows 11. Then enter the BIOS menu, and select the USB drive to boot the computer, and start the installation process by following the on-screen instructions.


User Comments :