A lot of users complain that Windows 10 black box keeps popping up. Why black boxes appear on screen? How to fix it? If you are also trying to figure them out, then this post of MiniTool is what you need.
Why Does a Black Box Appear on My Computer Screen
Why does a black box appear on my computer screen? After analyzing extensive user reports and references, we can conclude that the black box computer issue is often related to an outdated display driver. In addition, the corrupted system files, improper brightness settings, and dual graphics cards are responsible for Windows 10 black box keeps popping up.
How to Fix Black Boxes on Computer Screen
To help you fix the black box computer issue, we summarize several effective troubleshooting methods based on the possible causes.
Fix 1. Update the Display Adapter Driver
If you are using a graphics card driver that Microsoft doesn’t supply any updates, we recommend you update the display driver manually. This is because outdated graphics card drivers can cause black boxes on computer screen.
Step 1. Press the Win + R key to open the Run dialog box, and then type devmgmt.msc in the box and hit Enter.
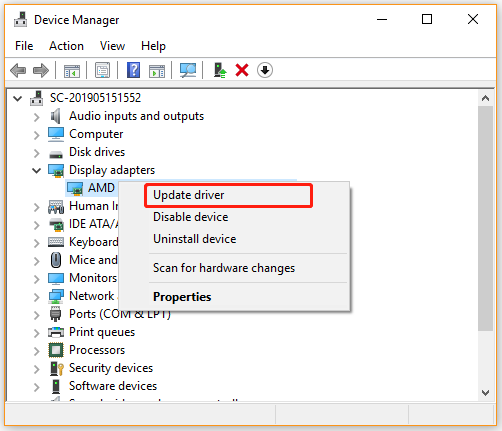
Step 2. Expand the Display adapters category, and then right-click the graphics card driver and select Update driver.

Step 3. Then you can select Search automatically for updated driver software option to update the driver automatically. Alternatively, you can download the graphics card driver from the manufacturer’s website and install it on your computer manually.
Once updated, restart your computer and see if Windows 10 black box keeps popping up.
Fix 2. Run Hardware and Devices Troubleshooter
Hardware and Devices troubleshooter is a Windows built-in tool that can help detect and repair various device issues like HID-compliant touch screen missing, volume mixer won’t open and etc. Here you can try using it to troubleshoot the black box computer issue.
Step 1. Press the Win + I keys to open the Settings app, and then navigate to Updates & Security > Troubleshoot one by one.
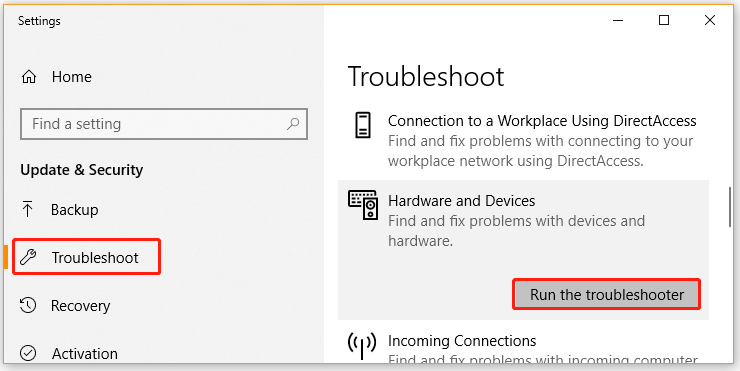
Step 2. Select Troubleshoot from the left side, and then scroll down to the Hardware and Devices section and click on Run the troubleshooter.

Now, the troubleshooter will detect the hardware problems automatically. Once the process completes, restart your computer and check if black boxes appear on screen.
Fix 3. Run an SFC or DISM Scan
Sometimes black box keeps flashing on screen if there are any corrupted system files. To exclude this situation, you can try performing an SFC scan or DISM scan to repair them. Let’s see how to do that:
Step 1. Type cmd in the search box, and then right-click Command Prompt and select the Run as administrator option.
Step 2. Type the sfc /scannow command in the elevated command prompt and hit Enter. After that, the SFC tool will scan and try to repair the corrupted system files automatically.

Step 3. If the SFC tool fails to work, you can try using the DISM tool. Type dism /Online /Cleanup-Image /RestoreHealth in the elevated command prompt and hit Enter. This process may take you some time to complete. So, please wait patiently and don’t stop halfway.
After that, restart your computer and see if Windows 10 black box keeps popping up.
Fix 4. Tweak the Brightness of Your Display
As mentioned above, improper brightness settings are one of the common reasons for black box keeps flashing on screen. To fix the issue, we recommend you slightly lower the display brightness. Here’s how:
Step 1. Type power plan in the search menu and select the Edit Power Plan from the Best match.
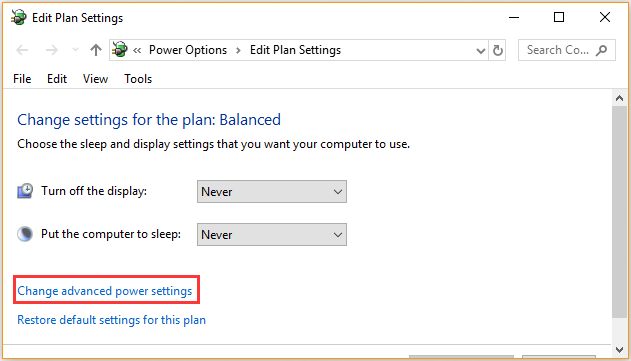
Step 2. Click on the Change advanced power settings link at the bottom of the window.

Step 3. Select Display from the left side, and then navigate to the Brightness and color section and set its brightness to 99% or 98% (lower than 100%). Then save the changes and reboot your computer to see if the black box keeps flashing on screen.
Fix 5. Disable the Onboard Graphics
If you are using onboard and external graphics cards together on the configuration, you may encounter the “Windows 10 black box keeps popping up” issue. In this case, you need to disable the onboard graphics card.
Step 1. Boot your computer into Safe Mode. If you don’t know how to do that, this post provides detailed steps.
Step 2. In the Safe Mode, open Device Manager by right-clicking the Start menu and select Device Manager.
Step 3. Expand the Display adapters category, and then right-click the onboard graphics card driver and select Disable device.
After that, you can exit Safe Mode and see if the black boxes on computer screen still persist.

![[Full Fix] Screen Resolution Changes on Its Own Windows 10](https://images.minitool.com/partitionwizard.com/images/uploads/2021/03/screen-resolution-changes-on-its-own-win10-thumbnail.jpg)


User Comments :