Have you gotten error "unable to recover your PC the system drive is too small" when recovering from a USB drive? This post from MiniTool Partition Wizard offers you 5 ways to solve this problem. You can try them one by one.
Unable to Recover Your PC the System Drive Is Too Small
Many people may create a USB recovery drive in case the PC crashes and needs to be reinstalled. In addition, many people may create a USB recovery drive before upgrading the PC in case they need to downgrade the PC later.
However, when they recover the PC from the USB recovery drive, they may get error “unable to recover your PC the system drive is too small”. The cause of the error may be as follows:
- There are some problems with the USB recovery image.
- The disk (target disk) on which you are trying to restore the system image may have inadequate size.
- Existing partitions prevent the recovery process.
To solve this problem, you can try the following methods.
Editor’s Choice:
MiniTool Partition Wizard DemoClick to Download100%Clean & Safe
- Connect the target drive to your PC.
- Launch MiniTool Partition Wizard.
- Click Migrate OS to SSD/HD Wizard.
Fix 1. Make a USB Recovery Drive Again
It’s possible that you have operated the recovery process incorrectly. So, I recommend you to try making a USB recovery drive and then recovering the PC again. Here is the guide:
Step 1: Create a USB recovery drive in Windows 10. The process should be as follows:
- Insert a USB drive to PC.
- Type “create a recovery drive” in the Windows search bar and click the best matched result.
- Make sure the Back up system files to the recovery drive option is checked. Then, click the Next
- Choose a USB drive and click Next
- Read the warning and click the Next Then, the PC starts to make the USB recovery drive. This process may take around an hour and a half.
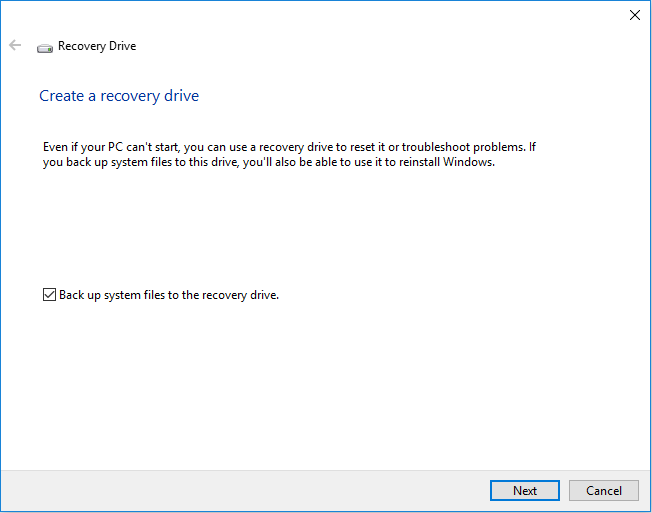
1. If you didn’t back up system files to the recovery drive, the drive cannot be used to reinstall Windows.
2. Personal files and any applications that did not come with your PC will not be backed up.
3. Microsoft suggests that the USB drive should be at least 16GB. But the actual required space may vary, because my Windows 10 computer only requires at least 8GB space and I have made the recovery drive successfully when the USB is only 15GB.
4. The USB drive will be reformatted. So, please make sure there are no important files on it.
5. The USB drive will be formatted to FAT32 file system. Therefore, to make a USB recovery drive, you don’t need to use a USB drive more than 32GB, because the extra space will be wasted.
Step 2: Recover the PC from the USB recovery drive. The process should be as follows:
- Insert the USB drive to the PC to be recovered.
- Power on this PC, and then press the BIOS key (F2, Del, etc.) when the logo screen appears, so that you can enter Firmware.
- In the Firmware, set the USB drive as the first boot device. Then, click the F10 key to save changes and exit the Firmware. Then, the PC can boot from the USB recovery drive.
- Choose your keyboard layout.
- Find Recover from a drive and click it. The location of this option may vary depending on different PCs.
- You will get two options: Just remove my files and Fully clean the drive. Read the warning and click the Recover The recovery process will begin.
1. Just remove my files option will remove all personal files and user accounts on the PC, all programs that didn’t come with this PC, and then reinstall the PC. If you’ve repartitioned your system drive, it will restore the default partitions.
2. Fully clean the drive option will wipe all personal files, programs, and the OS on the PC. To use this PC, you should manually install an OS on the PC later.
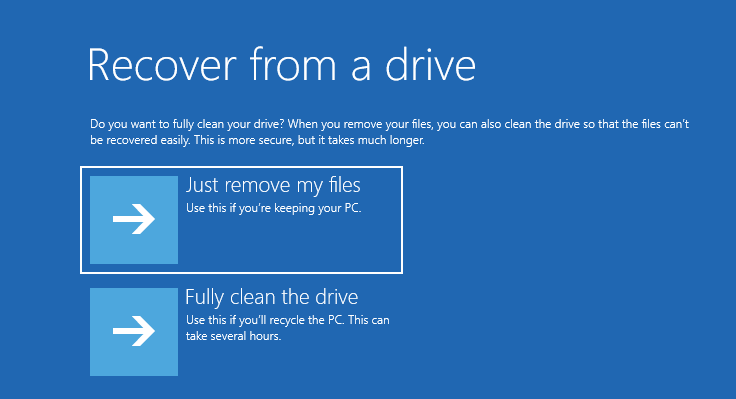
If you still encounter the “unable to recover your PC the system drive is too small” problem, please try other methods.
[SOLVED] How to Revive Windows 10 With Recovery Drive | Easy Fix
Fix 2. Change the Minimum Required Size
Sometimes, you may create a USB recovery drive on the disk A (the source disk) and then want to recover the PC on the disk B (the target disk). In this way, you can migrate the OS from disk A to B. But if the target disk is smaller than the source disk, you may get the error “unable to recover your PC the system drive is too small”.
Please check the capacity of the source and target disks. If the target disk is indeed smaller than the source disk, you can solve the problem by changing the minimum required size of the target drive automatically stamped in the file $PBR_ResetConfig.xml when creating the recovery drive.
Please open system image file > sources. Then open the $PBR_ResetConfig.xml file on a notepad, look for <MinSize> attribute, and change the value to make sure it is smaller than the target disk.
Fix 3. Delete or Format Volumes on the Target Drive
If the target disk has partitions already, it’s possible that the error is caused by the existing partitions. In this case, you can try deleting or formatting the partitions on the target disk. Here is the guide:
Step 1: Connect the USB recovery drive to PC. Boot the PC from the USB drive. This time, go to Troubleshoot > Advanced options > Command Prompt.
Step 2: In the window, use the following commands to delete all partitions of the target disk.
- Diskpart
- List disk
- Select disk * (* is the disk number of the target disk. You can identify the target disk by disk capacity.)
- Clean (this command will delete all partitions on the disk.)
Step 3: Close the Command Prompt window and then continue the USB recovery process.
Fix 4. Create a Windows Installation Media
If the above methods don’t work, you can choose this method. As the above mentioned, recovering from a USB drive will delete all personal files and apps. It’s similar to clean installation. Then, why not clean install Windows (especially if the system you want to recover/install is Windows 10)?
Here is the guide:
Step 1: Insert a USB drive to PC. Download Windows 10 Media Creation Tool from Microsoft’s official website.
Step 2: Run the Media Creation Tool. Accept license terms. Choose Create installation media for another PC.
Step 3: Choose Language, Windows Edition, and Architecture. Then, click the Next button.
Step 4: Choose USB flash drive and click the Next button. Choose a removable drive to hold Windows 10 image and then click the Next button.
Step 5: Connect the USB drive to the PC where you want to repair/install Windows 10. Boot the PC from the USB drive. Follow the installation wizard until you get the following picture:
- Upgrade: This option will reinstall Windows but will not delete personal files.
- Custom: This option is more like recovering from a USB drive, because it allows you to delete partitions on the target disk.
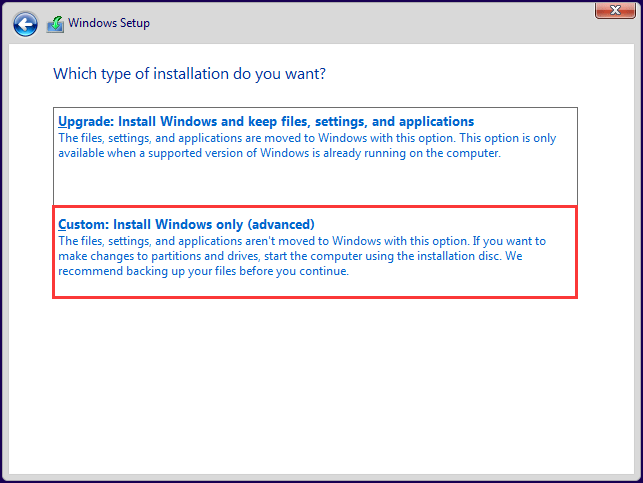
Follow the wizard and you can install Windows 10 on the target disk. If you want to get a more detailed guide, please refer to this post: How to Install Windows 10 on a New Hard Drive (with Pictures).
Fix 5. Migrate OS with MiniTool Partition Wizard
Some people may use a USB recovery drive to migrate OS. However, this feature is not available to Windows 7 and it will delete many personal files. If you want to migrate OS from HDD to SSD, MiniTool Partition Wizard is more suitable for you.
In addition, MiniTool Partition Wizard allows you to migrate system from large disk to a small disk, as long as the used space is not more than the space of the target disk.
Here is the guide:
MiniTool Partition Wizard DemoClick to Download100%Clean & Safe
Step 1: Connect the target drive to your PC via an USB adapter (SATA to USB or M.2 to USB). Launch MiniTool Partition Wizard and go to its main interface. Click Migrate OS to SSD/HD Wizard on the action panel.
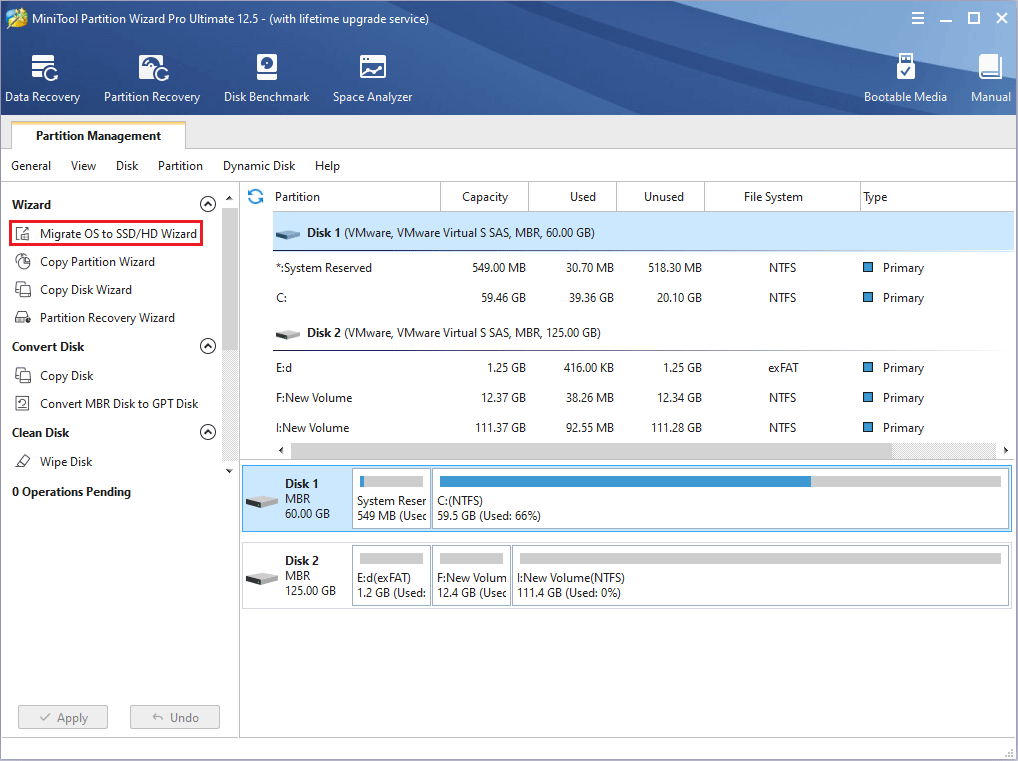
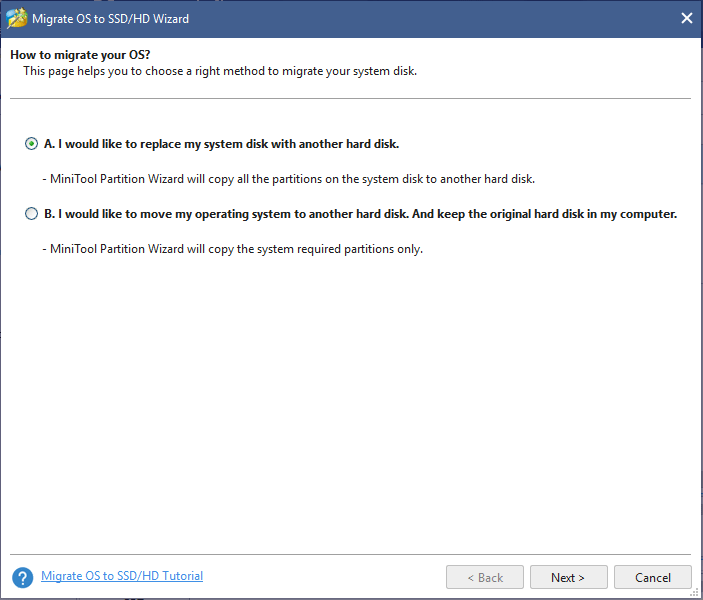
Step 2: Choose a migration method and click the Next button.
- Option A: This option will create the same partition layout on the target disk as the source disk and then migrate all contents on the system disk to the new drive, including OS, software, games, personal files, etc.
- Option B: This option only migrates system reserved/EFI partition and the C partition from the source disk to the target disk.
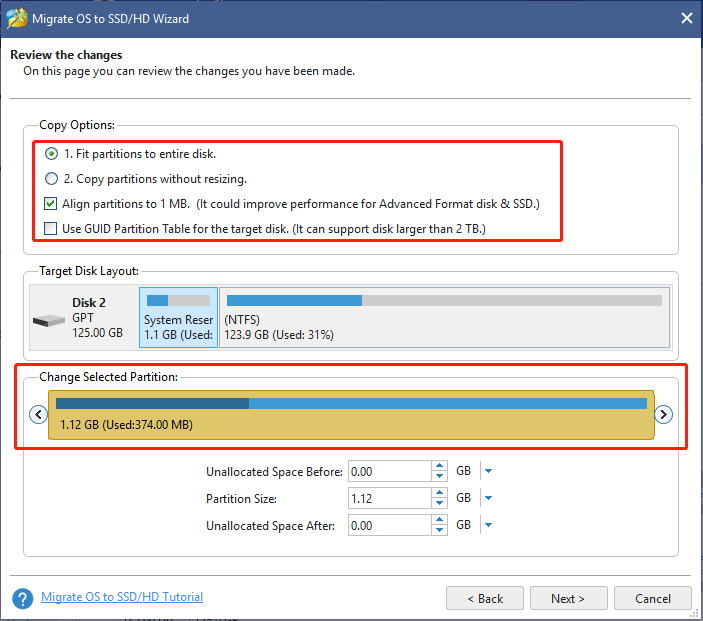
Step 3: Select the target disk as the destination disk and click the Next button. Check copy options and disk layout and then click the Next button.
- If the destination disk is smaller than the original disk, please choose copy option 1: Fit partitions to entire disk.
- If the original disk is an MBR disk and the destination disk is a GPT disk, you should check Use GUID Partition Table for the target disk (if the target disk is an MBR disk, this feature will convert it to a GPT disk). GPT disk allows you to create more than 4 primary partitions and supports disk larger than 2TB. For more information, please click MBR vs GPT.
- If you want to change partition size and location, please click a partition in the Target Disk Layout section and then drag the arrow and the partition block in the Change Selected Partition
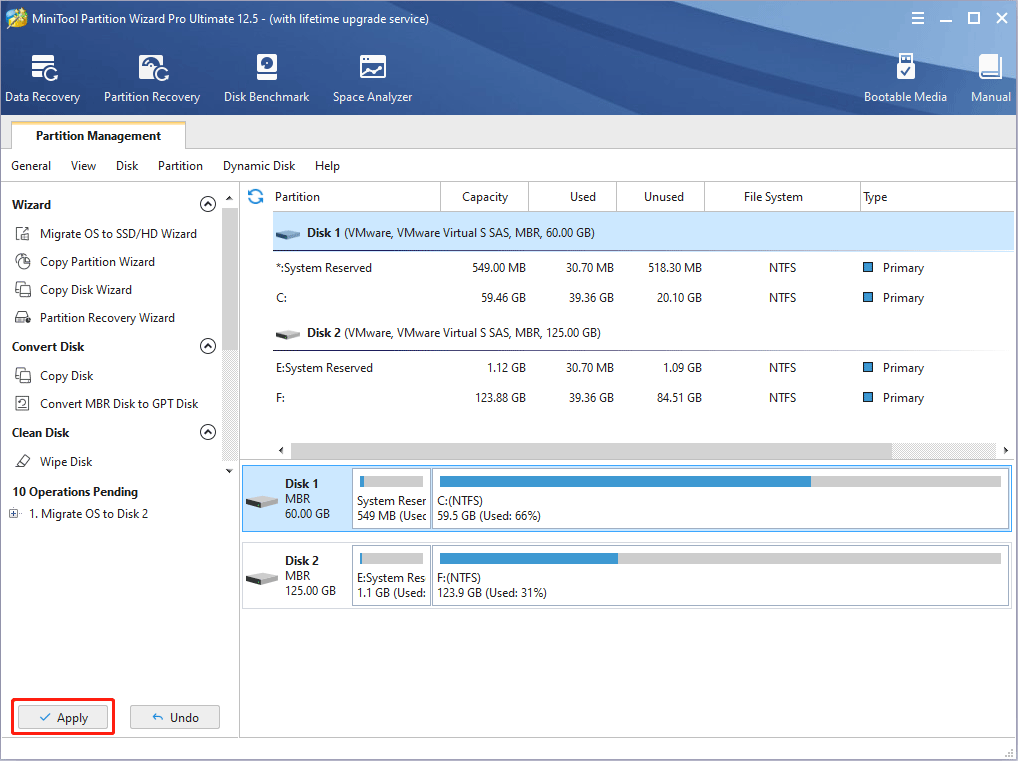
Step 4: Read the note and click the Finish button. Click the Apply button to execute the pending operation.
Step 5: After completing the OS migration process, disconnect the target disk and then install it into your PC. Then, enter BIOS to make sure the target disk is the first boot device. Then, you can boot the PC from the target disk.
Bottom Line
Is this post useful to you? Do you have other methods to solve the issue? Please leave a comment in the following zone. In addition, if you have difficulty in using MiniTool Partition Wizard, please contact us via [email protected]. We will get back to you as soon as possible.

User Comments :