Some users has reported that they are prompted that the system detected an overrun of a stack-based buffer for odd reasons. In this post, you will fully learn about this issue and get several possible solutions provided by MiniTool Software.
About Stack-based Buffer Overrun Error
Stack-based buffer overrun (or stack-based buffer overflow) is a kind of bug indicating that a program writes more data to a buffer located on the stack than that is actually allocated for the buffer. It is a general programming malfunction.
This issue might happen to your driver and lead to the driver overran stack buffer blue screen of death error. But more commonly, it’s related to your applications, and once it comes up, the adjacent data on the stack might be corrupted and the program is likely to crash or operate improperly.
The stack-based buffer error has been reported by plenty of users on the forum, and a case is displayed here:
Basically, I keep getting an error and the error is this – “The system detected an overrun of a stack-based buffer in this application. This overrun could potentially allow a malicious user to gain control of this application. (c0000409)” I have a build that can run AAA games ultra, so it’s not my hardware. I’m running it off my SSD; all drivers are updated; Windows 10 64-bit is fully updated; I’ve uninstalled the game multiple times and let the cache re-download. Does anyone have any advice that could possibly give me? — from www.reddit.com

According to the reports from the users who are experiencing the issue, the overrun of a stack-based buffer error message mainly appears in following 2 situations:
- After opening computer in Safe Mode due to the Windows running into certain problems, such as explorer.exe keeps opening.
- When trying to install the Twitch or Discord desktop applications.
you might have tried various solutions but in vain. To get rid of this issue, I collect some possible methods and put them altogether in this post. Hopefully, they could be helpful for you.
How to Fix Overrun of a Stack-Based Buffer Issue
- Scan Your Computer for Virus or Malware
- Run SFC And DISM Command
- Clean Boot the Computer
- Perform System Restore
- Try Startup Repair
- Back up Data and Reinstall Your Windows
Fix 1: Scan Your Computer for Virus or Malware
As the error message suggests, the specific program might be running with special privileges, and give the control to a malicious user, and thus be affected by certain malicious code or program. So, it’s necessary to scan your computer for any potential virus or malware.
It’s recommended to perform the Windows Defender Offline scan and here’s how to do it:
Step 1: Right-click the Start button and choose Settings from the menu.
Step 2: Navigate to Update & Security > Windows Security.
Step 3: Click Virus & threat protection in Protection areas section of the right pane.
Step 4: When you get the Windows Defender Security Center window, click Run a new advanced scan.
Step 5: Then, choose Windows Defender Offline scan and click Scan now button.
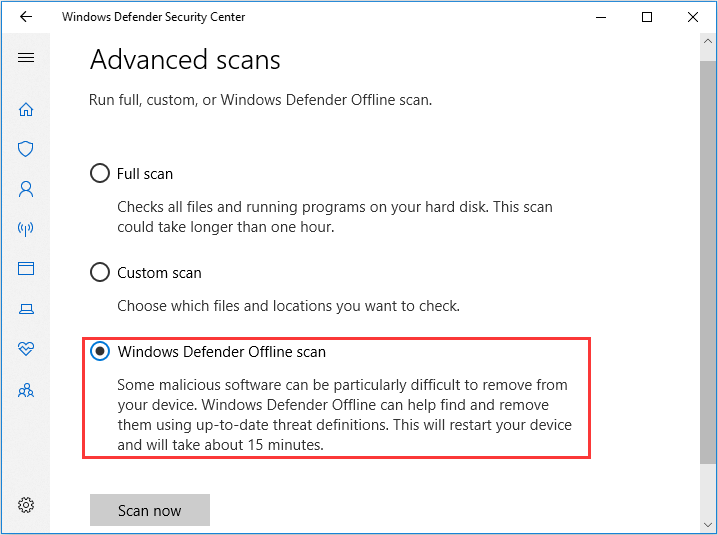
This kind of scan will help you remove malicious software that is difficult to remove, and it requires a restart to complete the process. It takes about 15 minutes and you should wait patiently until the scanning is finished.
Fix 2: Run SFC And DISM Command
In addition, the corrupted system files or Windows image files could also lead to buffer overrun detected on your computer. To fix stack-based buffer overrun issue in this case, you can try using System File Checker (SFC) and Deployment Image Servicing and Management (DISM) utilities.
Step 1: Press Windows + R to invoke Run dialog.
Step 2: Input cmd and press Ctrl + Shift + Enter to open Command Prompt as administrator.
Step 3: Type the command sfc /scannow and press Enter to start scanning the system files. Once any corrupted files are found, this tool will replace them with the cached copies and the scanning process will take some time. If this resolves the issue successfully, it’s fine. Otherwise, you need to continue with the next step.
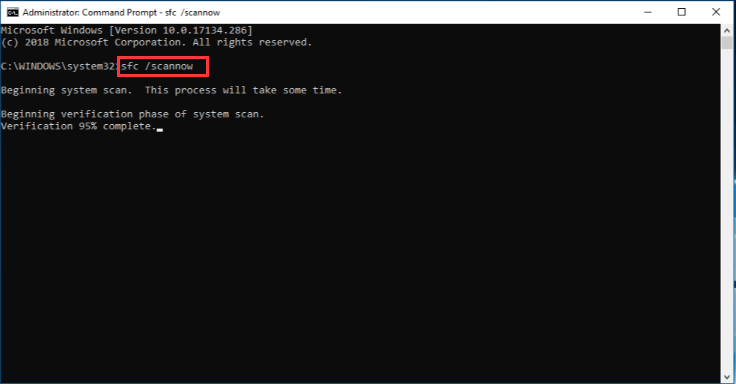
Step 4: Input the following command lines and press Enter after each to execute them:
- DISM /online /Cleanup-Image / ScanHealth
- DISM /Online /Cleanup-Image /RestoreHealth
After the operation is completed successfully, exit the window and restart your computer. Then, check if the stack-based buffer overrun issue has been resolved. Besides, you can run the SFC scan again as your needs.
Fix 3: Clean Boot the Computer
It’s possible that the system might detect an overrun of a stack-based buffer if a certain third-party application which starts with the system gets corrupted or runs into problems. In this case, you can clean boot your computer to prevent all the third-party programs or services from starting with the system. To do that, just follow the instructions below:
Step 1: Press Windows + S, input msconfig and click System Configuration from the search results to open it.
Step 2: Go to Services tab, check Hide all Microsoft services and click Disable all button to stop all the third-party services.
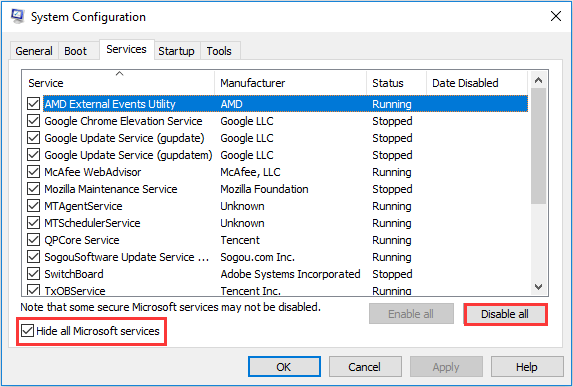
Step 3: Switch to Startup tab and click Open Task Manager.
Step 4: Then, select a program and click Disable. Repeat the operation to other programs in the list to prevent these third-party apps from starting with the system and confirm changes.
Step 5: When you back to the System Configuration window, click Apply and OK to save the changes.
After that, restart your computer to take effect the changes and the issue should have been resolved. By the way, you can re-enable these programs one by one to find out the problematic one and then keep it disabled or remove it.
Fix 4: Perform System Restore (If Available)
If you have enabled System Protection feature to protect your computer and created a restore point at least before the stack-based buffer overrun issue occurs, perhaps you can try reverting your computer to a previous restore point to fix the problem.
Step 1: Type restore in the Search box and choose Create a restore point from the results.
Step 2: The System Properties windows will appear and you need to click System Restore button under System Protection tab.
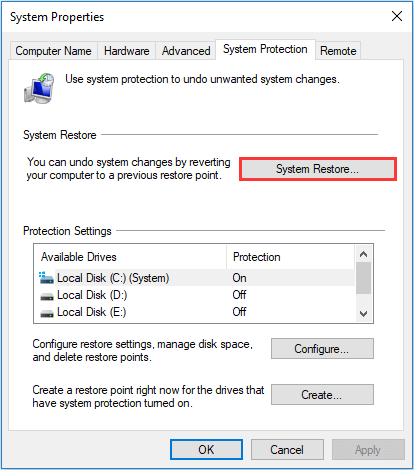
Step 3: Skip the welcome page. Choose the latest restore point and click Next button.
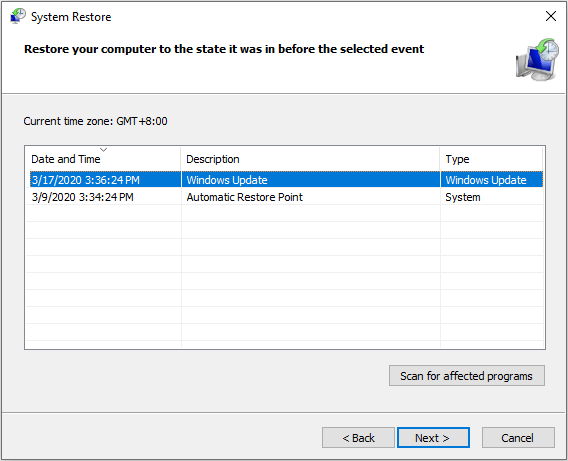
Step 4: You will be required to confirm the restore point in the next page. Make sure all the tasks are saved and then click Finish button to execute this operation which needs to restart your computer to apply changes.
After that, the issue should be removed hopefully.
Fix 5: Try Startup Repair
As mentioned before, if buffer overrun is detected by your system, it is possible that your computer gets frozen or cannot boot. If the above methods cannot fix the issue for you, it’s high time to try the Startup Repair.
To do that, you don’t have to start into the Safe Mode and here are 2 common options for you – perform the operation in Advanced Startup Settings or using Bootable Media. Let’s see them one by one.
Option 1: Perform Startup Repair in Advanced Startup Settings
Step 1: Forcefully shut down your computer for 3 times to enter Windows recovery environment and then click See advanced repair options.
Step 2: Go to Troubleshoot > Advanced options and choose Startup Repair.
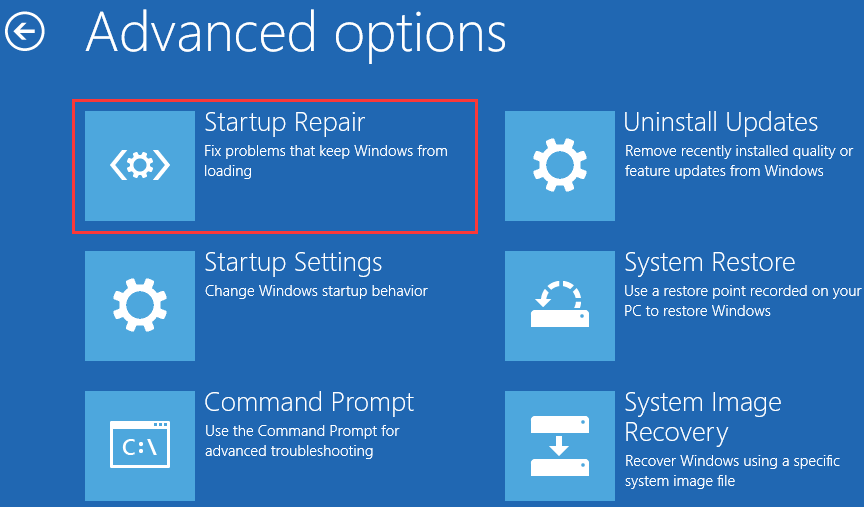
Step 3: Then, you will be required to choose a user account and input the corresponding password. Just do as the onscreen message prompts and click Continue button.

This tool will start diagnosing your computer and fix the detected potential problems that prevent it loading properly. The repair process will take some time to complete and you should wait patiently.
During the process, a log file named SrtTrail.txt is created and saved in the directory of C:WindowsSystem32LogFilesSrt. You can check it for the detailed information of this repair.
Option 2: Perform Startup Repair Using Windows Installation Media
If you cannot access the recovery environment using the common way, you can choose to employ an installation media, such as USB bootable media.
Step 1: Burn a USB installation media using Windows 10 Media Creation Tool in a normal computer.
Step 2: Connect the bootable USB drive to the problematic device and boot from it by changing the BIOS settings.
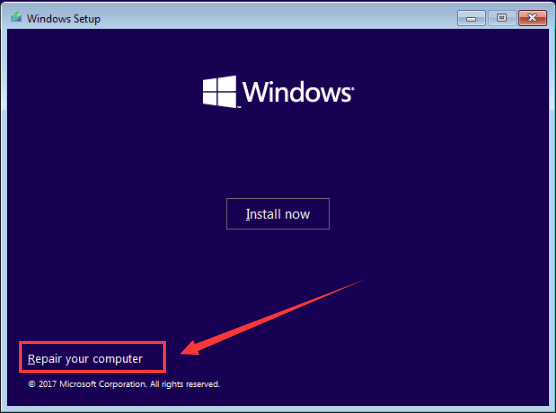
Step 3: When you get the Windows Setup window, enter your language and other preferences and click Next button.
Step 4: Click Repair your computer to enter the recovery environment and launch Startup Repair by referring to the steps in the above content.
Fix 6: Back up Data and Reinstall Your Windows
If none of the above methods help to get rid of stack-based buffer overrun error message, you might need to reinstall Windows to make your device work normally again.
This is a last resort, as reinstalling Windows will result in data loss on the system disk. So, you have to backup or transfer the needed files in advance. If there are a large number of files you want to backup, the easiest way should be back up the entire disk. To achieve that, you can use MiniTool Partition Wizard utility.
Step 1: Register to MiniTool Partition Wizard Pro Ultimate edition with a purchased license key.
Step 2: In the main interface, select the system disk and click Copy Disk from the left pane.
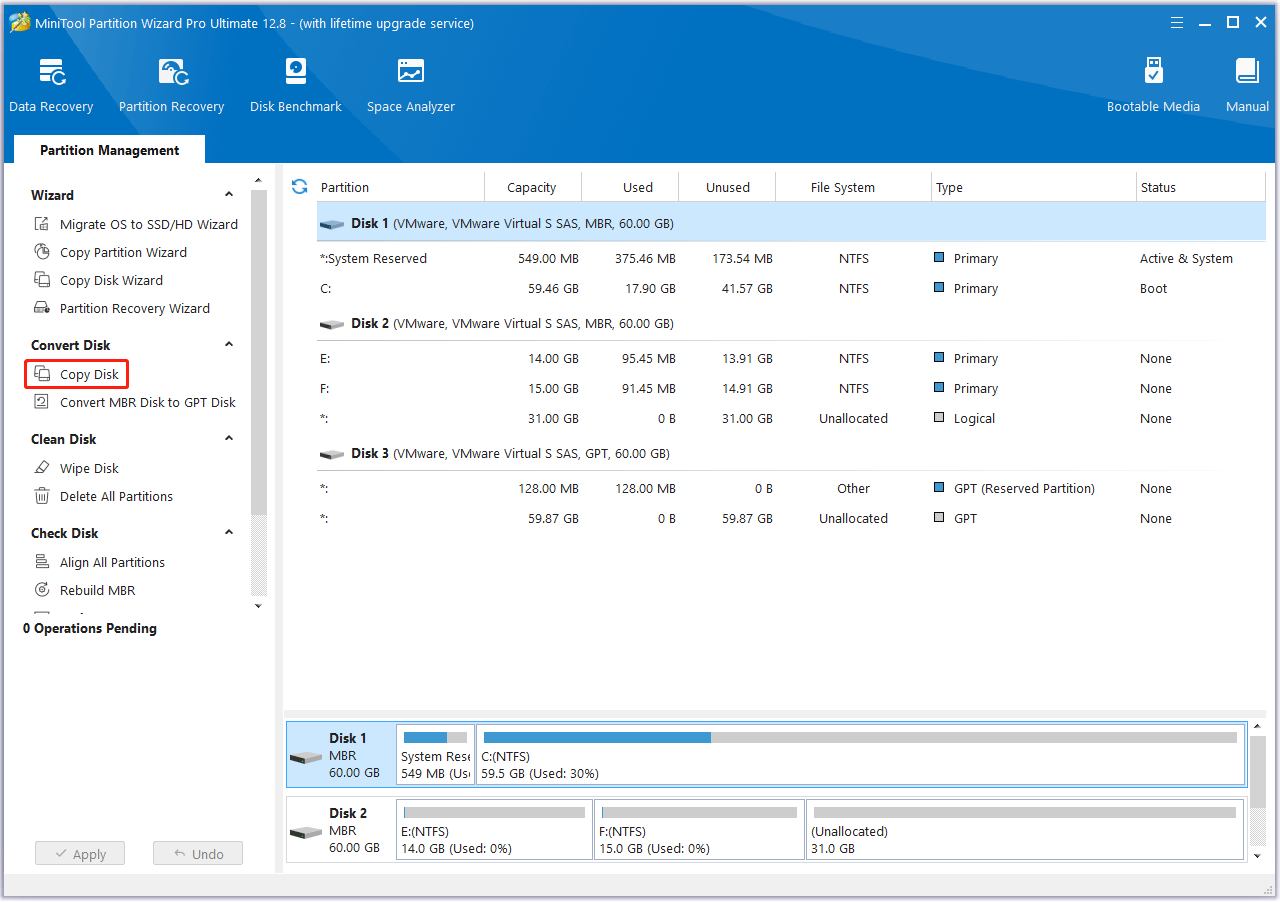
Step 3: Select the target disk to hold the backup and click Next.
Step 4: Choose the Copy Options (the default setting is fine), confirm the size and location of partitions on the new disk and click Next.
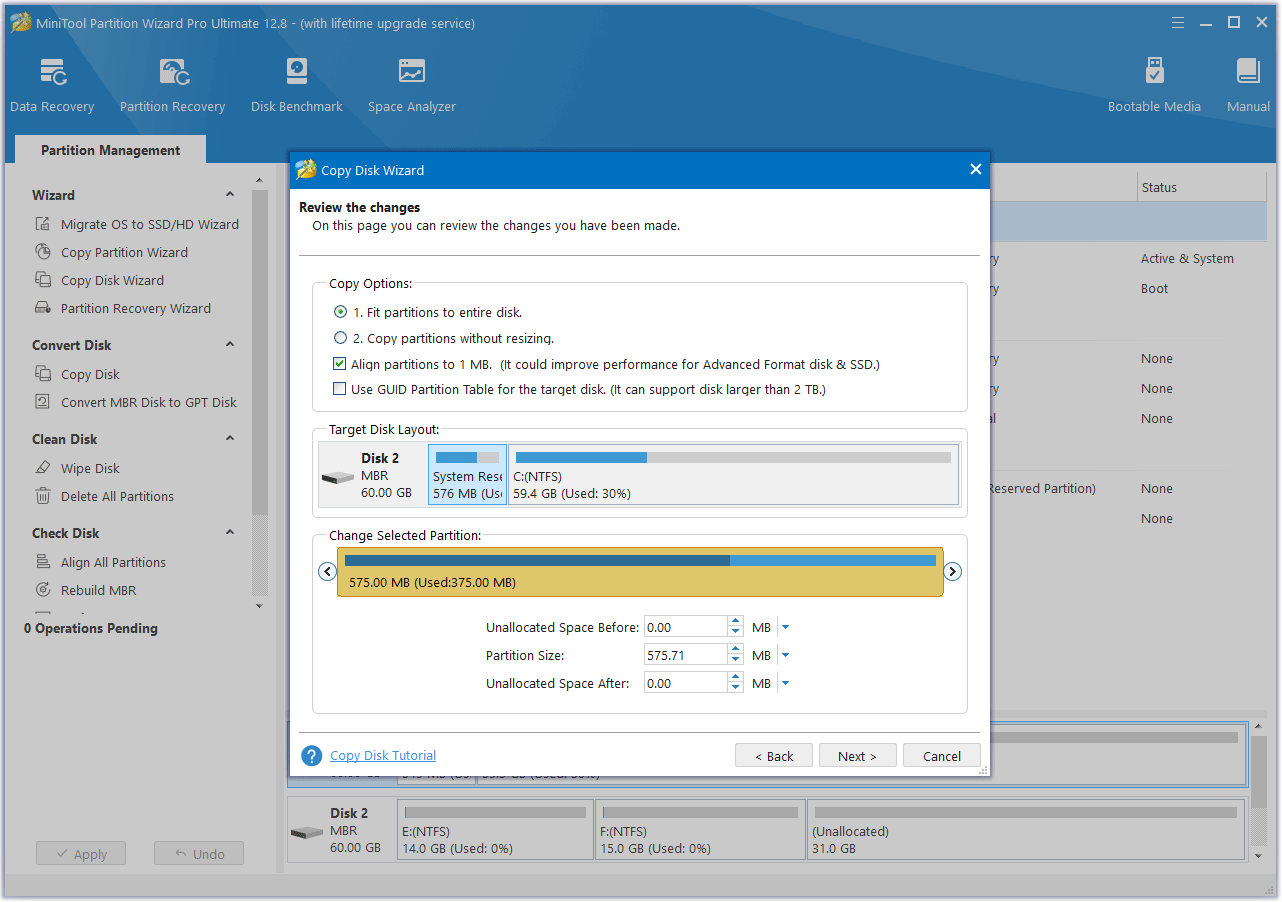
Step 5: Read the information about how to boot from the destination disk and click Finish. After back to the main interface, click Apply to execute the pending operation.
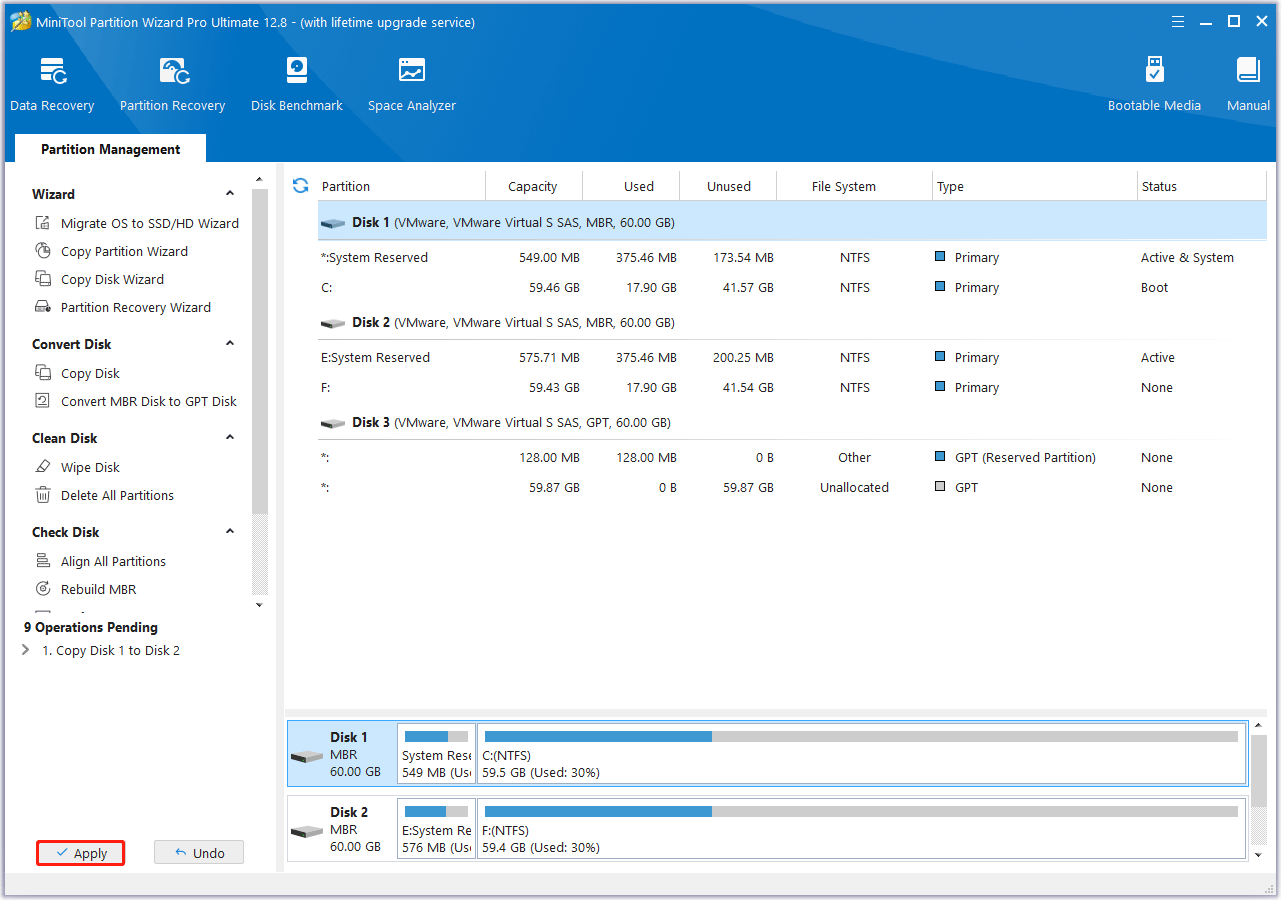
Now that you have backed up the system disk, you can reinstall Windows without any worries.
To do that, you can continue using the Windows installation media you create in previous mentioned method. After entering the Setup windows, please click Install now instead of Repair your computer, and then follow the given instructions to complete the installation.
Bottom Line
Do you have any problems about this post? Or do you have any better methods to resolve the issue under our discussion? Please let us know. You can leave a message in the comment box below, or contact us via [email protected].

User Comments :