System Partition and Boot Partition on Different Drives
The system partition and boot partition are computing terms for disk partitions of a disk drive. These two partitions must exist and be properly configured for a computer to operate. In other words, these two partitions are indispensable for booting an operating system.
System partition: This disk partition contains the 2 boot files Bootmgr and BCD.
Boot partition: It is a primary partition that contains the boot loader that is a piece of software responsible for booting the operating system.
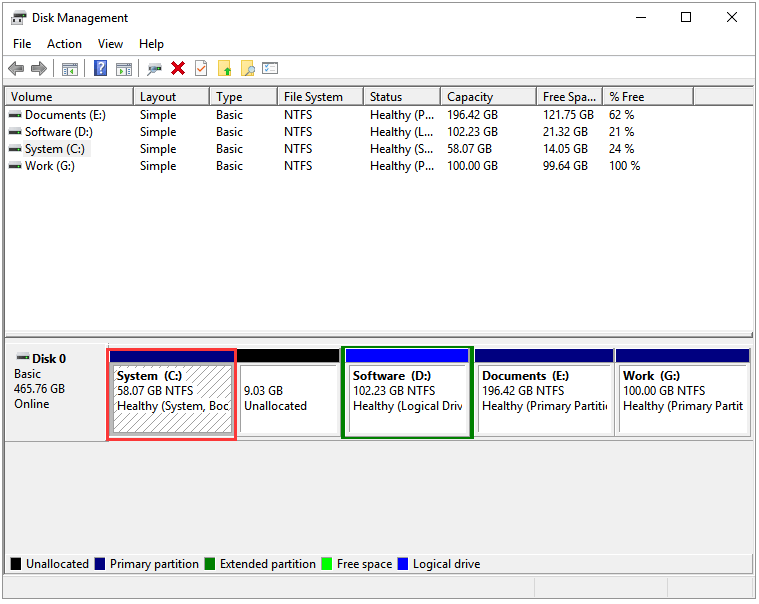
However, some computer users ran into the following situation:
I’ve just discovered that my boot and system partitions for windows 7 are on different hard drives. The boot partition is on my 120GB SSD and the system partition is on my 320GB WD HDD. This means that I must have both hard drives plugged in for my system to boot. Is there any way to fix this without having to re-install windows?
As the user said, in this situation, two drives are required to be connected for a normal Windows loading process, which is so inconvenient.
How to make system partition and boot partition on the same disk? The following content will show you 2 ways to deal with system reserved partition on wrong drive.
Method 1: Move System Partition
The first way is to move the system partition to the disk where the boot partition is located. How to do that without data loss? Here it is highly recommended you to apply the third-party software MiniTool Partition Wizard which can work without Windows OS.
Here is the tutorial on copying the system partition to the disk where the boot partition is located with MiniTool Partition Wizard.
Step 1: Make sure there is unallocated space on the target disk and its size should be larger than the size of the system partition.
- If you have enough unallocated space on the target disk, you can directly move to Step 2;
- If not, please try the Move/Resize Partition feature to get larger enough unallocated space.
Now, there is enough unallocated space, and you can apply the Copy Partition feature of MiniTool Partition Wizard to copy the system partition to the target disk.
Step 2: Get MiniTool Partition Wizard and then launch it to get its main interface (In this part, you can try the free program, but I use the Pro edition to make instructions due to the following method’s needs).
MiniTool Partition Wizard DemoClick to Download100%Clean & Safe
Step 3: On the interface of MiniTool Partition Wizard, click the system partition and then select the Copy Partition Wizard feature from the left panel.
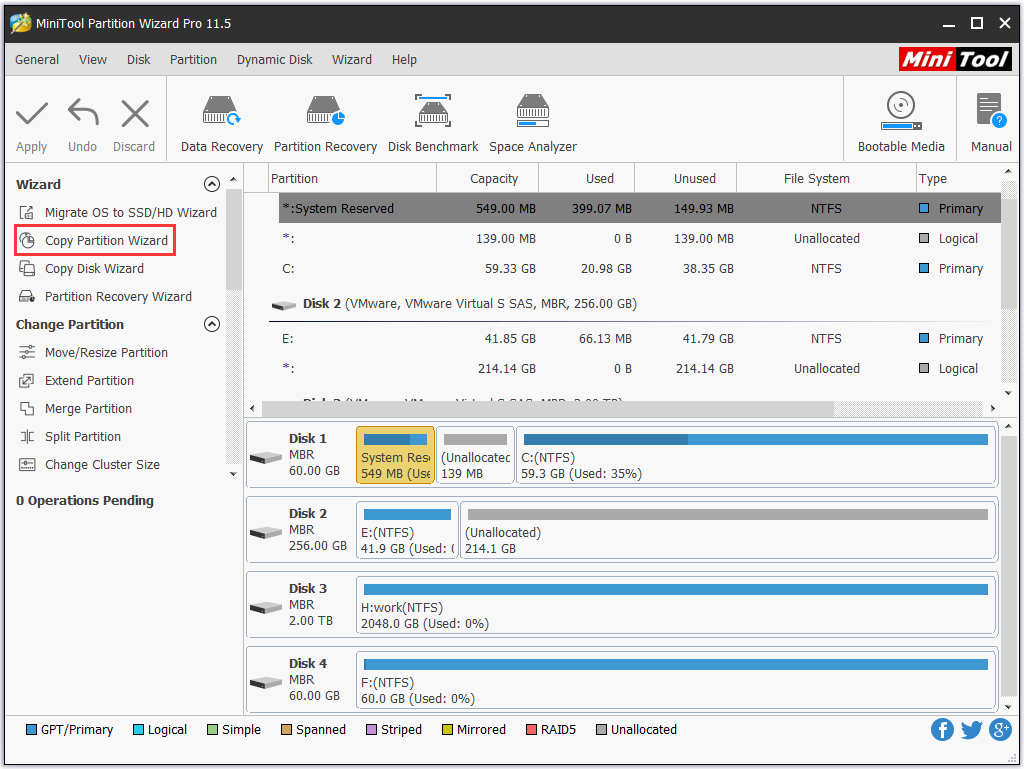
Step 4: Click the Next button to continue.
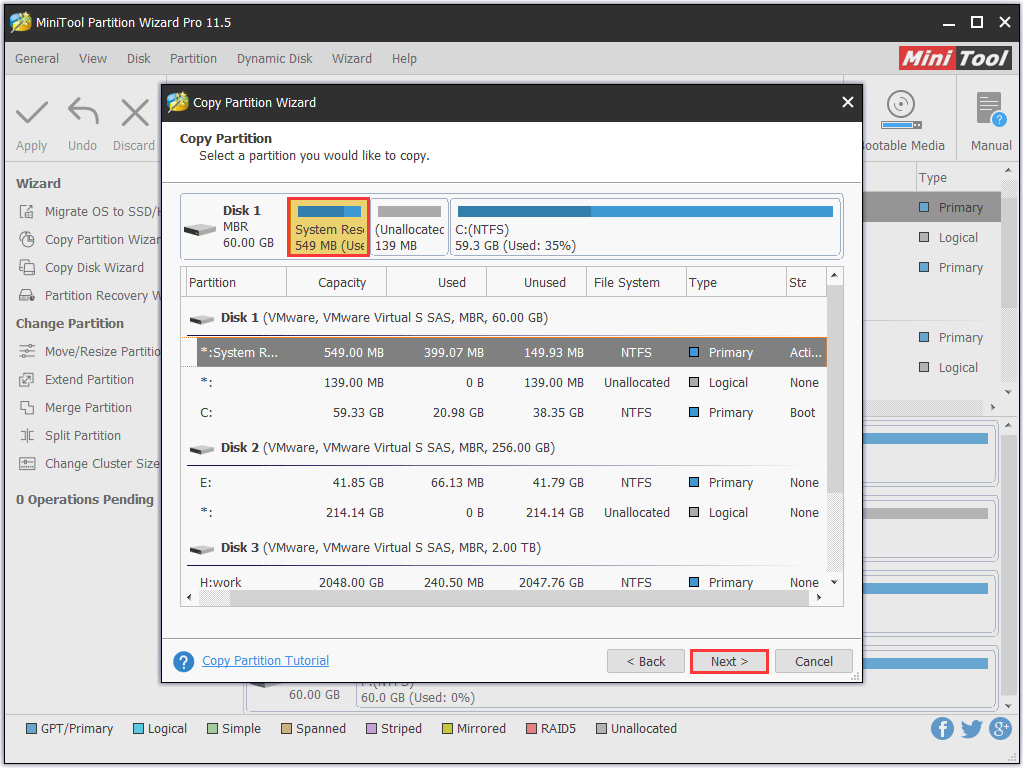
Step 5: Select system partition to copy, and then click the Next button.
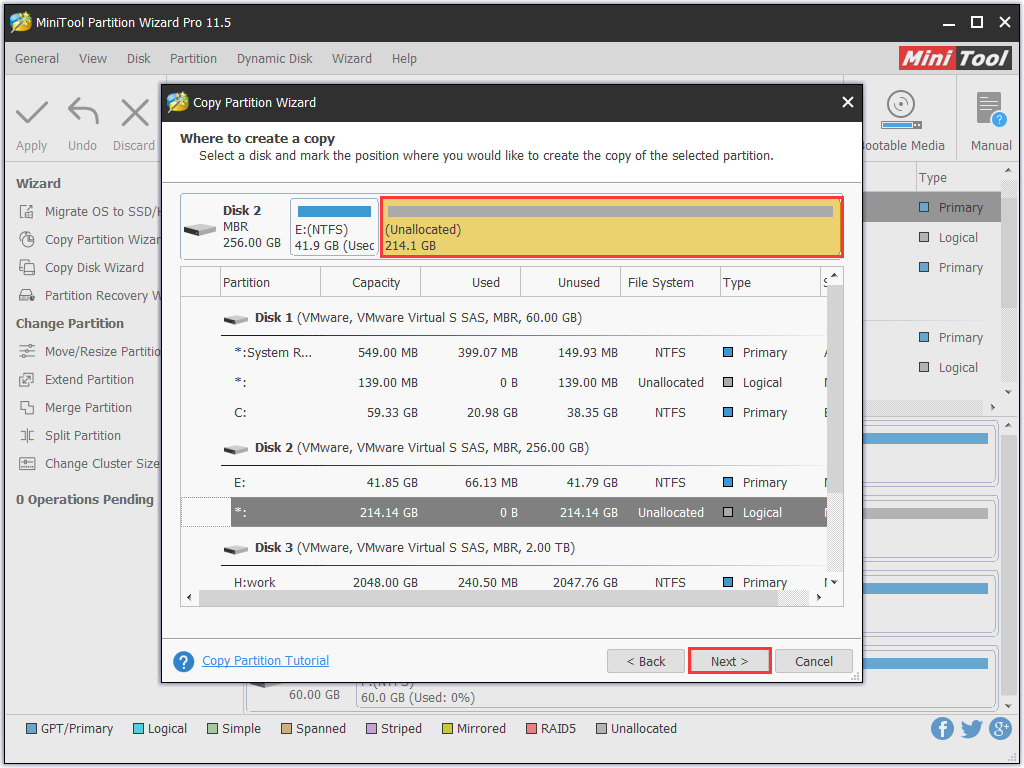
Step 6: Select the unallocated space from the partition list to save the copy of the system partition and then click the Next button.
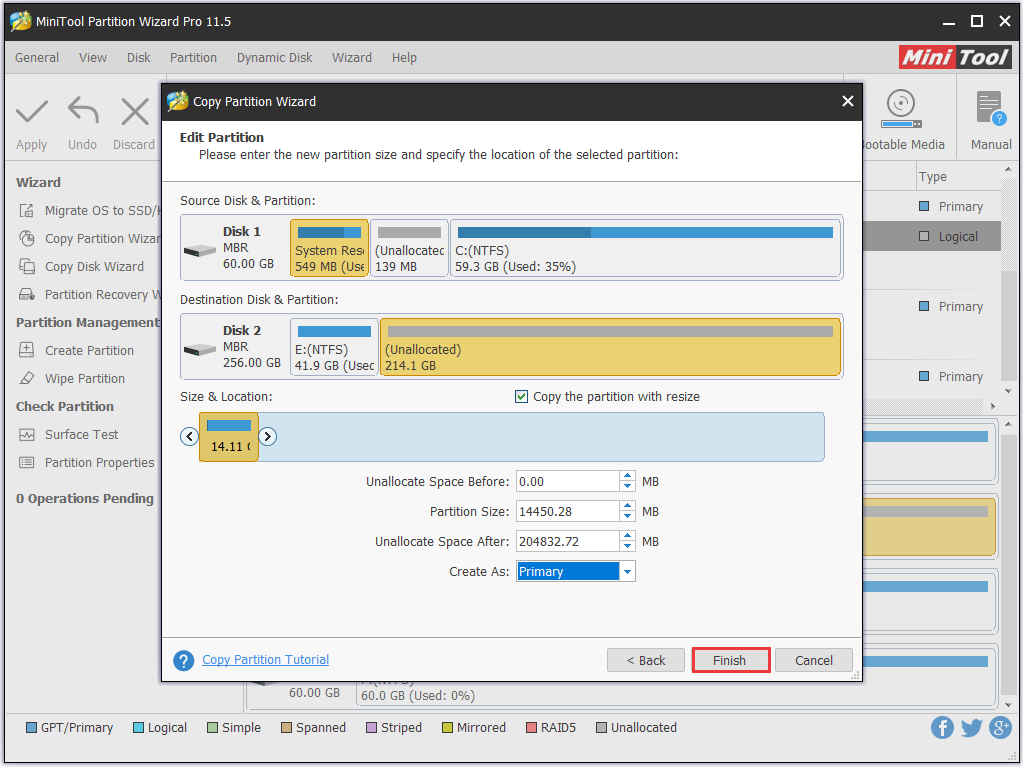
Step 7: Move the handle to enlarge or shrink the new partition. Then click the Finish button.
Step 8: After going back to the main interface of MiniTool Partition Wizard, please click the Apply button this interface.
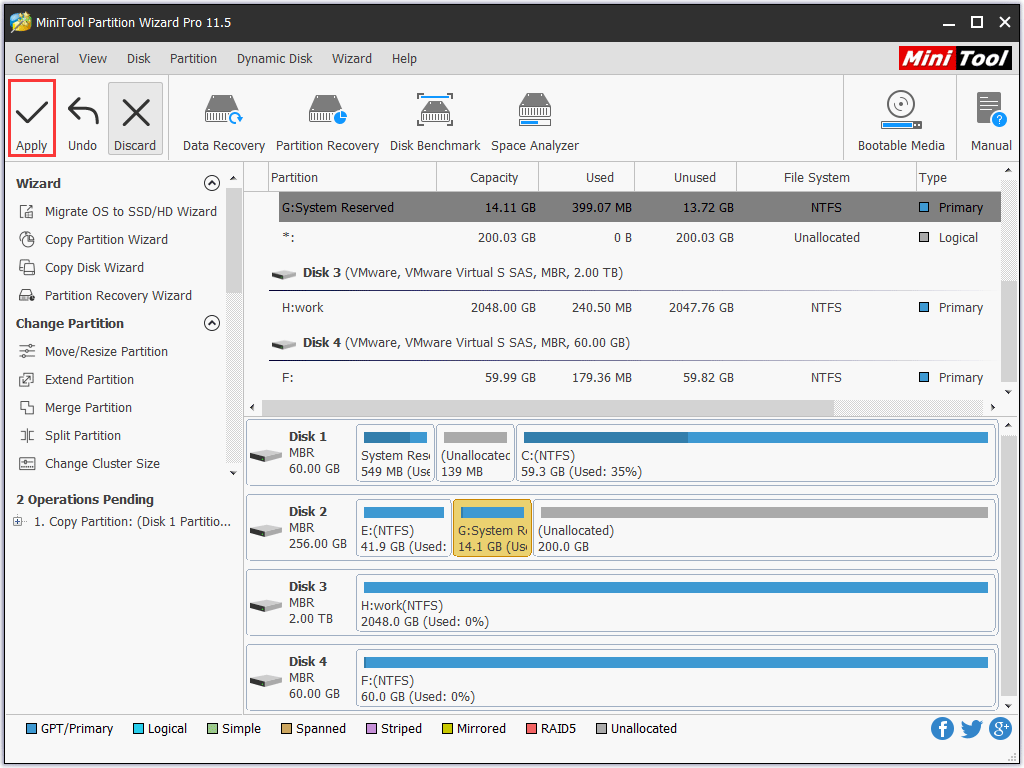
Step 9: When the copying process finishes, the system partition and boot partition should be located on the target disk. In this case, please enter BIOS to make sure the disk where boot partition and system partition are located in the 1st location.
Step 10: Remove the disk that contained the system partition and then try to boot your computer. If the computer boots successfully, reconnect the disk and delete the system reserved partition.
Method 2: Build System Partition
Apart from moving the system partition to the disk where boot partition is on, you can also try building a system partition on the disk where the boot partition is located.
The building process can be divided into two stages – one is creating a new partition for the disk where the boot partition is on and the other is writing boot files to the created partition. This process is helpful in terms of combining the system partition and the boot partition.
To create a new partition when your computer has no Windows operating system, you can also try MiniTool Partition Wizard. But in this situation, you need to pay money for its Bootable Edition, and prepare a normal computer and a USB flash drive that containing no important files (migrate the important files by using the Copy Partition feature mentioned above if there are some such files).
If you are a personal user, the MiniTool Partition Wizard Pro Edition can meet your needs in this situation.
MiniTool Partition Wizard DemoClick to Download100%Clean & Safe
Attention:
- The following steps require certain computer knowledge to finished, because any mis-operation would lead to system failure. Therefore, please follow every mentioned step strictly.
- Only if system partition and boot partition are on a basic drive, this way can work. (you can try to convert dynamic disk to basic disk.)
- You are unable to combine a GPT system hard drive, EFI system partition, and boot partition. (If the GPT disk is no more than 2TB, you can convert it to MBR disk)
Now, follow the steps below to make the system partition and boot partition on the same disk.
Step 1: Remove the disk where the system partition is located carefully.
Step 2: Connect the prepared USB flash drive with the normal computer at first.
Step 3: Buy the MiniTool Partition Wizard Pro Edition, install it on the computer, and launch it to get its main interface.
Step 4: Make a Bootable USB flash drive with MiniTool Partition Wizard.
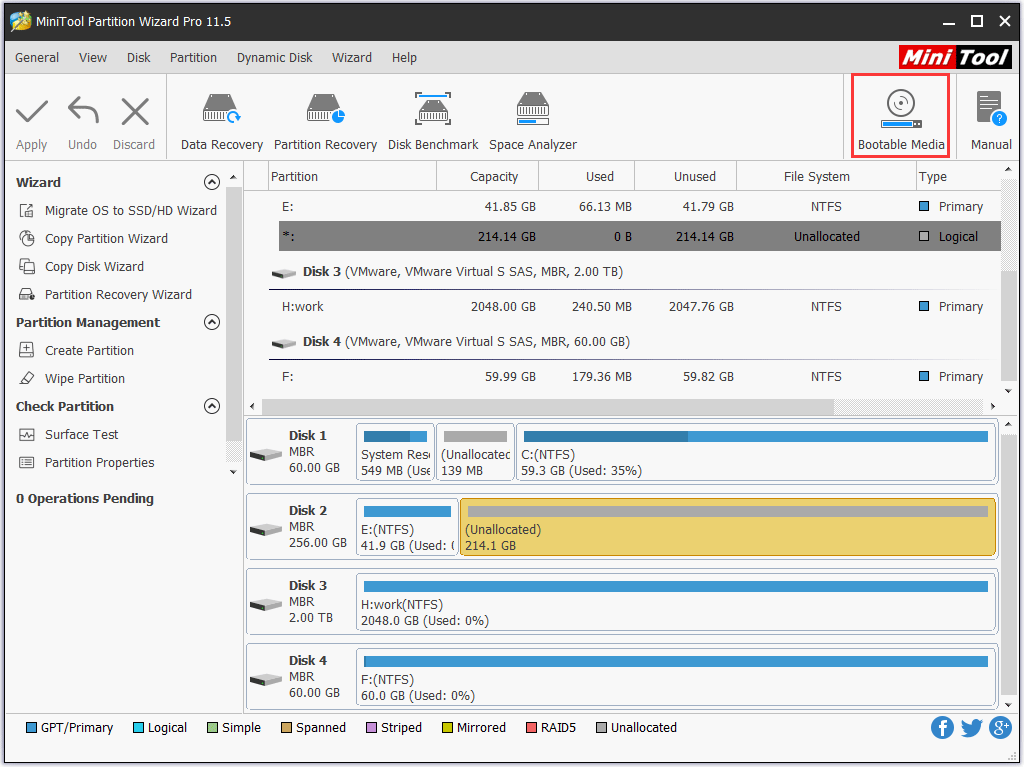
- Click the Bootable Media feature on the main interface.
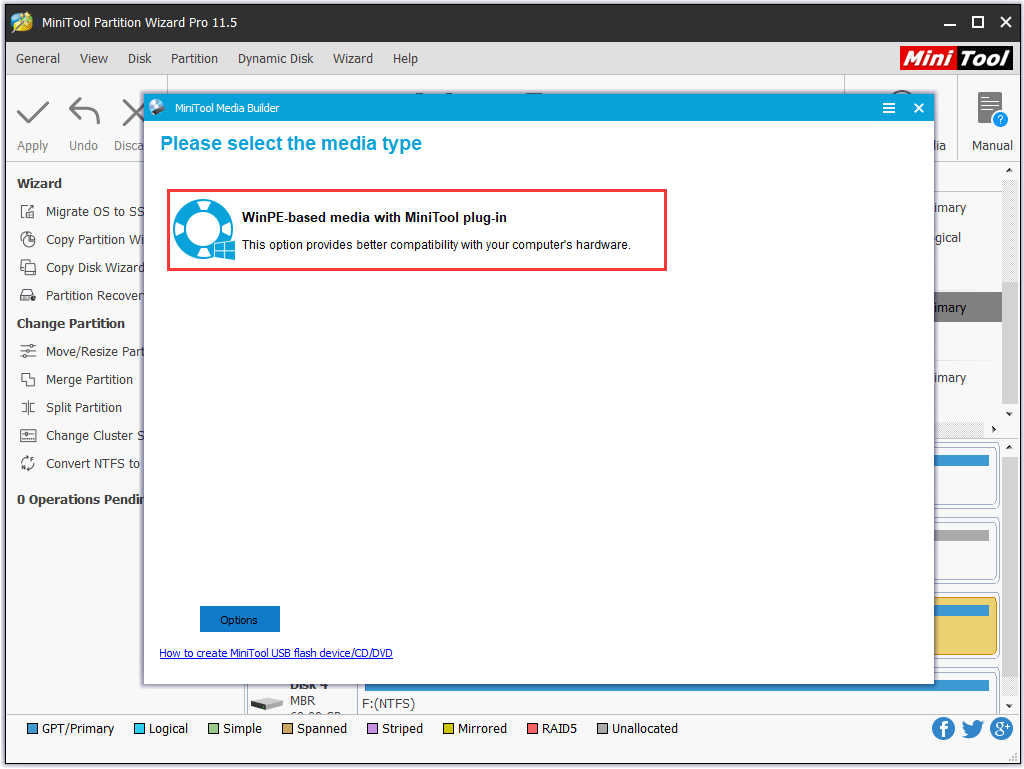
2. Select WinPE-based media with MiniTool plug-in to continue.
- To build a Bootable USB flash drive, please click USB flash drive. Then click Yes to confirm that you want to burn the boot flash drive.
- Wait for the software to generate boot files on the flash drive. And then click Finish after finishing burning.
Step 5: Connect the made bootable USB flash drive with the original computer, and then boot it from the bootable USB flash drive.
Step 6: Create an active primary partition on the disk where the boot partition is located.
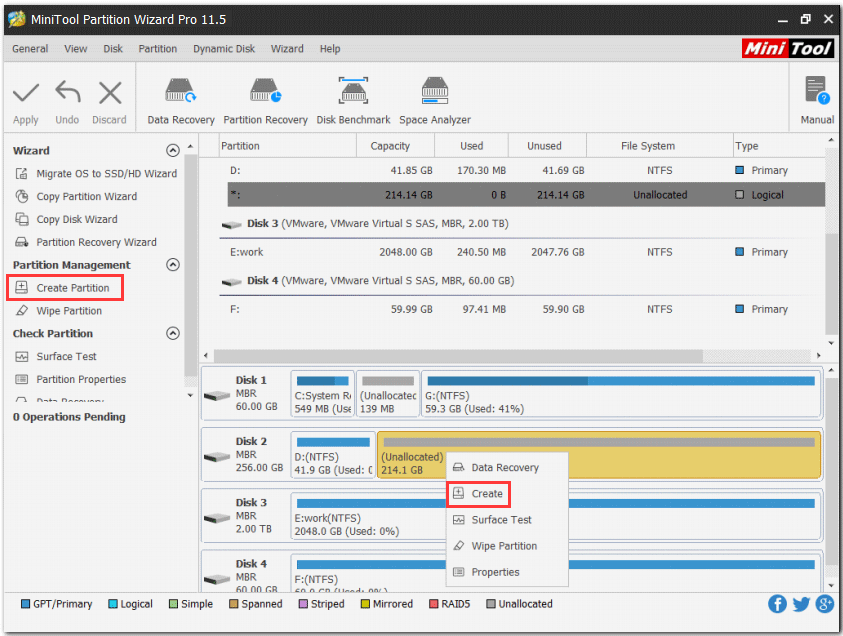
1.Click the unallocated space on this disk, and then select Create Partition from the left panel. Or give the unallocated space a right click, and then choose the Create
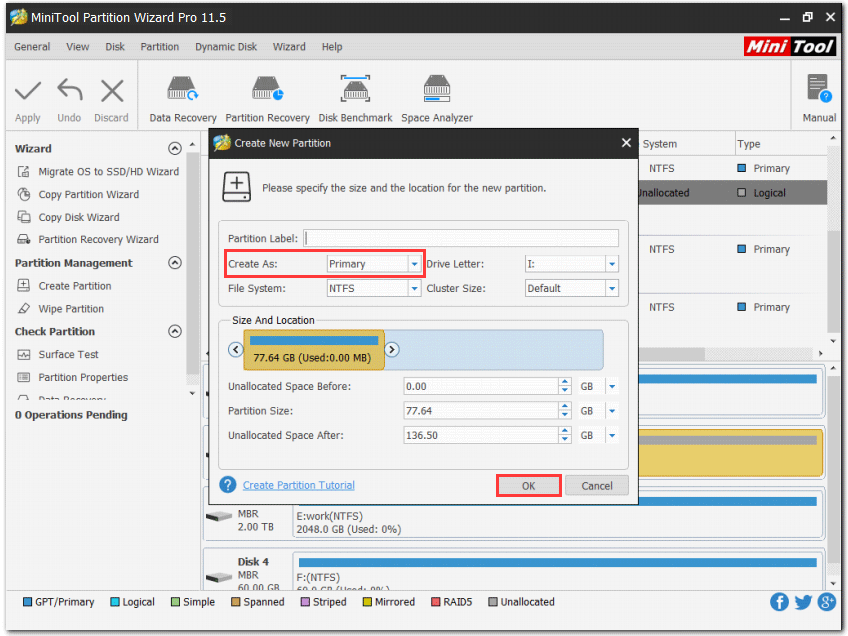
2. Select Create AS Primary, and drag the handle leftwards or rightwards to resize the partition size. Then click the Next
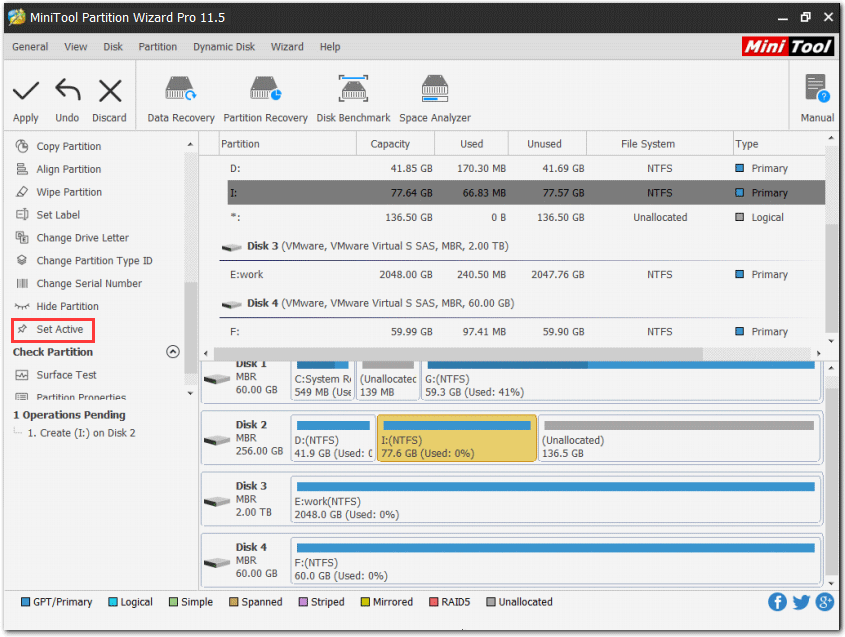
3. Click the new created partition and then choose the Set Active from the left panel.
Note: You should pay attention to the following items:
- For an MBR disk, only one primary partition on it can be set active.
- If you set the wrong partition as active and change the original active partition into inactive, they will be blocked from Windows.
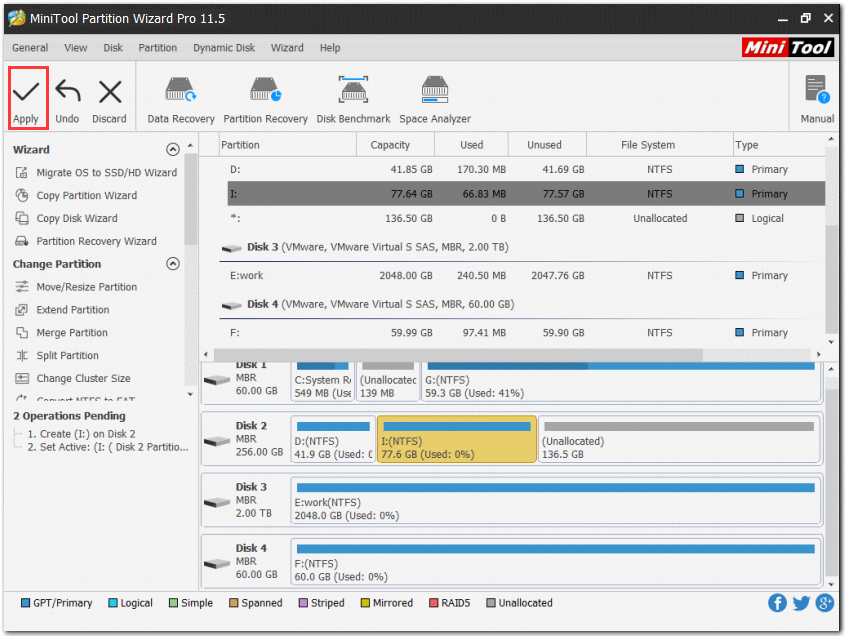
4. Once go back to the main interface, please click the Apply button to execute all the changes.
Step 7: Write boot files to the system partition via Command Prompt.
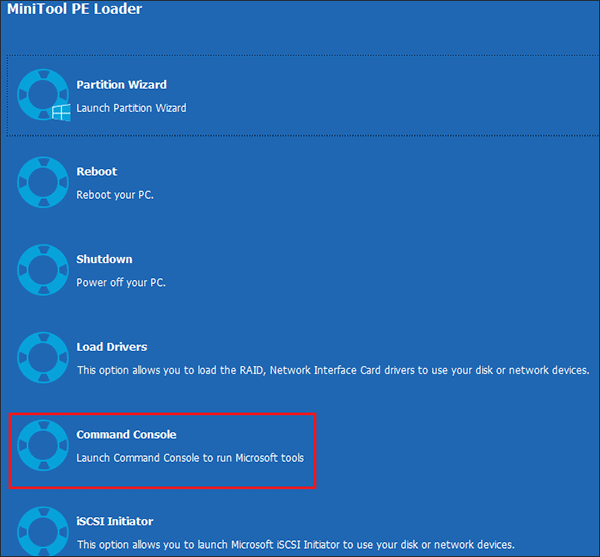
Click Command Console on the MiniTool PE Loader window to launch Command Prompt and then please type the bcdboot #:windows command (# refers to the drive letter of the boot partititon where Windows is installed) on the Command Prompt window and hit the Enter key to execute this command to create new boot files for the newly created partition as well as to deploy them in this drive.
Further reading:
BCDBoot is a command-line tool that is used to configure the boot files on a PC or device to run the Windows OS. You can apply this tool in the following cases:
- Add boot files to a computer after applying a new Windows image. In a typical image-based Windows deployment, use BCDBoot to set up the firmware and system partition to boot your image.
- Sey up a computer to boot to a virtual hard disk (VHD) file that includes a Windows image.
- Repair system partition. If the system partition has been corrupted, you can use this tool to recreate the system partition files by using the new copies of these files from the Windows partition.
- Set up or repair the boot menu on a dual-boot computer. You can use this command-line tool to add or repair the boot menu if you have installed at least two copies of Windows on your computer.
Now, the boot files have been copied to the active partition, you should go to BIOS to set the disk as the first boot. After that, please restart your computer to see if it works well.
Bottom Line
Both two methods to fix system reserved partition on wrong drive have been introduced in the content. Hope these two solutions can help you solve this problem.
If you have any questions to these two solutions, please don’t hesitate to contact us via [email protected] or leave them in the following comment zone. We will replay to you ASAP.

User Comments :