Steam Unpacking Slow Issue
Many Steam users complain that they have encountered Steam unpacking slow issue. This issue mainly occurs in the following two cases:
Case 1. You have preloaded a game.
I downloaded the preload now it’s saying it’s going to take 2 hours to unpack the game. Then, what was the point of the preload? — reddit.com
When the game is not yet available, Steam allows you to preload an encrypted version of the game that is inaccessible until the release date. When the release date hits, if you purchase this game, you can get a decryption file and Steam starts to “unpack” (decrypt) the game files through the Steam client.

This is the Steam unpacking process that is visible to users. Of course, there are some cases where Steam unpacking process can’t be sensed by users, for example, when you download a game after its release, the unpacking process accompanies the download process. In this case, the unpacking process is invisible.
But if your computer’s hard drive is slow while the network is fast, Steam will be also stuck in the unpacking state for a while after the download is complete.
Case 2. You update a game.
I’ve been unpacking a 50.9 MB update for Payday 2 for 40+ minutes now and it’s almost half way done. It seems like any game I update it takes a long time before I can actually start it. — reddit.com
The Steam unpacking slow issue also occurs when an update is packed in a horrible way. This update is essentially a small update, but it decompresses a huge file. As a result, the unpacking speed is slow and you sometimes need to have 30GB free to apply a 200MB update.
How to Solve the Steam Unpacking Slow Issue
Unpacking process is a normal process, but why is the Steam unpacking speed so slow? After reading many users’ answers on various forums, I find the Steam unpacking slow issue is mainly related to hard drive. At the same time, from these answers, I conclude the following methods for you to solve the Steam unpacking slow issue.
How to Speed up Steam Unpacking?
- Pause Unpack or Restart Steam
- Set Steam’s Priority to High
- Delete Files in Depotcache Folder
- Defrag HDD or Optimize SSD
- Make Sure Enough Free Space
- Check Drive for Errors
- Upgrade to SSD
Fix 1. Pause Unpack or Restart Steam
There is no reason to explain this phenomenon, but some people report that they have solved the Steam unpacking slow issue just by pausing and un-pausing the unpacking process. Some users also report that they solved the issue just by exiting steam and logging back in, or by restarting the Steam client.
Fix 2. Set Steam’s Priority to High
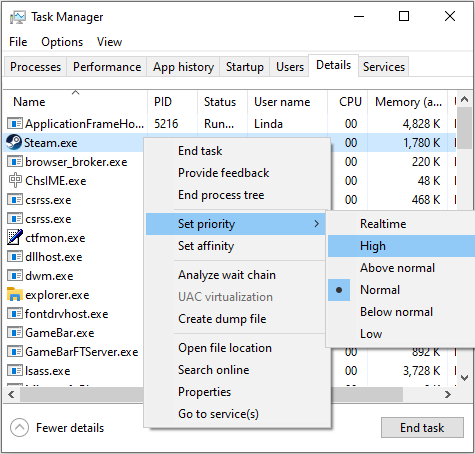
If you are running multiple programs at the same time, or you have many boot startup programs, this method may help you solve the Steam unpacking slow issue. If you set Steam’s priority to high, the system will allocate more resources to Steam to improve its running speed. Here is the guide:
- Right-click on the blank area of the Windows Taskbar and choose Task Manager from the context menu.
- Skip to Details
- Find the exe program, right-click on it and navigate to Set priority > High.
Fix 3. Delete Files in Depotcache Folder
Steam depotcache folder may store excess, temporary data on your computer that can take up valuable space. It may also store private data such as passwords or browsing history in the registry or on the file system.
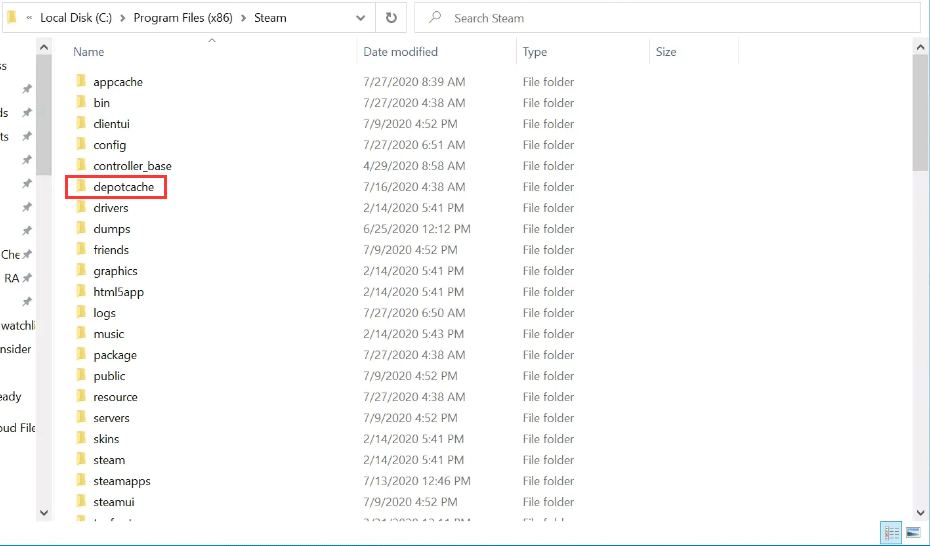
Some users report that they have solved the Steam unpacking slow issue by deleting files in the Steam depotcache folder. Here is the guide:
- Close Steam.
- Go to path: C:Program Files (x86)Steamdepotcache. The path varies depending on where your steam is installed in.
- Delete everything in the depotcache folder.
Fix 4. Defrag HDD or Optimize SSD
If you use HDDs, you should deal with file system fragmentation issue. How do file system fragmentations appear?
When you write data at the beginning, the data is usually stored to disk continuously. However, after writing and deleting data frequently, these files are gradually scattered and stored in different places on the entire disk, instead of being continuously stored in consecutive clusters of the disk. This is called file system fragmentation.
File system fragmentation issue will reduce the disk read and write performance, and then affect the performance of the operating system and software. In this case, you should defrag HDDs to improve the performance.
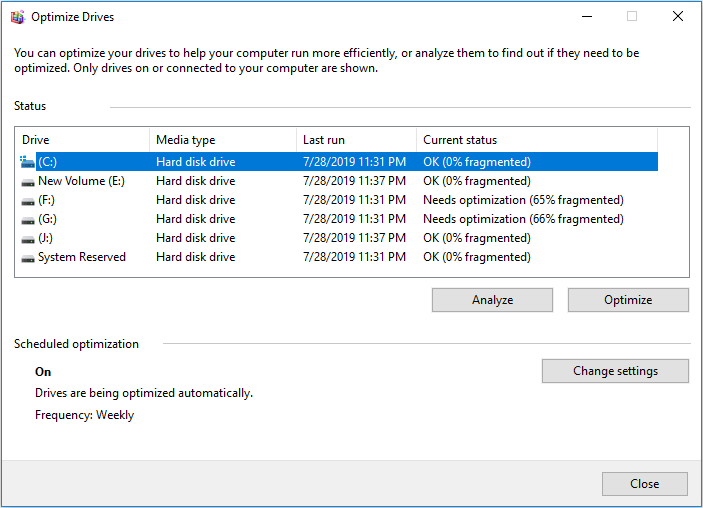
But if you use SSDs, defragmentation is not suitable for you. Instead, you should enable TRIM feature to trigger GC (Garbage Collection) process. Fortunately, staring from Windows 8, HDD disk defragmentation feature and SSD TRIM feature are integrated in one Windows built-in tool named Optimize Drives.
This tool will detect and determine whether the drive is HDD or SSD and then it will run disk defragmentation for HDDs and run TRIM for SSDs. Here is the guide on how to run Optimize Drives tool:
- Enter “optimize” in the Windows search box.
- Click the Defragment and Optimize Drivesicon to run it.
- Choose a disk and click the Optimize
Fix 5. Make Sure Enough Free Space
A Steam user suggests on forums that “For those who have an SSD, make sure you have at least 30GB of free space on your drive or unpacking will be very slow.” Then, many people report that they have solved the Steam unpacking slow issue through this method. I think this method also works to HDDs.
To make the unpacking process go smoothly, you should make sure the drive where Steam is installed in has enough free space. To do that, you can delete some unnecessary files. But if you don’t want to delete files and there is enough free space on other drives, you can solve the problem by extending the drive where Steam is installed in.
Then, MiniTool Partition Wizard can help you extend a drive easily. In addition, this feature is free. Here is the guide:
MiniTool Partition Wizard FreeClick to Download100%Clean & Safe
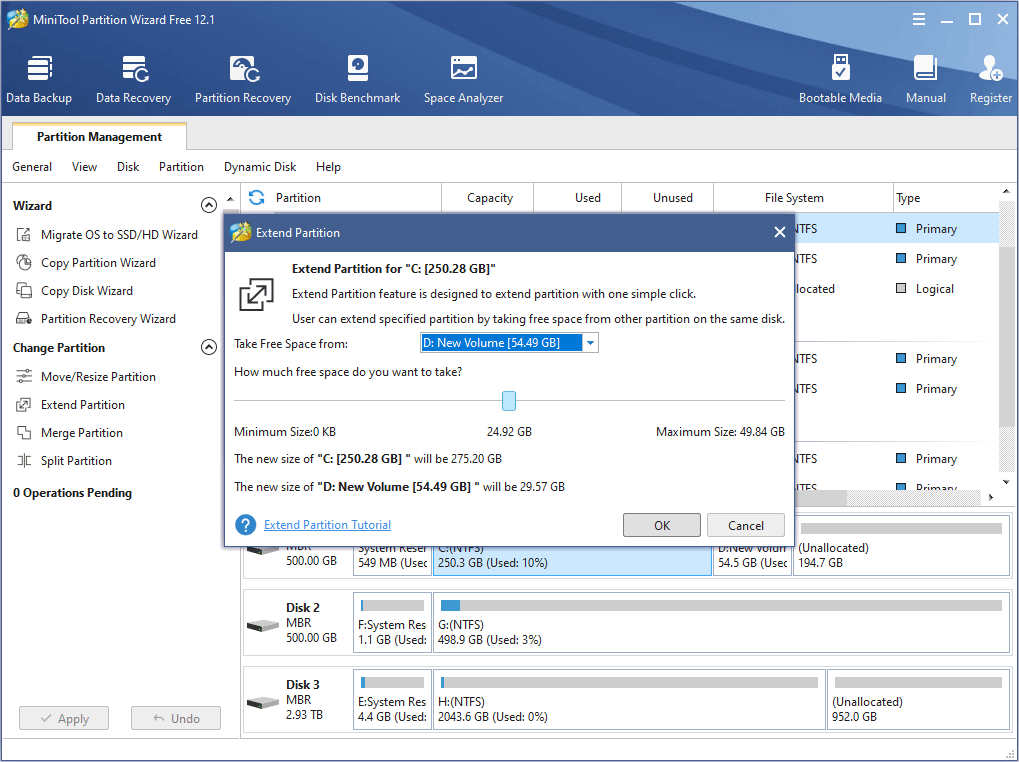
Step 1: Free download MiniTool Partition Wizard and launch it. Go to its main interface and right-click the drive where Steam is installed in. Then, choose Extend from the context menu.
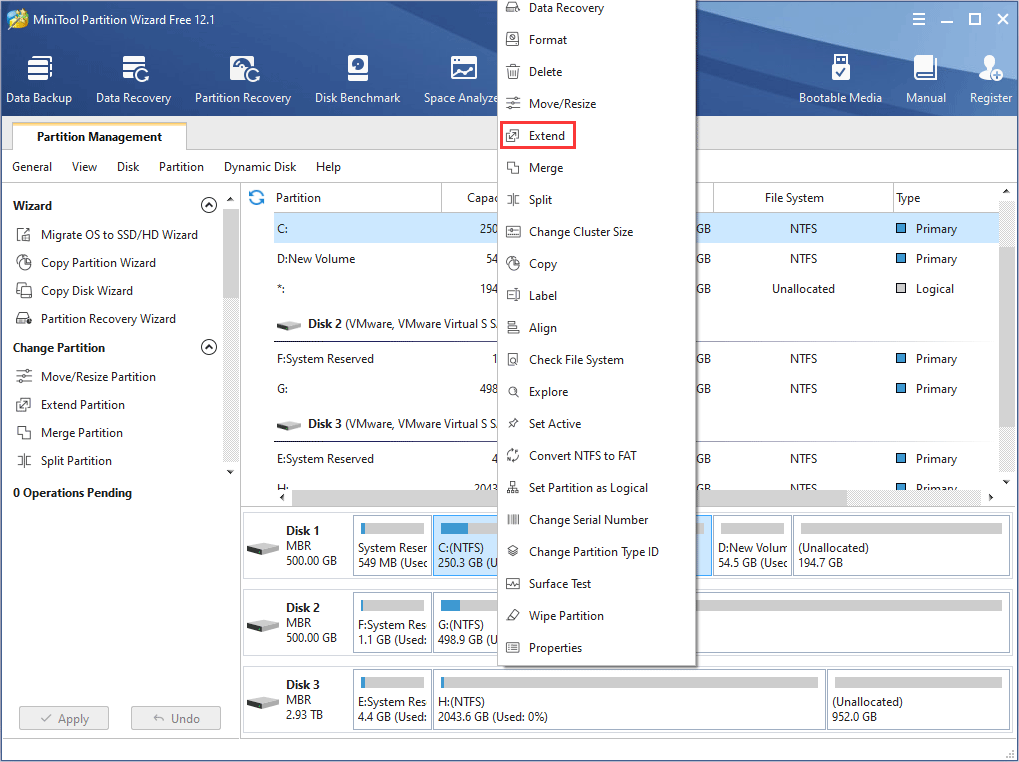
Step 2: Choose the drive or unallocated space you want to take space from and drag the sliding block to determine how much free space you want to take. Then, click OK button.
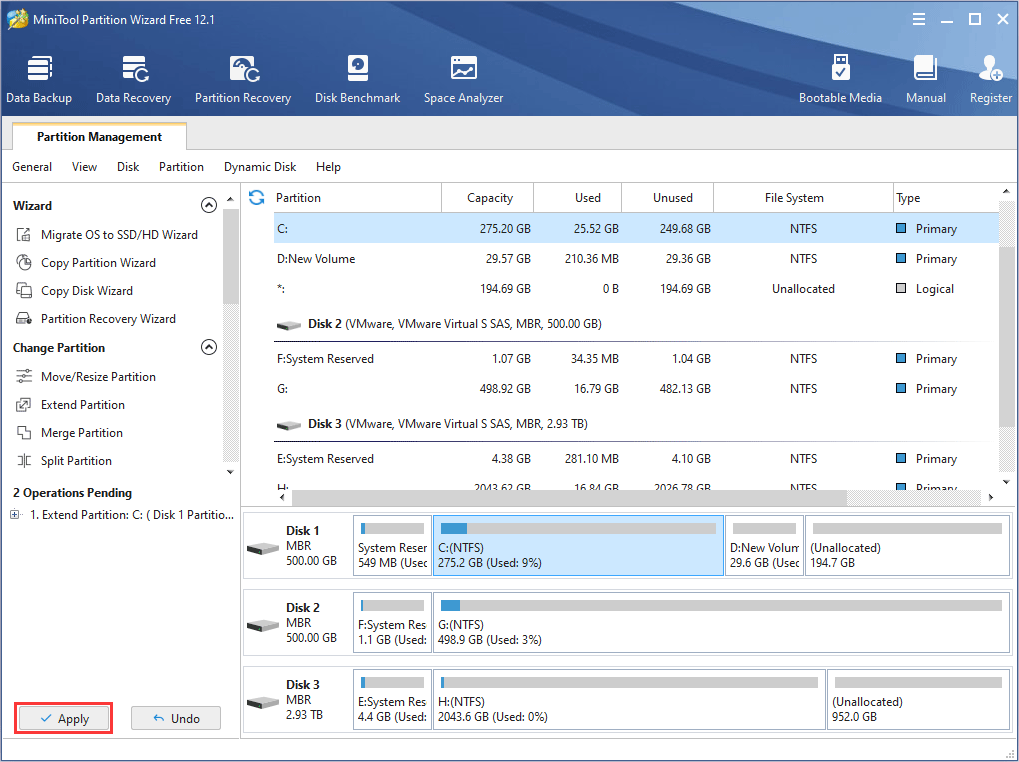
Step 3: Click Apply button to execute pending operations.
MiniTool System Booster TrialClick to Download100%Clean & Safe
Fix 6. Check Drive for Errors
Windows built-in Error checking tool can fix file system corruption and logical bad sectors that may prevent your PC from running normally. Here is the guide to Error checking:
- Open File Explorer.
- Right-click the drive where Steam is installed in and select Properties.
- Navigate to Toolstab and click Check
If the above method doesn’t solve the Steam unpacking slow issue, I recommend you to use MiniTool Partition Wizard Free Edition to check how many bad sectors are on the drive. Here is the guide:
- Free download and launch MiniTool Partition Wizard.
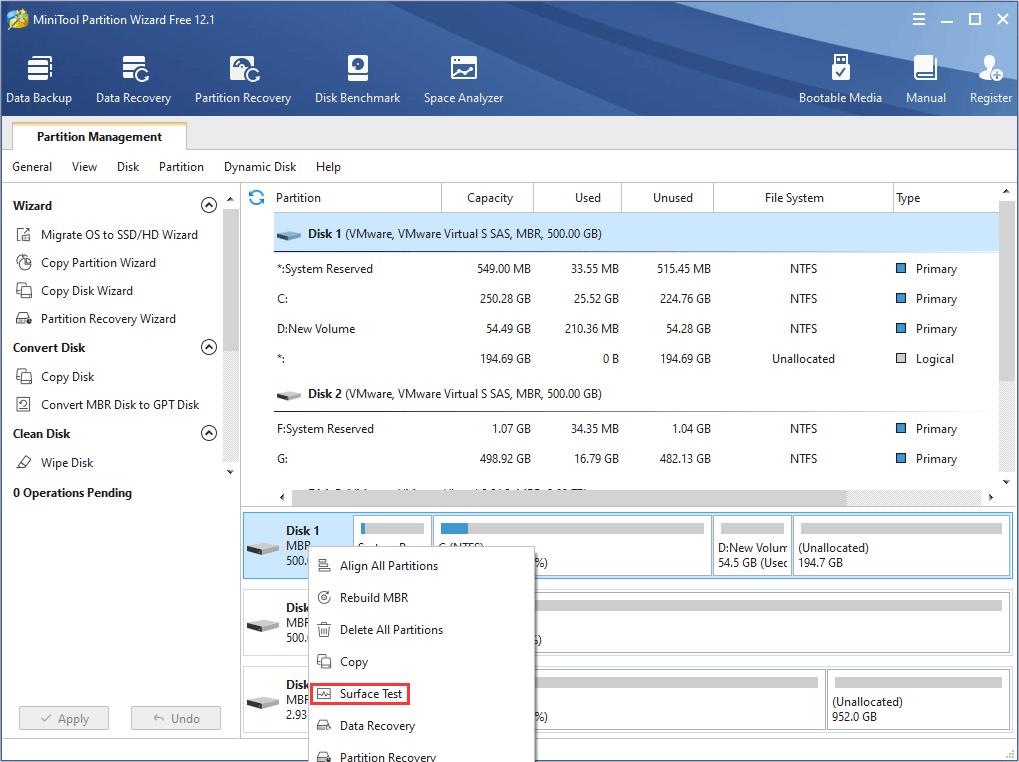
- Right-click a drive or a disk and choose Surface Test.
- Click Start Now Green blocks are good blocks and red blocks are bad blocks. If there are too many red blocks, you should consider replacing hard drive.
Fix 7. Upgrade to SSD
If you are using a HDD, upgrading to SSD may solve the Steam unpacking slow issue. This may be the most effective way but also the most expensive way to solve this issue.
To upgrade HDD to SSD, you may need a hard drive clone program to clone all content or merely the OS from the HDD to the SSD. Then, MiniTool Partition Wizard can also help you in this aspect. Here is the tutorial:
MiniTool Partition Wizard DemoClick to Download100%Clean & Safe
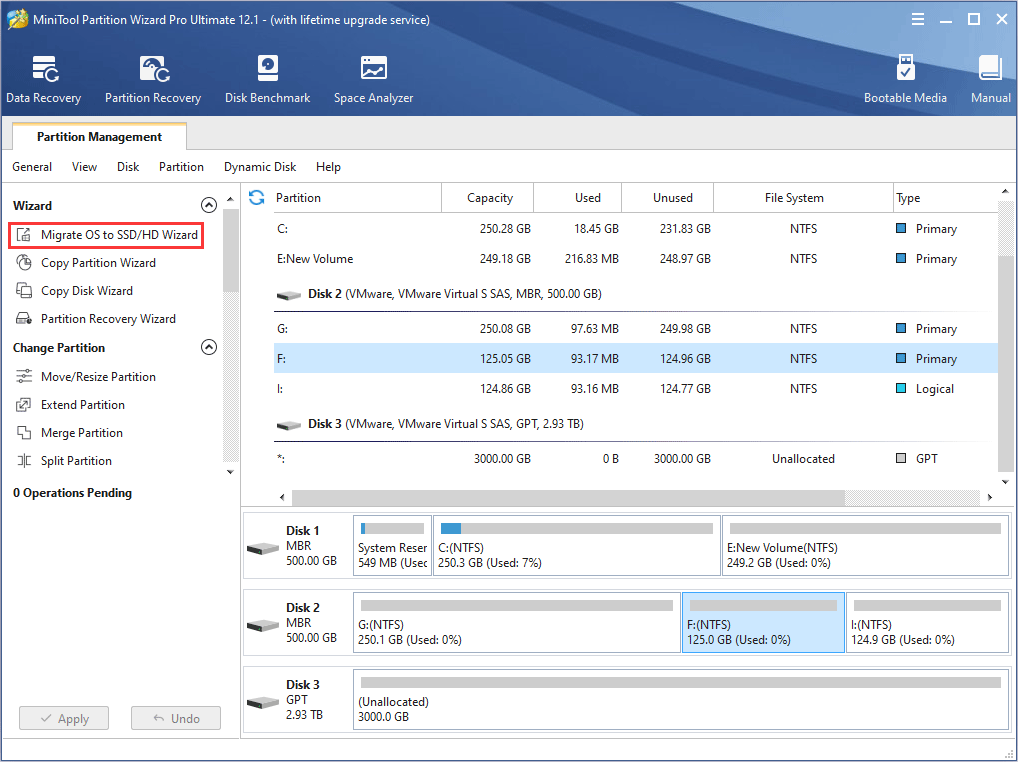
Step 1: Connect the SSD to the computer USB port via a connector adapter. Install MiniTool Partition Wizard and open this software. Go to its main interface and click on Migrate OS to SSD/HDD in the action panel (the above link is a Trial Edition, and the OS migration feature is not free).
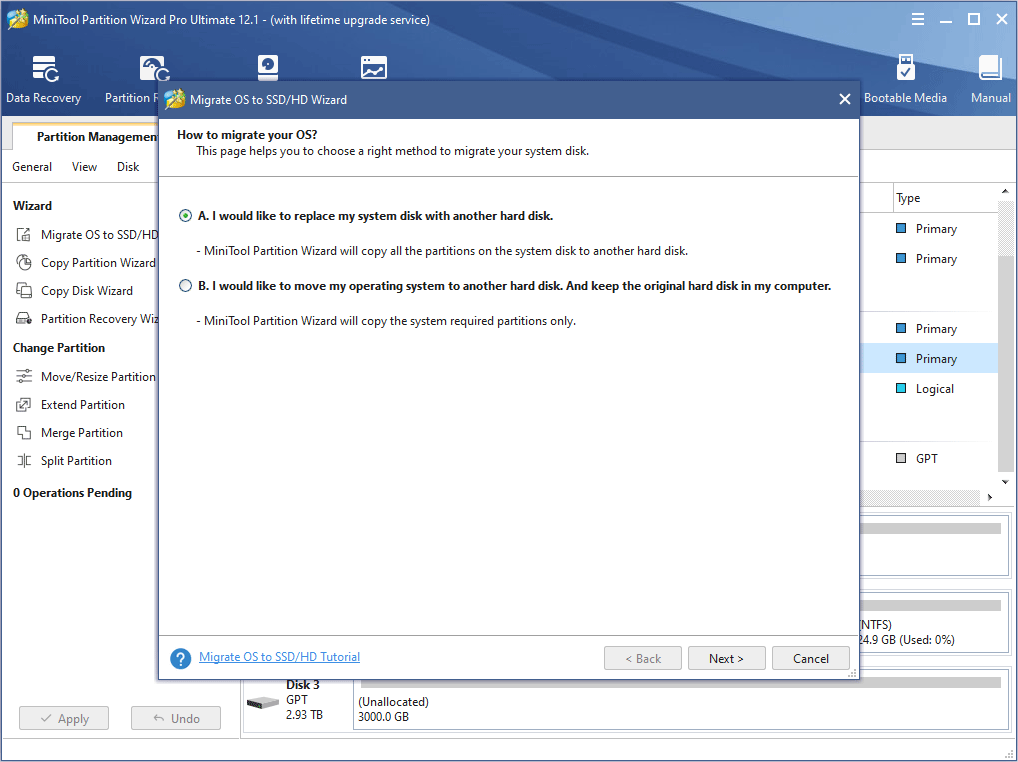
Step 2: Choose the right method to migrate the system disk and click Next. Option A allows you to clone the whole system disk, while option B only allows you to migrate the OS.
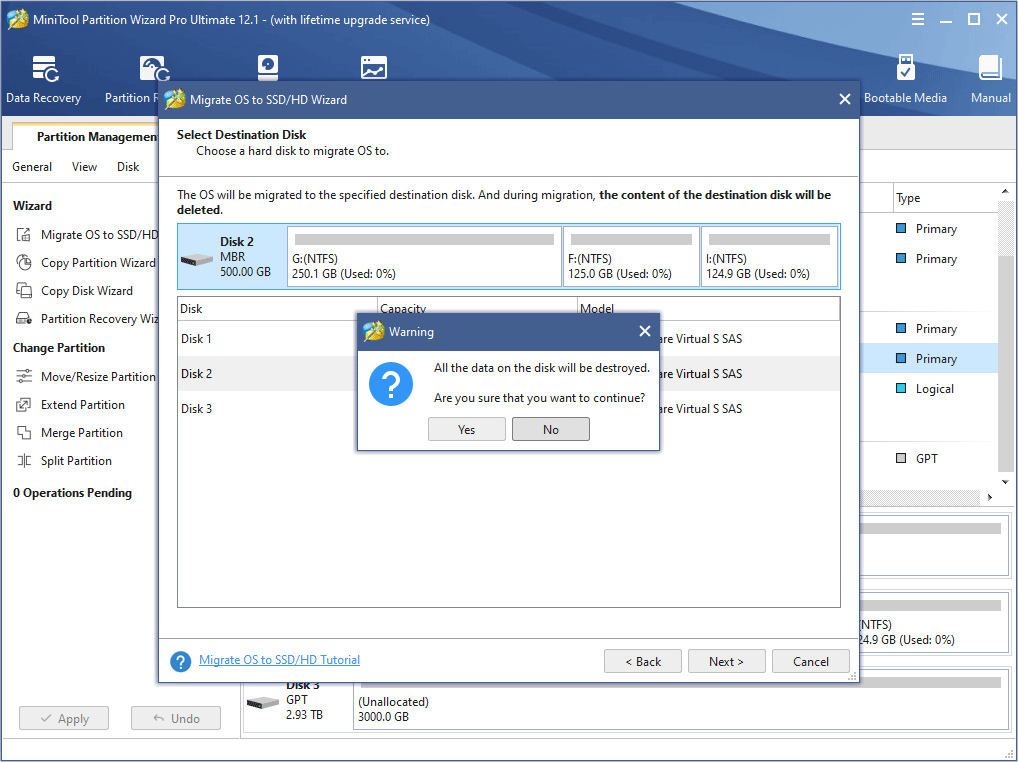
Step 3: Choose the new drive as the destination disk and then click Next.
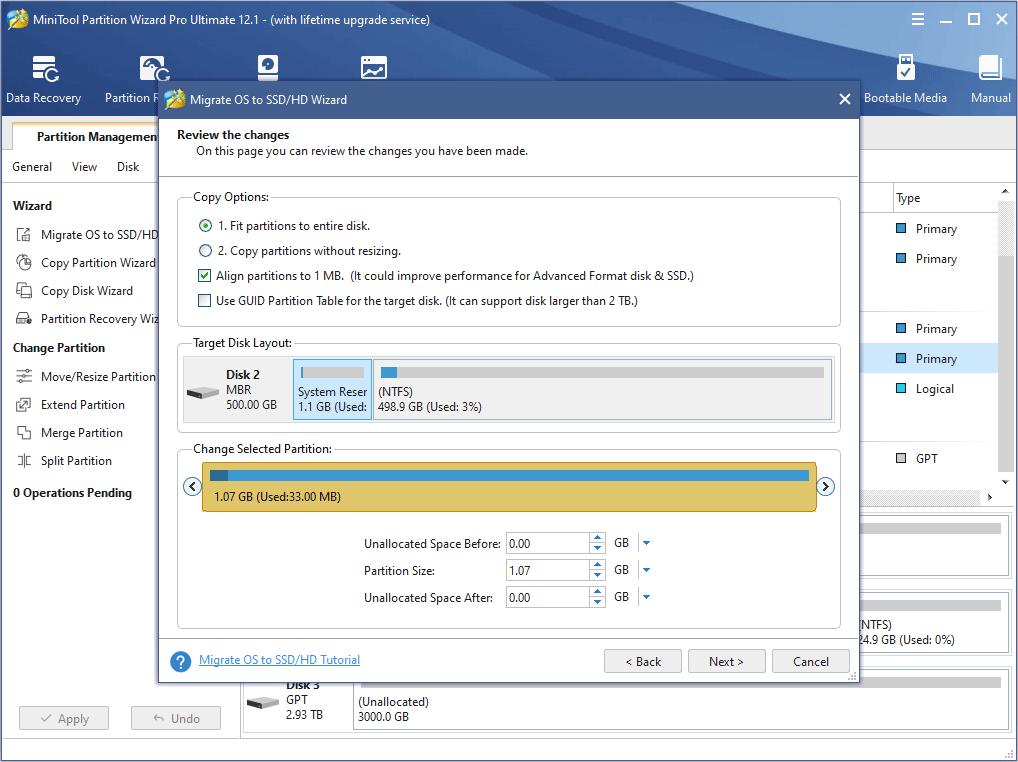
Step 4: Review changes and click Next button. In this step, you can keep default settings. But if the old disk is a MBR disk and you want to use GPT style in the new disk, you can check the box before Use GUID partition table for the target disk.
Step 5: Read a note on how to boot from the destination disk and the click Finish button. Then, click the Apply button to execute pending operations.
Step 6: Disconnect the SSD from the USB port and then disassemble the computer to install the SSD. As for the hard drive installation guide, you can refer to this post: How to Install a Second Hard Drive in Your Laptop and Desktop PC.
Bottom Line
Is this post helpful to you? Do these methods work for you? Do you have other methods to solve the Steam unpacking issue? Do you have difficulty in performing the above methods? Please leave a comment below or email at [email protected]. We will get back to you as soon as possible.
Steam Unpacking Slow FAQ
The possible reasons why Steam unpacking take so long are as follows:
- The read-write speed of the hard drive is very slow.
- There are some glitches in Steam client.
- The update or installation package is too big.


User Comments :