This post focuses on SSD cache, including its definition, main types, benefits, as well as limitations. Based on that, MiniTool illustrates you how to use SSD as cache on AMD and Intel systems respectively.
What Is SSD Cache
SSD cache is a data management system that uses a small solid-state drive as cache for a larger hard disc drive. It is termed as SSD caching that is known as flash caching. SSD caching is the temporary storage of data on NAND flash memory.
The SSD cache feature is a controller-based solution that caches the most frequently accessed data onto lower latency SSDs. This operation can dynamically improve system performance. The SSD cache is exclusively used for host reads.
The core concept of SSD caching is to offer a much faster and more responsive SSD that works as a temporary storage unit for storing requested data like OS operational scripts.
Further reading:
SSD cache is a secondary cache, which is a complement for the primary cache in the controller’s dynamic random-access memory (DRAM). But SSD cache works differently from the primary cache.
In primary cache, each I/O operation must store data through the cache to execute the operation. In this sort of cache, the data usually is stored in DRAM after a host read.
Differently, SSD cache is only utilized when System Manager views it’s beneficial to put the data in cache to increase system performance. The data in SSD cache often is copied from volumes and stored on two internal RAID volumes that are created automatically when creating an SSD cache.
QNAP NAS supports SSD caching and auto-tiering. Qtier technology automatically transfers data between SSDs and hard drives on the basis of their access frequencies. Qtier IO-awareness reserves a cache-like space to improve IOPS performance. However, Qtier is only supported by x86-based NAS (Intel or AMD) and 64-bit ARM-based NAS with 2GB RAM and QTS 4.4.1 (or later).
The RAM requirements vary according to the QNAP NAS cache capacity.
| QTS NAS | QuTS hero NAS | |
| SSD Cache Capacity | RAM Requirement | |
| 512GB | ≧ 1GB | ≧ 16GB |
| 1TB | ≧ 4GB | ≧ 32GB |
| 2TB | ≧ 8GB | ≧ 64GB |
| 4TB | ≧ 16GB | ≧ 128GB |
| 16TB | – | ≧ 512GB |
| 30TB | – | ≧ 1TB |
| 120TB | – | ≧ 4TB |
Main Types of SSD Cache
There are three main types of SSD caches. Here, we will introduce them one by one.
Write-around SSD caching: It is a process to directly write the data to the primary storage by bypassing the cache initially. The data that will be firstly sent to the actual SSD is cached finally. Besides, there is no cache to move things to the cache. So, it will be slower to move this data back to the cache.
Even though, the system is still efficient as the data will be copied back only when the data is identified as “hot”. Nevertheless, it could result in high latency when loading the recognized “hot” data back to the cache. It implies that the cache won’t disappear from irrelevant data.
Write-back SSD caching: It writes data to the SSD cache first and then sends it to the primary storage device. Though caching is much better than normal read-write operations, it causes low latency for both write and read operations.
If you encounter cache failure, the cached data will lose. Hence, manufacturers often apply this caching to products to make duplicate writes.
Also read: 9 Best Duplicate File Finders Help You Find Duplicate Files
Write-through SSD caching: It writes data to the SSD cache and the primary storage device simultaneously. It is commonly used caching and hybrid storage solutions. Only when the host confirms that the write operation on both the SSD cache and primary storage device has finished, the data on the SSD cache will be available. This is the safest but also the slowest method.
Benefits and Limitations of SSD Cache
The SSD cache is a way of obtaining faster storage, reduced latency, and improved all-round NAS performance and access speeds. It brings benefits to IOPS-demanding applications like databases (online transaction processing, and email servers), virtual machines, and virtual desktop infrastructure.
After putting your system into a clean state, you will get an obvious benefit that is brought by SSD caching. The OS can enter the usable state faster than a non-SSD cached system. Likewise, it would be much faster to launch Steam and favourite games with SSD caching after a reboot.
Intel builds the SSD caching technology – Smart Response Technology. The proprietary iteration of the mechanism is only available on SRT-ready motherboards with Intel chipsets. Besides, Intel doesn’t run the technology of all its chipsets, which limits the hardware configurations that you can expect to have. But it can still run SSD caching.
If your processor is AMD, you need to use third-party software to emulate SSD caching as AMD because AMD hasn’t developed or integrated a rival technology into AMD chipsets. For example, you can use programs like FancyCache and PrimoCache.
How to Use SSD as Cache
No matter your computer has an Intel or AMD processor, you can use an SSD as a cache. The requirements and steps are different on the two processors. Similarly, you are recommended to make a backup for your system or data before starting the process. The section below illustrates the details.
Part 1: Back up the System or Data
For backing up your system and data, MiniTool Partition Wizard can help. Both the Migrate OS to SSD/HD and Copy Disk features of MiniTool Partition Wizard enables you to back up system and data to the connected storage devices on the PC within a few clicks.
Here is a tutorial on how to back up data with MiniTool Partition Wizard.
Step 1: Download and install the program by clicking the button below and following the on-screen instruction.
MiniTool Partition Wizard DemoClick to Download100%Clean & Safe
Step 2: Connect a storage device to your PC.
Step 3: Launch MiniTool Partition Wizard to enter its main interface.
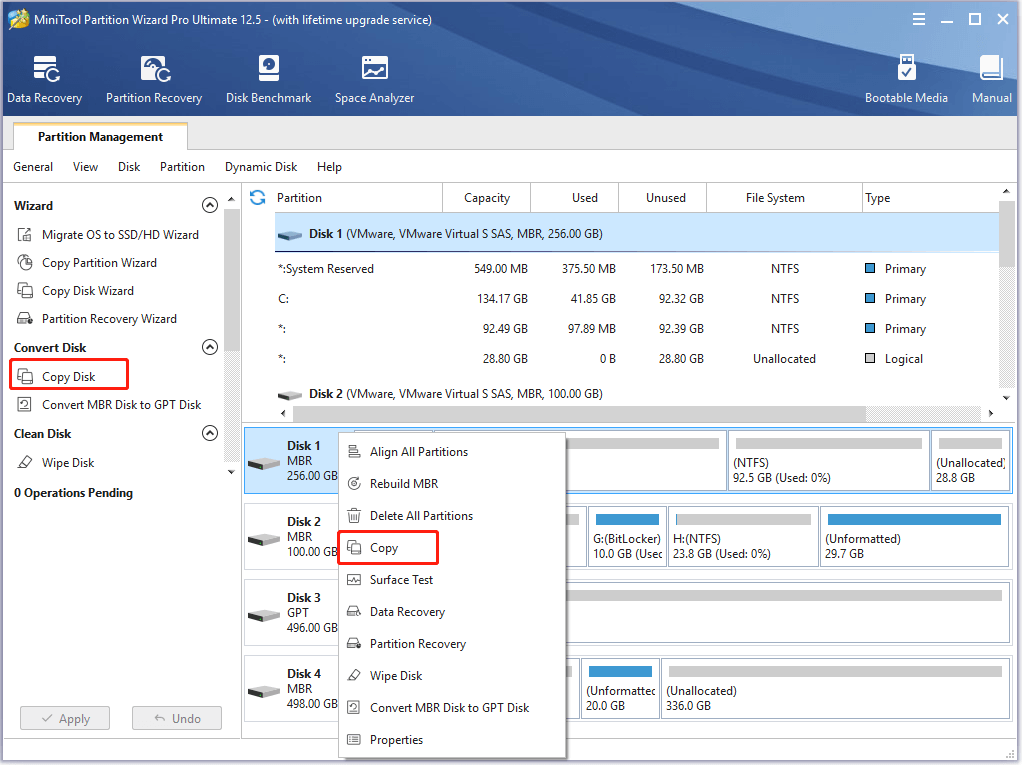
Step 4: Highlight your system disk and click the Copy Disk option in the action panel. Alternatively, you can also right-click on the system disk and click Copy.
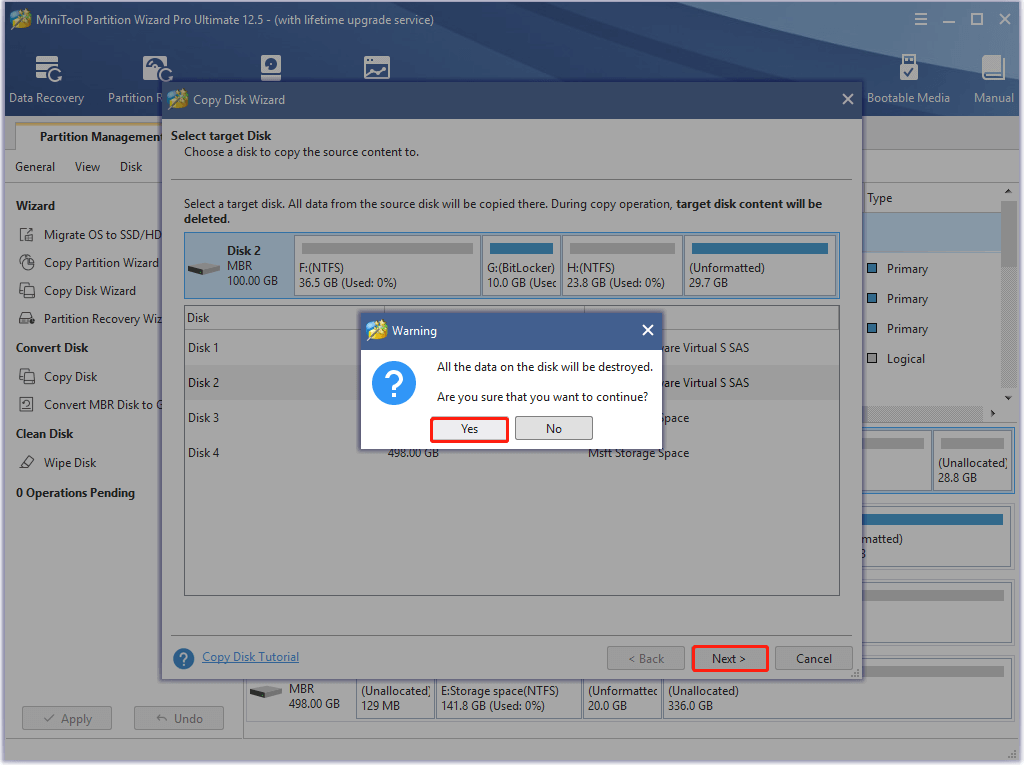
Step 5: In the next window, choose a target disk for the copied disk and click Next. Here, you should click the connected disk. If you have backed up the data in the target disk, click Yes in the prompted warning window to continue the process.
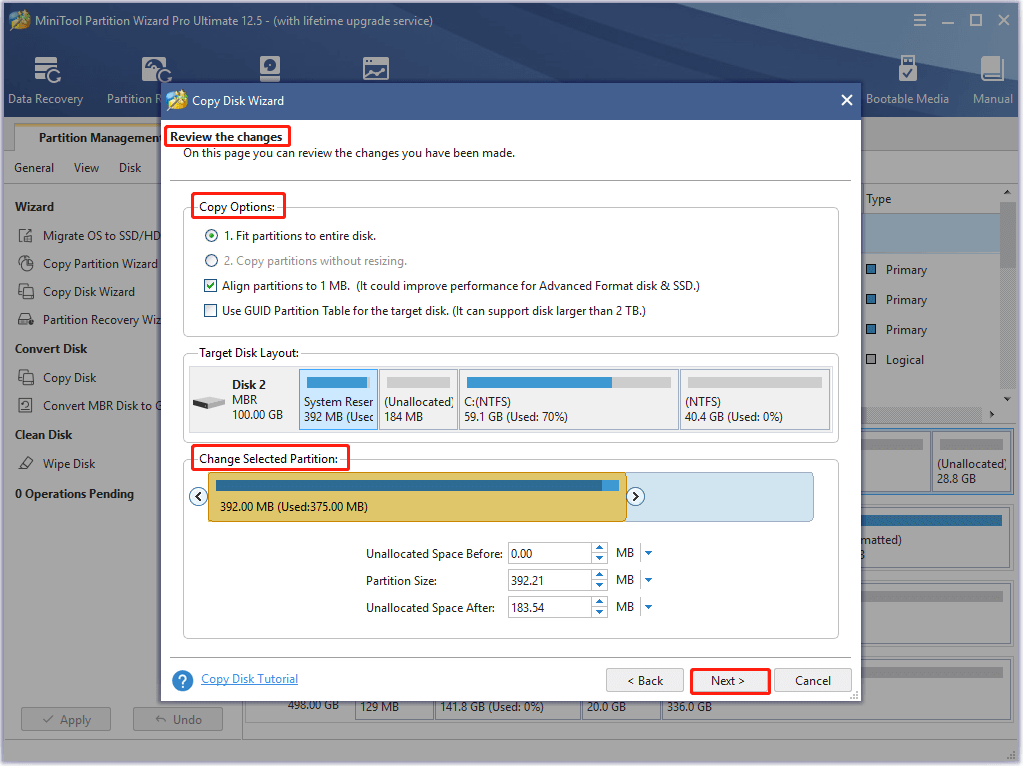
Step 6: You can review the changes in the Copy Disk Wizard window. Then choose copy options and change the selected partition based on your demand. After that, click Next.
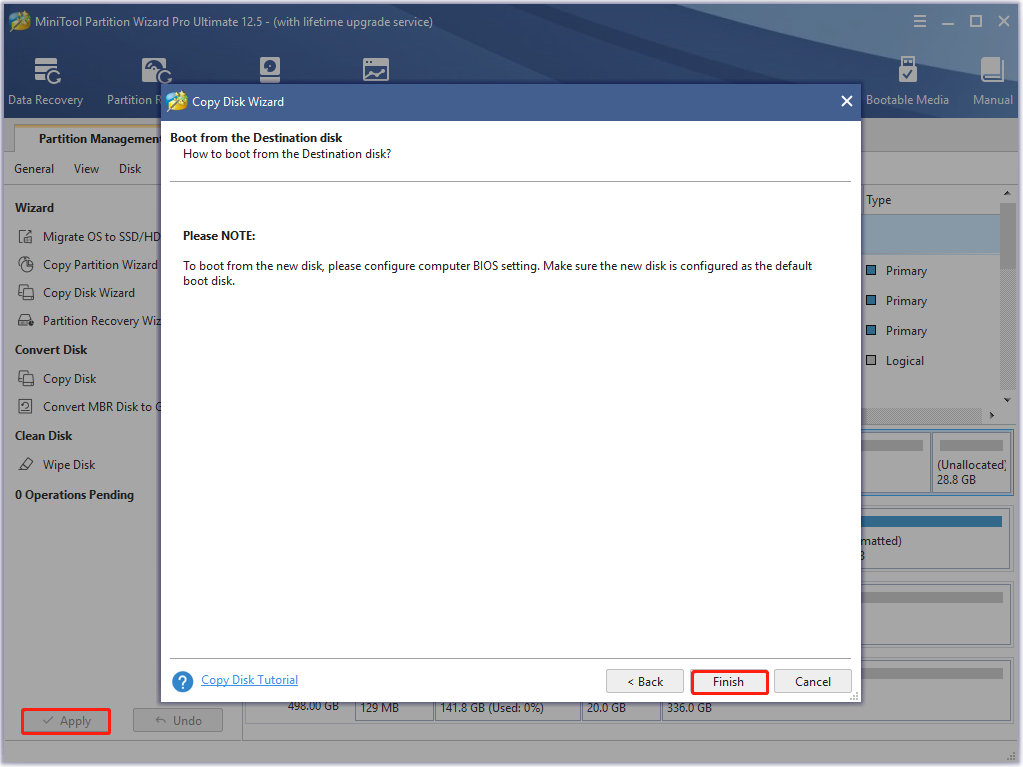
Step 7: Click Finish to save the changes you’ve made. After backing to the main interface, click Apply to execute the pending operation.
Part 2: Set up SSD Cache
How to use SSD as a cache? Here we will show you how to do that on AMD and Intel systems respectively.
For AMD system
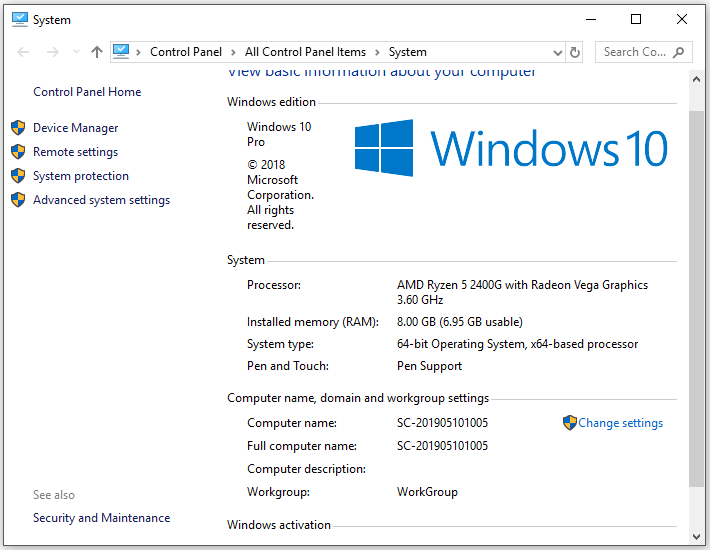
If you want to use SSD as a cache for your HDD on the AMD system, make sure your system meets the following minimum configurations.
- Windows 10 operating system
- AMD RyZen, 4xx series motherboard
- A minimum of 4G RAM (6G RAM to support the RAM cache)
- Secure Boot is NOT enabled (Consult your system documentation for further details)
- There are no other SSD caching or AMD software RAID solutions installed
- The BIOS SATA disk settings are set to AHCI, not RAID
Step 1: Set the BIOS SATA disk settings to AHCI not RAID. For that, you should:
- Enter the BIOS setup by turning on the PC and keeping pressing a BIOS key.
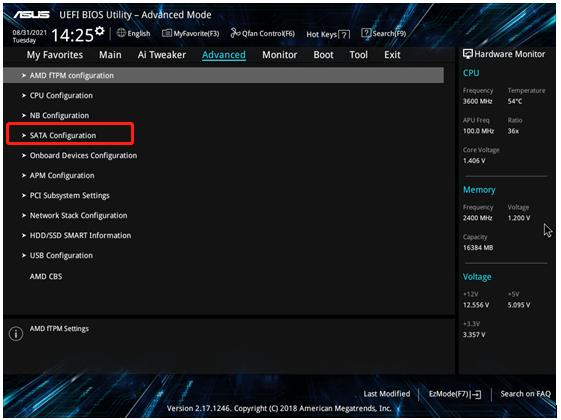
- Navigate to the Advanced tab and click SATA Configuration.
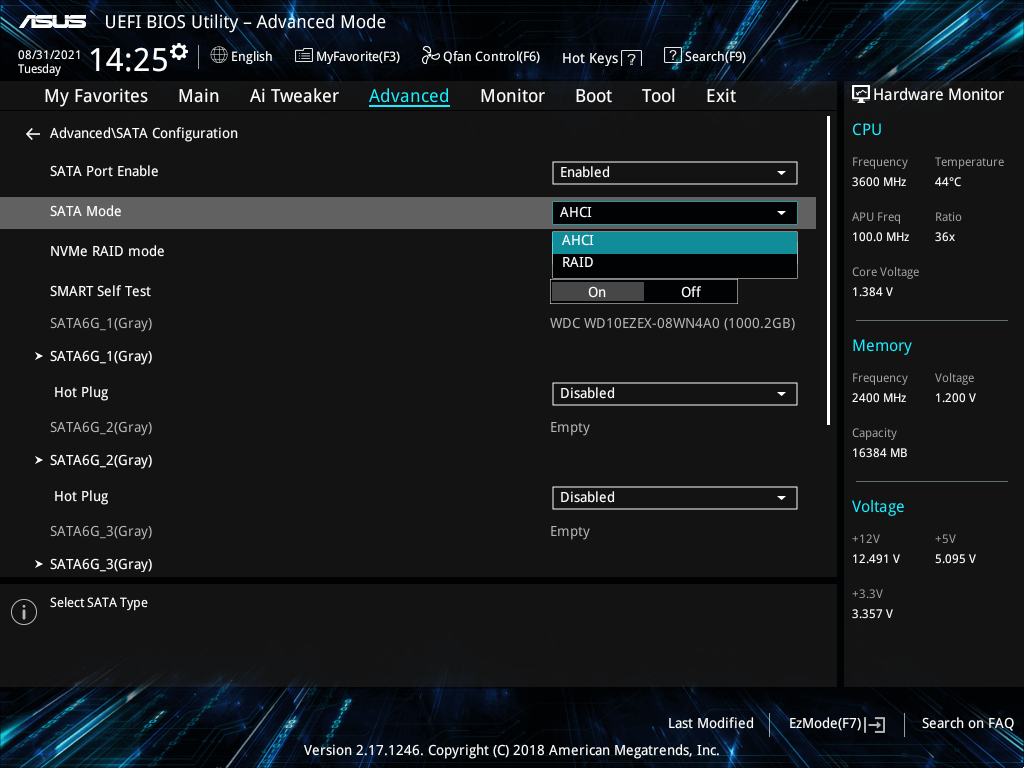
- Choose AHCI from the drop-down menu of SATA Mode.
- Press F10 and click OK to save the changes and exit the operation. Then your computer will restart.
Step 2: Click here to download and install the latest AMD StoreMI program and drivers.
Step 3: Run the StoreMI program and click Create Bootable StoreMI.
Step 4: If the system doesn’t choose the drive automatically, you should select an available empty SSD or HDD from the list manually.
Step 5: Click Create and follow the pop-up instruction to go on.
Step 6: After the system boots up, check that the device has booted from the StoreMI by opening Disk Management. From here, you can also extend the capacity of the boot volume.
Step 7: Right-click on the C partition and click Extend volume. Then follow the prompted instruction to expand the capacity.
Also read: How to Increase Disk Space for Laptop? Try These Methods Now
For Intel system
Here’s the guide on how to use SSD as cache on the Intel system. At first, you should also ensure that your system meets the requirements below.
- Windows 7, Windows 8, or Windows 10 (32-bit and 64-bit editions) operating systems
- An Intel® Z68, Z87, Q87, H87, Z77, Q77, or Intel® H77 Express Chipset-based desktop board
- An LGA 1155 or 1150 package Intel® Core™ Processor
- A System BIOS with SATA mode set to RAID
- Intel® RST software 10.5 version release or later
- Single hard disk drive or multiple drives in one RAID volume
- Solid state drive (SSD) with a minimum capacity of 18.6 GB
Step 1: Set the SATA mode to the RAID mode, and then save and restart the system.
Step 2: Download and install latest Intel SRT software by clicking here.
Step 3: Run the Intel RST software to go to its main interface.
Step 4: Tap the Enable acceleration option under the Status or Accelerate menu.
Step 5: Select the SSD as the cache device.
Step 6: Choose the size from the SSD to allocate as cache memory. The rest of the SSD space can be used for storing data.
Step 7: Select the RAID volume drive that you would like to accelerate.
Step 8: Choose either the Enhanced mode or the Maximized mode based on your demand.
Step 9: Click OK and follow the prompted instruction to finish the process.
Conclusion
What is SSD cache? How to use SSD as cache? This post offers you the answers and more details about SSD cache Windows 10. If you have any thoughts on SSD cache, please share them with us in the following comment area. For any issues while using MiniTool software, contact us by sending an email via [email protected].



User Comments :