Recently, a great many people complain that their Smite keeps crashing on Windows PC. How to fix Smite crashing on startup? If you are also trying to fix it, then you come to the right place. This post of MiniTool will provide you with 10 solutions.
Smite is a quite popular third-person MOBA video game developed by Hi-Rez Studios. This game has been published for Microsoft Windows, PlayStation 4, Nintendo Switch, and Xbox One. However, many users vex that Smite keeps crashing after installing updates.
The Smite not launching issue can be caused by various factors including antivirus software, corrupt games files, problematic Microsoft Visual C++ Redistributable packages, and so forth. Fortunately, we explore many effective fixes after analyzing extensive user reports.
How to Fix Smite Not Launching
- Add the game to the exception lists of your firewall
- Reinstall Microsoft Visual C++ 2010 Redistributable package and Smite
- Verify integrity of game files
- Uninstall the EasyAntiCheat program
- Check if the Hi-Rez Studios Authenticate and Update service is running
- Move the msvcr100.dll or msvcp110.dll files to the SysWow64 folder
- Uninstall the updates for Microsoft Visual C++ x86
- Create a new user account
- Play the game with a single monitor
- Upgrade your HHD to SSD
Solution 1. Add the Game to the Exception Lists of Your Firewall
One of the most common reasons why Smite keeps crashing can be your antivirus software or Firewall. To fix the error, you can try adding the game to the exception lists of your Firewall or antivirus.
Step 1. Type firewall in the search box and then select the Windows Defender Firewall from the context menu.
Step 2. Click on Allow an app or feature through Windows Defender Firewall from the left pane.
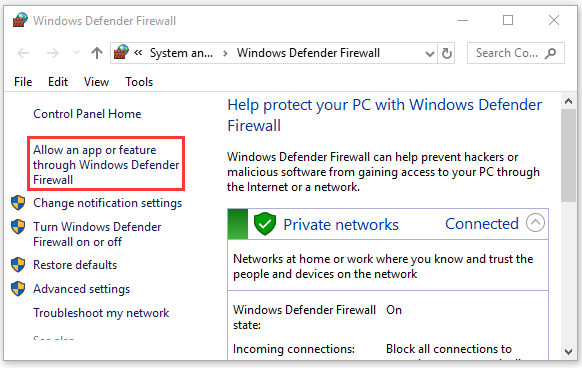
Step 3. Select the checkbox for Smite from the list of installed programs and click OK.
Solution 2. Reinstall Microsoft Visual C++ 2010 Redistributable Package and Smite
If there are any problems with the Visual C++ Redistributable Package, the Smite failed to launch game error can happen. You can fix it by reinstalling the Visual C++ components and Smite.
Step 1. Type control in the search box and select Control Panel from the context menu.
Step 2. Change the View by to Category at the top right corner and click on Uninstall a Program.
Step 3. Right-click Microsoft Visual C++ Redistributable Package from the list of installed programs and select Uninstall it. Then follow the on-screen prompts to complete this process.
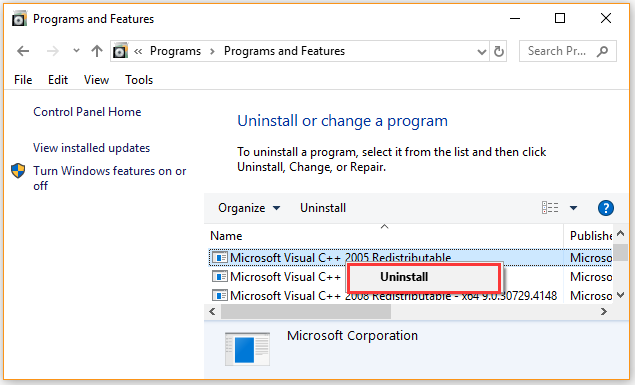
Step 4. Click here to download the Microsoft Visual C ++ 2010 Redistributable Package and install it on your computer.
Step 5. If the Smite crashing on launch issue still persists after the above steps, you may have to reinstall this game. Some users reported that they fixed the issue by downloading the game from Steam. Here you may have a try!
Solution 3. Verify Integrity of the Game Files
Incomplete or corrupt game files are another reason why Smite keeps crashing. Here you can follow the steps below to verify the integrity of the game files.
Step 1. Right-click the Steam launcher and select Run as administrator.
Step 2. Navigate to the Library tab, and then right-click Smite from the list of games and select Properties.
Step 3. In the Properties window, navigate to the Local Files tab and click on the Verify Integrity of Game Files option.
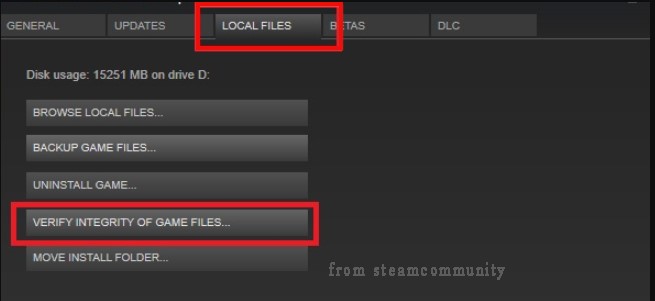
Once the process complete, relaunch the game and see if the Smite freezing issue is fixed.
Solution 4 Uninstall the EasyAntiCheat Program
The EasyAntiCheat program is an essential component for Smite. Once the EAC file gets problematic, you may encounter the issue “Smite keeps crashing” on Windows PC. To fix it, you need to uninstall EAC from the Smite folder.
Step 1. Press Win + E keys to open the File Explorer, and then navigate to the following path:
C: Program Files SteamsteamappscommonSMITEBinariesEasyAntiCheat
Step 2. Right-click the EasyAntiCheat_Setup file and select Uninstall. After that, close everything and try running the game. If Smite keeps crashing or comes up with an error, you just have to install the EasyAntiCheat again.
Step 3. After you install the EasyAntiCheat, back to the Smite folder again and run the EasyAntiCheat_Setup program from here. Then right-click the Smite program and click on Repair/Install.
Solution 5. Check if the Hi-Rez Studios Authenticate and Update Service Is Running
You may encounter Smite crashing on startup if the Hi-Rez Studios Authenticate and Update service is disabled. Follow the steps below to check if the service is running.
Step 1. Press Win + R keys to open the Run dialog box, and then type services.msc in the box and hit Enter.
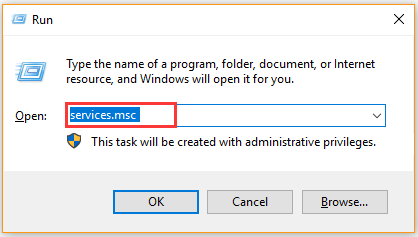
Step 2. Scroll down the list of services until you find the Hi-Rez Studios Authenticate and Update service. If it is not running, right-click the service and select Properties.
Step 3. Change the Startup type to Automatic, and then click on the Start button.
Step 4. Click on the OK button to save the change.
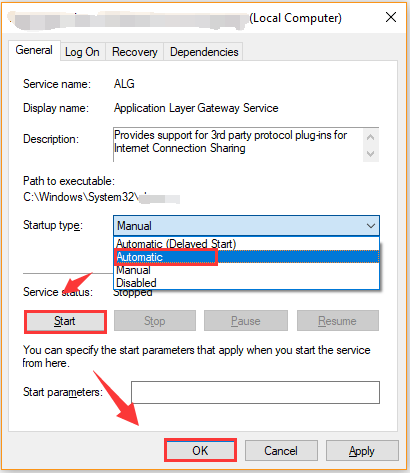
Now, you can restart your computer and see if the Smite failed to launch game issue still persists.
Solution 6. Move the msvcr100.dll or msvcp110.dll Files to SysWow64 Folder
Both msvcr100.dll and msvcp110.dll are Windows DLL files that are included in the Microsoft Visual C++ 2010 Redistributable Package or some application. Several users reported that they fixed the Smite crashing on startup issue by moving the files to the SysWow64 folder. Here’s how:
Step 1. Click here to download the 32-bit version of that DLL file and save it to your computer.
Step 2. Press Win + E keys to open the File Explorer, and then navigate to the C:WINDOWSSysWOW64Wow64 directory.
Step 3. Copy the DLL file and paste it to the SysWOW64 folder.
Now, you can reboot your computer and check if Smite keeps crashing.
Solution 7. Uninstall the Updates for Microsoft Visual C++ x86
Lots of users encounter the Smite not launching issue after installing the Microsoft Visual updates. To fix it, you need to uninstall the updates for Microsoft Visual C++ x86 updates.
Step 1. Press the Win + I key to open the Settings app and then go to the Update & Security section.
Step 2. Scroll down the right sidebar and click on View update history.
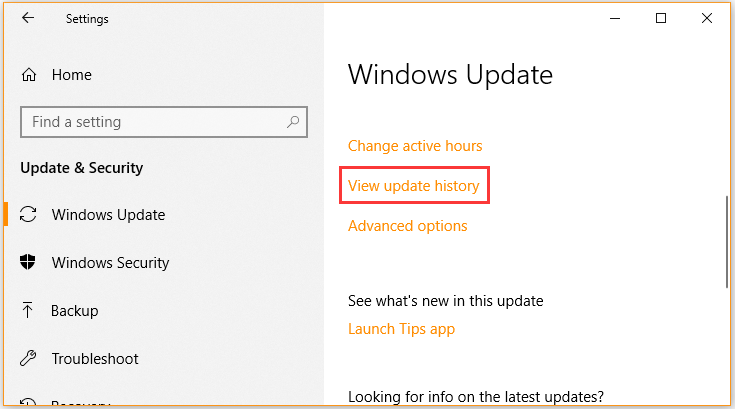
Step 3. Click on Uninstall updates, and then right-click the problematic update and select Uninstall.
Once you remove the updates, relaunch the game and see if the Smite freezing issue still happens.
Solution 8. Create a New User Account
If there are any issues with your user account, you may encounter Smite crashing on launch. Here you can fix it by creating a new user account.
Step 1. Press Win + I keys to open the Settings app and click on Accounts.
Step 2. Select the Other people option from the left pane and click on Add someone else to this PC from the right-side pane.
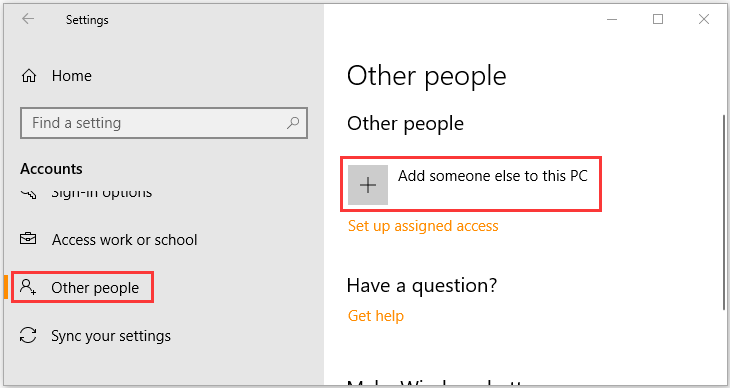
Step 3. Click on I don’t have this person’s sign-in information in the pop-up window.
Step 4. Click on Add a user without a Microsoft account. Then Windows will prompt you to create a new Microsoft account. Here you need to enter a user name and assign a password for the new account and click on Next.
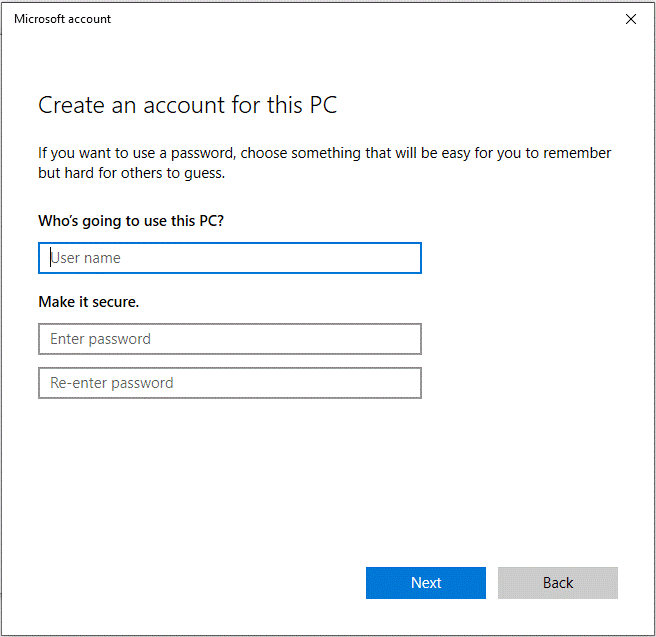
Once you create a new account, you can switch to it and see if the issue still appears.
Solution 9. Play the Game with a Single Monitor
Many users encounter the “Smite failed to launch game” issue when using a dual monitor setup. In order to fix this problem, it’s recommended that you disable the second monitor and then reboot your computer.
Solution 10. Upgrade Your HDD to SSD
If the Smite freezing issue still persists after you have tried all the above methods, then you can consider upgrading your HDD to SSD. As you know, SSD boasts faster data transferring speed than HDD. If you install the game on SSD, you can avoid the crashing problem and enjoy a good game experience.
Here comes a question. How to upgrade HHD to SSD without reinstalling OS? MiniTool Partition Wizard is what you need. It is an all-in-one partition manager that boasts many powerful features like Convert MBR to GPT, move/resize partition, align partition, recover lost data, migrate OS to SSD/HD, copy disk, rebuild MBR, and so forth.
Step 1. Install an SSD on your Windows PC and then launch MiniTool Partition Wizard to enter its main interface.
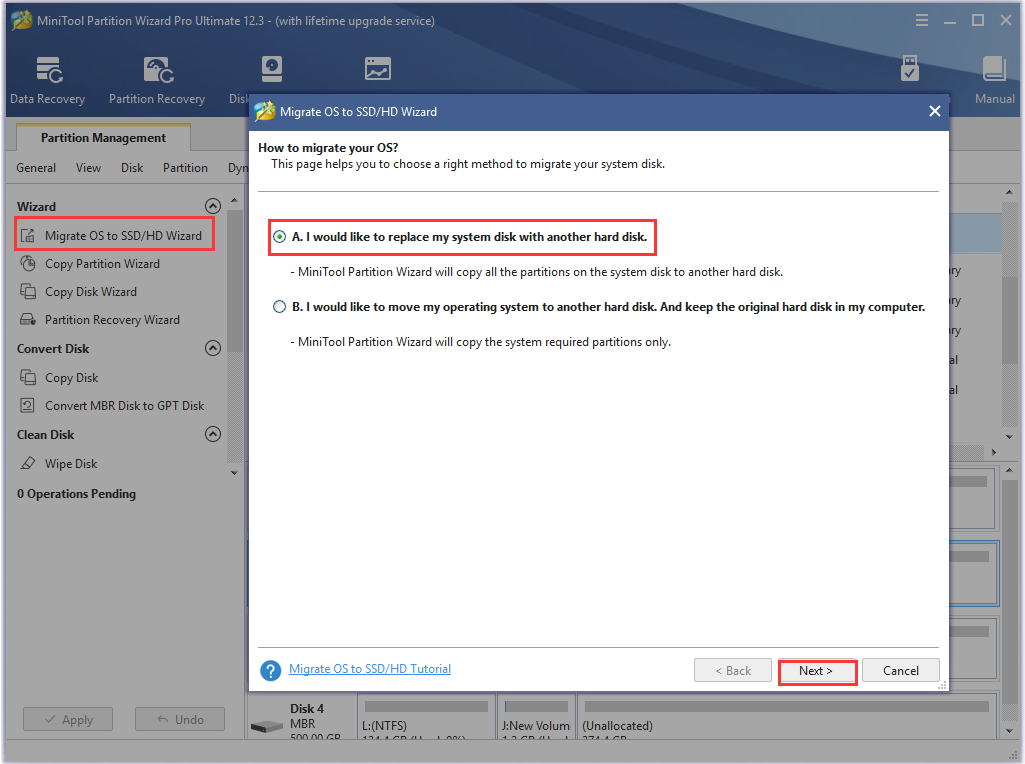
Step 2. Click on the Migrate OS to SSD/HD Wizard feature at the left pane and select a suitable method to migrate your system disk. Here we take Option A for example. After you select a migration method, click on Next to go on.
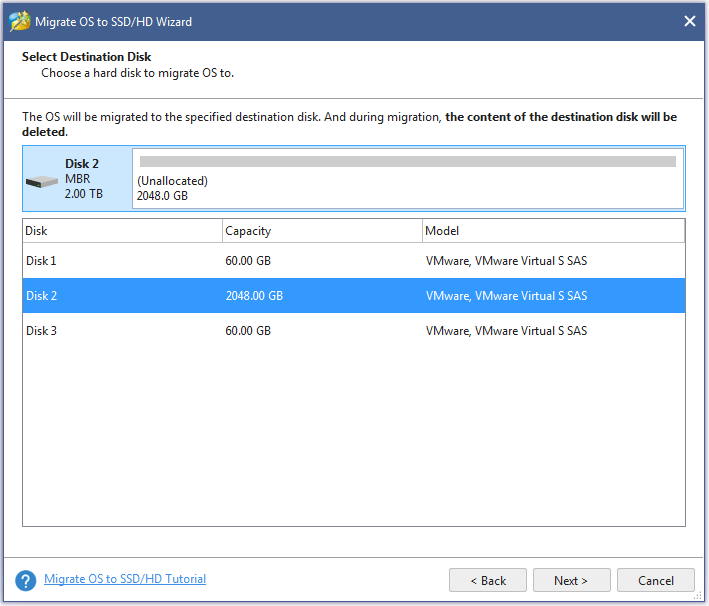
Step 3. Select the SSD that you just installed from the disk map and click on Next to continue.
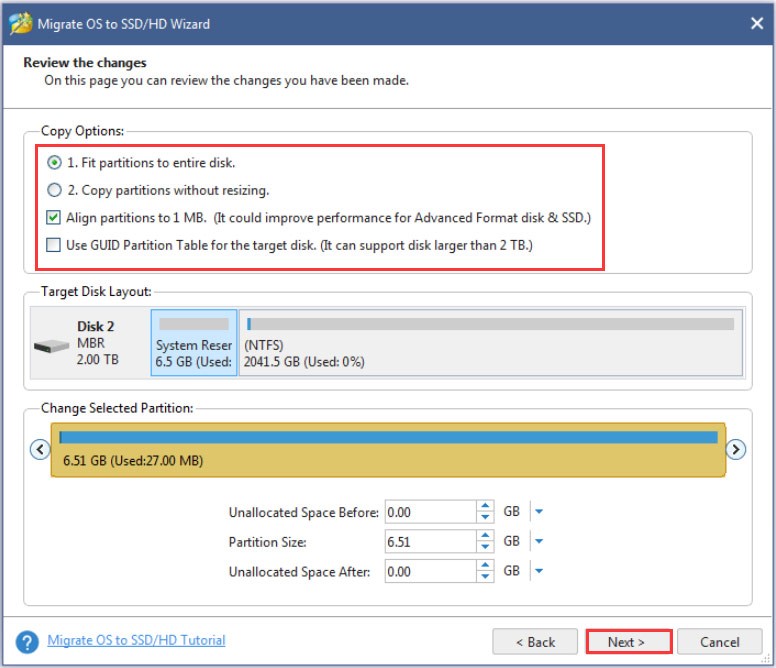
Step 4. Review the changes you have made and click on Next to continue. Here we recommend you click on Align partitions to 1MB, which can improve the performance of SSD.
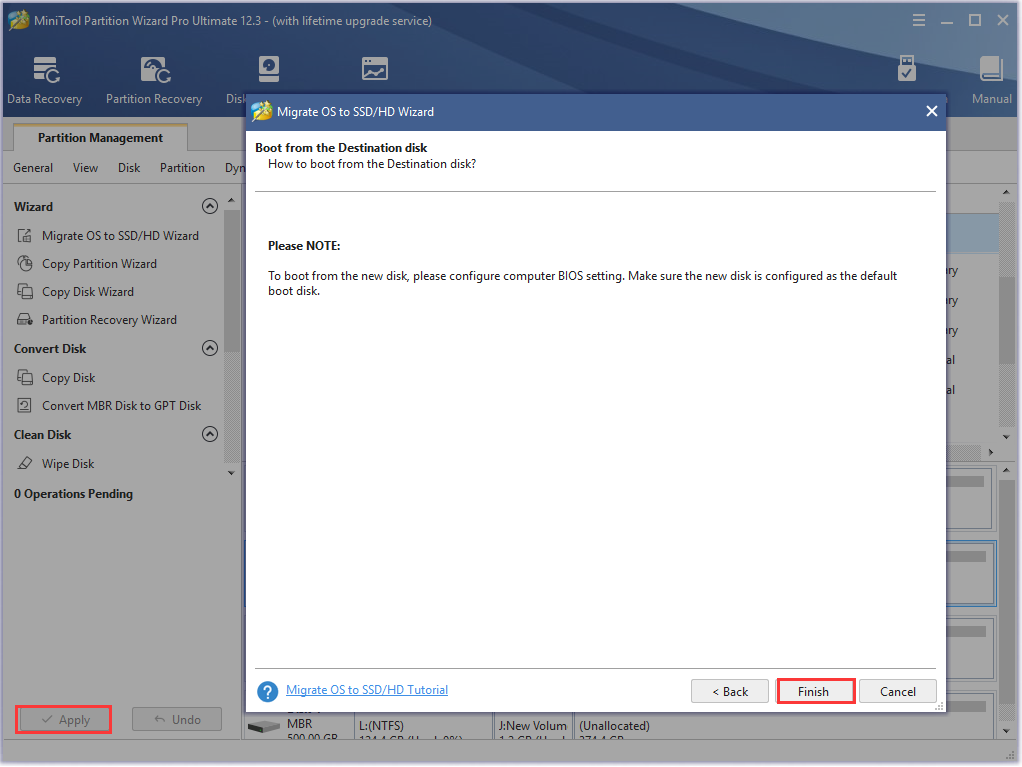
Step 5. Click on Finish in the pop-up window to confirm the changes. At last, you need to click on Apply to execute the pending operation.
Bottom Line
How to fix the Smite crashing issue? I believe that you already have known the answer. This article introduces 10 effective troubleshooting methods to you. If you have any suggestions or ideas on this topic, you can leave them in the comment area. You can send us an e-mail via [email protected] if you have any questions about MiniTool Partition Wizard


User Comments :