Seagate SSD is one of the best SSDs from the top hard drive manufacturers. In this post, MiniTool Partition Wizard introduces the basic information about some Seagate SSDs. You can choose one if you want to upgrade your old hard drive with a new SSD. Besides, you can also learn about how to upgrade your hard drive.
Seagate is an American data storage company which focus on making hard drives. It is one of the leaders of hard drive manufacturers and there are many users who prefer Seagate hard drives to those of other brands.
In the following contents, I’d like to introduce you some internal Seagate SSDs. If you’re looking for external ones, you can refer to our previous post: Pick up a Right Seagate External Hard Drive for You.
Something You Need to Know Before Buying an SSD
When you want to buy an internal SSD, you should take many factors into consideration, especially the storage capacity, hardware interface, read/write speed and price.
Storage Capacity
Storage capacity is one of the most important factors which you should pay attention to, because it decides how much data you can store on the SSD. The capacities of most consumer SSDs range from 120GB to 2TB.
Larger capacity means that you can save more data and you need to pay more money. Most users won’t choose an SSD less than 250GB to install in their PC or laptop, and 500 GB should be the sweet spot between price, performance and capacity. If you can afford, 1TB could also be a nice choice.
There are also some drives larger than 2TB, such as SanDisk Ultra 3D NAND SSD and Samsung SSD 860 EVO. They are typically expensive and better for professional users.
Hardware Interface
The hardware interfaces of internal SSDs on the market include SATA, mSATA, M.2, etc. SATA and M.2 are more common to see on general SSDs.
Generally, SATA SSDs and M.2 SSDs use different transmission protocols and the price are different between them. SATA SSDs use AHCI protocol which supports data transfer speed of up to 600 MB/s. M.2 SSDs mainly use NVMe protocol, which means the data transfer speed could be about 1000 MB/s.
Therefore, you need to check the slot of your PC or laptop and make sure the SSD you want to buy can be installed on your device.
Read/Write Speed
The read/write speed of an SSD is much faster than an HDD and you don’t need to worry too much about it. Usually, an SSD write speed is slower than its read speed. An average read speed would be about 500 MB/s. If you require higher performance, you can take an NVMe M.2 SSD into consideration.
Besides, some SSDs are designed with different read/write speed for different capacities.
Seagate SSDs on the Market
Now you can choose one SSD according to your needs. Here are some popular internal Seagate SSDs.
5 Popular Internal Seagate SSDs
- Seagate Barracuda 120 SSD
- Seagate Barracuda 510 M.2 SSD
- Seagate Firecuda 120 SSD
- Seagate Firecuda 510 M.2 SSD
- Seagate Firecuda 520 M.2 SSD
Seagate Barracuda 120 SSD
- Capacity: 250GB, 480GB, 500GB, 960GB, 1TB, 2TB
- Physical size: 2.5-inch x 7mm
- Hardware interface: SATA 6Gb/s
- Read/write speed: up to 560/550 MB/s
- MTBF: 1.8M hours
- Price: start at $39.99 on Amazon
- Warranty: 5-year limited warranty
Seagate Barracuda 120 is a relatively cheap Seagate SSD. It unlocks the maximum SATA 6.0 Gb/s speed with 3D TLC NAND that delivers the speed you need. Besides, it can be easily upgraded from hard drives with a plug-and-play 2.5-inch 7mm form factor and SATA interface, and it has nice durability with a 5-year limited warranty. It is user-friendly for common users.
Seagate Barracuda 510 M.2 SSD
- Capacity: 250GB, 256GB, 500GB, 512GB, 1TB
- Physical size: M.2 2280
- Hardware interface/protocol: PCIe Gen3 ×4, NVMe
- Read/write speed: up to 3400/3000 MB/s
- MTBF: 1.8M hours
- Price: start at $59.99 on Amazon
- Warranty: 5-year limited warranty and optional data recovery services
Barracuda 510 SSD also provides a 5-year warranty. This one is smaller than Seagate Barracuda 120 and it is quite suitable for laptops. But you need to pay attention to the hardware interface. If you don’t have NVMe M.2 connection on your PC or laptop, you will be unable to install the SSD.
You must have noticed that the read/write speed is up to 3400/3000 MB/s. It is wonderful for enthusiast class users.
Seagate Firecuda 120 SSD
- Capacity: 500GB, 1TB, 2TB, 4TB
- Physical size: 2.5-inch
- Hardware interface: SATA 6Gb/s
- Read/write speed: up to 560/540 MB/s
- MTBF: 1.8M hours
- Price: start at $99.99 on Amazon
- Warranty: 5-year limited warranty
Seagate Firecuda 120 has been released as a gaming SSD recently. It is designed with nice speed, endurance and capacity. With the capacity up to 4TB, you will get plenty of space to store your game files. It is the highest capacity Seagate SSD so far. And it comes with a 5-year limited warranty.
Seagate Firecuda 510 SSD
- Capacity: 500GB, 1TB, 2TB
- Physical size: M.2 2280
- Hardware interface/protocol: PCIe Gen3 ×4, NVMe
- Read/write speed: up to 3450/2500 MB/s
- MTBF: 1.8M hours
- Price: start at $99.99 on Amazon
- Warranty: 5-year limited warranty
Compared with the M.2 SSD of Seagate Barracuda SSD series, Firecuda 510 SSD could run even faster and it is more expensive on Amazon. It is primarily aimed at game lovers, but some creative professionals prefer it as well.
Seagate Firecuda 520 SSD
- Capacity: 500GB, 1TB, 2TB
- Physical size: M.2 2280
- Hardware interface/protocol: PCIe Gen4 ×4, NVMe
- Read/write speed: up to 5000/4400 MB/s
- MTBF: 1.8M hours
- Price: start at $119.99 on Amazon
- Warranty: 5-year warranty
Seagate Firecuda 520 is the newest M.2 SSD built for pro-level gaming. It is nearly 45% faster than most PCIe Gen3 M.2 NVMe SSDs. Of course, you need to cost more if you want to get this SSD.
Compared with other SSDs with similar performance, Seagate Firecuda 520 SSD lacks a heatsink, which might be its disadvantage.
Upgrade Your Old Disk with a New Seagate SSD
If you want to upgrade your old hard drive with a new Seagate Barracuda SSD or Firecuda SSD, you need to initialize the hard drive at first, and then you can transfer the data from the old disk to your new SSD, unplug the old disk and install the new SSD. For the detailed information and steps, you can refer to the following tutorial.
Initialize the New Seagate SSD
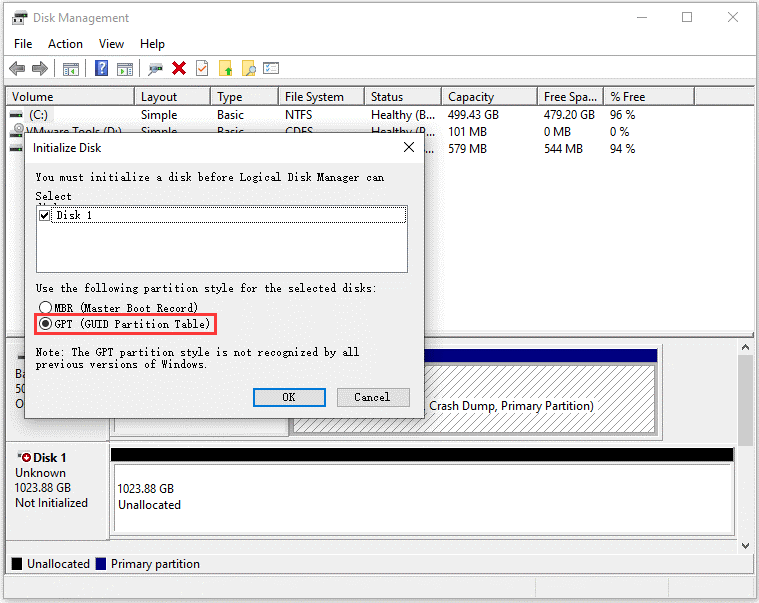
There are two types of disk partition styles: MBR and GPT. When you connect a new disk to your PC or laptop, Windows will remind you that you must initialize a disk before Logical Disk Manager can access it. And you need to choose a partition style while initializing the disk. For SSDs, I recommend you to use GPT style if it is supported by the motherboard, especially for those larger than 2TB.
Here is how to initialize an SSD in Disk Management.
Step 1: Connect your Seagate SSD to your computer with a SATA/M.2 to USB adapter. If you don’t have a USB adapter, you can buy one.
Step 2: Press Win + R to invoke Run window. Then type diskmgmt.msc in the box and click OK to launch Disk Management.
Step 3: Right-click your Seagate SSD and select Initialize Disk. In the pop-up window, choose GPT (GUID Partition Table) and click OK to start the initializing process.
Transfer Data to the New SSD
After initialize your SSD, you can start transferring data on your old disk to the new Seagate SSD.
To do that, you need to use professional data cloning software. Here I recommended MiniTool Partition Wizard, a reliable disk manager. Since you need to clone the system disk, you need to upgrade the manager to Pro Ultimate Edition. Then you can follow the steps below to transfer data.
Step 1: Launch MiniTool Partition Wizard to get its main interface.
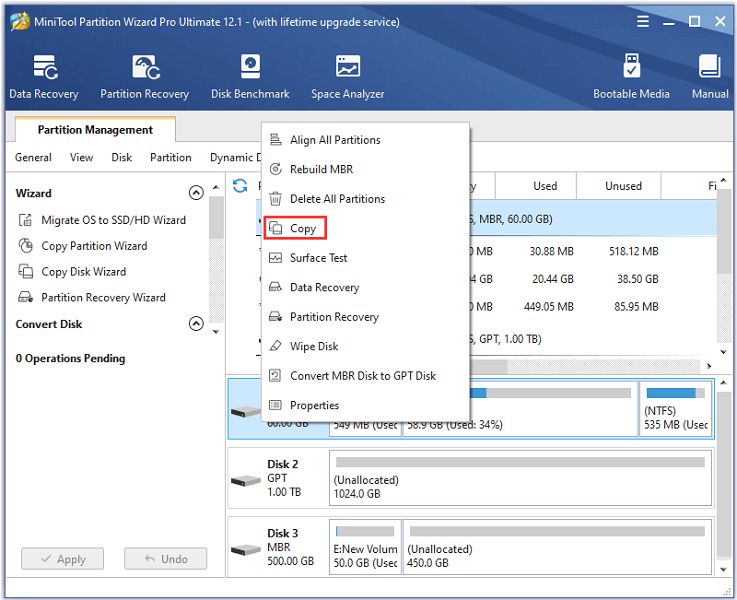
Step 2: Right-click your system disk and select Copy.
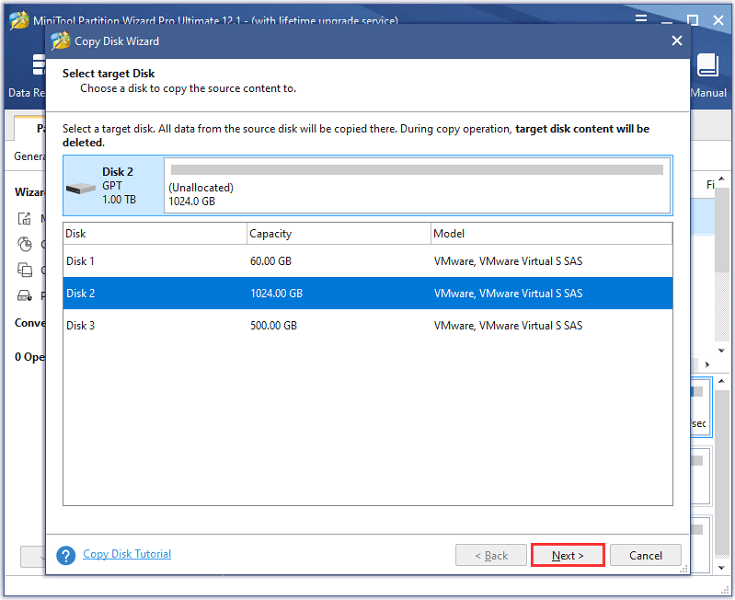
Step 3: In the pop-up window, select your Seagate SSD as the target disk to store the data and click Next to continue.
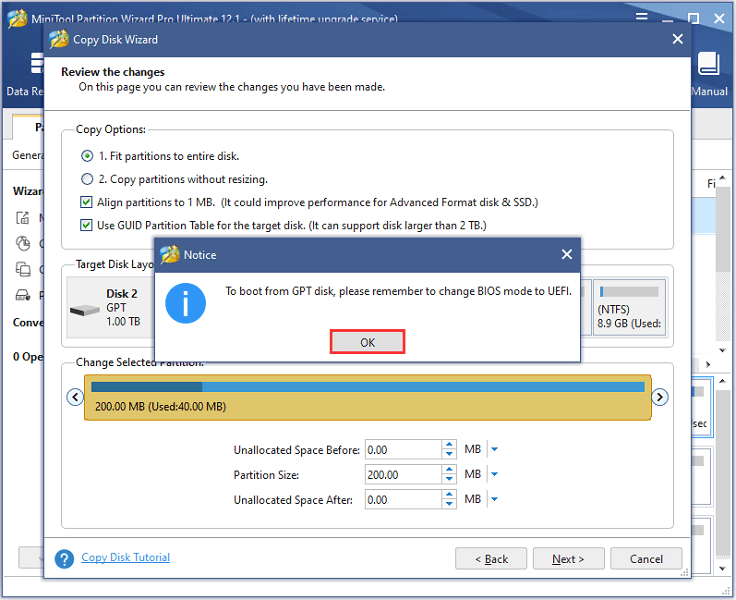
Step 4: Configure Copy Options and Target Disk Layout according to your needs. Remember to check Align partitions to 1MB and Use GUID Partition Table for the target disk. Then click Next. Read the pop-up notice and click OK to confirm the operation.
Step 5: Read the note which tells you how to boot form the new disk and click Finish. When you get back to the main interface, click Apply.
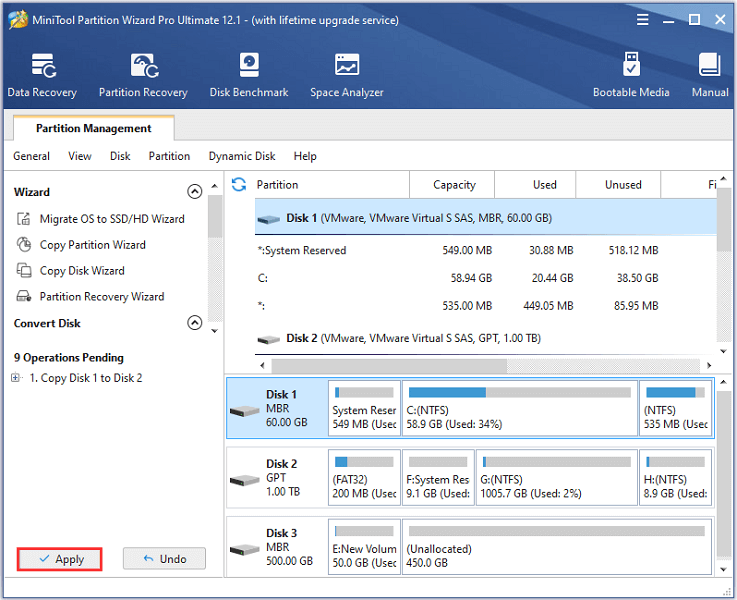
After transferring all the data in your old disk, you can exit MiniTool Partition Wizard. Then shut down your PC, disconnect the power and remove all cables. When you’re sure it’s safe, take the case cover off, unplug your old disk and install the new Seagate SSD.
If you have never done this by yourself, you can ask professionals for help or refer to the following tutorial: How to Install SSD in PC? A Detailed Guide Is Here for You!
Can I upgrade my disk with a Seagate SSD? Here is the tutorial.Click to Tweet
Bottom Line
If you need to upgrade your old hard drive, a Seagate SSD should be a good choice. Seagate provides various types of SSDs and this post introduces some of them. You can choose one according to your needs. You can also learn about how to upgrade your hard drive to a new Seagate SSD.
If you encounter any problems while using MiniTool Partition Wizard, please don’t hesitate to contact us via [email protected]. And you can share your ideas in the following comment section.

User Comments :