Have you come across the issue “PUBG stuck on loading screen”? This problem is troubling a great number of users. Don’t be alarmed. Now, read the post of MiniTool in which 7 effective troubleshooting methods will be discussed.
What Causes PUBG Stuck on Loading Screen
As an online multiplayer battle game, you can play PUBG (PlayerUnknown’s Battlegrounds) on PC, PS4, and Xbox One. Its wonderful game experience has attracted lots of players around the world. However, you may be vexed by a common problem “PUBG not loading” too.
There are various causes behind the PUBG loading screen stuck problem.
- Outdated hardware such as your conventional hard drive and AMD graphics will lower the PUBG loading. Sometimes the outdated devices may trigger the incompatibility.
- Sometimes improper Internet settings also lead to PUBG blocked loading of file.
- According to the official report, overclocking no your CPU or GPU may cause your PUBG stuck on loading screen. So, you should disable all sorts of overclocking.
- BEServices is also known to cause problems with your game.
Please keep reading carefully, we will be discussed how to fix the problem in detail.
Solution 1. Delete the Game User Settings on Your Computer
According to the tech officials of PUBG, deleting the game user settings present on your device can resolve the problem. This is because all the configurations that can be against your game like the resolution and other local settings are contained in the user game settings.
Now, follow the full guide below to delete the game user settings.
Step 1. Close all your running games and programs on your computer.
Step 2. Navigate to the following destination path in your File Explorer:
C:Users{UserID}AppDataLocalTslGameSavedConfigWindowsNoEditor
Step 3. Then you should see a file named GameUserSettingss.ini and click Delete key to delete it. After that, restart your computer.
Step 4. Now, open your Steam client and navigate to the Library tab where all your installed games will be listed.
Step 5. In the listed games, right-click the PUBG and select Properties.
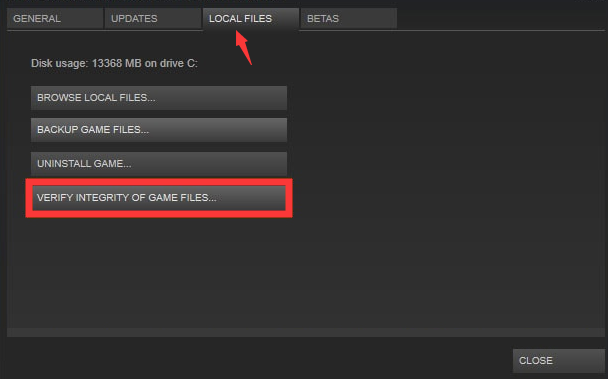
Step 6. In the properties window, go to the Local Files tab and click on the Verify Integrity of Game Files option. Then Steam will verify all the files presented. If there are any missing or corrupted files, Steam will download and replace them accordingly.
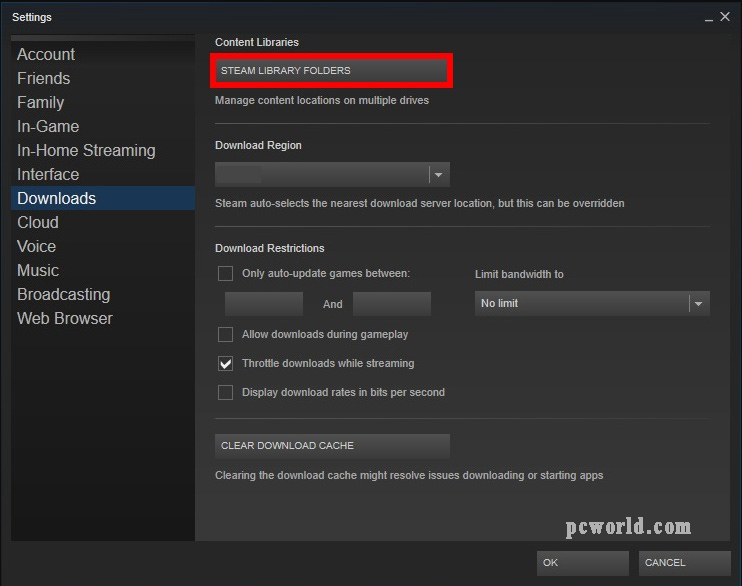
Step 7. Go to the Settings interface, and then click the Download tab on the left pane and click the Steam Library Folders under the Content Libraries.
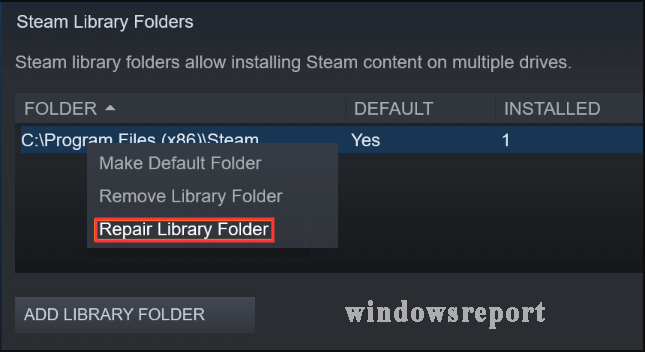
Steam 8. In the Steam Library Folders, you can see all your Steam content information. Right-click the folder and select Repair Library Files form the sub-menu.
Step 9. Restart your PUBG and check if the problem “PUBG loading screen stuck” is fixed.
Solution 2. Configure the Windows Firewall Settings
In addition, configuring Windows Firewall settings is also proven to be useful by some players to fix the problem. Before you do, you need to locate the PUBG local file directory on your computer. Here’s how:
Step 1. Open the Properties window of the PUBG, and then go to the Local files tab and click Browse local files.
Step 2. Then you should be redirected to the game folder in the File Explorer. Open the file TslGame > Binaries > Win64 one by one and copy the directory link by pressing Ctrl + C keys.
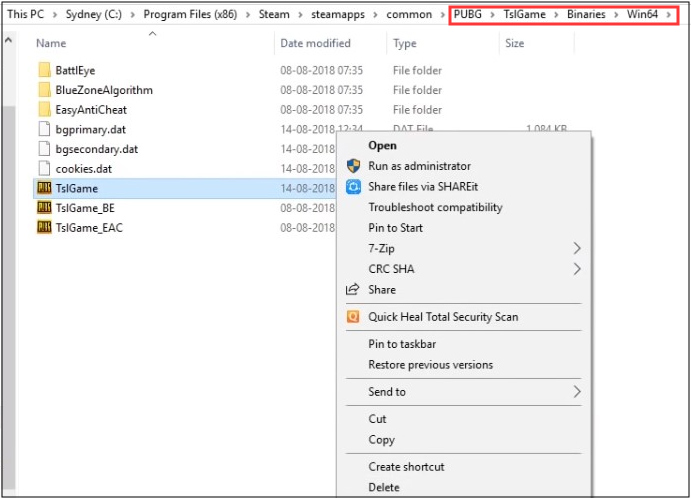
After you locate the PUBG local file directory, you can follow the steps below to configure the Windows Firewall settings. First of all, you need to create a new inbound rule.
Step 1. Open the Control Panel by searching it in Cortana, and then navigate to System and Security > Windows Firewall (Windows Defender Firewall).
Step 2. In the pop-up window, click the Advanced settings on the left side.
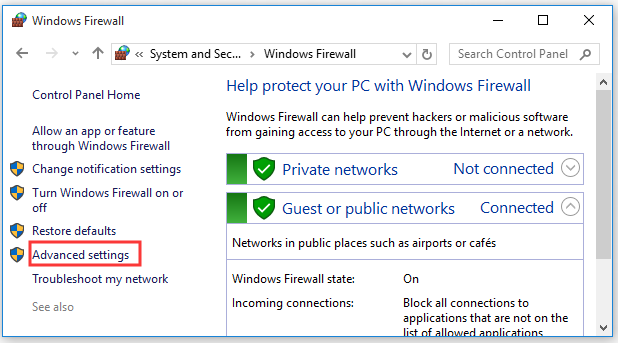
Step 3. Click Inbound Rules on the left and click New Rule on the right.

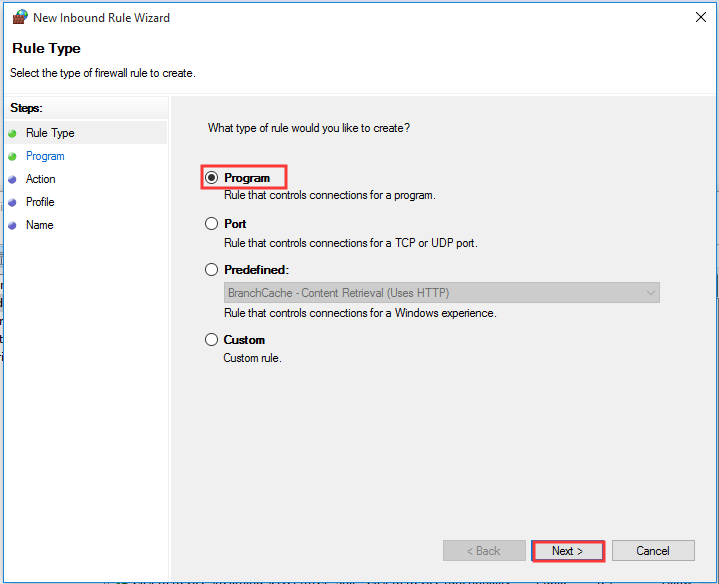
Step 4. Then select the Program (by default) and click on the Next button.
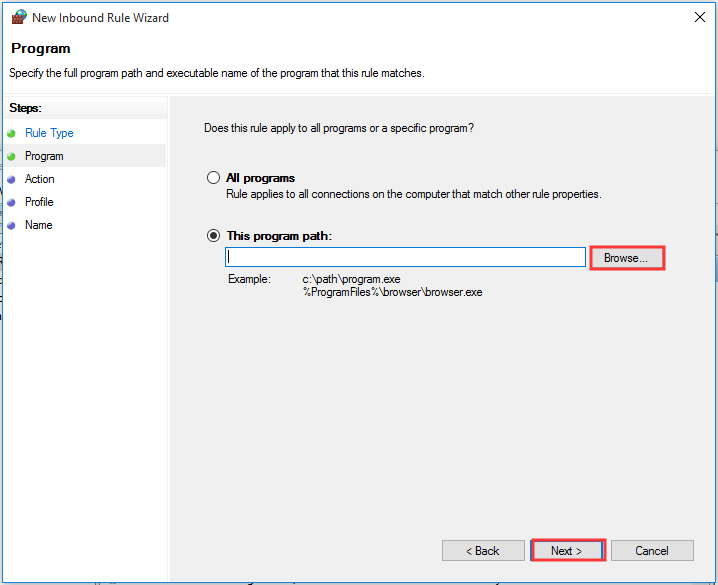
Step 5. Paste the PUGB file directory link that you just copied into the box under the This program path option. Then click Browse to select the local file directory as mentioned above and click Next to continue.
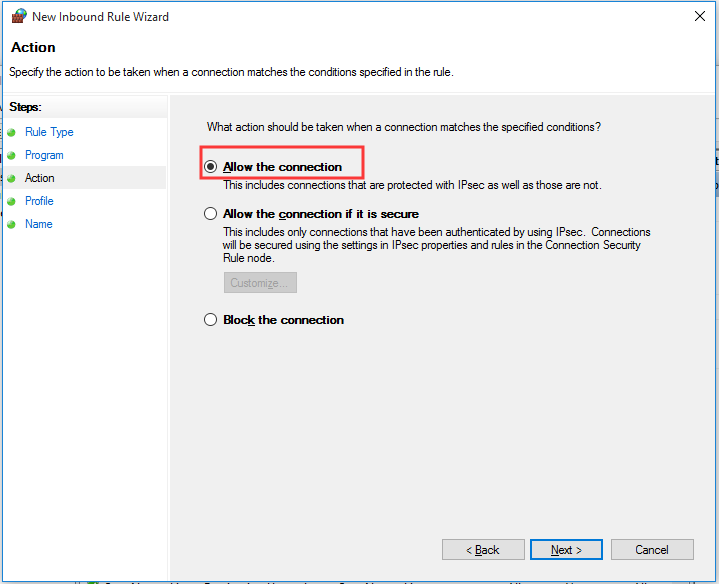
Step 6. Make sure you select the option Allow the connection and click Next.
Step 7. You will be asked “when does the rule apply?” Click Next.
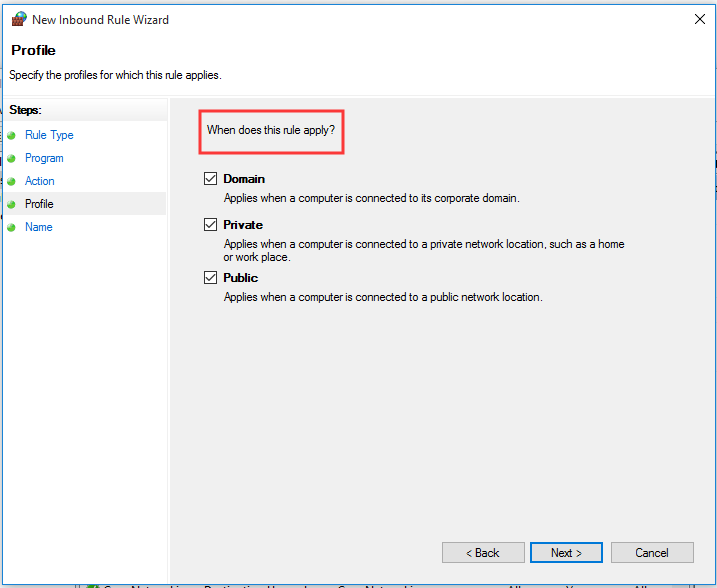
Step 8. Enter a name for this inbound rule and click Finish.
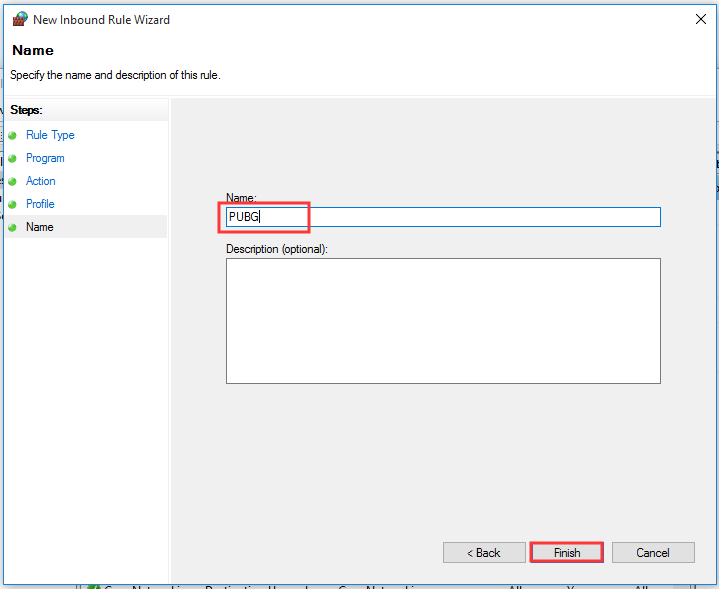
Once you created a new inbound rule, you need to create a new outbound rule for PUGB game files. The operational steps are similar to create an inbound rule as shown above. After configuring Windows Firewall settings, restart your computer and check if PUBG not loading the problem is resolved.
If this method fails to work, move on to the following methods.
Solution 3. Move the Game to a Solid State Drives (SSD)
If you are using a conventional hard drive for a long time, you may encounter the PUBG not loading into the game problem. In most cases, the SSD has less access and write time. So, you can enjoy a faster booting speed than a standard hard drive.
Using a Solid State Drive can help you extract and load the game files, or boot Windows faster. More importantly, this method has been proven to be useful according to the report from the PUGB community.
Here you can try moving the game to an internal SSD. There are 2 options to copy your PUBG to an internal SSD using a Steam tool or a professional clone-disk tool.
Note: Please make sure you have the minimum amount of RAM memory (16GB) on your computer.
#Method 1. Use Steam Tool
The process is relatively complex, so please reading carefully. First of all, you need to create a Steam library folder on the SSD. Here’s how.
Step 1. Connect the SSD that you prepared to the computer and open your Steam.
Step 2. In the Settings window, select the Downloads category on the left pane and click on the Steam Library Folders button.
Step 3. In the pop-up window, click on the Add Library Folder, select the hard drive that you want to create the folder on and click New Folder.
Step 4. After that, type a new name for this folder and click OK. Then click on the Select button to choose the folder you just created.
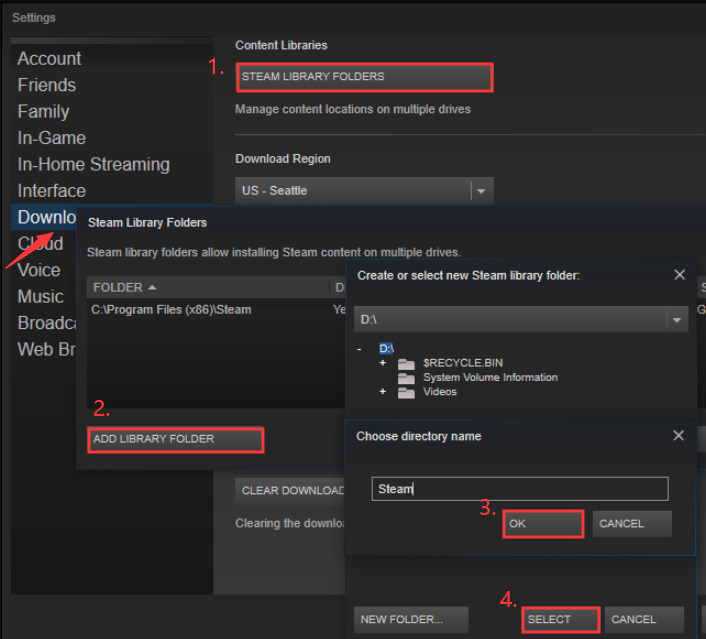
Next, you can move the PUBG game files to the Second Steam Library. Here’s how to do that:
Step 1. In the dashboard of Steam, right-click the Steam Library and select Properties.
Step 2. Go to the Local Files tab and click on the Move Install Folder button. Then select the second Steam Library you just created and click on the Move Folder button.
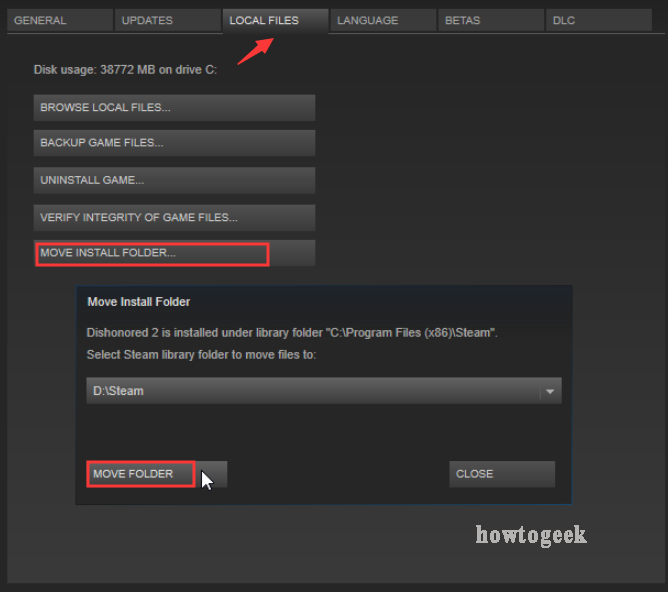
After that, Steam will move the game files to the second Library. Now, you can try launching the PUBG from the second library and check if the PUBG not loading issue is gone.
#Method 2. Use MiniTool Partition Wizard
As shown above, removing games to the SSD is a relatively complex process. If you want to remove your games to SSD more easily, you can use a professional tool. Here it is highly recommended that you use MiniTool Partition Wizard.
MiniTool Partition Wizard FreeClick to Download100%Clean & Safe
This tool is a powerful partition manager that you can use to measure disk performance, convert MBR to GPT disk and so on. Here it not only helps you move games but also upgrade your HDD to SSD without reinstalling OS.
Step 1. Connect the SSD to your computer and launch the software to open its main interface.
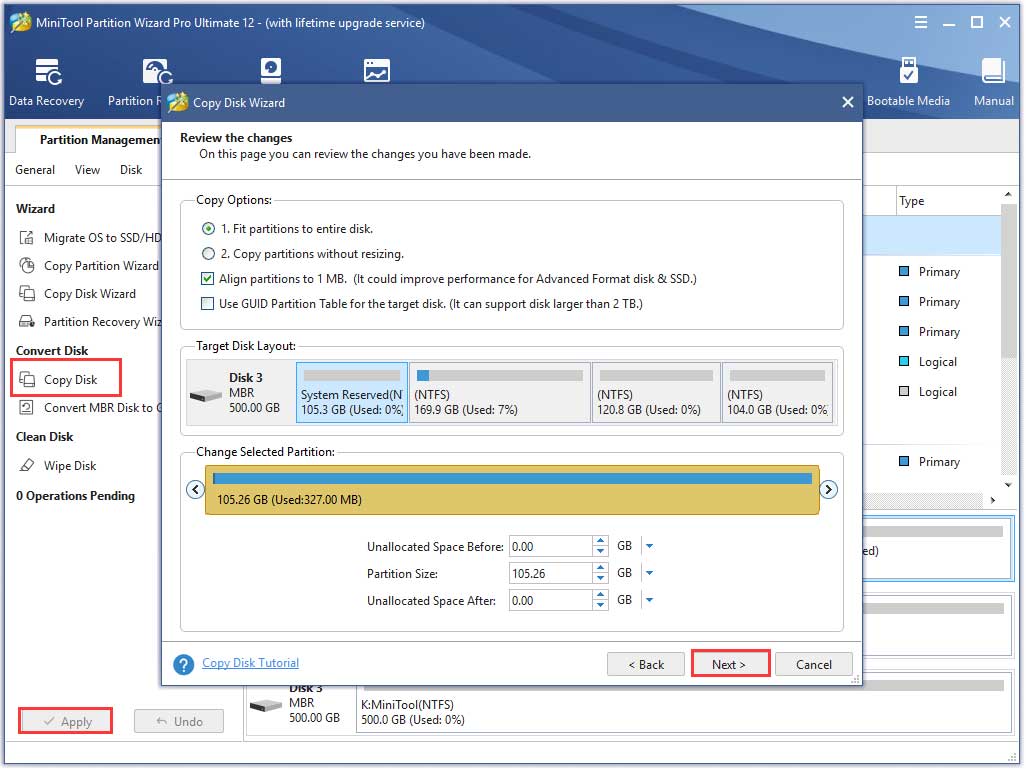
Step 2. Select your previous hard drive and click Copy Disk feature on the left pane.
Step 3. In the pop-up window, select the SSD you prepared and click on Next.
Step 4. Then you need to select a copy method based on your needs and click Next to continue.
Step 5. Click Finish in the next pop-up window and click Apply to execute this process.
It is so easy to operate, right? MiniTool Partition Wizard is your best choice to upgrade HDD to SSD.
Solution 4. Lower the Display Resolution
If you encounter the PUBG stuck on loading screen problem, this probably indicates there is a problem with your display resolution or some aspect ratios are not supported. For that, you can try lowering the display resolution.
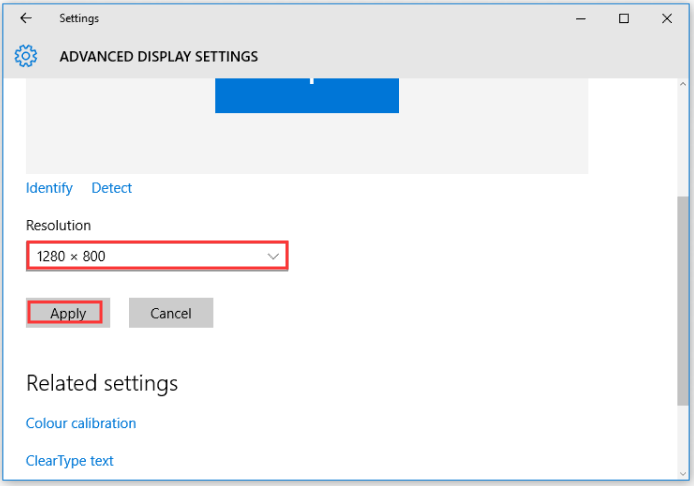
Step 1. Right-click any blank space on the desktop and select Display settings.
Step 2. Click Advanced display settings, and then try lowering the display settings from the drop-down menu and click Apply to save the change.
Method 5. Update the Graphics Card Driver
According to the report, an outdated graphic card driver also leads to your PUBG not loading smoothly. So, updating the graphics card driver may resolve the problem. Here’s how:
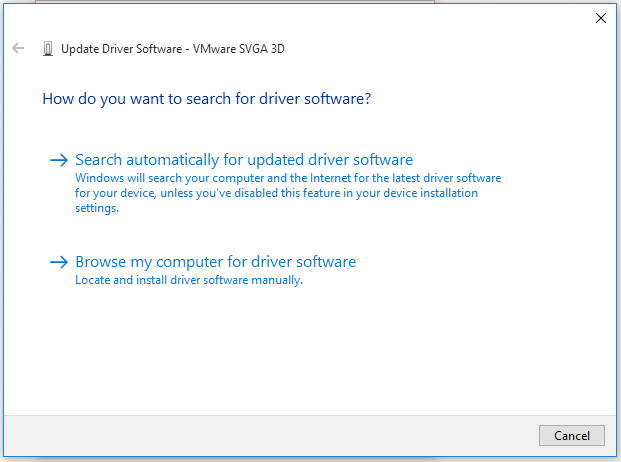
Step 1. Press Win + X keys and select the Device Manager from the contextual menu.
Step 2. Expand the Display adapters, and then right-click the graphic card driver and select Update Driver. Then you can select update the driver either manually or automatically based on your needs.
Method 6. Reconfigure Your Internet Settings
Sometimes Internet problem will stop your PUBG from loading, you can reconfigure it to resolve the PUBG blocked loading of file issue.
Step 1. Press Win + R keys to open the Run box, and then type cmd in it and press Ctrl + Shift + Enter keys to open an elevated prompt.
Step 2. Then type the following command and hit Enter one by one after typing each command.
- ipconfig/release
- ipconfig/all
- ipconfig/flush
- ipconfig/renew
- netsh int ip aet dns
- netsh winsock reset
Step 3. Restart your computer and check if the issue is fixed
Method 7. Turn off BEServices in Task Manager
In addition to the above methods, you can try fixing the problem by turning off BEServices in the task manager. It is known to cause problems with the game.
Step 1. Open PUBG and Steam on your computer.
Step 2. Right-click the Start menu and select Task Manager.
Step 3. In the Process tab, select the BEServices and click End task.
Bottom Line
In today’s article, we discussed top 7 methods to fix the PUBG stuck on loading screen issue. Now, it’s your turn to have a try. If you any questions, please send us an email via [email protected]. We also appreciate any ideas left in the comment area.
PUBG Stuck on Loading Screen FAQ
- Open the Steam client and login to your account.
- Click on the Library, and right click the game on the left pane and select Properties.
- Navigate to the Local Files tab and click on the Verify the integrity of Game Files
- Right click the game in the Steam Library and select Properties.
- Navigate to Local Files tab and click the Browse Local Files
- Locate the game executable, and then right click it and go to Properties.
- Click the Compatibility tab and check the box of Run this program as an administrator.
- Click Apply to execute the change.

![Nexus Mod Manager A Problem Occurred During Install [Full Guides]](https://images.minitool.com/partitionwizard.com/images/uploads/2019/12/nexus-mod-manager-a-problem-occured-during-install-thumbnail.jpg)
User Comments :