A lot of users complain about MSI Dragon Center not working. Are you also troubled by the Dragcenter issue? Don’t worry. This post of MiniTool summarizes 5 proven methods to fix the problem.
MSI Dragon Center is a free pre-installed application that often comes with MSI laptops. It can control the real-time performance of all MSI components connected to your PC. Since the release of the Dragcenter app, it’s widely popular among users.
Sometimes, however, users also encounter MSI Dragon Center not working issues like “stuck on waiting for MSI SDK Initialization”, “RGB not working or not syncing”, etc. After analyzing extensive user reports and posts, we summarize the following 5 proven solutions. Let’s start trying.
Solution 1. Install the Latest Version of the App
Many users reported that they managed to fix the MSI Dragon Center not working issue after installing the latest version of the app. Before you do that, you need to clean install the app, and reinstall it from the official website.
Step 1. Right-click the Start menu at the bottom left and select Apps and Features or Programs and Features based on your Windows version.
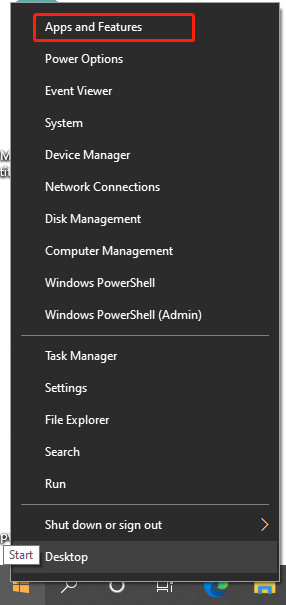
Step 2. Scroll down the list of installed programs to find MSI Dragon Center, and then select it and click on Uninstall. Then follow the on-screen prompts to complete the uninstallation.
Step 3. Search and find the MSI SDK app and uninstall it with the same step.
Step 4. Press Win + R keys to open the Run dialog box, and then type %programdata% in it and hit Enter.
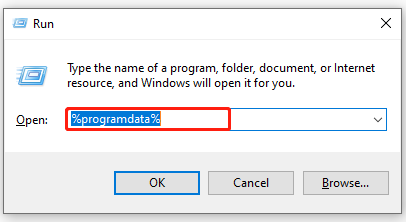
Step 5. In the pop-up ProgramData folder, delete all files and folders related to MSI. Similarly, execute the %appdata% and %localappdata% commands in the Run box, and remove all files and folders related to MSI in the two folders.
Step 6. Once clean installed, click here to visit the official website of the MSI Center app and download the installation package. After that, you can reinstall the app and check if the Dragon gaming center not working issue gets solved.
Solution 2. Check MSI Central Service
If you are stuck on waiting for the MSI SDK initialization, you can check if the related service is configured properly. Follow the steps below to check the MSI Central service.
Step 1. Open the Run box by pressing Win + R keys, and then type services.msc and press Enter.
Step 2. In the Services window, scroll down the list of services to find MSI Central Service, and then right-click it and select Properties.
Step 3. Make user this service is running. If not, click on Start. Then change the Startup type to Automatic.
Step 4. Click on Apply and OK to save the change.
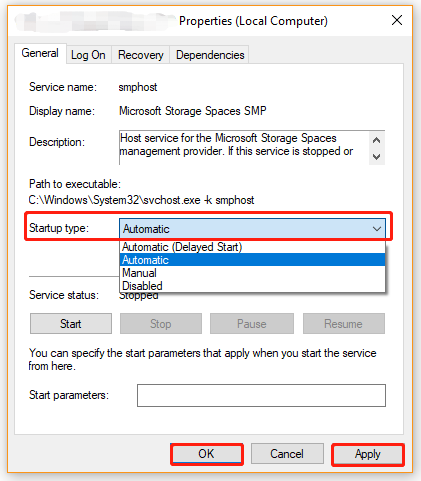
Now, you can restart your computer and see if the Dragon gaming center not working issue is resolved.
Solution 3. Run MSI Dragon Center as Administrator
Sometimes the Dragon Center not opening issue can occur due to lack of access permissions. In this case, you can fix it by running the app as an administrator.
Step 1. Right-click the Dragcenter app’s shortcut on your desktop and select Properties.
Step 2. In the Properties window, navigate to the Compatibility tab and tick the checkbox next to Run this program as an administrator.
Step 3. Click on Apply and OK to save the change.
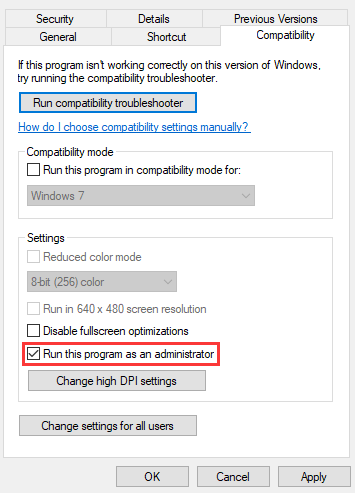
After that, you can check if the MSI Dragon Center not opening problem gets resolved.
Solution 4. Allow the Program Through Your Windows Firewall
The MSI Dragon Center not installing issue can occur if your Windows Defender Firewall or antivirus program blocks the app. So, we recommend you allow the app through your Firewall.
Step 1. Type firewall in the search box and then select the Windows Defender Firewall from the context menu.
Step 2. Click on Allow an app or feature through Windows Defender Firewall from the left pane.
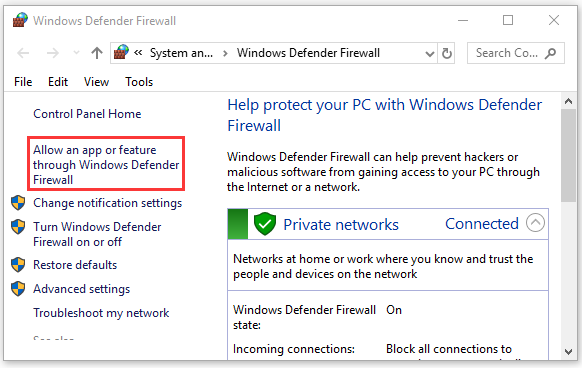
Step 3. Select the checkbox for MSI Dragon Center or other MSI-related apps from the list of programs, and then tick the checkbox for both Private and Public networks, and click OK to save the change.
Once done, you can restart your computer and see if the MSI Dragon Center not installing issue is fixed.
Solution 5. Check System File Errors
If the MSI SDK issue still occurs after you try all the above solutions, you may need to check the system file corruption. To repair system files, you can run an SFC scan or DISM scan. Here’s how:
Step 1. Type cmd in the search box, and then right-click the Command Prompt from the top result and select Run as administrator. Click on Yes in the UAC confirmation window.
Step 2. In the elevated Command Prompt, type sfc /scannow command and hit Enter. After that, this tool will scan and repair the corrupted system files. This process may take you some time and make sure that it completes.

After that, you can reboot your PC and check if the problem disappears.


User Comments :