About Microsoft Software Protection Platform Service
Microsoft Software Protection Platform Service (Sppsvc), a service in Task Manager, is a security service built in Windows in order to stop piracy and protect software tampering, which is implied by its name. The Sppsvc is responsible for downloading, installing and executing Windows digital licenses and applications.
Besides, it is helpful for initiating license. As Microsoft claims, software protection platform service performs well in how Microsoft software activates, validates online and runs when tampering or hacking is detected.
What Causes SPPSVC High CPU Usage
Though it has so many benefits, it has its shortcomings. One of the most frequently discussed points is the Microsoft Software Protection high CPU issue. In fact, high CPU usage issue on Windows OS is a very common one compared with other errors like computer keeps crashing, blue screen of death, black screen, etc.
You may encounter various high CPU usage cases such as state repository service high CPU, Wsappx high CPU, and so forth. How Microsoft Software Protection Platform Service high CPU is different from other high CPU cases?
The SPPSVC high CPU issue will occur under 2 circumstances. It can happen in a genuine Windows copy and a copy that is activated with third-party applications like KMS. You can click here to check if Windows 10 is genuine or not.
What causes Microsoft Software Protection high CPU? Several factors can result in this issue. They are summarized as follows.
- The PC is infected by virus or malicious software.
- The Microsoft Software Protection Platform Service is stuck with validations.
Of course, other elements can also trigger the SPPSVC high CPU issue. Here comes the real point of this error – how to fix Microsoft Software Protection Platform Service high CPU. Well, several solutions have been offered to you.
Also read:
High CPU usage but low GPU usage
Epic Games Launcher high CPU usage
Solution 1: Restart Microsoft Software Protection Platform Service
If you have the privilege of administrator, you can restart Microsoft software protection platform service to solve the Microsoft Software Protection high CPU issue. This method is pretty simple and convenient. You just need to follow these steps to do that.
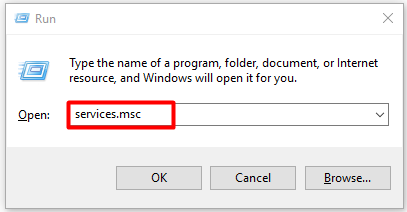
Step 1: Open the Run window and type services.msc, and then hit Enter.
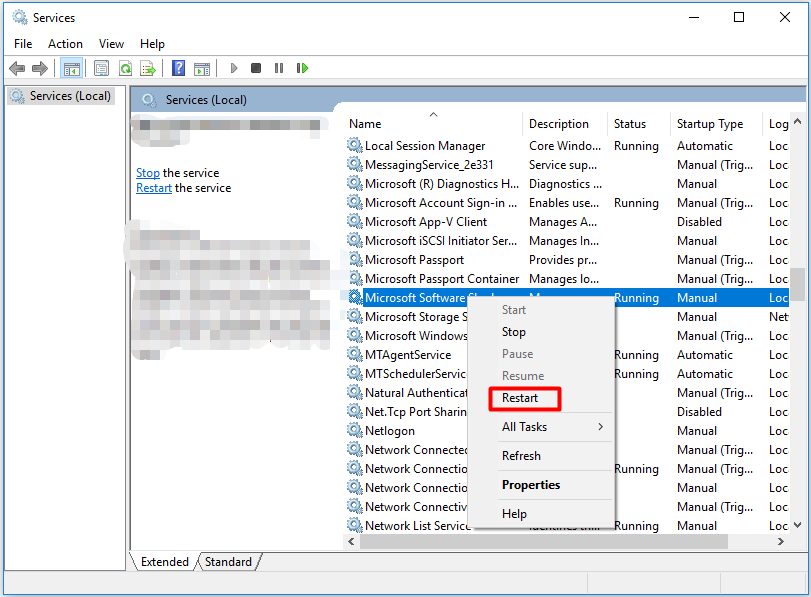
Step 2: Scroll down the service list to find Microsoft Software Protection Platform Service. Then, right click on the service and click Restart option. If the Restart button is greyed out, you need to click Start and then click the Restart button.
Step 3: Now, check if the SPPSVC high CPU issue is solved. If not, try other solutions immediately.
Solution 2: Update Your Windows
The Sppsvc.exe may start consuming system resource because of the missing Windows updates. As it is known to all, outdated system drivers and software can cause various kinds of errors. So, updating your Windows is worth trying.
Step 1: Open Windows Settings by holding Win plus I keys, and then navigate to Windows Updates section.
Step 2: Move to the right side of the window and click on Check for updates option. Then, you will see that Windows is checking for updates. Besides, if Windows finds any available updates, it will download and install it automatically.
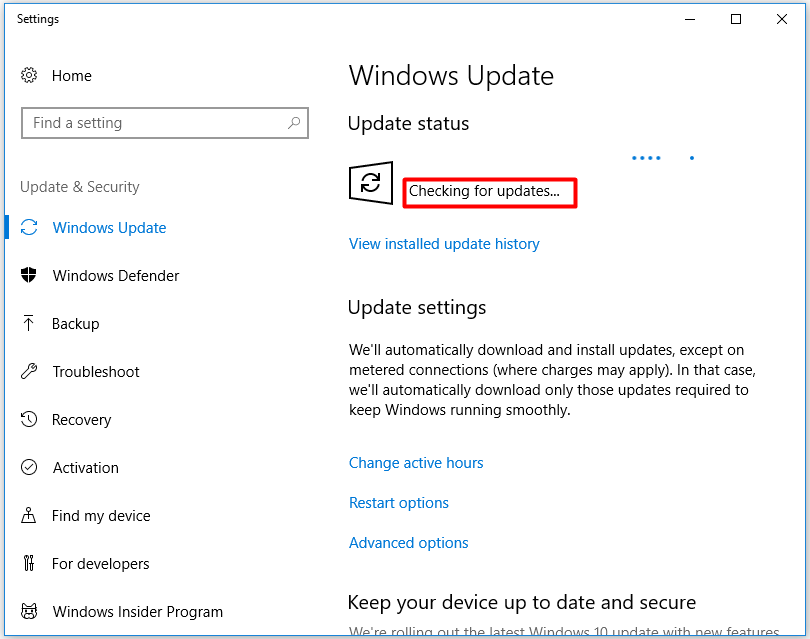
Step 3: When the new update is installed on your computer, reboot the device and see if the high CPU issue is resolved.
Top recommendation: How to Check If Drivers Are up to Date? Here Are Details
Solution 3: Run System Maintenance Troubleshooter
The System Maintenance Troubleshooter is a Windows built-in utility, which can fix various Windows related issues. For instance, the Troubleshooter will help you solve errors such as printer offline, Ethernet not working, unidentified network, Canon printer not responding and so on.
Hence, you can consider running system maintenance troubleshooter with steps below to fix the Microsoft Software Protection high CPU error.
Step 1: After opening Control Panel, type troubleshoot in the search bar and you can see the corresponding search result in the window. Click on Troubleshooting to continue.
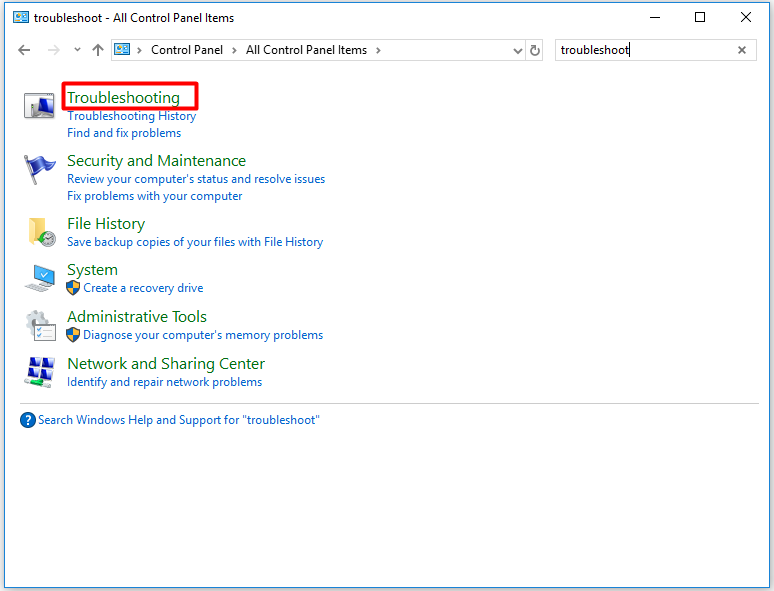
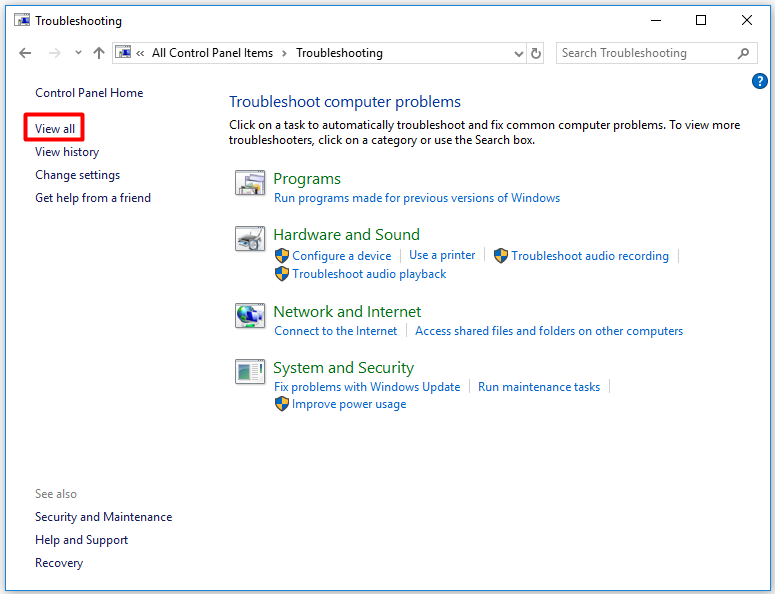
Step 2: In the Troubleshooting window, click View all in the left pane.
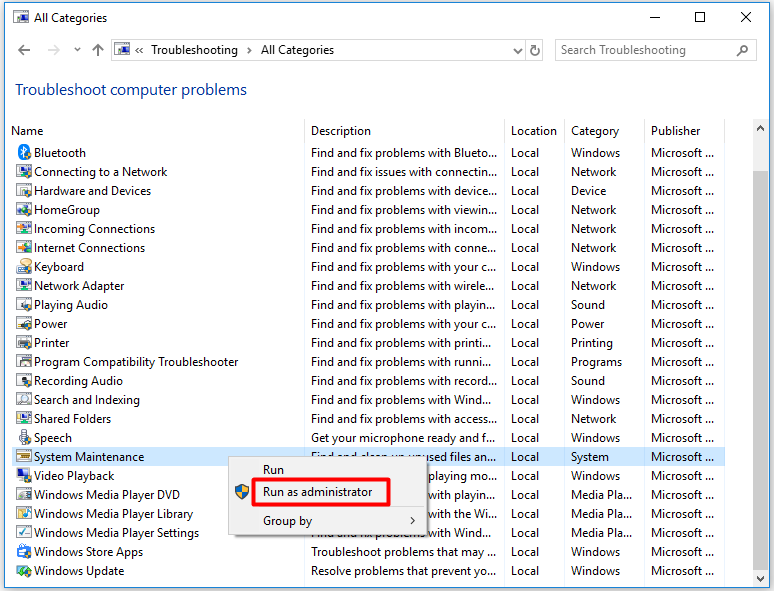
Step 3: Drop down the menu until you find System Maintenance. Right click it and select Run as administrator.
Step 4: In the pop-up window, click the Next button.
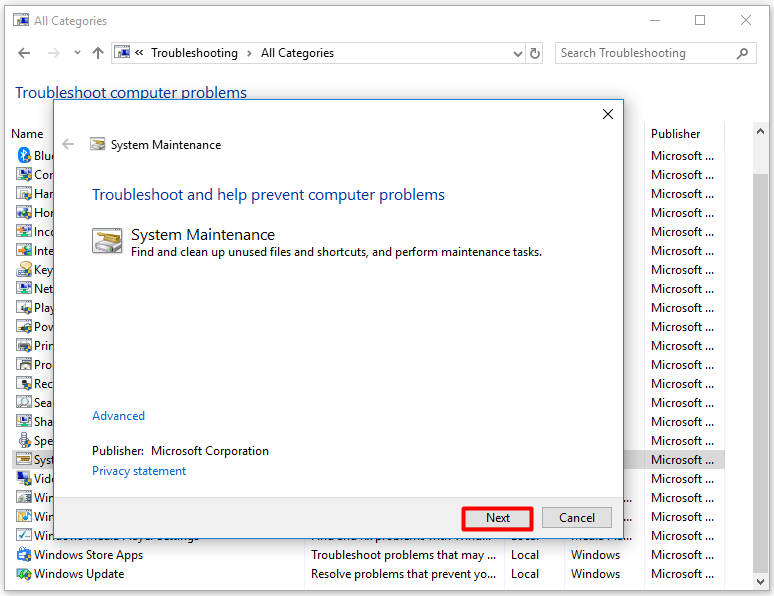
Step 5: Now, the Troubleshooter will scan for errors on your operating system. It will tell you the errors and corresponding fixes if it finds any. You just need to follow the on-screen instruction to complete the operation.
Solution 4: Boot Your Computer in Safe Mode
When the Microsoft Software Protection high CPU occurs, try a clean boot. Safe Mode can fulfill the requirement, because only necessary services, drivers and processes will run in this mode. Hence, you can boot your computer into Safe Mode and see if the Microsoft Software Protection Platform Service still uses system’s resource unreasonably.
If the SPPsvc high CPU usage issue disappears in safe mode, it indicates that the software clash with the service is the source of the error. And you need to take some measures to cope with it. For example, you can disable all the services in the Task Manager and then enable them one by one until the issue appears again. Then, you can remove or disable the service.
Solution 5: Scan for Malware or Virus
Since virus and malware can lead to Microsoft Software Protection Platform Service high CPU, it’s recommended to scan your computer for any virus or malicious software with antivirus software installed on your computer. You can do this with your antivirus programs to keep your computer is clean (without virus or malware).
You may also like this: How to Clean up Your Computer? Top 8 Methods for You
If you don’t install any antivirus software on your computer, you can use the built-in program – Windows Defender. Open it and choose a scan option based on your need. However, some users doubt that is Windows Defender enough. As for this, you can utilize other tools like Microsoft Safety Scanner to protect your PC.
Solution 6: Run System File Checker
System File Checker (SFC) is also a utility that comes with Windows operating system (since Windows 98). It is widely used for scanning computer for corrupted system files. Here, you can also apply it to fix Microsoft Software Protection high CPU issue. For that.
Step 1: Open the Run dialog window and type taskmgr. Then, press the Enter key.

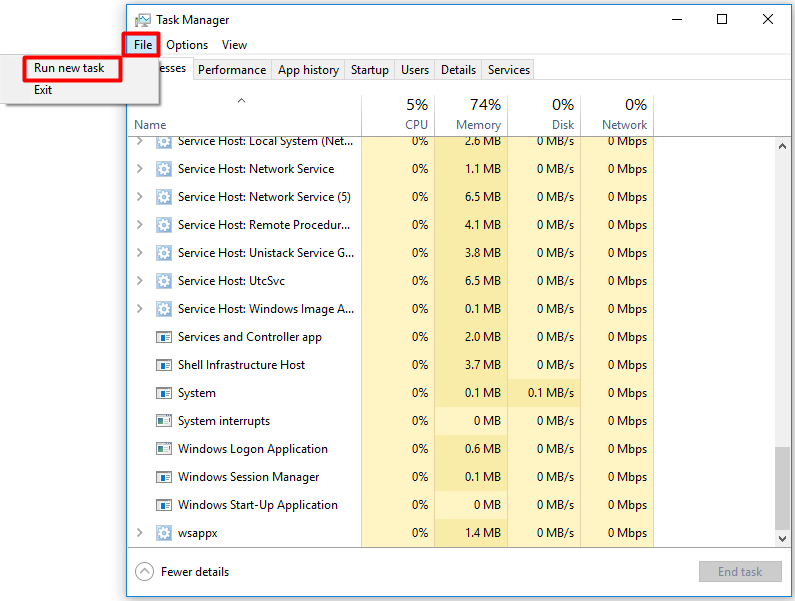
Step 2: Click on the File tab and select Run new task from the elevated menu.
Step 3: From the pop-up window, type powershell and select the Create this task with administrative privileges checkbox. Then, hit Enter.

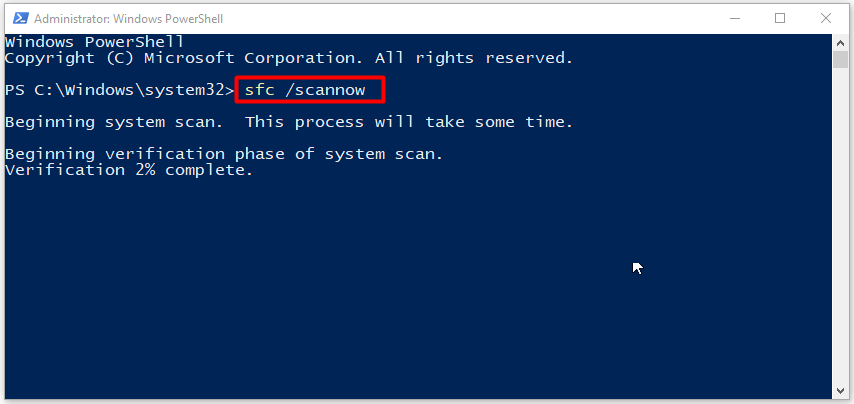
Step 4: Type sfc /scannow and press Enter in the elevated window. After that, the program will scan your system automatically. You just need to wait for some time.
Solution 7: Update or Disable KMS
If you use KMS software to activate Windows products and encounter the SPPsvc high CPU error, you should check if your KMS software is the latest version. If the high CPU issue still appears after you update the KMS activation and reboot the device, try disabling KMS or stopping the sppsvc.exe.
Step 1: Type task scheduler in the search box, and then click on Task Scheduler from the search results.

Step 2: After opening the Task Scheduler, expand Task Scheduler Library and open the KMS process. Right click on each entry in the right side of the window and choose the Disable option.
Step 3: Now, restart your computer and check if the Microsoft software protection platform service high CPU error is fixed.
Solution 8: Refresh Your Windows with a Fresh Copy
If the SPPsvc high CPU issue still persists after carrying the solutions above, you can utilize this trump card – refresh your Windows with a fresh copy. In other words, you will install a new copy of Windows.
To do that, you can utilize MiniTool Partition Wizard. The Migrate OS to SSD/HD Wizard and Copy Disk feature can help you install a new copy of Windows with ease. You just need to plug a USB flash drive that contains a genuine Windows to your computer, and then follow the steps below.
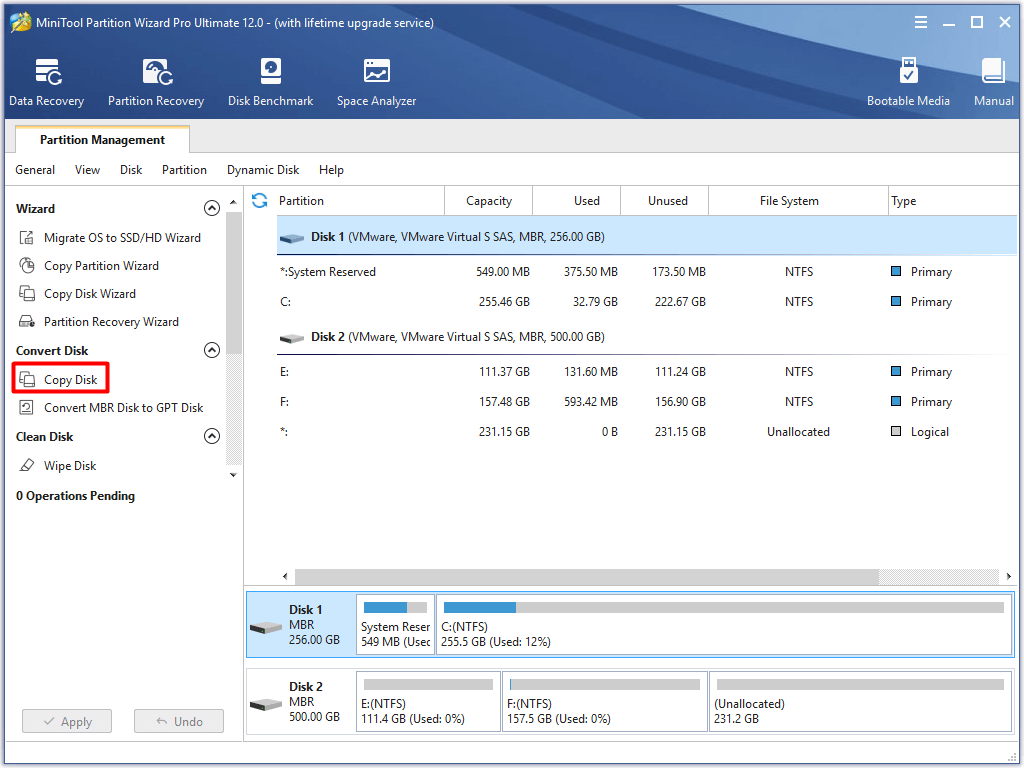
Step 1: Launch MiniTool Partition Wizard to get its main interface. After selecting your system disk, click on the Copy Disk feature in the left action panel.
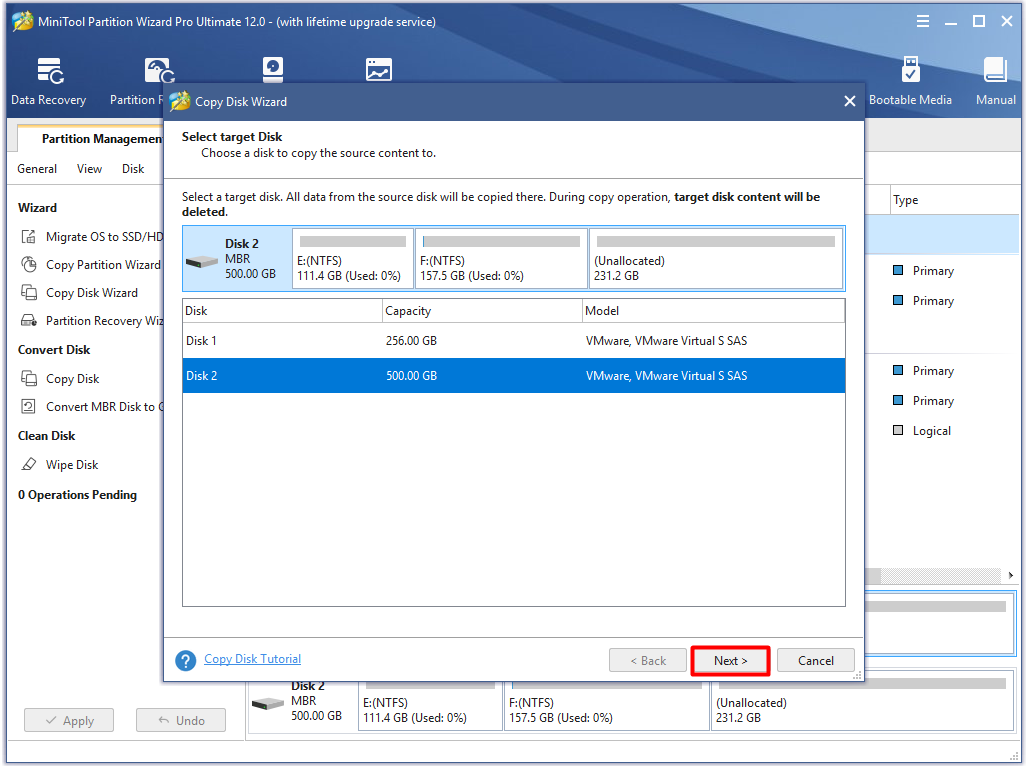
Step 2: In the next window, choose a destination drive for your copied disk and click Next.
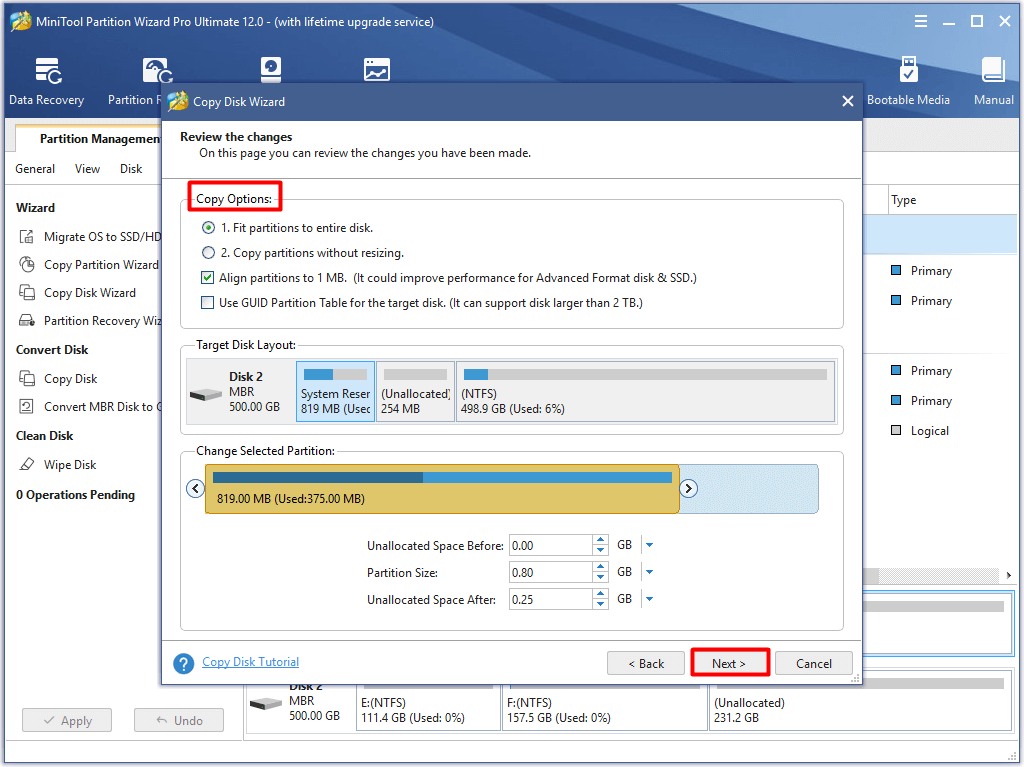
Step 3: You can choose copy options based on your demand in this window. After that, click the Next button to go on.
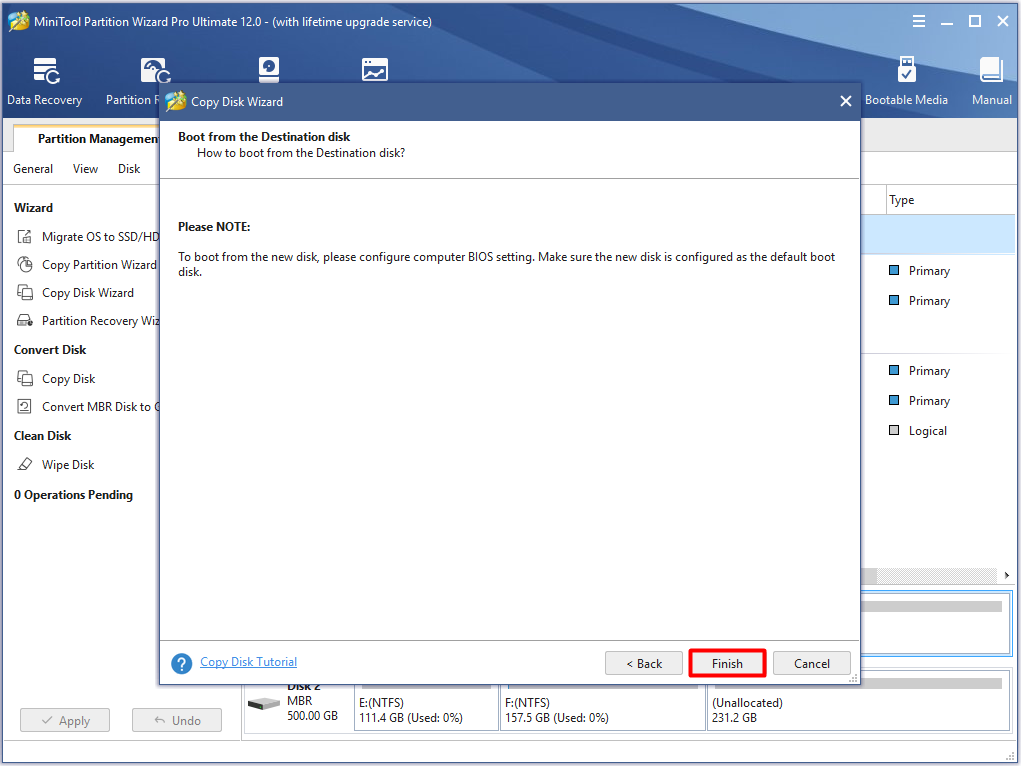
Step 4: Click the Finish button to back to the main interface.
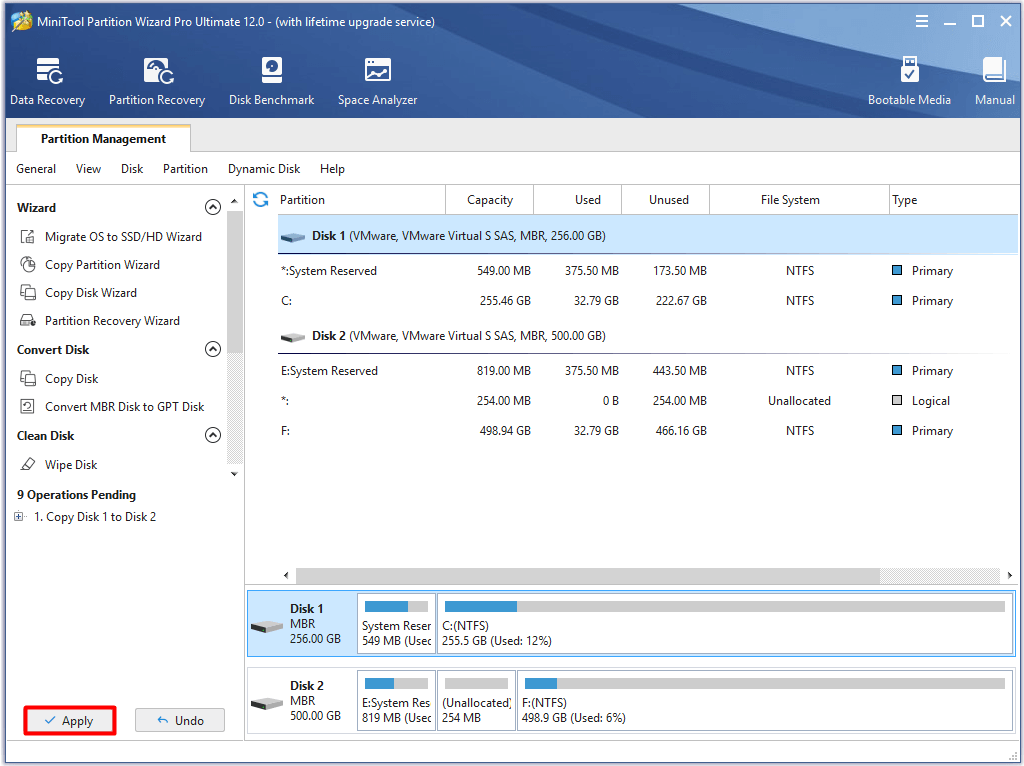
Step 5: Click on Apply to carry out the copy disk operation.
Alternatively, you can also perform restore to bring your computer to a previous date to fix the high CPU issue. However, this will undo some changes that you made after the restore point creation time. Hence, you need to be cautious when making a decision.
Conclusion
Read here, you may have an overall understanding of the Microsoft Software Protection Platform Service. More importantly, with the given methods, you will not be confused by Microsoft Software Protection Platform Service high CPU anymore.
Pick one solution to fix the high CPU issue based on your need. If you have any doubt about MiniTool Partition Wizard, send us an email via [email protected].
Microsoft Software Protection Platform Service FAQ
It is pretty easy to disable Software Protection Service Windows 10.
- Open the Run window and type taskmgr, and then hit Enter.
- Find out the target service from the list.
- Right click on the service and choose End task.
You can use the following methods to fix SPPSVC high CPU issue.
- Restart the Microsoft Software Protection Platform Service
- Update your Windows
- Run the system maintenance troubleshooter
- Boot your computer into Safe Mode
- Scan for malware or virus
- Run the system file checker
- Update or disable KMS
- Disable software protection service Windows 10
- Refresh your Windows with a fresh copy

User Comments :