What Is Microsoft Compatibility Telemetry?
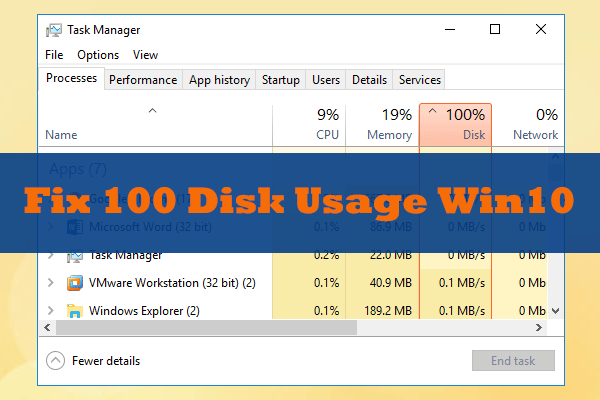
Some of you may not know what Microsoft Compatibility Telemetry is. You may notice it just because Microsoft Compatibility Telemetry high CPU or high disk problem.
In Task Manager, I often see the Windows Compatibility Telemetry process running in the background using up unnecessarily CPU. Do you know how to permanently turn off the telemetry? — answers.microsoft.com
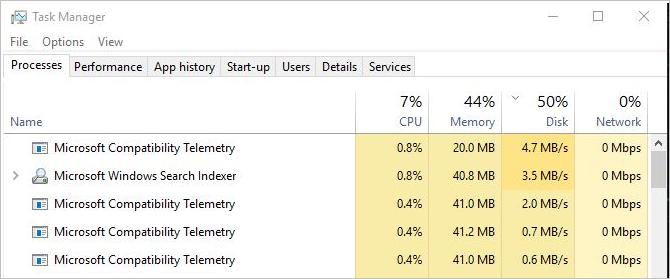
Some of you may also notice the existence ofCompatTelRunner.exe file running because it will slow down your PC. Here is another screenshot of another post seeking for help on answers.microsoft.com.
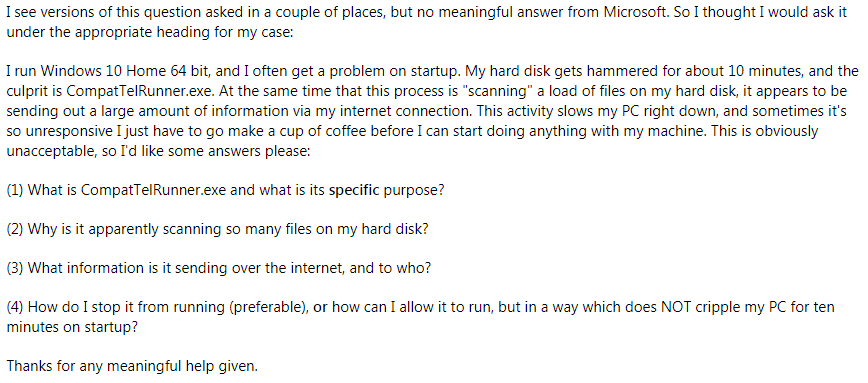
What is CompatTelRunner.exe? In fact, CompatTelRunner.exe is the executable file of Windows Compatibility Telemetry. They are the same thing to some extent. Now, you may be wondering what Microsoft Compatibility Telemetry is.
Microsoft Compatibility Telemetry, also referred to as Windows Telemetry, aims to improve Microsoft products and services. Microsoft asserts that it can also help you with device security, program compatibility and driver compatibility, etc.
It surely is a legit Windows service that collects and sends data periodically from your computer to Windows development team in order to improve Windows’ performance, compatibility and bug repair, etc.
But what kind of data will it collect and send from you? Actually, the information Windows Compatibility Telemetry collects and sends really depends on the Windows data telemetry level. The data telemetry is divided into four levels: security, basic, enhanced, and full.
Security: Information needed to help secure Windows, Windows Server, and System Center. This includes data about connected user experience and telemetry component settings, malware removal tools, and Windows Defender.
Basic: Basic device information, including quality-related data, application compatibility, application usage data, and data in the “security” level.
Enhanced: Other insights, including how to use Windows, Windows Server, System Center, and applications; how they are performed; advanced reliability data, and data in the “Basic” and “Security” levels.
Full: All the data needed to identify and help to solve a problem, this include data in the “security”, “basic” and “enhanced” levels.
Some users also think Microsoft Compatibility Telemetry will not only send the data listed above but also send the following information to Microsoft development team.
- Typed text on your keyboard.
- Everything you say into microphone.
- Full transcription of your conversation with Cortana.
- A list of all multimedia files on your computer.
- The first 35 MB of data when you open your Webcam.
After reading the list above, many of you may be very concerned about your data privacy. Luckily, you can avoid privacy leak, high disk usage and high CPU usage problems due to Microsoft Compatibility Telemetry by configuring it or disabling it.
How to Configure or Disable Microsoft Compatibility Telemetry on Windows 10
If you are only concerned about privacy leak, you can adopt one of the following methods. However, if you are more annoyed by the disk usage problem, you may also refer to the guidance on Microsoft Compatibility Telemetry disk usage.
How to Disable Microsoft Compatibility Telemetry on Windows 10
- Configure Microsoft Compatibility Telemetry through Registry Editor.
- Disable Microsoft Compatibility Telemetry through Group Policy Editor.
- Disable Microsoft Compatibility Telemetry through Task Scheduler.
- Delete CompatTelRunner.exe.
Method 1. Configure Microsoft Compatibility Telemetry through Registry Editor
Registry is an important database in Microsoft Windows used for storing system and application settings information. Therefore, you can use Registry Editor to configure Microsoft Compatibility Telemetry on Windows 10.
Here is the tutorial.
Step 1: Open Registry Editor.
- Press “Windows + R” keys simultaneously.
- Enter “regedit” into the Run box and press Enter
Step 2: Input value to configure Microsoft Compatibility Telemetry level.
- Navigate to HKEY_LOCAL_MACHINE> SOFTWARE > Microsoft > Windows > CurrentVersion> Policies >DataCollection.
- Highlight DataCollection and double-click AllowTelemetry from the frame on the right-hand-side page.
- Press Enter key input “0” into the Value data. (Attention: Value “0” stands for security level; value “1” stands for basic level; value “2” stands for enhanced level and value “3” stands for full level.)
- Click OK to save changes.
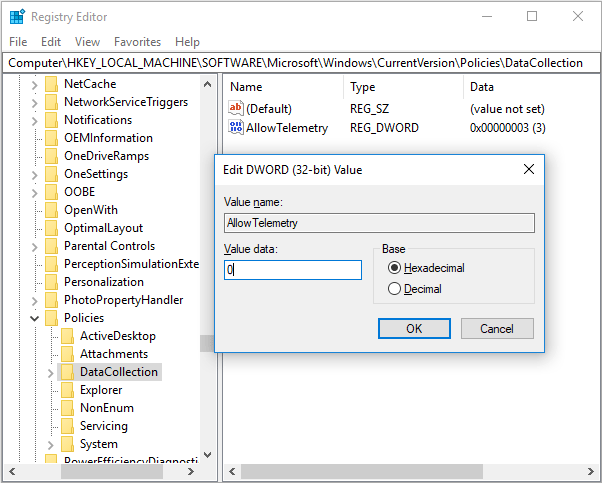
After following the steps listed above, you can adjust the Microsoft Compatibility Telemetry to the lowest level so that it can only collect and send a small amount of data. This way, it will not eat a lot of your CPU and disk while you also don’t need to worry about the leakage of sensitive information.
Method 2. Disable Microsoft Compatibility Telemetry through Group Policy Editor
Group Policy can control the working environment of user accounts and computer accounts. It can manage and configure user settings in the operating system, applications, and Active Directory. As you can see, you can configure or disable Microsoft Compatibility Telemetry Windows 10 through the Group Policy Editor.
Here is the tutorial.
Step 1: Open Group Policy Editor.
- Press “Windows + R” key simultaneously to call out Run
- Enter “msc” in the Run box and then press Enter key.
Step 2: Disable Microsoft Compatibility Telemetry.
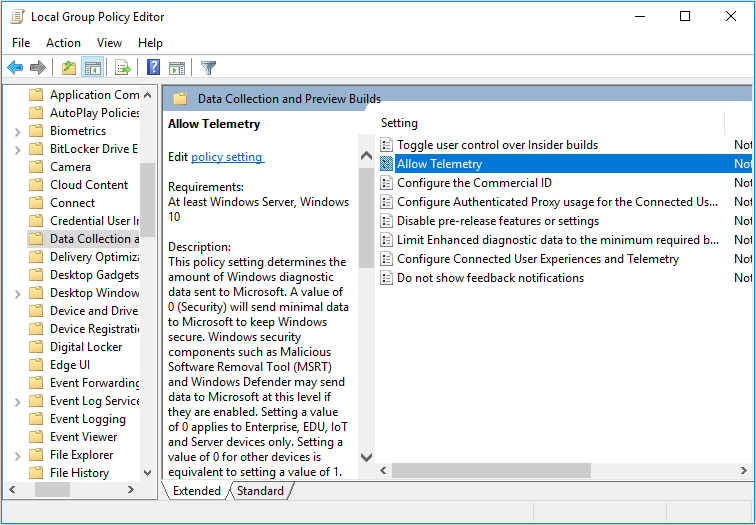
- Navigate to Computer Configuration > Administrative Templates > Windows Components > Data Collection and Preview Builds.
- Highlight Data Collection and Preview Builds and double-click Allow Telemetry in the right-hand-side box.
- Choose Disabled and then click OK to save change in the pop-up window.
Method 3. Disable Microsoft Compatibility Telemetry through Task Scheduler
Task Scheduler can schedule launch of programs or scripts at predefined times or after specific time intervals. This way, you can prevent Microsoft Compatibility Telemetry from launching in Task Scheduler.
Here is the tutorial.
Step 1: Open Task Scheduler.
- Press “Windows + R” key simultaneously.
- Enter “msc” in the Run box and then press Enter key.
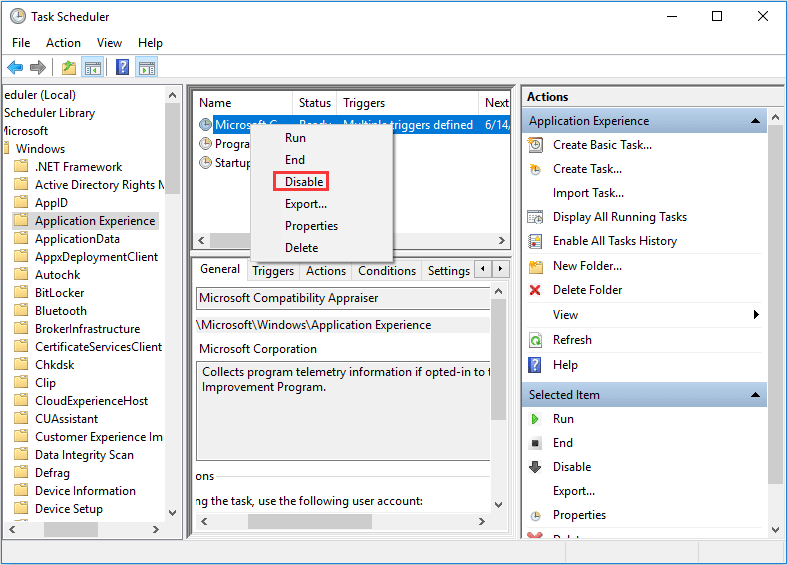
Step 2: Disable Microsoft Compatibility Appraiser.
- Navigate to Task Scheduler Library > Microsoft > Windows > Application Experience.
- Highlight Application Experience and right-click Microsoft Compatibility Appraiser in the middle box to disable it.
Method 4. Delete CompatTelRunner.exe
You can also get rid of CompatTelRunner.exe Microsoft Compatibility Telemetry directly by deleting CompatTelRunner.exe. This is also a Microsoft Telemetry removal tool.
Here is the tutorial.
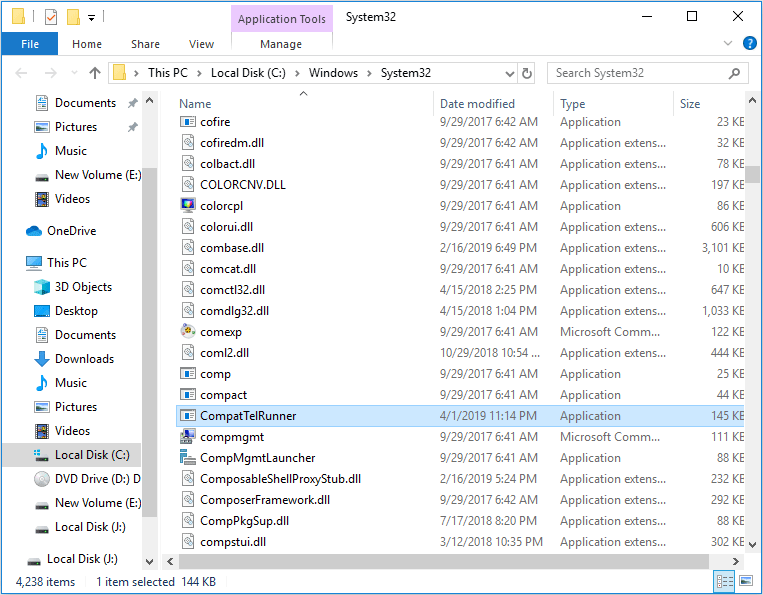
Step 1: Open System32 folder.
- Press “Windows + R” key simultaneously.
- Enter “C:WindowsSystem32” in the Run box and then press Enter
Step 2: Take ownership.
- Find exe and right-click it to choose Properties.
- Skip to Security tab and click Advanced button in the Properties
- Click Change button that follows Owner in Advanced Security Settings
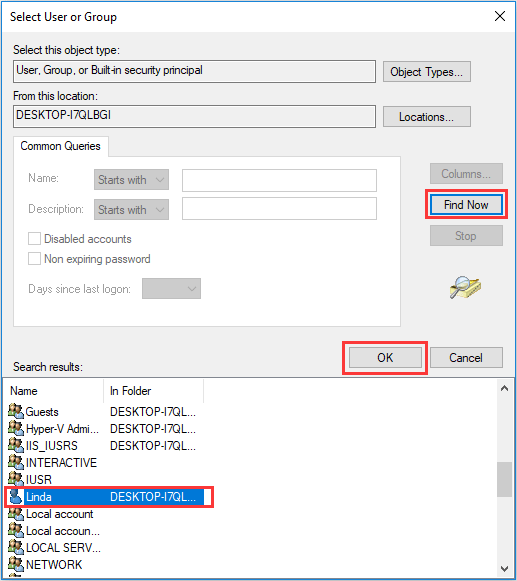
- Click Advanced button in the new window.
- Click Find now and scroll down to select your account.
- Click OK to save change.
- Finally, you should click Apply button on the Advanced Security Settings
- Click OK when a note window pops up.
Step 3: Change permission settings.
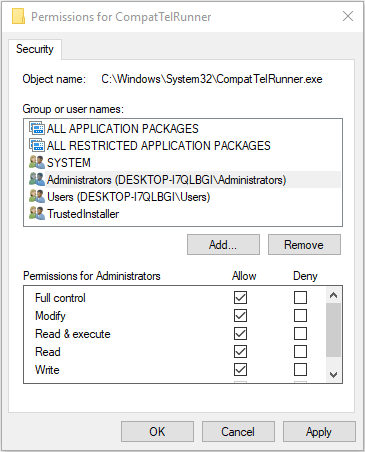
- Open the Properties interface and click Edit button to change permissions.
- Highlight Administrators and check Full control under Allow.
- Click OK to save change.
- Click OK when a warning window pops up.
Step 4: Right-click CompatTelRunner.exe to delete it.
Guidance on Microsoft Compatibility Telemetry Disk Usage
If you are facing Microsoft Compatibility Telemetry high disk usage problem, you can also try the following methods.
How to Fix Microsoft Compatibility Telemetry High Disk or High CPU Usage
- Close the Microsoft Compatibility Telemetry process on Task Manager.
- Run antivirus.
- Run SFC command.
- Restore system.
- Wipe hard drive and reinstall system.
Method 1. Close the Microsoft Compatibility Telemetry Process in Task Manager
If the Microsoft Compatibility Telemetry high disk and high CPU usage problem don’t occur frequently, you can close the process on Task Manager to relieve these problems.
You can right-click the taskbar and select Task Manager to open it. Then, right-click the Microsoft Compatibility Telemetry application under the Processes tab and choose End task to close it.
Method 2. Run Antivirus
If you have tried the above methods and the problem still persists, you can try running antivirus. You can use the built-in Windows Defender or other antivirus software.
Here is a tutorial on Windows Defender.
Step 1: Find Windows Defender.
- Click Start button and select Settings.
- Select Update & Security.
Step 2: Run Windows Defender.
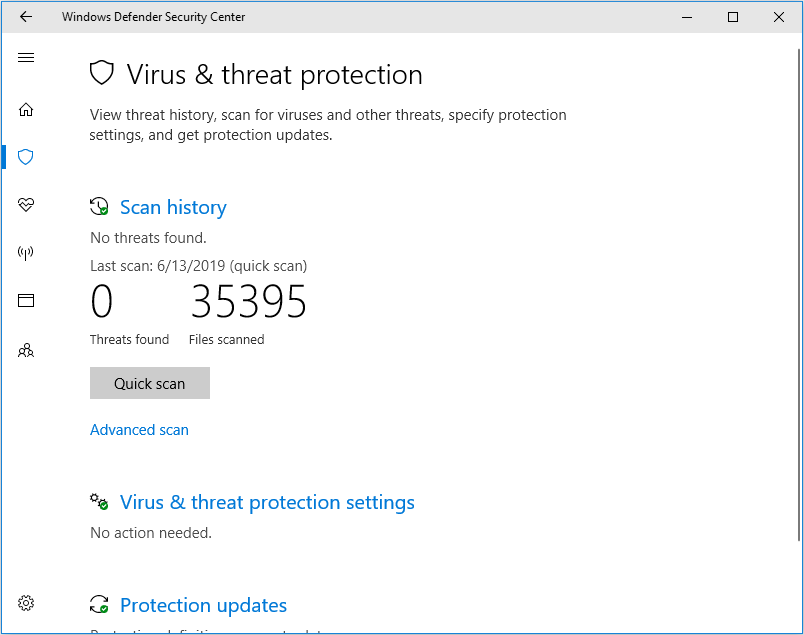
- Click Windows Defender and Open Windows Defender Security Center.
- Click Virus & threat protection and then click Quick scan.
Method 3. Run SFC Command
The Microsoft Compatibility Telemetry high disk or high CPU problem may be caused by corrupted system files related to Microsoft Compatibility Telemetry. Thus, you can run SFC command to replace it.
Here is the tutorial.
Step 1: Type “command prompt” in Windows search box.
Step 2: Right click the Command Prompt icon and select Run as administrator.
Step 3: Type “sfc /scannow” and press Enter key. Then, wait until the procedure ends.
Method 4. System Restore
If the Microsoft Compatibility Telemetry problem appears all of a sudden and you’ve never encounter this problem before, you can try system restore to revert your computer to the good state. Click How to Restore Computer to Earlier Date to get detailed steps.
Method 5. Wipe Hard Drive and Re-install System
There is a possibility that the Microsoft Compatibility Telemetry problem is caused by unknown problem on your hard drive. In this case, you can wipe your hard drive and do a clean installation of Windows.
However, before you wipe your hard drive, you should back up your data in advance. The free backup software, MiniTool Partition Wizard is highly recommended.
Here is the tutorial.
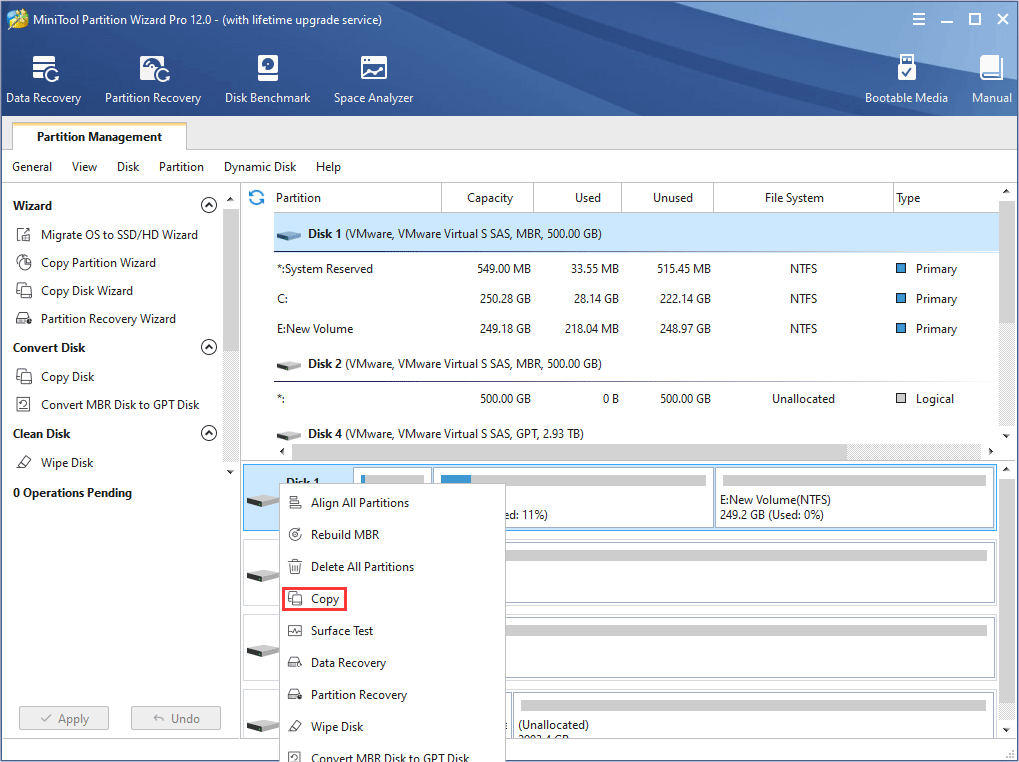
Step 1: Activate Copy Disk feature.
- Download MiniTool Partition Wizard and launch it to get its main interface.
- Right-click system disk and choose Copy.
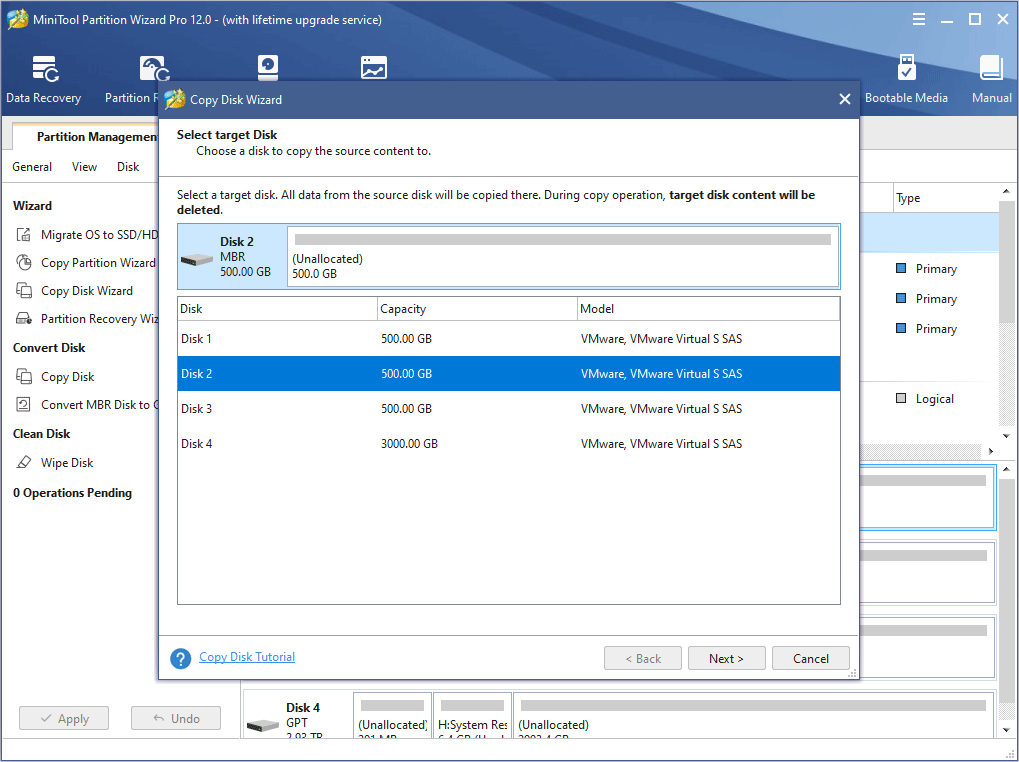
Step 2: Select a destination disk and click Next.
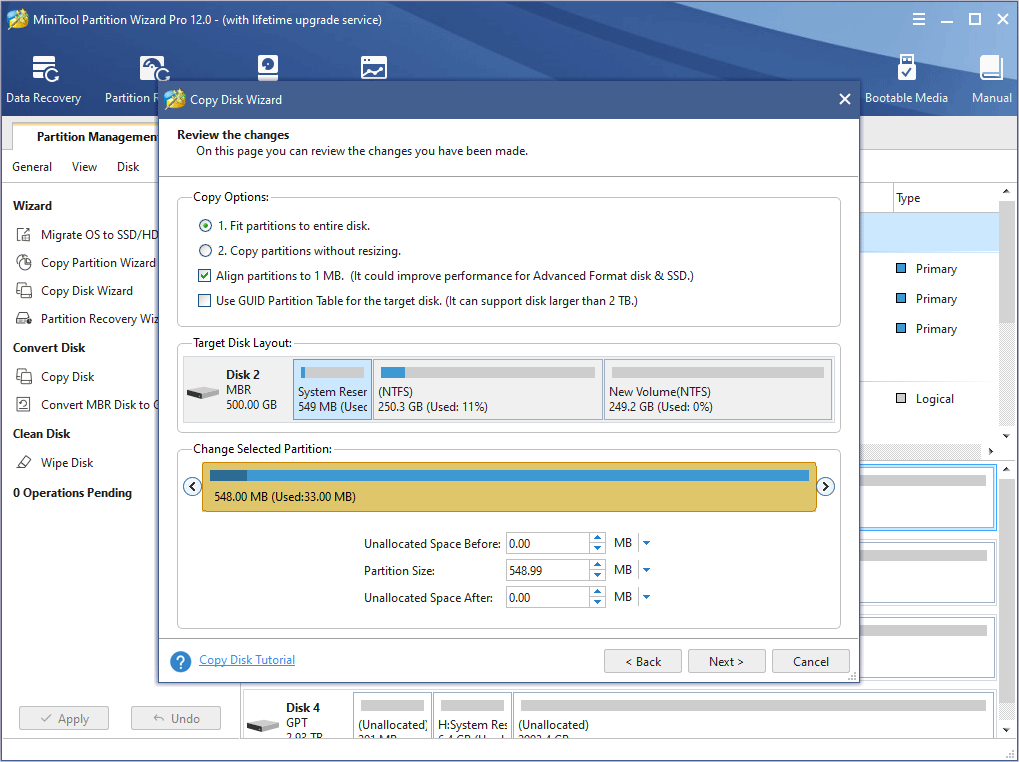
Step 3: Choose the copy options and adjust disk layout. Then click Next.
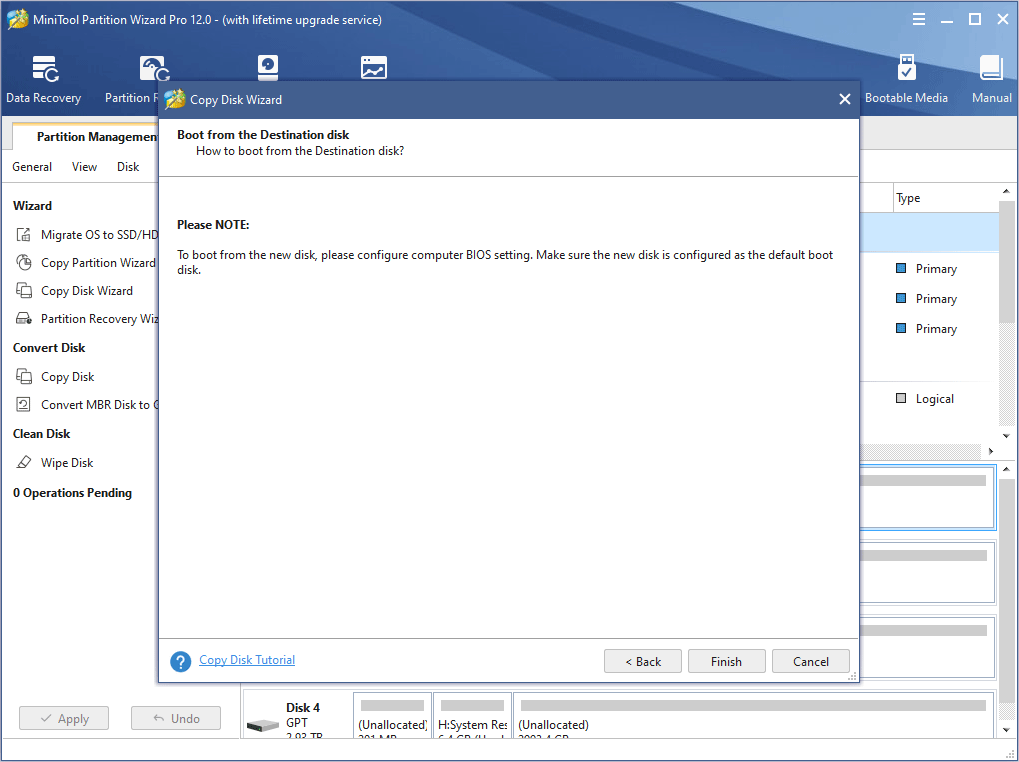
Step 4: A note window pops up. Read it and click Finish.
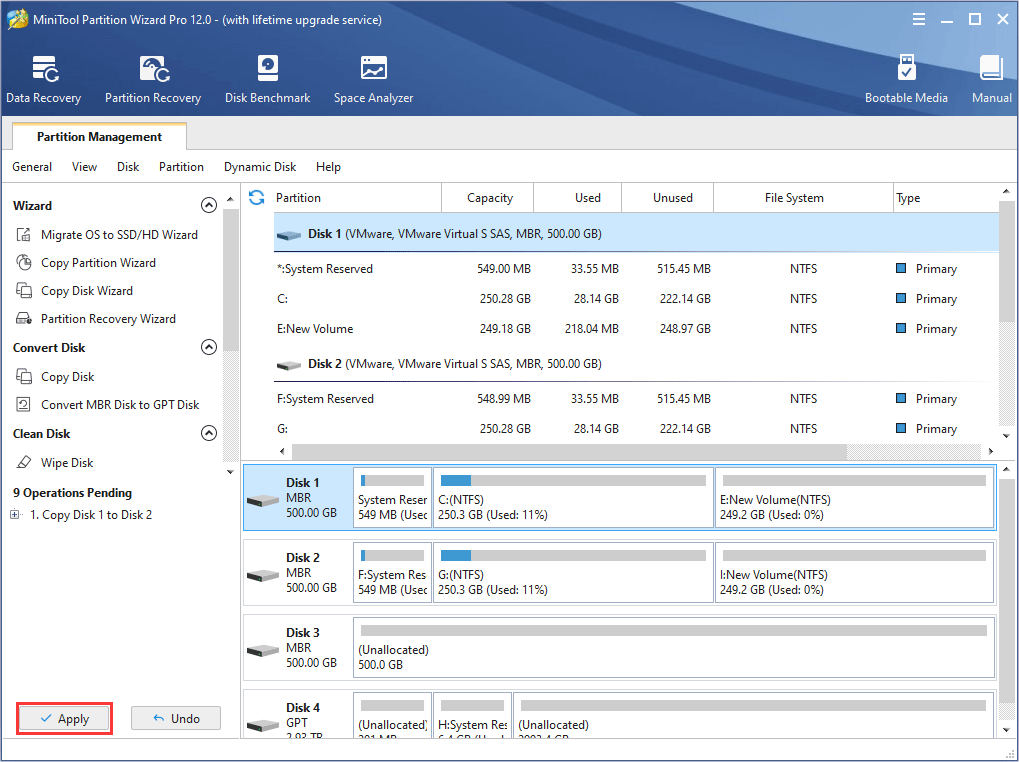
Step 5: Click Apply button to execute the pending operations.
Then, you should make a Windows 10 installation media. Please click How to Install Windows 10 on a New Hard Drive to see the detailed steps.
The next move is to wipe the original system disk with MiniTool Partition Wizard. To make sure the system disk is wiped thoroughly, we suggest you wipe it with the Bootable Media feature.
Step 1: Make a bootable disk of MiniTool Partition Wizard.
Step 2: Plug in the MiniTool bootable disk and set in the firmware to make the computer boot from the bootable disk.
Step 3: Please refer to How to Wipe Disk to wipe the original system disk.
Then, you can plug in the Windows 10 installation media to install Windows 10.
After the new Windows 10 is installed, you can check whether the problem is solved. If not, you may have to upgrade your hard drive.
Microsoft Compatibility Telemetry FAQ
You can turn off Microsoft compatibility telemetry through Registry Editor:
- Press “Windows + R” keys simultaneously. Enter “regedit” into the Run box and press Enter key to open Registry Editor.
- Navigate to HKEY_LOCAL_MACHINE > SOFTWARE > Microsoft > Windows > CurrentVersion > Policies > DataCollection.
- Highlight DataCollection and double-click AllowTelemetry from the right page frame.
- Press Enter key input “0” into the Value data box. Then, click OK to save changes.
Bottom Line
Is this article helpful to you? We need your feedback. However, if you ever have any problems with Microsoft Compatibility Telemetry, please leave a comment below or email to [email protected] for help. We will reply as soon as possible.



User Comments :