It’s agreed that Windows 10 has made great improvements over the previous Windows 7. To some extent, Windows 10 has quite a few improvements in security, performance, and efficiency. However, many users ask how to make Windows 10 look like Windows 7. There are eight effective ways in this post. Now give it a try.
Before You Do
In order to make Windows 10 look like Windows 7 smoothly, you have to make some changes that probably bring some unexpected risks such as data loss, system failure and so on. So, it is highly recommended that you back up your system to an external hard drive.
MiniTool Partition Wizard provides you with a perfect solution for partition management, file recovery, and disk clone. This program also breaks some limitations, such as allowing you to create a USB bootable media when you encounter boot failure.
The process is very simple to back up your system with this powerful software. You just need to make a copy of the source disk containing your system to another hard drive in case of any accident.
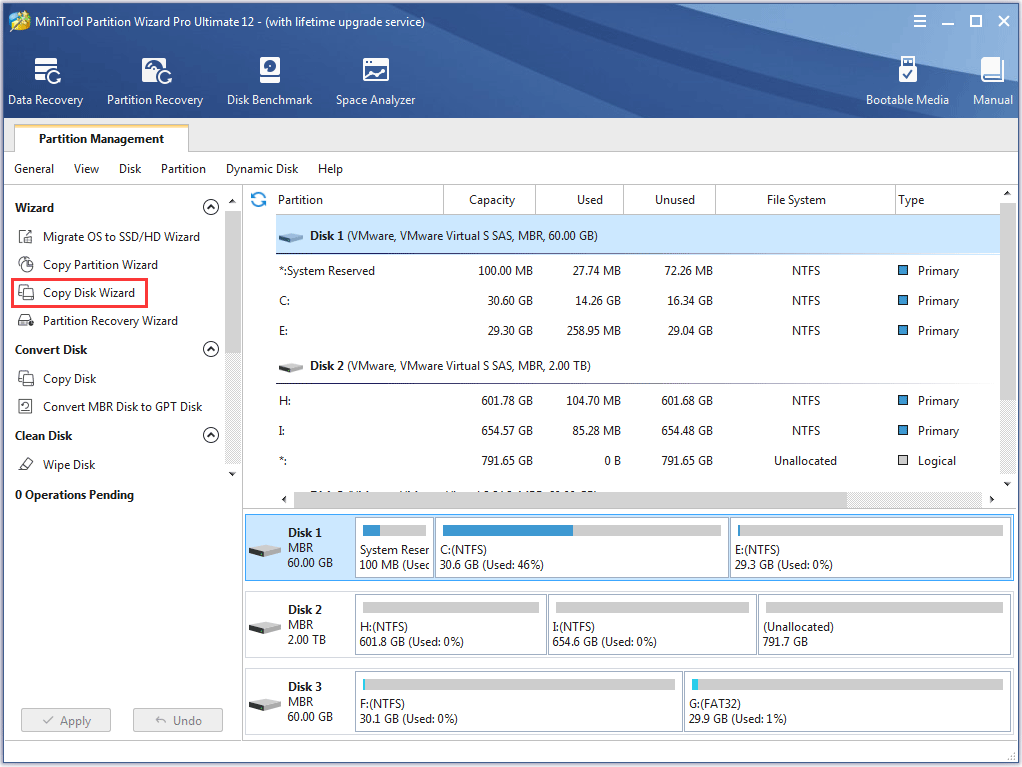
Now, you can take the following methods to make Windows 10 look like Windows 7 without concerns.
To make Windows 10 look and feel Like Windows 7, we assist you with 9 effective methods.
Let’s begin!
Method 1. Set Windows 7 Wallpaper as Your Desktop Background
The first and most simple way to make Windows 10 look like Windows 7 is to set the Windows 7 wallpaper as your desktop background.
Step 1. Download this classic Windows 7 wallpaper and save it on your computer.
Step 2. Right-click on this image and select Set as Desktop Background.
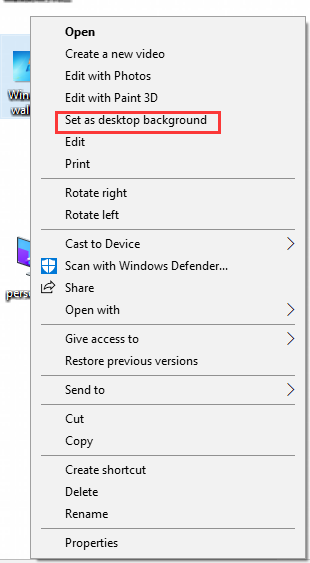
Now, you can pretend that you still keep the Windows 7.
Method 2. Change the Start Menu
Changing the Start menu into Windows 7 classic Start menu is another simple way to make Windows 10 look like Windows 7, just need a free tool Classic Shell to change the start menu.
Let’s follow the below steps to alter your Windows 10 start menu.
Step 1. Download and install Classic Shell. This free tool can modify the Windows 10 Start Menu to resemble the Windows 7 version.
Step 2. After launching classic shell, click Start Menu Style button and select the Windows 7 Style from the listed options. Then click on Pick image.
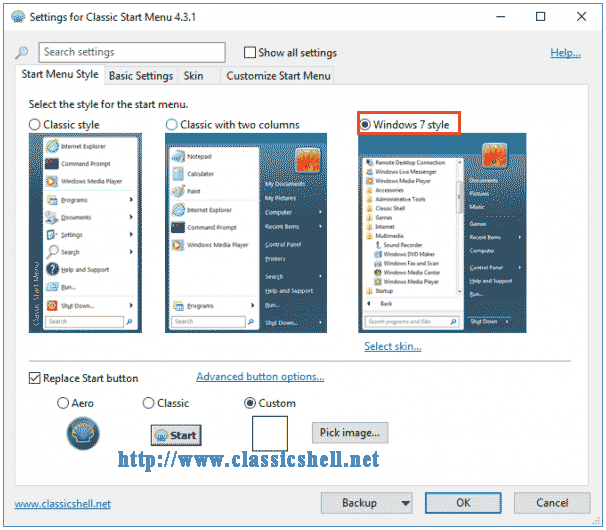
Step 3. Then you need to download the images of the Windows 7 Start orb. After that, go back to the Classic Shell menu and check Custom at the bottom of the window.
Step 4. Next, click on Pick image and select the Windows 7 start orb you downloaded.
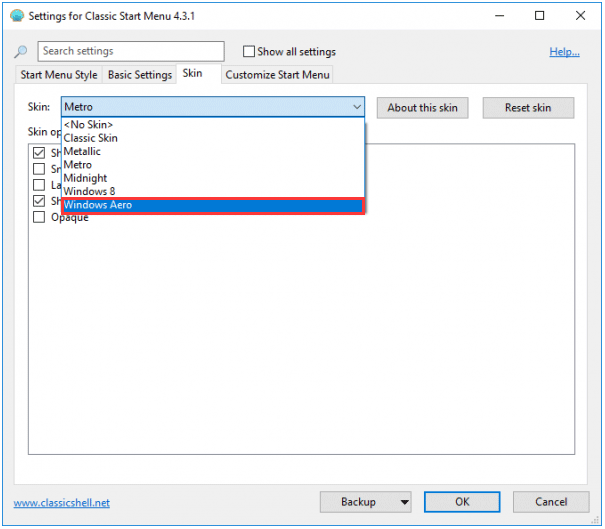
Step 5. Move forward to the Skin tab and select Windows Aero from the Skin drop-down menu. And click OK to execute the new settings.
Method 3. Make Windows 10 File Explorer Look like Windows 7 Explorer
To make Windows 10 look and act like Windows 7, changing Windows 10 File Explorer into Windows 7 Explorer is a good solution as well.
Windows 10 File Explorer created multiple changes from what is now known as the classic Windows 7 explorer, which was designed to improve the overall user experience. While some users still prefer to use the classic version. If you are one of the purists, follow the guide below to revert Windows 10 File Explorer to the classic version.
Step 1. You need to download the OldNewExplorer program and extract this file from a RAR.
Step 2. Navigate to the OldNewExplorer folder you extract and double click on the OldNewExplorerCfg file.
Step 3. Install this application and allow it to make changes to your operating system.
Step 4. Activate the Use classical drive grouping in This PC feature and Use command bar instead of Ribbon option.
Step 5. Exit this app and restart your PC in order to make these new setting take effect.
More details you can visit how to make Windows 10 file explorer look like Windows 7.
If you are not satisfied with these changes that make Windows 10 look like Windows 7, please keep reading to view more methods.
Method 4. Set the Color of Windows Title Bars to Look Like Windows 7
The Windows 10 title bar is white by default. You can change the title bar’s color to resemble Windows 7 built-in settings. Now let’s see how to add color to the Windows title bar.
Step 1. Right-click on your desktop and select Personalization to continue.
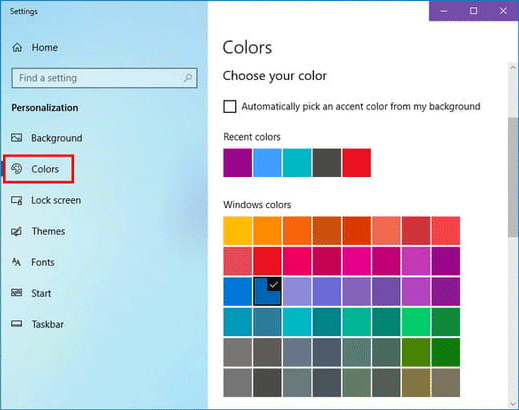
Step 2. In the pop-up window, choose Colors on the left action panel.
Step 3. In order to resemble Windows 7, it’s recommended you select Navy Blue.
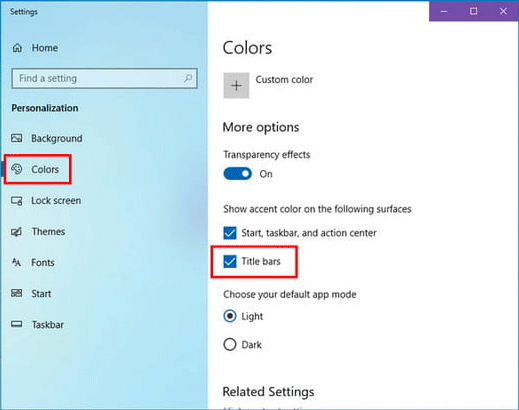
Step 4. Then switch the colors of the Title bars. You can check the Title bars option towards the bottom of the action panel.
Method 5. Use Internet Explorer to Replace Microsoft Edge
In addition, you can also use Internet Explorer to replace Microsoft Edge, which also makes Windows 10 look and feel more like Windows7.
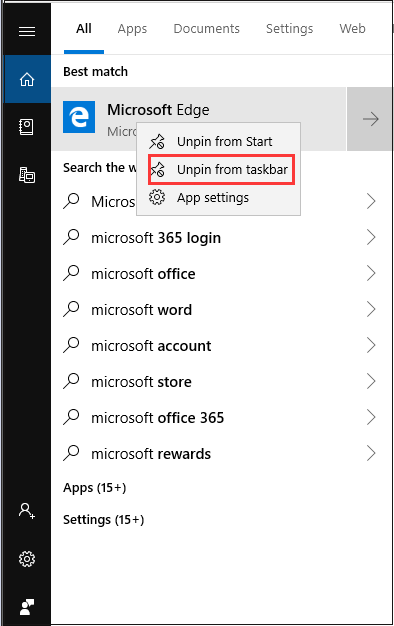
Step 1. Right click on the Microsoft Edge icon and select Unpin from taskbar.
Step 2. After that, find Internet Explorer by using the Start Menu’s search field.
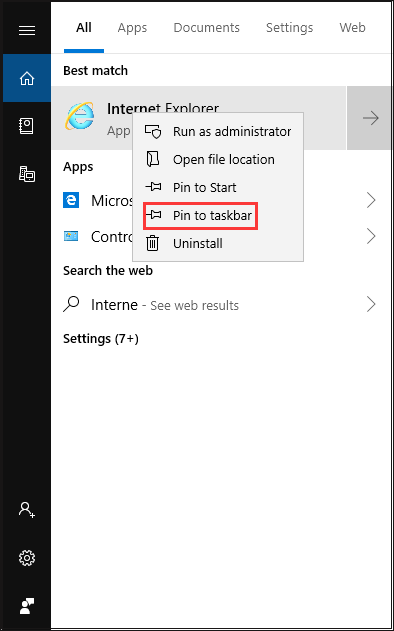
Step 3. Right click on Internet Explorer and select Pin to taskbar.
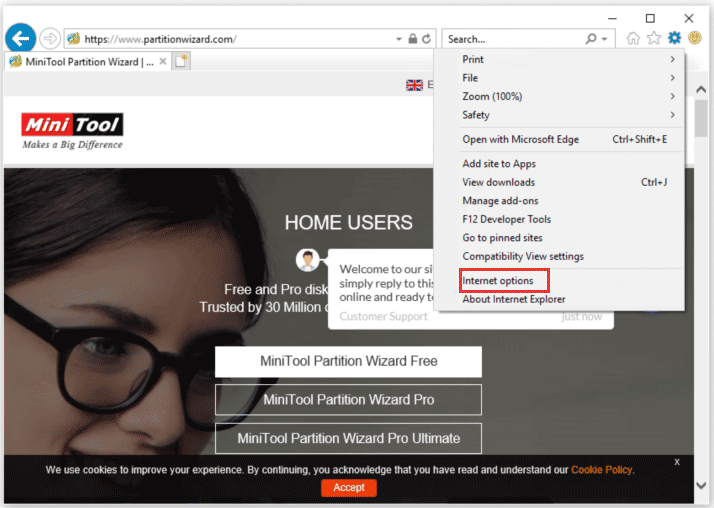
Step 4. Open Internet Explorer, click on the gear-shaped tools icon in the upper-right corner to select Internet options.
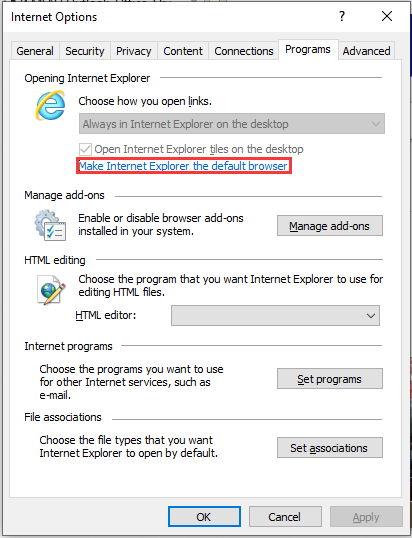
Step 5.Once the Internet options pop-up window emerges, select the Programs tab from the upper taskbars. Then, click Make Internet Explorer the default browser.
Step 6. Select Internet Explorer on the listed results and then click on the Set this program by default setting.
After finishing all steps, Internet Explorer will replace Windows’ Microsoft Edge browser. Do you think this is the end to make Windows 10 look and feel more like Windows7? No, let’s move down to more methods.
Method 6. Log in with a Local Account Instead of Microsoft Account
In Windows 10, your Windows account is tied to your Microsoft account by default. In other words, you log in to your computer with your Microsoft E-mail and password.
Unlike Windows 10, you can use a local account or create a new local account that is separated from your Microsoft account. Here you can replace your Microsoft account with a local account, which makes Windows 10 look and feels like Windows 7.
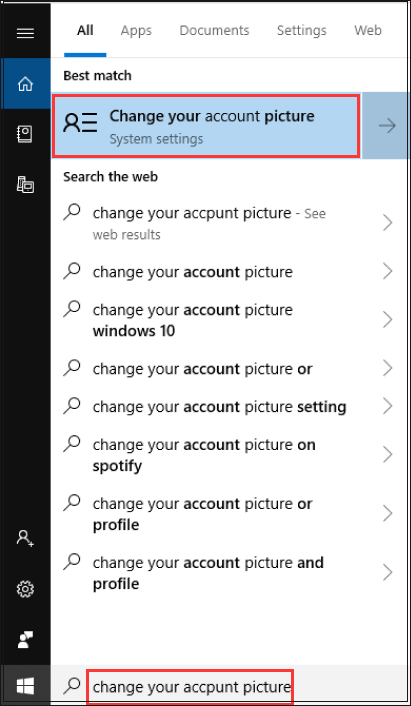
Step 1. Type Change your account picture in the search box and double click it to open the account settings window.
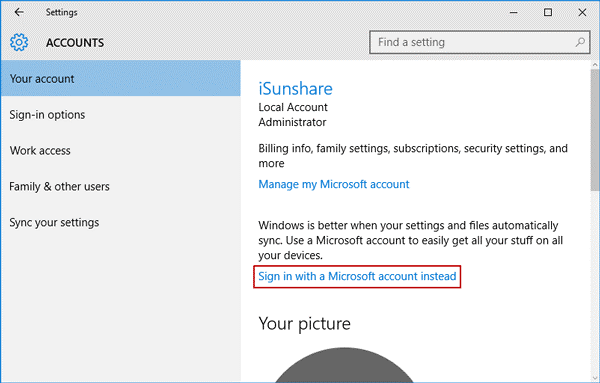
Step 2. When you open the account settings windows, just click on Sign in with a local account instead.
Step 3. Then you will receive a link, just click on that link. After that, you can switch to a local account by verifying your current password. Click on Next to continue.
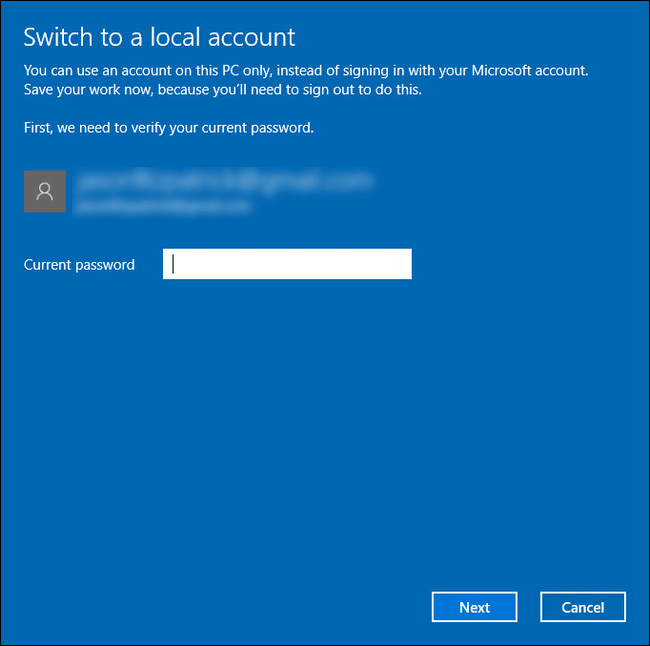
Step 4. Enter a new local username and password. After re-entering password and password hint, click Next to apply this change.
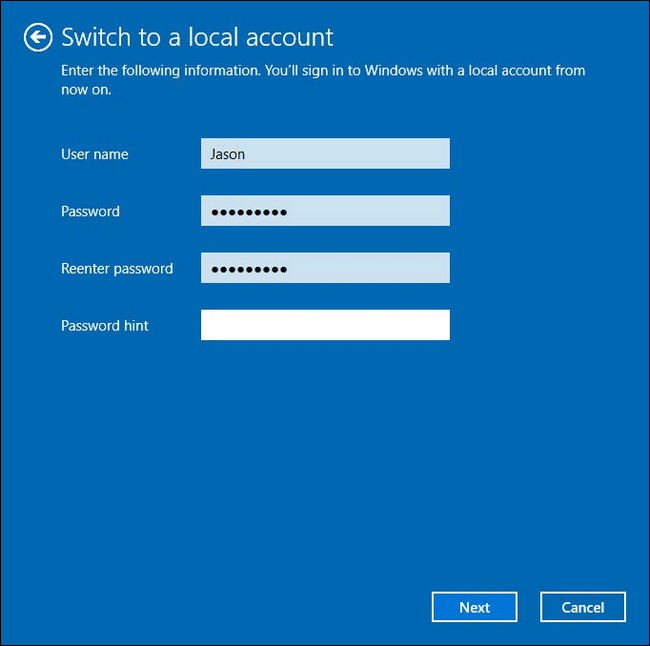
Step 5. In this new window, click on Sign out and finish, which means the Microsoft account will be converted to a local account that won’t change anything with the Windows Store app.
Method 7. Remove the Cortana and Task View Button from the Taskbar
The Windows 7 Classic Start menu includes a search box right on the menu, while in Windows 10, the search box was moved to the taskbar and integrated into Cortana and the Task View icon was added to taskbar as well.
To make Windows 10 look like Windows 7, you can remove both of them from the taskbar.
Step 1. Right-click the blank space on the taskbar, then click on Cortana and Hidden to remove this Microsoft’s personal assistant.
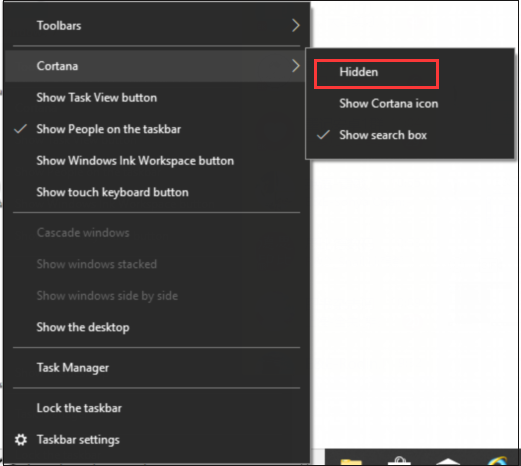
Step 2. Right-click on the taskbar and select the Show Task View button to disable this feature.
Method 8. Quickly Access the Classic Personalization Windows
Do you know the personalization window from Windows 7 still can be accessed in the control panel? In fact, when you right-click on the blank space of Windows 10 desktop and select Personalization, you will enter into the new Personalization section in PC Settings.
Here you can add a shortcut to the desktop so that you can quickly access the classic Personalization window if you want.
Step 1. Right-click your desktop to create a new folder from the pop-up menu.
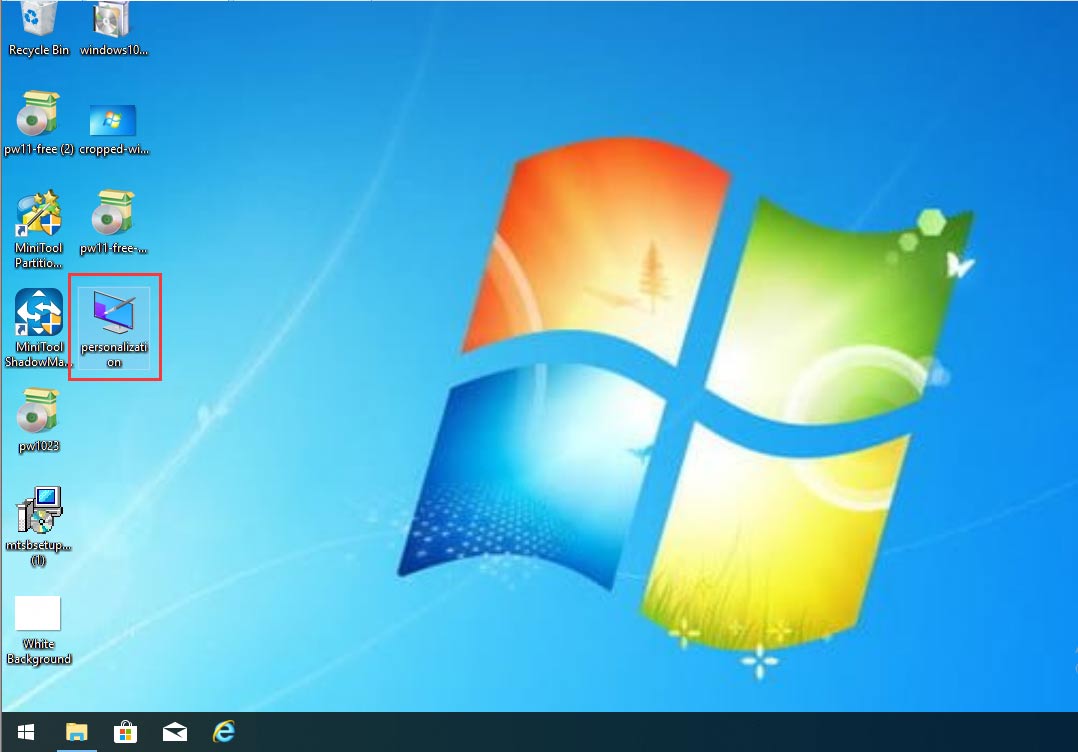
Step 2. Copy and paste the text Personalization.{ED834ED6-4B5A-4bfe-8F11-A626DCB6A921} into the name of the new folder and hit Enter button.
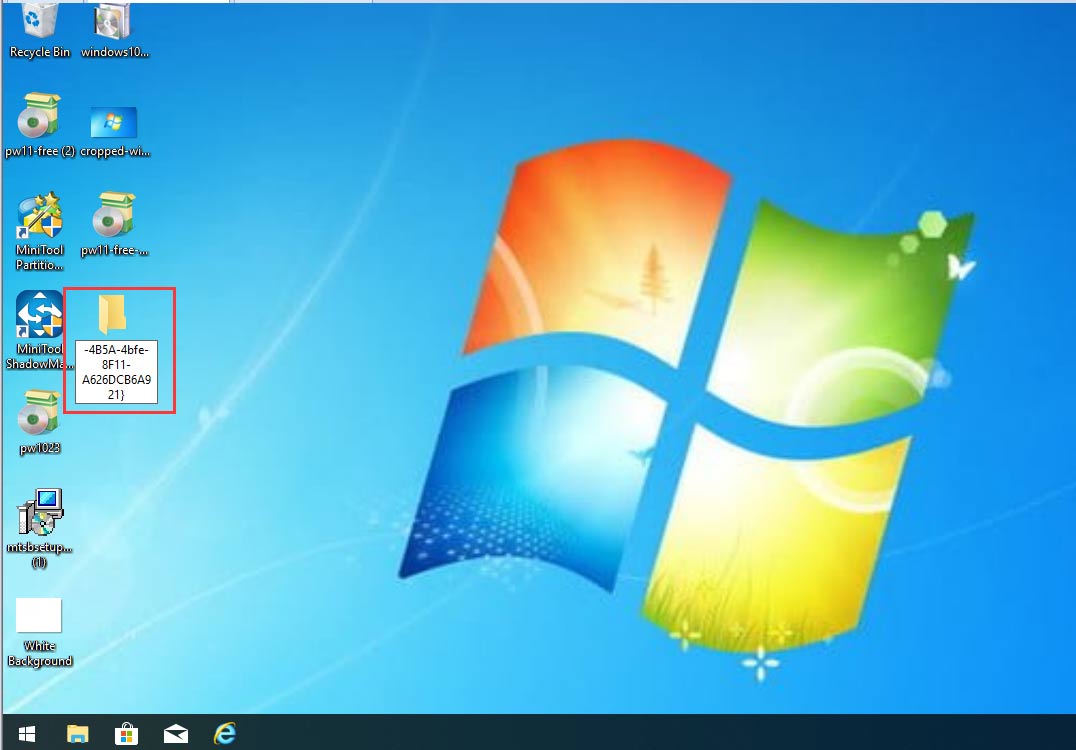
Then you will find this new folder turning into the classic personalization window and its name also changes to Personalization. You can double click on this icon to access the classic Personalization in Windows 7.
Method 9. Turn off the Action Center
Action center is a new feature available in Windows 10 that can help you to click on all the notifications easily. It’s convenient to view all recent notifications you may have missed.
However, perhaps you are wondering how to get rid of it to make Windows 10 look and act like Windows 7. Of course, you can disable the Action Center by using built-in settings.
Now, you can follow the below steps.
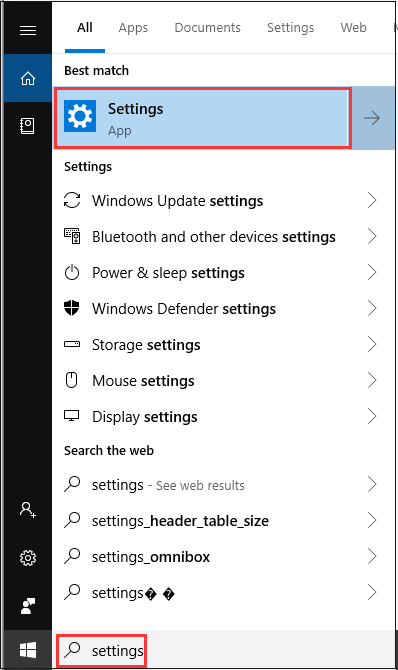
Step 1. Type Settings in the search box and double click this app.
Step 2. Navigate to System. Then in the pop-up window, select Notifications & actions icon from the left taskbar. Then toggle the switch off on the slider to disable the Action Center.
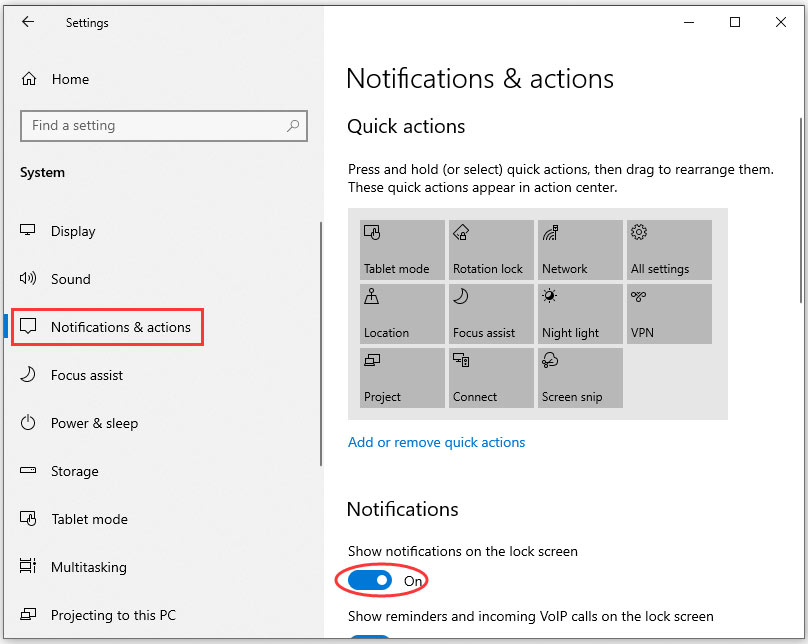
Right now, you have disabled the action center.
Final Words
In a nutshell, all accessible ways about how to make Windows 10 look like Windows 7 are told to you. Now, it’s your turn to try. Hope this post can help solve your current problem.
Any questions, please contact us via [email protected] or you can share your ideas in the comment area.

User Comments :