The purpose of this article is to inform you of some useful tips about laptop hard drive sizes. Apart from that, you will learn how to manage laptop hard drive spaces and how to upgrade laptop hard drive without losing data.
To know how to choose the right size of hard drive for your laptop is very important. When you try to build a laptop by yourself or upgrade hard drive, you may wonder: what size hard drive do I need for my laptop?
How to choose laptop hard drive size? Actually, it is not a difficult question to answer. You just need to be aware of some basic knowledge about how to pick a right-size laptop hard drive. And then learn how to manage the hard drive space flexibly and reasonably.
Hard Drive Physical Size
As for hard drive physical size, hard drives come in two main sizes–“3.5 inch”, and “2.5 inch”–which are technical classifications that refer to the width of a hard drive’s platter, but not the full dimensions of the hard drive unit itself.
- 5 inch drives are 146 mm long, 101.6 mm wide, and either 19 or 25.4 mm tall.
- 5 inch drives are 100 mm long, 69.85 mm wide, and either 5, 7, 9.5, 12.5, 15, or 19 mm tall.
Generally speaking, 3.5 inch drives are used in desktops and 2.5 inch drives are used in laptop computers. If you want to use a 2.5 inch drive in a desktop, you typically need a special bracket to fit it in a 3.5 inch drive bay.
After knowing the laptop hard drive physical size, the storage capacity is our biggest concern. How to choose a laptop hard drive in terms of capacity?
Hard drive provides users with a large amount of storage. And the price is acceptable. So there are still many users choosing hard disk as their laptop hard drive. Here is some information about laptop HDD/SSD sizes.
Laptop HDD/SSD Sizes
Laptop HDD Sizes
For home users, laptop hard drive size ranges from 250 to 500GBs is fine. And most laptop users are using 500 GB hard drive, which is more than enough for the standard laptop system. I have an old laptop with 500 GB hard drive pre-install. Now it is still working and the hard drive space is sufficient.
For users who want to store a lot of movies or other files on this disk, they even want to upgrade to1TB hard drive, which is possible and feasible with a piece of disk cloning software.
Laptop SSD Sizes
SSDs don’t come in such large capacities as traditional hard drives. The smallest common SSD size is said to be 128GB, which is about 25 percent of the capacity of the 500GB hard drives you find on many inexpensive laptops. The most common SSD size is 256GB. Solid-state drives rarely have more than 256GB, and those aren’t cheap.
Which one is best? Well, it depends on what you’re going to do with your laptop. So, if you don’t play games very often and just use the laptop to handle some official businesses and listen to music, 256GB of SSD storage should be sufficient.
If you’re working with a flexible budget, 512GB of SSD storage could be your best choice. And no matter what size is a laptop hard drive, you’d better use a partition manager to manage your hard drive space reasonably and flexibly.
How to Manage Laptop Hard Drive Flexibly
There are two ways for you to manage laptop hard drive namely Disk Management and MiniTool Partition Wizard Free Edition. Both of them are free and safe disk management tool. I will show you the two ways one by one.
The capacity of laptop hard drive is limited, so you need to manage laptop hard drive space flexibly.
Windows Built-in Tool – Disk Management
Disk Management is a Windows built-in disk partition manager. It can help you perform some basic disk partitioning operations such as create volume, delete volume, extend/shrink volume (See: Why Extend Volume Grayed out and How to Quickly Fix It – MiniTool), format partition, change drive letter and so on.
To find out the size of your laptop hard drive and manage its space flexibly, you can follow the steps below to access Disk Management.
Step 1. Access Disk Management via the following two different ways.
- Right-click Windows start menu and choose Disk Management from the list.
- Press Windows + R key and then input msc and hit Enter.
Step 2. Select a partition or disk on the main interface and then right-click it. You will see a list of features you can choose.
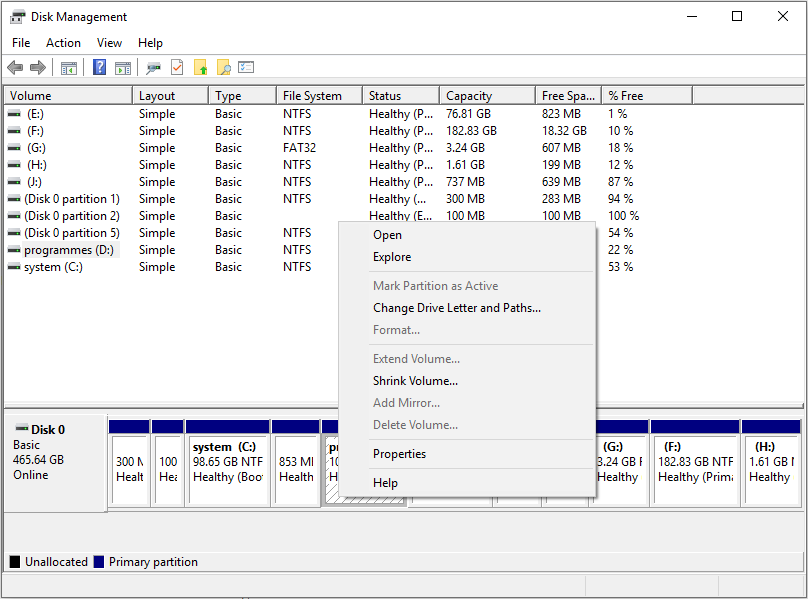
Step 3. Follow the prompts to complete the operation. If you want to manage a hard disk or SSD, USB flash drive, SD card, you may select the whole disk and right-click it to choose a corresponding feature.
Disk Management enables users to manage disks and partitions with its basic features. However, it does not provide users with some advanced features like convert MBR disk to GPT without data loss, change cluster size, convert FAT to NTFS and so on.
At this time, if you need to manage laptop hard drive with some advanced features that Disk Management do not have, you can download a free partition manager MiniTool Partition Wizard Free Edition.
The Partition Manager – MiniTool Partition Wizard Free Edition
MiniTool Partition Wizard Free Edition can help you manage laptop hard drive flexibly. Its features like extend partition, move/resize partition, copy disk/partition, check file system, change cluster size, align partition and so on.
Step 1. Download MiniTool Partition Wizard Free Edition by clicking the following button.
MiniTool Partition Wizard FreeClick to Download100%Clean & Safe
Step 2. Choose a partition or disk on the main interface and then select the relevant function from the left action panel.
- To manage a disk, you can select the whole disk and all the available features will be listed on the left action panel.
- To manage a partition, you can select the target partition and then choose a function from the left action panel or right-click menu.
- Here I choose Extend Partition feature to show you how to use this free partition manager.
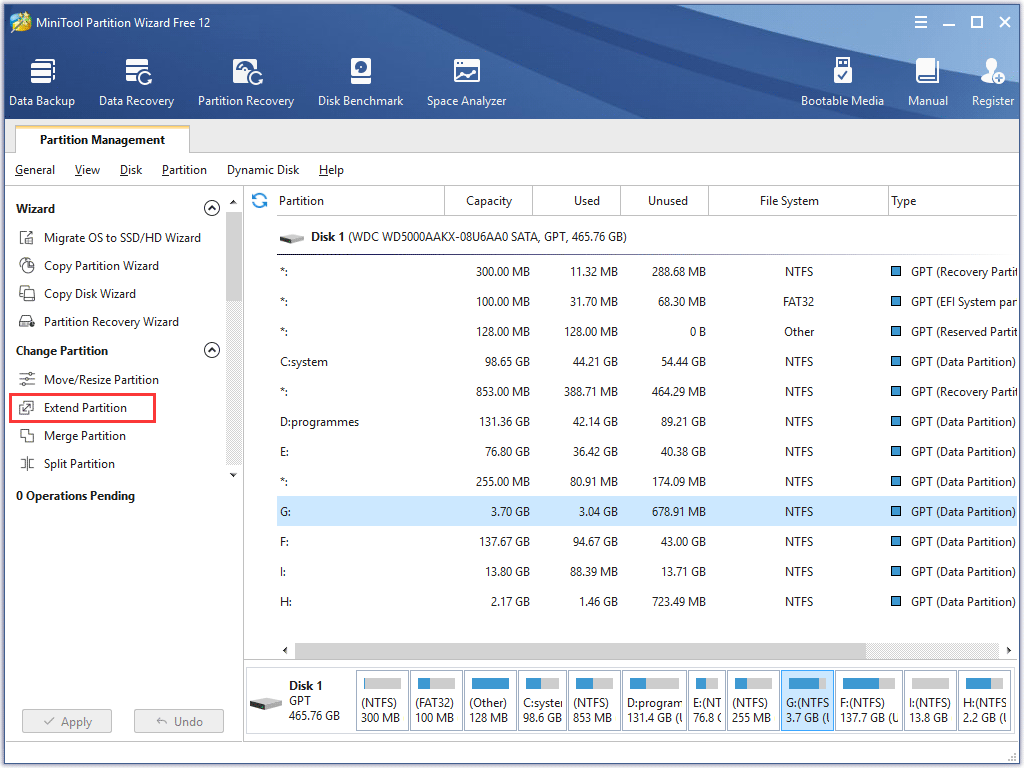
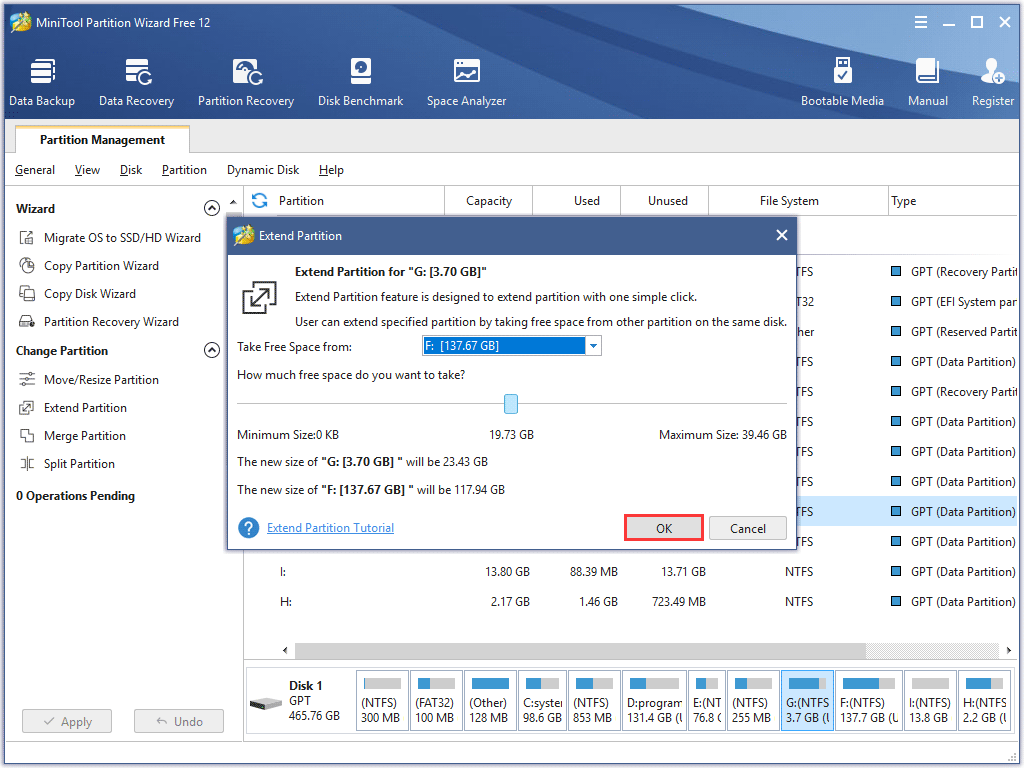
Step 3. Follow the prompt to select a partition to take some free space from other partitions or unallocated spaces. Then click OK.
Step 4. At last, remember to click Apply on the upper left corner to allow the pending operation.
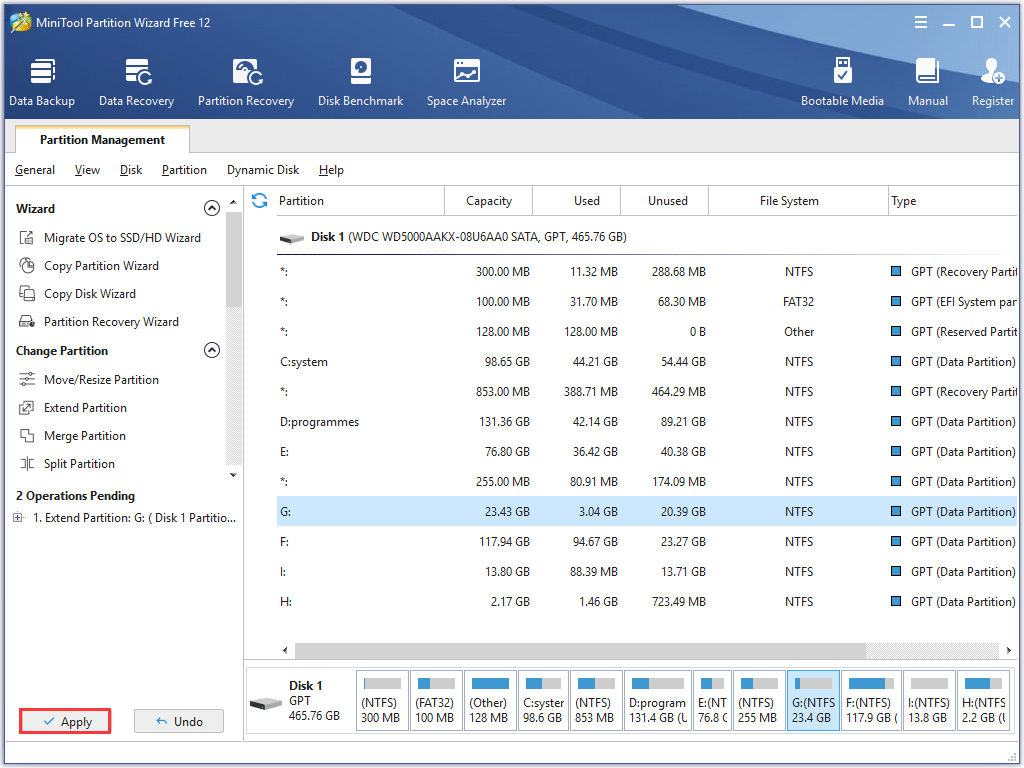
You see, it is very effortless using this partition manager. If you need to manage laptop hard drive or SSD, you may download the freeware and have a try.
MiniTool Partition Wizard FreeClick to Download100%Clean & Safe
Upgrade Your Laptop Hard Drive
It’s a common thing to upgrade your laptop hard drive when you find the laoptop hard drive size is not reasonable or too small. Besides, nowadays, many laptop users move from a hard drive to an SSD for better performance and faster speed.
If you want to upgrade your laptop hard drive to a speedy SSD or a larger HDD to increase hard drive capacity, you may follow the steps as below to upgrade laptop hard drive in a simple way.
Before you start migrating OS with MiniTool Partition Wizard Free Edition, you need to connect the SSD or HDD with large capacity to your laptop. Then you can follow the steps as below.
Step1. Download MiniTool Partition Wizard Free Edition by clicking the following button. Install it on your computer to open the main interface.
MiniTool Partition Wizard FreeClick to Download100%Clean & Safe
Step 2. On the main interface, choose the function Migrate OS to SSD/HD Wizard from the left panel.
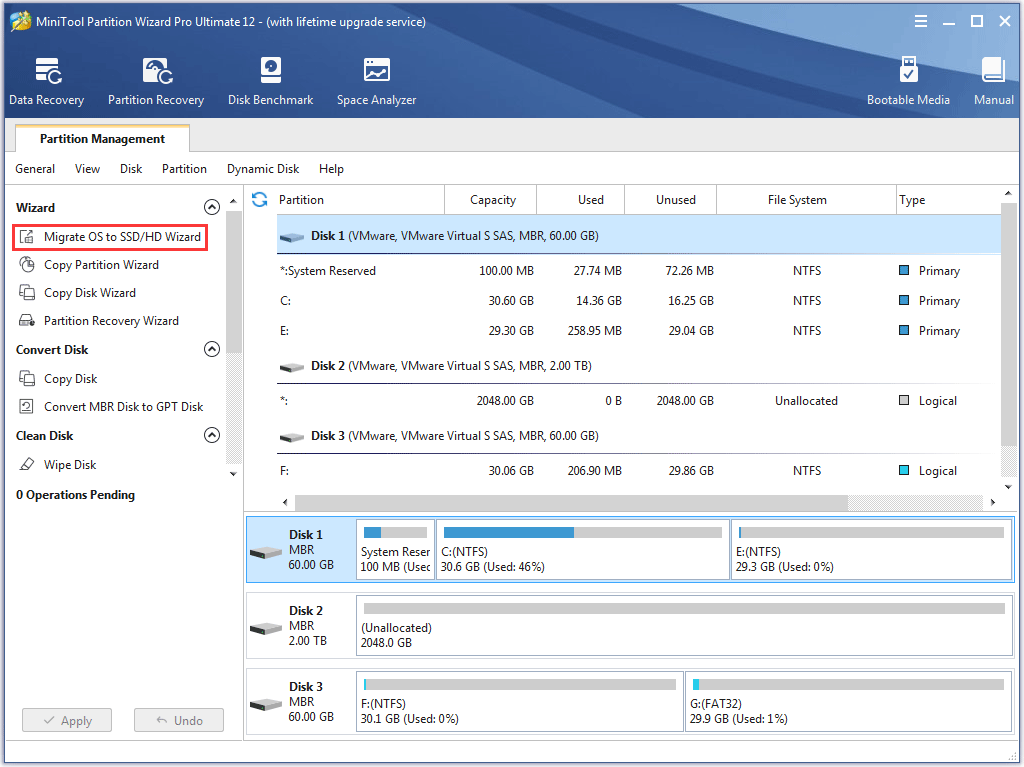
Step 3. Choose a suitable way to migrate OS, and then click Next button to continue.
- Option A: If you want to replace the system disk with SSD/HDD, choose option A. It performs the same as the Copy Disk.
- Option B: if you want to migrate the operating system to SSD only, you can choose option B, as it copies only the system required partitions to a new hard drive or SSD.
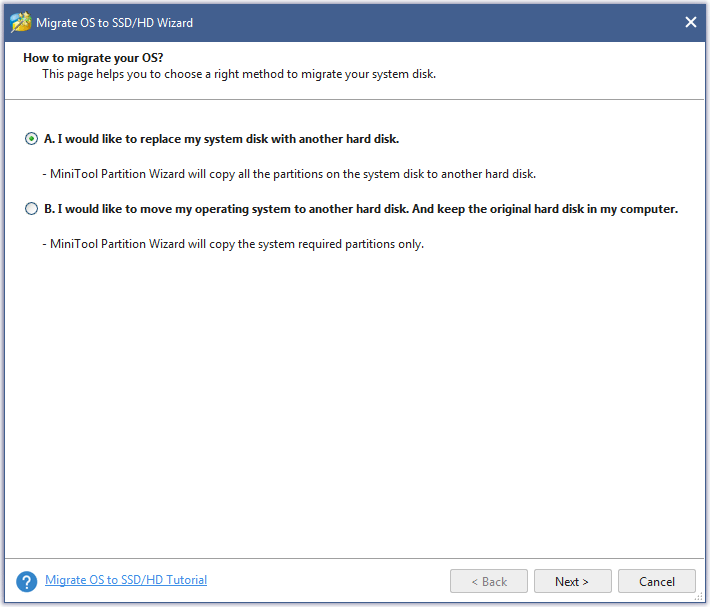
Step 4. Select the destination disk to migrate OS to and click Next.
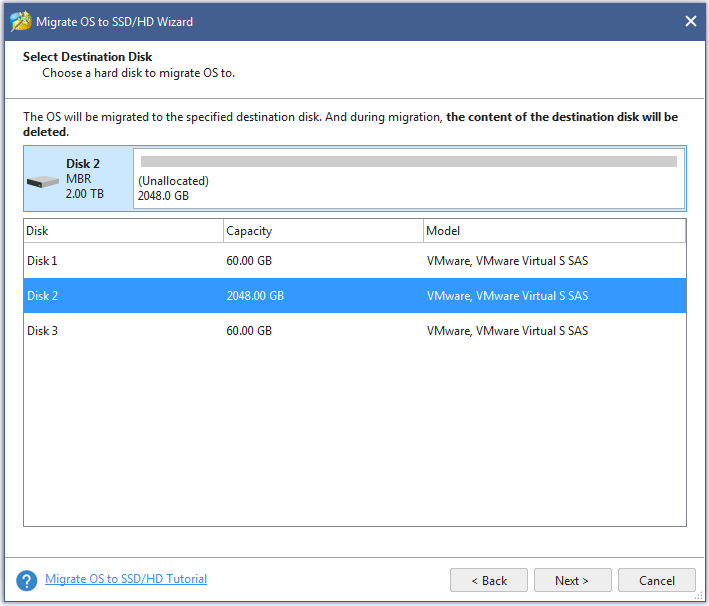
Step 5. Here you are able to edit partition size and location.
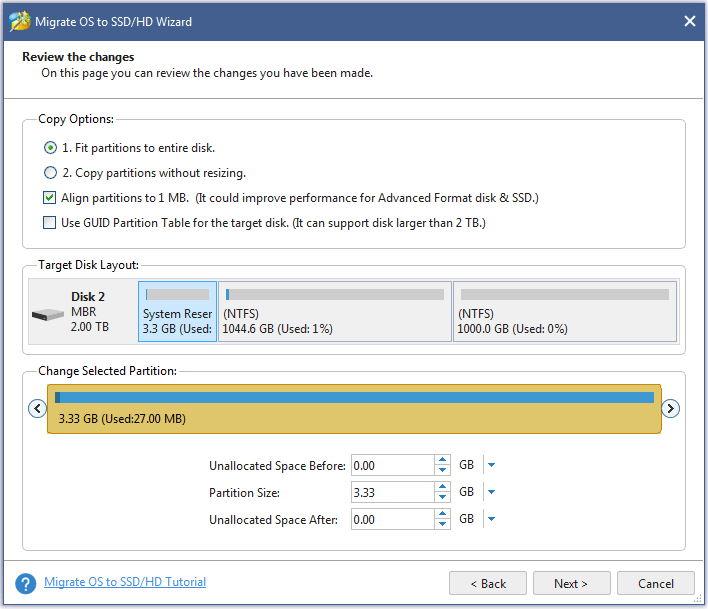
- Align partitions to 1MB: with this option checked, all partitions on SSD will be aligned automatically so that performance can be improved largely.
- Use GUID Partition Table for the target disk: This optionmakes it possible to use all space of hard disk larger than 2TB, but UEFI boot should be enabled in BIOS.
- To migrate the OS installed on MBR disk to the target disk using GUID partition table is not available in the free edition.
- For users whose operating system is already installed on a GPT disk, they will not see the option Use GUID Partition Table for the target disk.
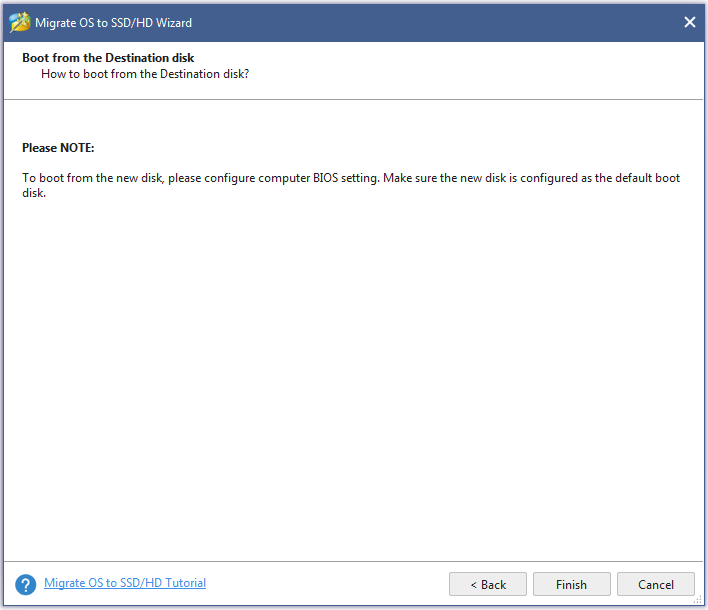
Step 6. The note as below will tell you how to boot from the destination disk. Please read the note and click Finish to go back to the main interface.
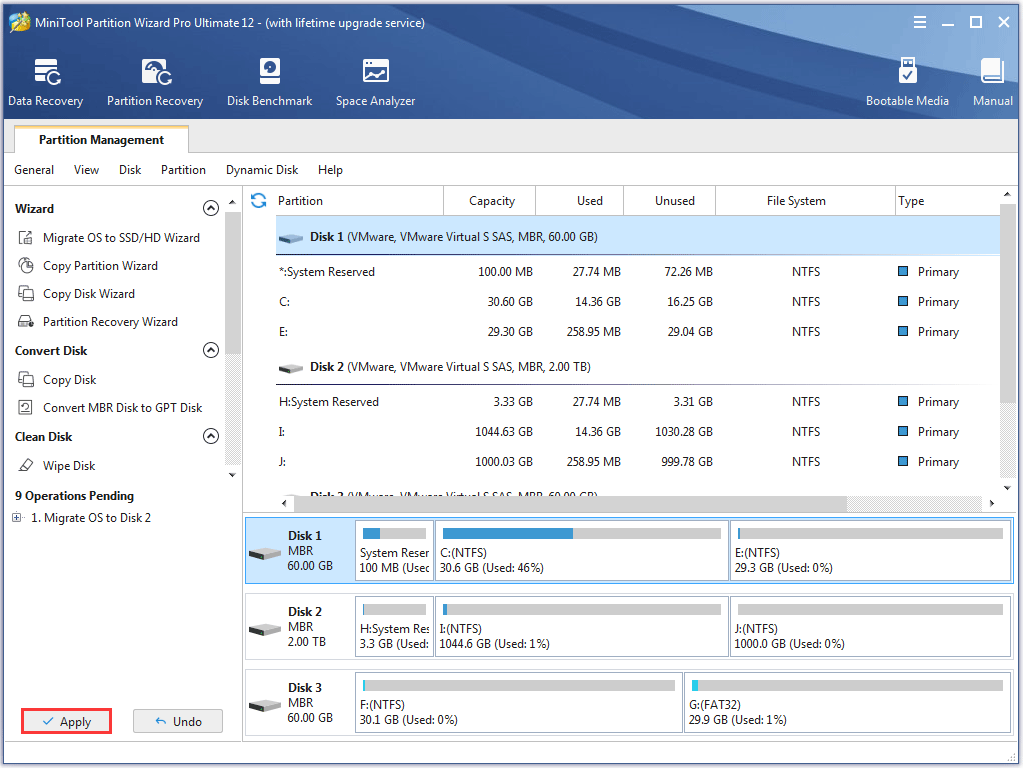
Step 7. Click the Apply button on the top to make all changes performed.
When it is finished, you can take out the old hard drive and install the new one. You need to enter BIOS and change the boot order to boot from it.
Conclusion
Now you have learned the common laptop hard drive sizes as well as how to manage and upgrade laptop hard drive. If you don’t know what size hard drive you need for your laptop, you can refer to the suggestions in this article to choose a right-sized laptop hard drive or solid-state drive. If you need to upgrade laptop hard drive, just follow the steps above.
If you want to share your opinion about how to choose the right-sized laptop hard drive, you may leave a comment in the following comment zone. If you need any help when using MiniTool Partition Wizard Free Edition, you may contact us via [email protected].

User Comments :