If you feel that your HP Notebook is running slower and slower, or the storage space is insufficient, doing the HP Notebook SSD upgrade is a very good solution. This article from Partition Magic will give you a detailed introduction to why you should upgrade your HP Notebook SSD, how to find the right SSD for your HP Notebook, how to replace the SSD, etc.
HP Inc. is a leading information technology company, formerly known as Hewlett-Packard. The company has launched many computer models, such as HP Pavilion, HP ENVY, HP Spectre, HP OMEN, HP EliteBook, etc.
As time goes by, you may want to replace your computer or upgrade your old SSD because of problems such as the slow speed and small capacity of the original SSD. In fact, upgrading an old SSD is a very cost-effective approach. Especially when your budget is not sufficient, the price of SSD is not as high as before, and there are many brands or models to choose from.
If you have the same needs, this article may help you. It provides a complete guide to HP Notebook SSD replacement.

Why Do You Need to Upgrade HP Notebook SSD
There are several reasons to do the HP Notebook SSD upgrade:
- Performance deterioration: Some old HP Notebooks are configured with a slow SSD when they leave the factory, which will cause the system to freeze and respond slowly when multitasking.
- Insufficient storage space: When you are currently using a 128GB or 256GB SSD, it can no longer store more photos, videos, and files, or install large games.
- Improved security and stability: The long-term use of an old SSD will cause the computer system to frequently blue screen/crash. Upgrading the SSD can solve these problems.
After understanding why you should upgrade HP Notebook SSD, you must choose a suitable SSD and check your HP Notebook SSD’s compatibility. If you don’t know this information, please continue reading below.
HP SSD Compatibility Check
Before buying a new SSD, you need to check whether your SSD is compatible with your PC. In fact, the compatibility between the SSD and computer mainly depends on two points. On the one hand, whether the new SSD has the same hard disk interface as the computer, and on the other hand, whether the hard disk tray on the PC matches the shape or size of the new SSD.
To get what port your PC supports and what size SSD it can accommodate, you can use the following 3 methods:
1. Check the computer manual or model.
The computer manual will usually tell you what SSD your HP Notebook uses, including the port type and hard drive size.
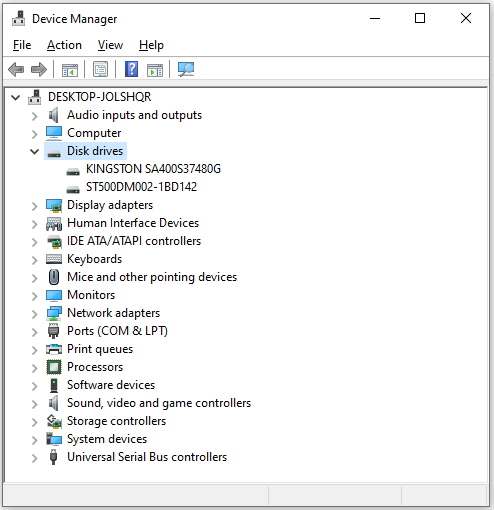
2. Find the model of the drive on your computer through Device Manager.
If your HP computer manual is lost, you can use Device Manager to find the model of the SSD currently installed on your computer. Then, search for the model on Google to get the size and port information of the SSD of that model.
So how do you use Device Manager to operate? Here are the detailed steps:
- Press the Win + X keys together to open Device Manager. You can also right-click the Start icon and choose Device Manager.
- Expand Disk drives, and then you can see the model of the drive your PC uses.
- Just search the model number on your browser, and you will get information about the port and size of the SSD you want.
3. Disassemble the computer and check the ports and hard drive bays.
If the above 2 methods cannot help you determine the available drive ports and sizes of the computer, you can disassemble the computer to check what the SSD ports and hard drive bays are.
However, using this method requires you to understand the structure of the computer and what the most common ports of the SSD look like. Common SSD ports are SATA, mSATA, and M.2.
HP Notebook SSD Upgrade
How to do an HP Notebook SSD replacement? You need to complete the following 3 parts: initialize the new SSD, migrate data, and replace the old one with a new SSD. Here is a step-by-step guide.
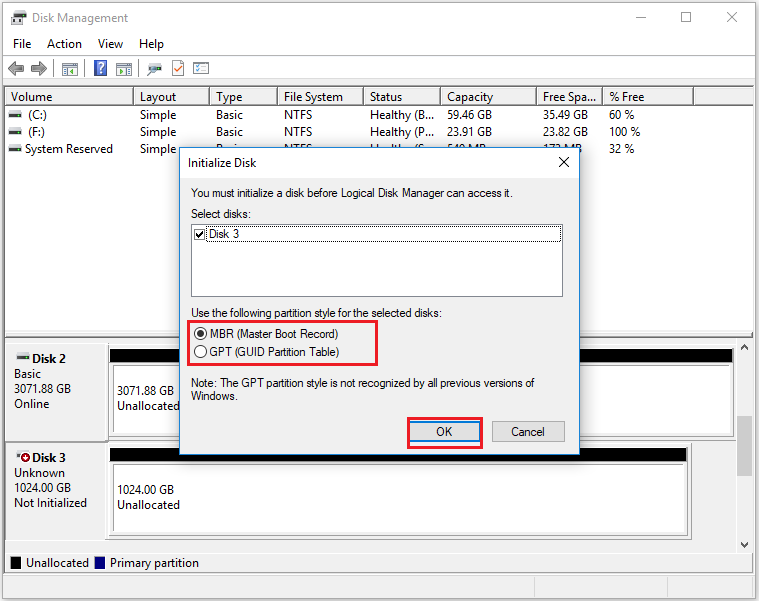
Part 1: Initialize New SSD
Newly purchased SSDs are usually uninitialized. Uninitialized disks will not be displayed in “This PC”, but can be seen in Disk Manager. Based on this, you need to initialize the new disk first.
Step 1: Connect the new SSD to your HP Notebook with a USB adapter.
Step 2: Press the Win + R keys together to open the Run box. Then, input diskmgmt.msc and click OK.
Step 3: Right-click the new SSD disk and select Initialize Disk.
Step 4: In the pop-up window, set the partition style the same as the source SSD disk (MBR or GPT) and click on OK to confirm.
Part 2: Clone Old SSD Data to New SSD
To transfer your data to a new SSD, you can use MiniTool Partition Wizard — a professional and dependable disk partition manager. It offers features like Copy Disk and Migrate OS to SSD/HD to help you move your data safely.
This software not only can help you clone the hard drive but also help you partition hard drives, change cluster size, format USB to FAT32, rebuild MBR, extend/delete/copy partitions, recover hard drive data, etc.
MiniTool Partition Wizard DemoClick to Download100%Clean & Safe
Step 1: Launch MiniTool Partition Wizard to its main interface. Click on the Migrate OS to SSD/HD Wizard feature from the left action panel.
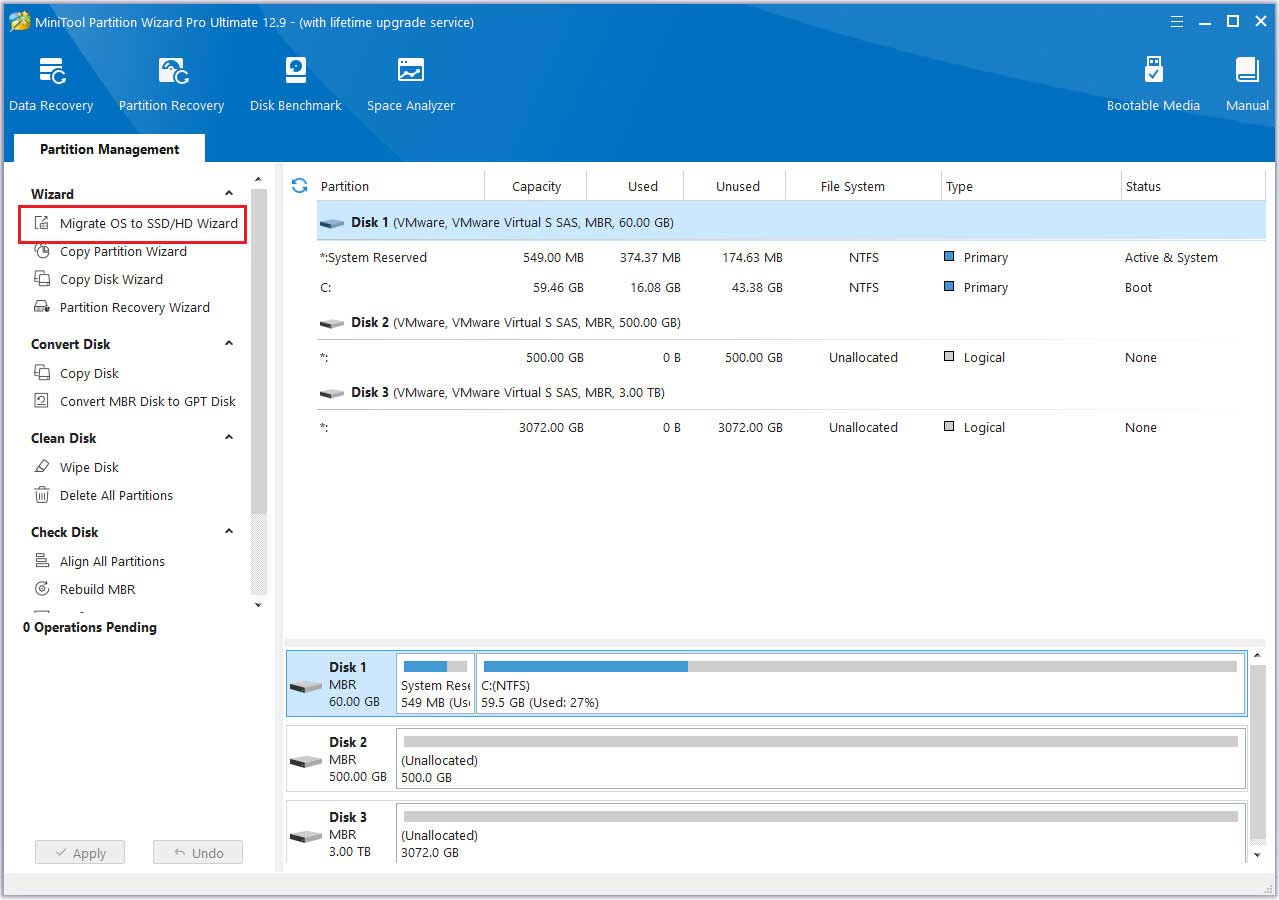
Step 2: In the window that appears, select the option that best suits your operating system migration requirements, then click Next.

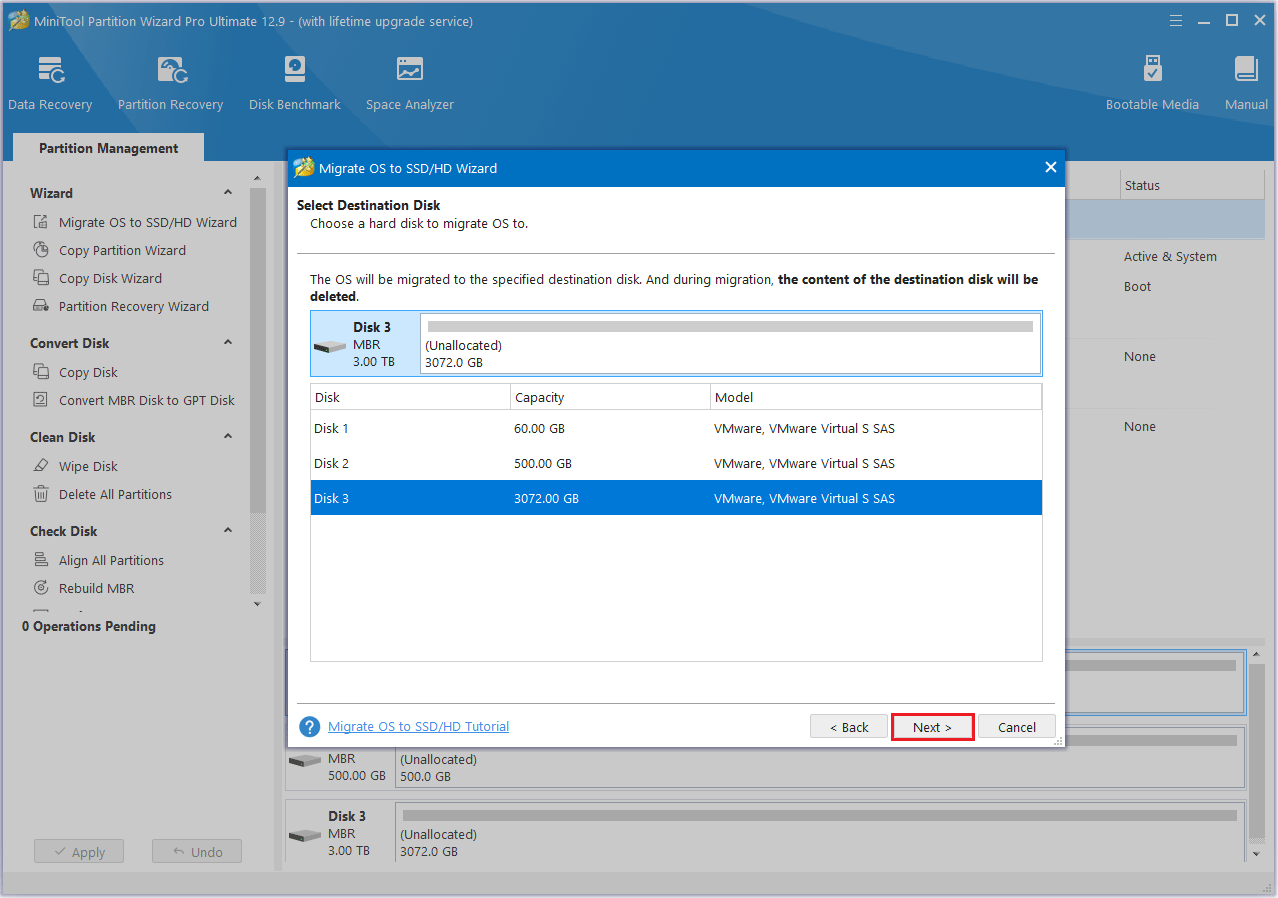
Step 3: Choose the new SSD as the target disk and click Next. When a warning message appears, read it carefully and click Yes to proceed.
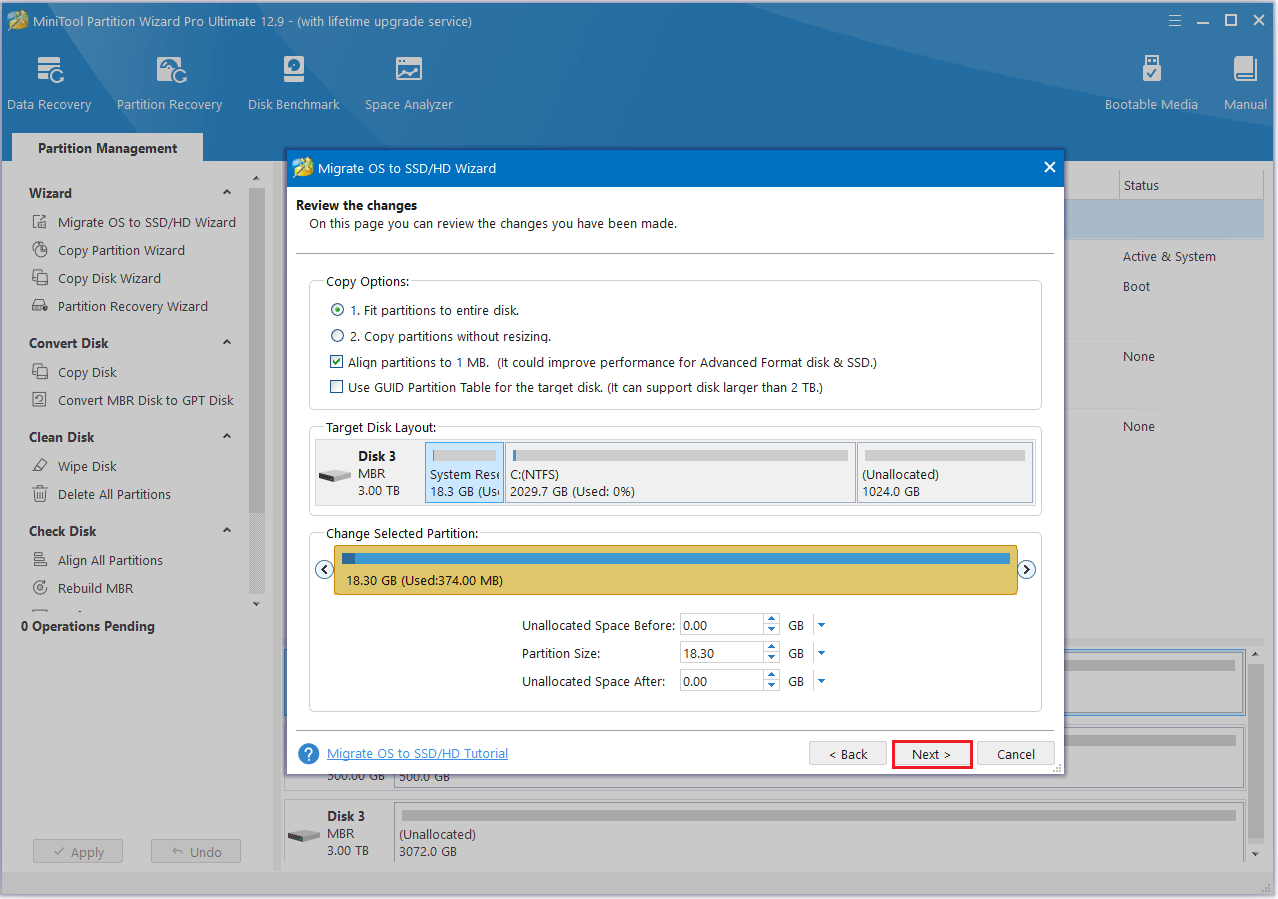
Step 4: Adjust the disk layout in the “Review the changes” window, then click Next.
- Fit partitions to entire disk: The partitions on the source disk will be extended by an equal proportion to fill the entire new SSD.
- Copy partitions without resizing: All the partitions on the source disk are copied into the new SSD without changes in size or location.
- Align partitions to 1 MB: The Align partitions to 1 MB option will apply 4K alignment on the SSD.
- Use GUID partition table for the target disk: The Use GUID partition table for the target disk option will apply GPT on the SSD, but it only appears when the source disk is an MBR disk.
- Change Selected Partition: You can resize or move the partition according to your needs.
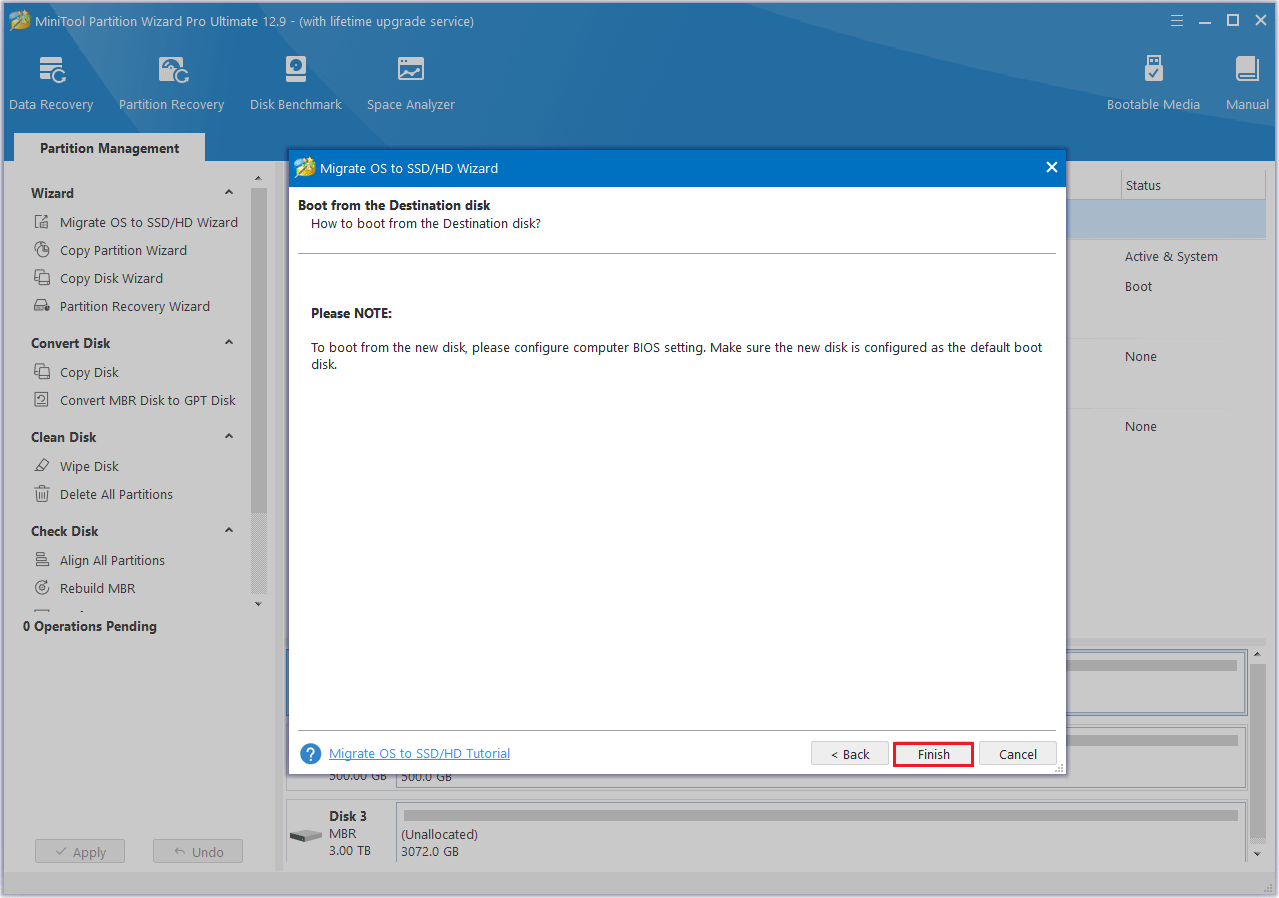
Step 5: A warning window “How to boot from the destination disk?” will appear. Click Finish to proceed.
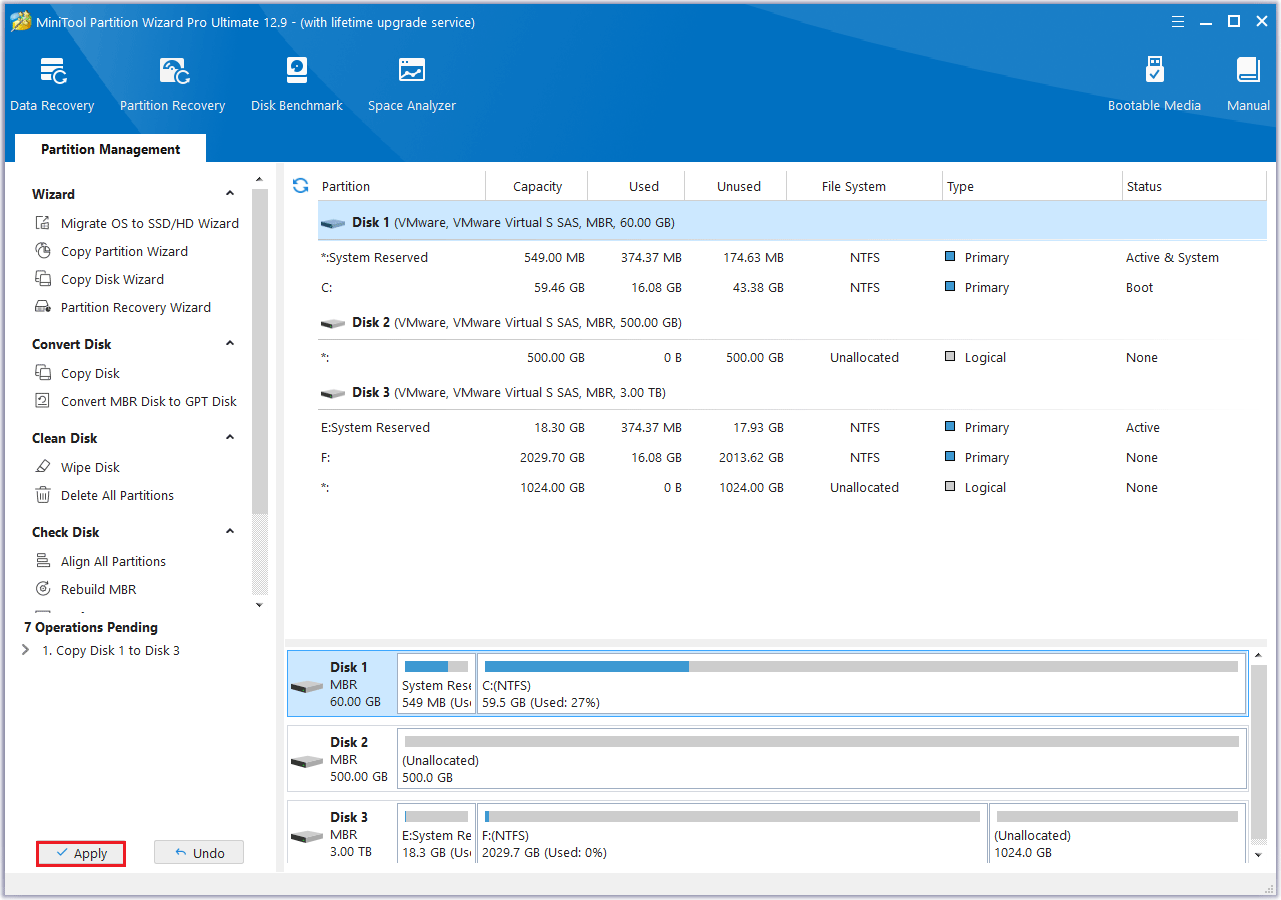
Step 6: Then, click the Apply button to execute the pending changes.

Alternatively, you can use the Copy Disk feature to clone your disk to the new SSD. Here are the steps:
- In the main interface, highlight the original disk and select Copy Disk from the left action panel.
- In the pop-up window, select a new SSD and click on Next.
- Choose a copy option based on your needs. Then click on Next.
- Finally, click on Finish and Apply to save the pending operation.
Part 3: Replace the Old SSD with the New SSD
After migrating the data to a new disk, you need to replace the old disk with the new disk.
- Turn off the computer and disconnect all external devices connected to the computer.
- Put the laptop upside down, remove all screws with a screwdriver, remove the rubber strip with a crowbar, and remove the bottom cover of the HP computer with a hook.
- Disconnect the battery cable from the system board.
- Remove the Phillips screws that secure the SSD to the system board and remove the SSD.
- Place the new SSD into the slot and secure it with screws.
- Install all screws the same way.
What to Do After Replacing the SSD in Your HP Notebook
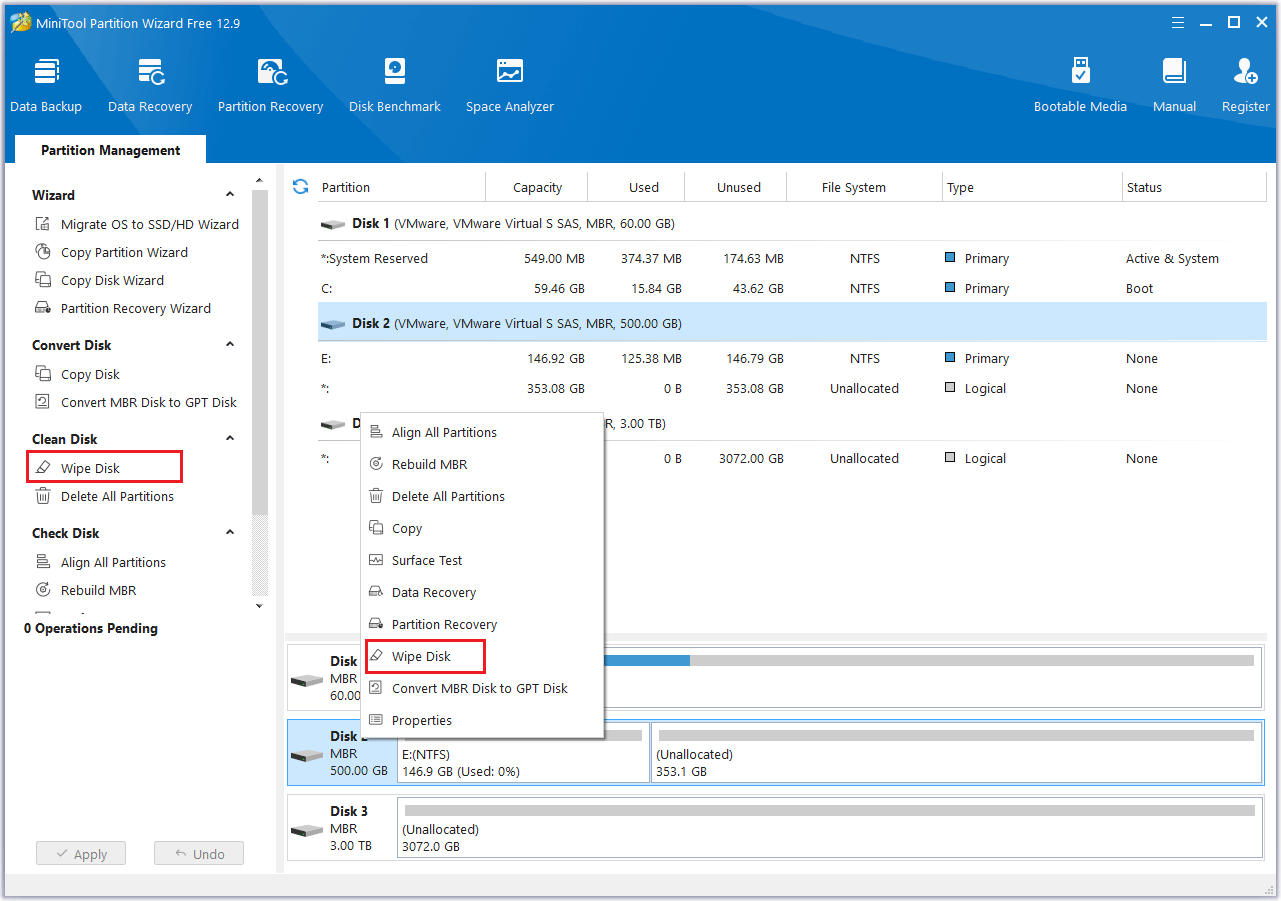
How to deal with old disks? If you want to sell an old disk, you need to clear the data on the disk to prevent someone from stealing your data. If you still want to continue using the disk, you can rebuild a new partition to meet your needs after clearing the data.
To do this, you can try the MiniTool Partition Wizard. Its Wipe Disk feature can help you clear your data, and the Create Partition feature can help you rebuild your partition. Before this, you should connect your hard drive to your PC.
MiniTool Partition Wizard FreeClick to Download100%Clean & Safe
#1. Wipe Disk
Step 1: Run MiniTool Partition Wizard to enter its main interface.
Step 2: Right-click the disk and choose Wipe Disk. Alternatively, you can click the disk and choose Wipe Disk from the left side.
Step 3: In the prompted window, choose a wiping method from the given options and then click OK to save the changes.
- Fill sectors with Zero – Quick
- Fill sectors with One – Quick
- Fill sectors with Zero & One – Slow
- DoD 5220.22-M (3 passes) – Very Slow
- DoD 5220.28-STD (7 passes) – Very Slow
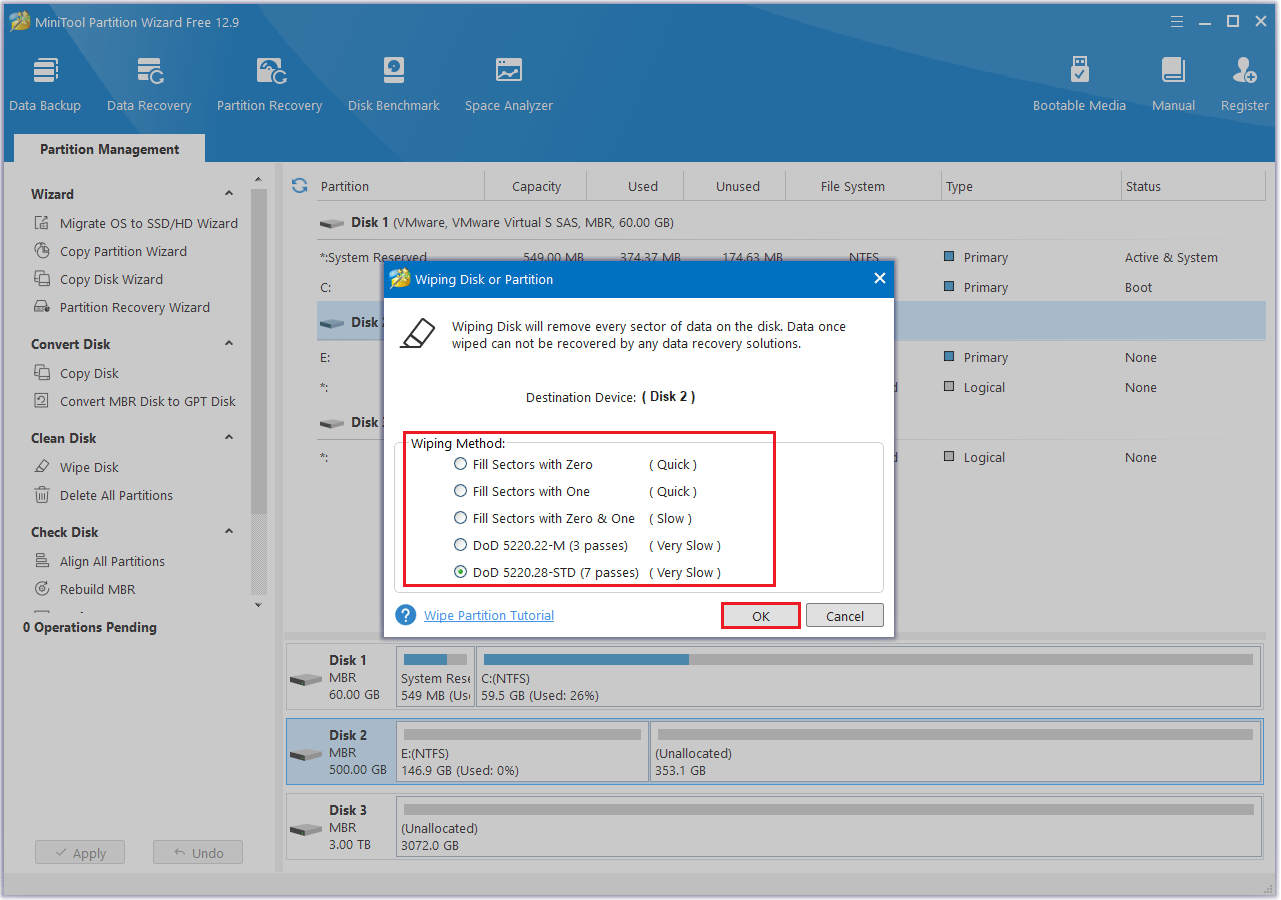
Step 4: Then click Apply to execute the pending operation.
#2. Create Partition
Step 1: Click Create Partition from the left menu after selecting the unallocated space.

Step 2: In the new pop-up window, you can set partition labels, partition types, primary partition or logical partitions, drive letters, file system, etc. Then click OK.
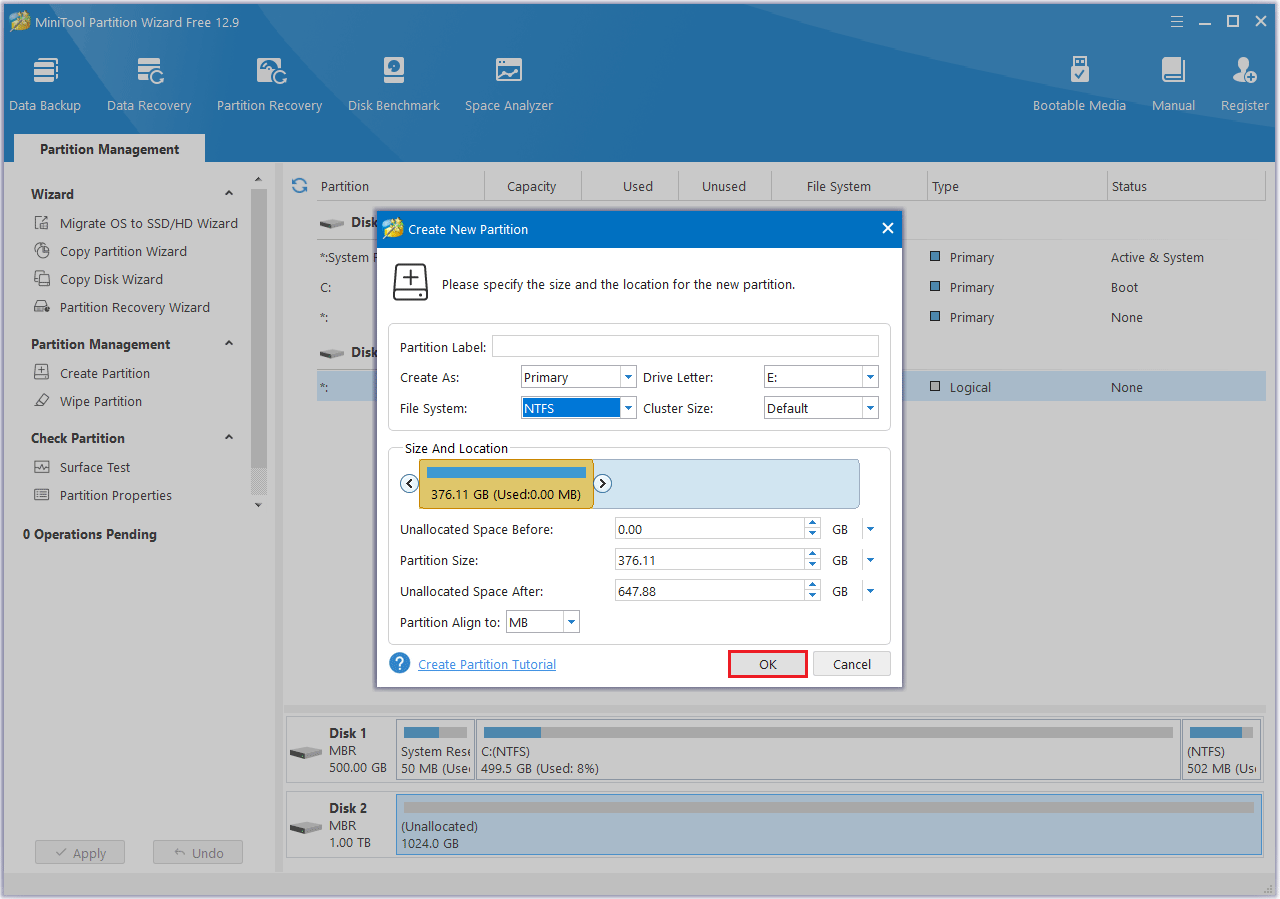
Step 3: You can preview a new partition that will be created. Click the Apply button to confirm the creation.

Bottom Line
In this post, I have introduced you to a full guide on how to do the HP Notebook SSD upgrade and HP SSD compatibility check. If you have any questions or suggestions while using MiniTool Partition Wizard, you can contact us via [email protected] to get a quick reply.
About The Author

Position: Columnist
Cecilia is a new member of MiniTool. She works as an English editor on the MiniTool team. She likes to learn articles about computers and is passionate about partition management and Windows operating systems. She is committed to allowing readers to use simple, efficient, and fast methods to solve the computer problems they encounter. To provide more professional solutions, she will continue to learn and master computer knowledge.
User Comments :