Upgrading your computer’s internal solid-state drive (SSD) for greater capacity or speed often leaves the old drive unused.
Instead of letting it sit unused, you can turn it into a fast external storage device for backups, file transfers, gaming, or portable work files.
This guide explains how to use an SSD as external storage, what hardware you need, expected performance, and common issues to avoid.
Can You Use an SSD as External Storage?
Yes. You can use an old internal SSD as an external storage by installing it into a compatible USB enclosure.
Benefits include:
- Lower cost than buying a new external SSD
- Faster performance than most external HDDs
- Reuse existing hardware
- Portable storage for multiple devices
To do this, you only need:
- An SSD enclosure matching the SSD type
- A USB cable
- Optional formatting before reuse
Is it worth using an old internal SSD as external storage? For most users, yes.
| Option | Performance | Cost |
| Reuse old SSD | High | Very low |
| Buy a new external SSD | High | High |
| External HDD | Low | Low |
If you already own a spare SSD, purchasing an enclosure is often significantly cheaper than buying a new external SSD.
Here are some best uses for an old SSD:
Backup Drive
Store:
- Documents
- Photos
- Videos
- System backups
Gaming Storage
Use the SSD for:
- Steam libraries
- Epic Games libraries
- Xbox Game Pass games
Portable Workspace
Carry:
- Work projects
- Design files
- Virtual machines
- Video editing assets
Because SSDs have no moving parts, they are more durable than traditional external HDDs during travel.
Further reading:
When using an old internal SSD as external storage, it may lack TRIM support, a feature that helps maintain the performance and lifespan of an SSD.
As we all know, internal SSDs support TRIM. Why do they not support it when used as external drives?
The reason is that the TRIM command of internal SSDs communicates with the operating system through the SATA or NVMe interface. When using an internal SSD as external storage, it will be connected to the PC via a USB port, causing the TRIM command to be unable to be transmitted and executed.
To ensure TRIM support after converting an internal SSD to an external drive, the external SSD needs to have a standard USB 3.0 interface, and both the operating system and the drive enclosure must support TRIM.
Here, this comprehensive guide will walk you through every step of transforming your old internal SSD into an external storage device on Windows.
How to Use SSD as External Storage?
How to use SSD as external storage? In this section, we provide a step-by-step guide to help you do that.
- Confirm SSD interface.
- Purchase the right drive enclosure and tools.
- Transfer data to another SSD.
- Remove the old SSD from computer.
- Install the SSD into the enclosure.
- Connect the external SSD to computer.
- Format the SSD to reuse.
Part 1. Confirm the SSD Interface
Internal SSDs come in two mainstream interfaces.
- SATA SSDs are typically 2.5-inch hard drives, 100mm (length) x 69.85mm (width) x 7mm (height), connected via a SATA cable.
- M.2 SSDs are small, rectangular hard drives that can be directly inserted into the M.2 slot on the motherboard. Common width is 22mm, length can be 30, 42, 60, 80, 110 mm, and height is typically around 1.35 mm per side.
You can identify whether an SSD is a SATA SSD or an M.2 SSD easily by its shape.
If it is an M.2 SSD, you should also check the following:
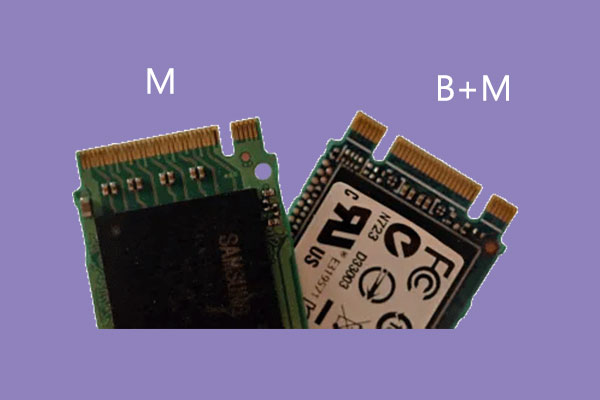
- Pin Interface: B+M Key (two notches) or M Key (one notch)
- Size: 2230, 2242, 2260, 2280, or 22110.
- PCIe Version: PCIe 3.0, PCIe 4.0, PCIe 5.0.
- PCIe Lanes: x1, x2, x4, x8, x12, x16, or x32.
Part 2. Purchase the Right Enclosure and Tools
After learning the SSD type, you should now prepare the right enclosure and tools.
How to choose a suitable SSD enclosure? Here are some factors to consider:
#1. Choose an SSD enclosure that matches your SSD’s interface (SATA or M.2 as well as B+M key or M key), speed (SATA version or PCIe version plus lanes), and size (2230, 2280, etc.).
#2. Choose an SSD enclosure whose USB port and speed match your computer.
- Check if your computer uses a USB Type-A (rectangular) or Type-C (oval and smaller) port.
- Press the Windows logo key + X and select Device Manager from the menu. Expand Universal Serial Bus controllers, and you can see the USB port’s speed (USB3.0, USB 3.1, or USB 3.2)
#3. Check if the hard drive enclosure supports the following features:
- UASP (USB-connected SCSI protocol): This feature enables faster read and write speeds compared to traditional USB 3.0.
- TRIM support: Some enclosures include TRIM support, allowing SSDs to continue using TRIM even after they have been converted to external drives.
- Tool-free installation: This feature allows users to install internal SSDs into the enclosure without any screws.
- Cooling mechanism: A casing made of aluminum alloy or with a built-in fan helps dissipate heat and prevent performance issues caused by overheating and throttling.
- Physical protection: A robust casing (usually made of metal or reinforced plastic) protects the hard drive from physical damage, dust, and moisture.
Then, prepare a screwdriver. Most enclosures require a small Phillips-head screwdriver to open and secure the SSD. Some tool-free enclosures skip this, but a screwdriver ensures a tight fit.
Part 3. Transfer Data to Another SSD
Before using the old SSD as external storage, it’s better to transfer data to the new SSD, including the OS, partition, and important files.
MiniTool Partition Wizard can help you greatly with data transferring. It is a professional and reliable disk manager that offers the Copy Disk feature to copy all partitions and data from one disk to another.
Connect the new SSD to your computer with an NVMe/SATA to USB adapter. Then follow the steps below to transfer data to the SSD.
MiniTool Partition Wizard DemoClick to Download100%Clean & Safe
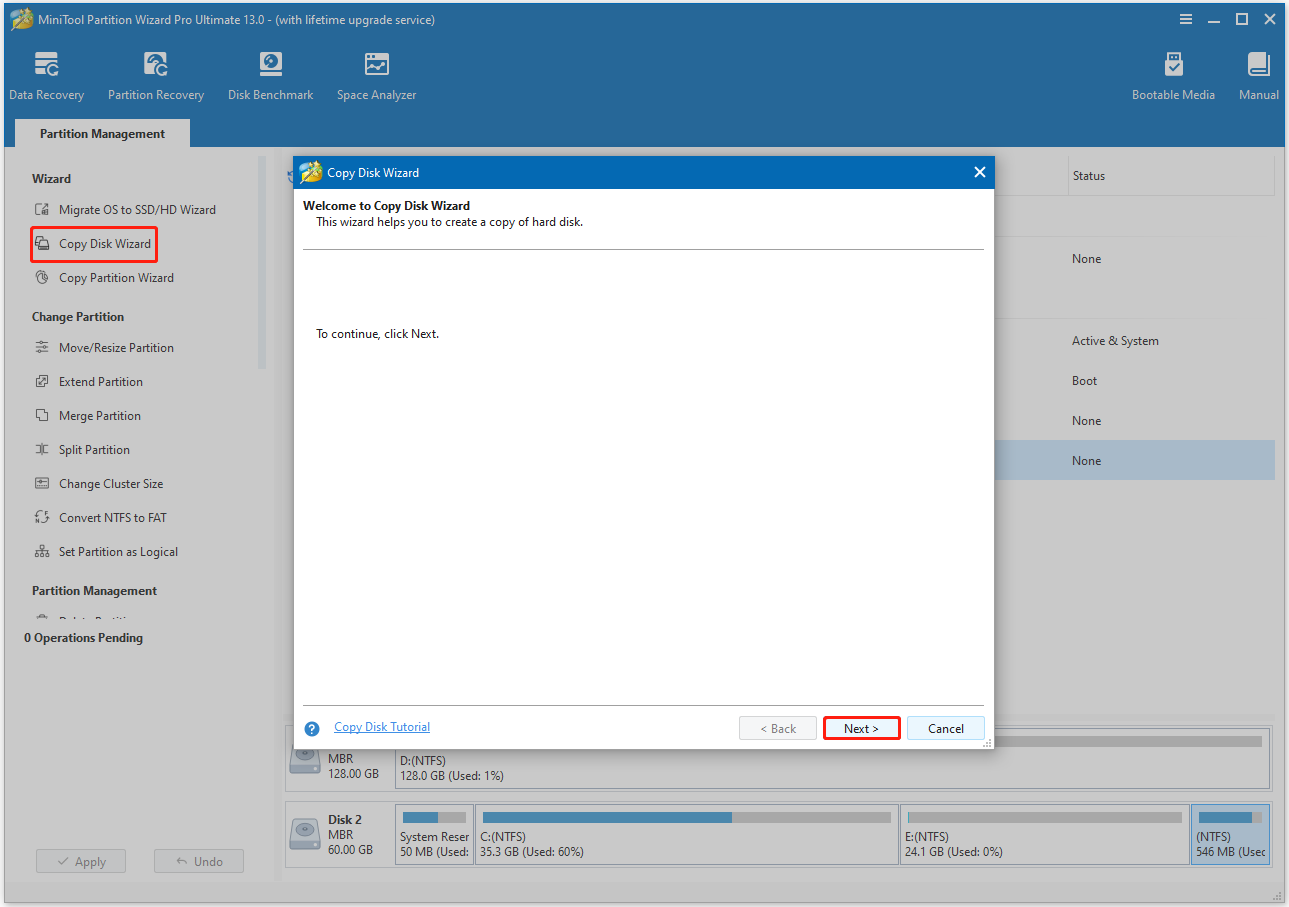
Step 1. Open and start the Copy Disk wizard.
- Launch MiniTool Partition Wizard on your computer.
- In the main interface, click Copy Disk Wizard in the left-hand panel.
- Click Next on the wizard’s screen.
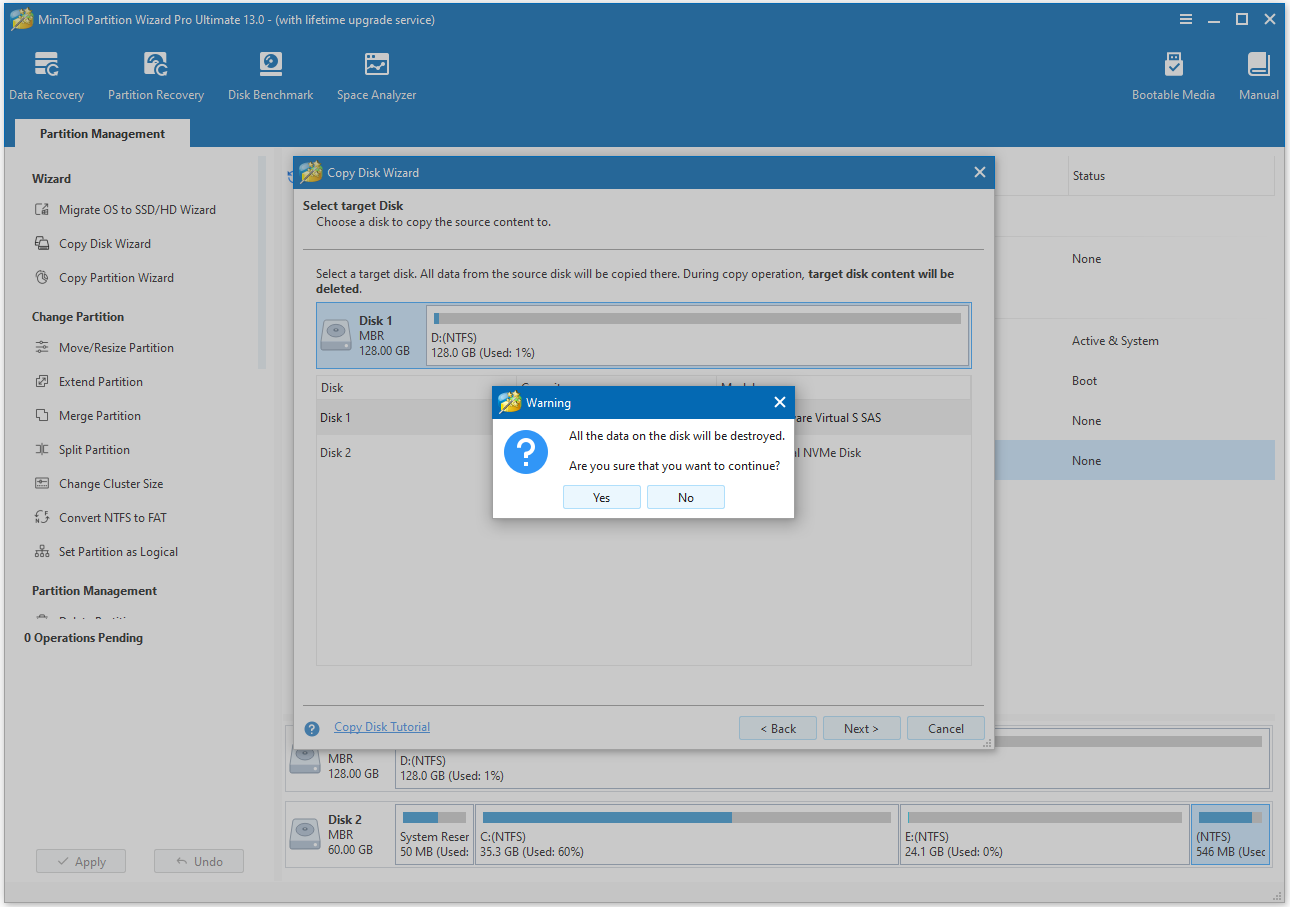
Step 2. Select source and target disks.
- On the Select Disk to copy screen, choose the old SSD and click Next.
- On the Select target Disk screen, select the new SSD and click Next.
- When prompted that all the data on the target disk will be destroyed, click Yes to continue.
Step 3. Adjust copy options.
Review the copy options. You have choices for how the partitions will be arranged on the new disk. Then click Next to go to the final step.
- Fit partitions to entire disk: Resizes the partitions to fill the entire target disk proportionally.
- Copy partitions without resizing: Copies the partitions with their original sizes, leaving any remaining space as unallocated on the target disk.

Step 4. Apply the cloning process.
- Read the NOTE information and click Finish.
- Preview the changes and click Apply to start the cloning process.
- Click Yes to confirm and allow the operation to proceed. The process may take some time to complete, especially for large disks.

In addition to the Copy Disk feature, MiniTool Partition Wizard can also help you partition a hard drive, convert MBR to GPT, recover data from a hard drive, migrate OS to SSD/HD, and more.
Part 4. Remove the Old SSD from Computer
To remove the old SSD from the laptop PCs, the steps are as follows:
- Power down and unplug: Shut down your computer completely and disconnect it from all power sources.
- Open the computer case. Remove the screws on the back of the case and slide off the side panel to open it.
- Locate the SSD and gently remove it from the slot. SATA connectors are typically located on the edge of the motherboard in an L-shaped pattern. M.2 connectors are located near the PCIe or SATA slots and are rectangular in shape.
Part 5. Install the SSD into the Enclosure
Now, you can install the SSD into the enclosure.
- Open the case: Depending on the model, you may need to slide off a cover or remove screws.
- Insert the SSD: Connect the SSD to the circuit board inside the case, ensuring the pins are aligned correctly. You may need to secure the M.2 drive with screws.
- Close the case: Secure the cover back onto the case.
Part 6. Connect the External SSD to Computer
With the SSD installed in the enclosure, it’s time to connect it to your computer.
Plug one end of the USB cable into the enclosure’s port. Then plug the other end into your device’s USB port.
Part 7. Format the SSD to Reuse
To reuse old SSD as external storage, it is best to format the partitions on it. All original data will be deleted, making the SSD free to store large amounts of new files.
To format the SSD, you can use Windows’ built-in tools, such as Disk Management or Command Prompt. However, you may encounter issues like the format option grey out in Disk Management or Diskpart format stuck at 0.
In this case, you should try a free partition manager, MiniTool Partition Wizard, to format your SSD.
This is free disk partitioning software that makes it easy to format your SSD. Furthermore, it overcomes the 32GB limit of FAT32, meaning you can format SSDs larger than 32GB to FAT32.
You can also use MiniTool Partition Wizard as a USB formatter, SD card formatter, FAT32 formatter, and more.
To format an external SSD using MiniTool Partition Wizard, try the following steps.
MiniTool Partition Wizard FreeClick to Download100%Clean & Safe
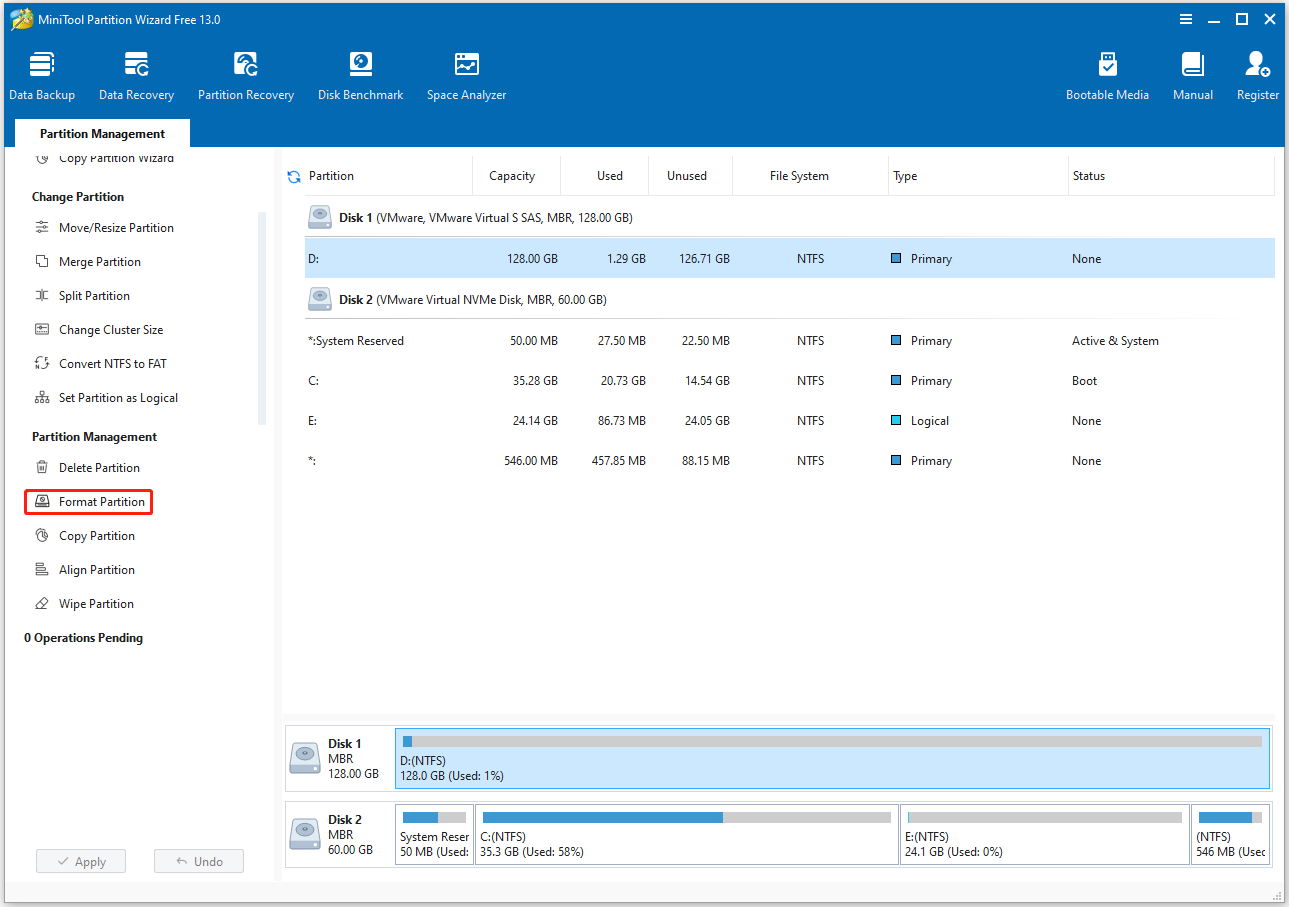
Step 1. Choose the partition on the SSD.
- Run MiniTool Partition Wizard to enter its main interface.
- Choose the partition on the SSD.
- Select the Format Partition feature from the left action panel.
Step 2. Configure the formatting settings.
In the pop-up Format Partition window, you need to configure the settings:
- Partition Label: Give the drive a name.
- File System: Select a file system.
- Cluster Size: Leave the default setting.
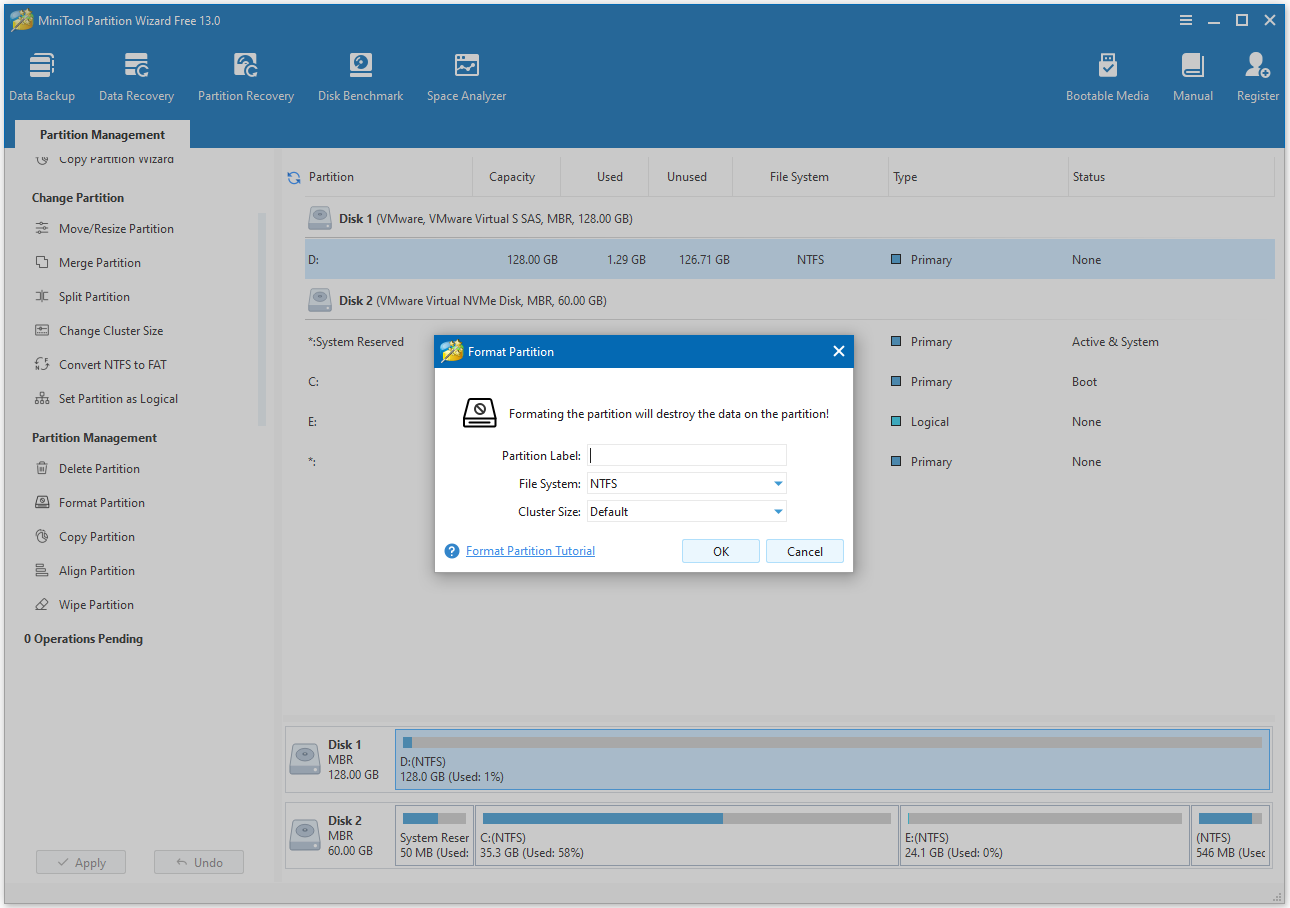
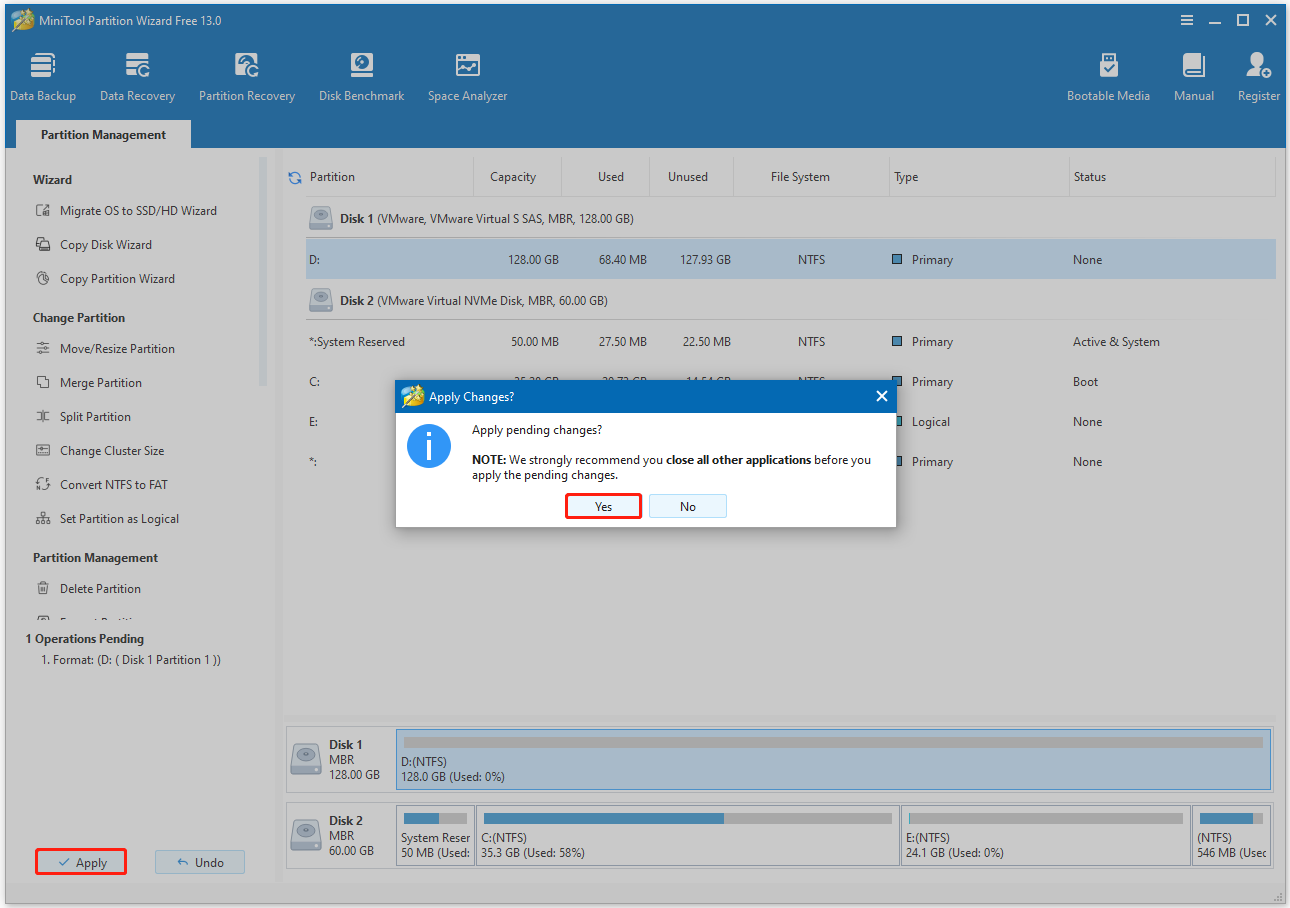
Step 3. Apply the changes and confirm.
- Click OK on the Format window.
- Then click Apply to start the formatting process.
- Click Yes to proceed when this tool prompts.
Then you can repeat the steps above to format other partitions on the SSD. Once it’s reformatted, you can use the internal SSD as fresh external storage.
If you don’t like the old partition layout on your external SSD, you can delete the partitions and repartition the SSD.
Common Issues When Using SSD as External Storage
Are you encountering some issues when using the old internal SSD as external storage? Here, we list some issues and corresponding solutions.
Issue 1. External SSD Not Detected
If the external SSD is not showing up on Windows, it is most likely a connection issue. Try these fixes:
- Check Connections: Replace the cable and try a different USB port.
- Reinstall the SSD: Open the enclosure, remove the SSD, and reinsert it firmly. Make sure it’s properly connected.
Issue 2. Slow Transfer Speeds
If you find that the SSD has slow transfer speeds, you should check if you are using a USB 3.0+ or Thunderbolt port/cable. Avoid USB 2.0 or low-quality cables.
Besides, use a hard drive enclosure that supports TRIM functionality.
Issue 3. External SSD Keeps Disconnecting
If your external SSD keeps disconnecting, you can try the following methods:
Disable USB Selective Suspend: It can prevent Windows from powering off the USB port.
Check for overheating: Overheating can trigger safety disconnections. Ensure the enclosure has ventilation holes and avoid using the SSD on soft surfaces (like beds and couches) that block airflow. If the enclosure feels hot during use, pause transfers and let it cool down.
Use SSD as External Storage FAQ
1. Interface speed limitations
2. Lack of TRIM support
3. Accidental disconnection
You can then download new games directly to the external drive or move existing games to it from your internal storage.
Bottom Line
Using an old SSD as external storage is one of the best ways to reuse existing hardware.
With a compatible enclosure, you can quickly convert an unused SATA or NVMe SSD into a portable, high-speed external drive for backups, gaming, content creation, and file transfers.
Compared with external HDDs, an SSD offers better speed, durability, and responsiveness while often costing little more than the enclosure itself.
If you have any problems or suggestions when using MiniTool Partition Wizard, you can contact us by sending an email to [email protected]. We’ll get back to you as soon as possible.
About The Author

Position: Columnist
Vega enjoys helping people with computer problems, including disk management, data recovery, data backup, and more. She is constantly expanding her knowledge in related fields. And she will continue to bring more easy-to-understand professional articles to help people solve various problems on the PC.
User Comments :