A lot of users complain about Spotlight not working in Windows 11. What causes the issue? How to fix Windows 11 Spotlight not working? Now, let’s start exploring the answers together with MiniTool.
The Spotlight is a Windows 10 feature that can download various pictures from Bing and displays the images on the login/lock screen. Also, it allows users to give feedback if they like the image or not. However, many users reported that they see the same picture each time they lock the login screen especially upgrading to Windows 11.
What causes Windows 11 Spotlight not working? After analyzing extensive user reports and posts, we find the issue can be triggered by many reasons, including poor network connection, Spotlight cache, a metered connection, antivirus interference, inconsistent asset folder, disabled dynamic theme, and even system file corruption. Don’t worry. We provide corresponding solutions to the issue.
Fix 1. Make Sure You Have an Active Internet Connection
Since the pictures displayed on the lock screen are downloaded from Bing daily, you may be stuck on the same picture if you have a poor network connection. To fix the Spotlight not working in Windows 11, make sure that you provide a fast and stable internet connection. If the issue persists after this, move down to the following methods.
Fix 2. Turn off Metered Connection
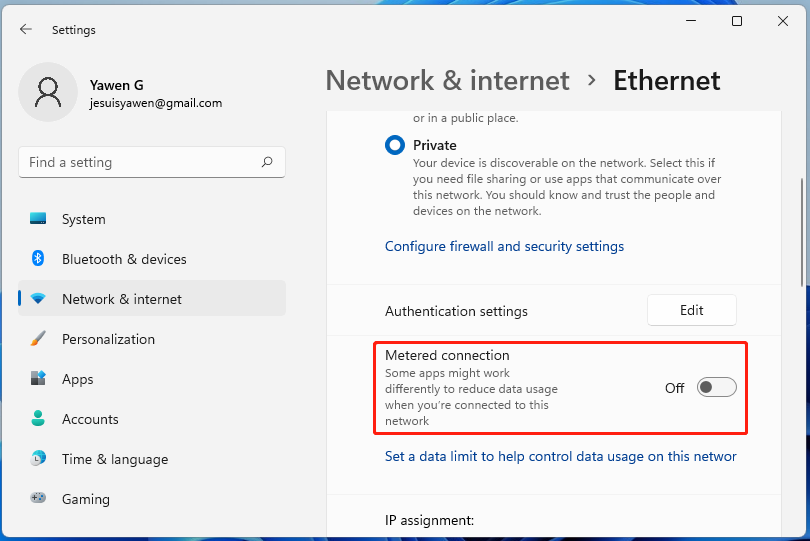
Some users reported that the Spotlight on Windows 11 not working issue can be caused by a metered connection. This is because it cannot download new images. If this scenario applies to you, you can fix it by turning off Metered connection.
Step 1. Press Win + I keys to open the Settings windows and select Network & Internet.
Step 2. Expand your network connection from the right pane such as Ethernet.
Step 3. Toggle off the switch next to Set as metered connection. After that, reboot your computer to make the change take effect and check if the Windows 11 lock screen Spotlight not working issue gets resolved.
Fix 3. Uninstall Bitdefender If Applicable
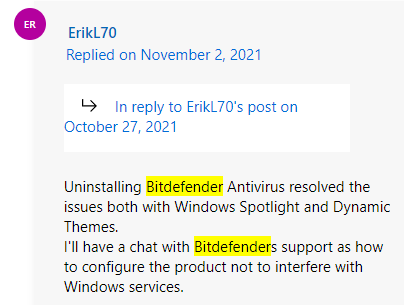
According to user reports from the answers.microsoft forum, uninstalling Bitdefender antivirus can help fix Spotlight not working in Windows 11. Here you may have a try.
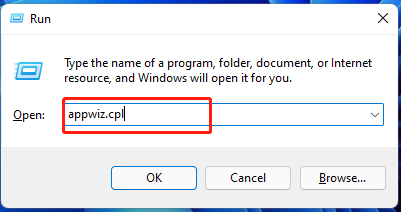
Step 1. Press Win + R keys to open the Run dialog box, and then type appwiz.cpl in it and hit Enter.
Step 2. In the Programs and Features window, scroll down the list of installed programs to Bitdefender Total Security, and then right-click it and select Uninstall.
Step 3. Follow the on-screen prompts to complete the uninstallation. Then you can repeat the same process to uninstall other Bitdefender-related antivirus programs from your Windows 11 PC.
Fix 4. Re-register Spotlight Using PowerShell
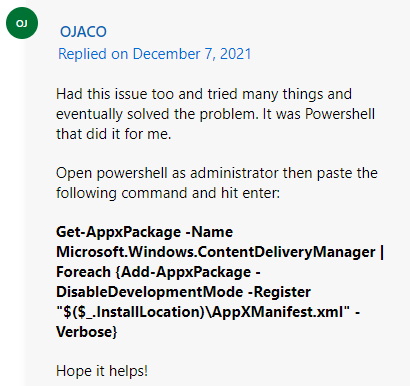
The Spotlight on Windows 11 not working issue can be triggered by a potential inconsistency. To fix it, you can re-register the Spotlight using PowerShell. This method has been proven by many people to be useful. Let’s try.
Step 1. Type PowerShell in the Search box, and then right-click the Windows PowerShell app and select Run as administrator.
Step 2. In the elevated PowerShell window, copy and paste the following command in it and hit Enter.
Get-AppxPackage -Name Microsoft.Windows.ContentDeliveryManager | Foreach {Add-AppxPackage -DisableDevelopmentMode -Register “$($_.InstallLocation)AppXManifest.xml” -Verbose}

Once finished, close the PowerShell and restart your computer to see if the Spotlight not working on Windows 11 is fixed.
Fix 5. Adjust Your Time and Date
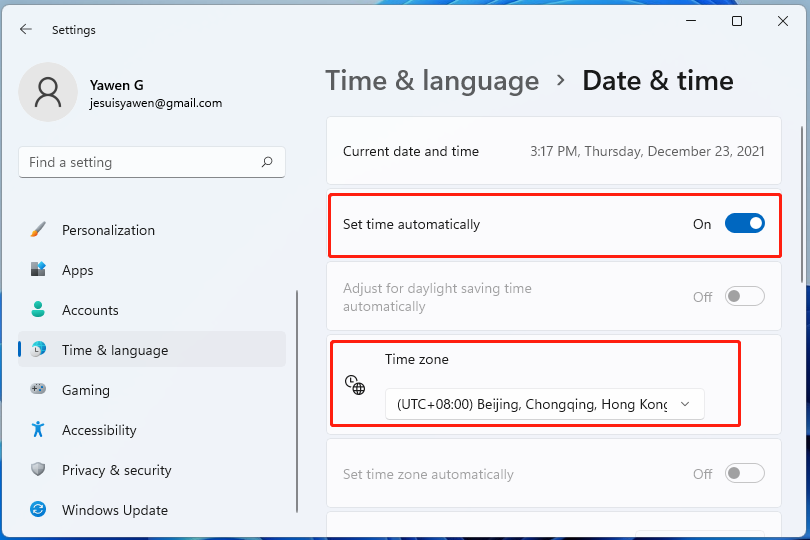
If your time and date are not set properly, you may encounter the Spotlight not working issue. Follow the steps below to change your time and date.
Step 1. Right-click the time and date settings at the bottom right corner and select Adjust date and time.
Step 2. Toggle on the switch next to Set time automatically from the right pane and select your current time and date from the Time Zone section.
Step 3. Go to the Language & region section and check if you set the Country or region correctly.
Fix 6. Re-enable Spotlight in Windows 11
Another simple solution on how to fix Spotlight not working in Windows 11 is to enable and disable Spotlight.
Step 1. Open the Settings app and select Personalization from the left pane, and then select Lock screen from the right pane.
Step 2. Go to the Personalize your lock screen section and click on Picture or Slideshow from the drop-down menu. Then restart your computer.
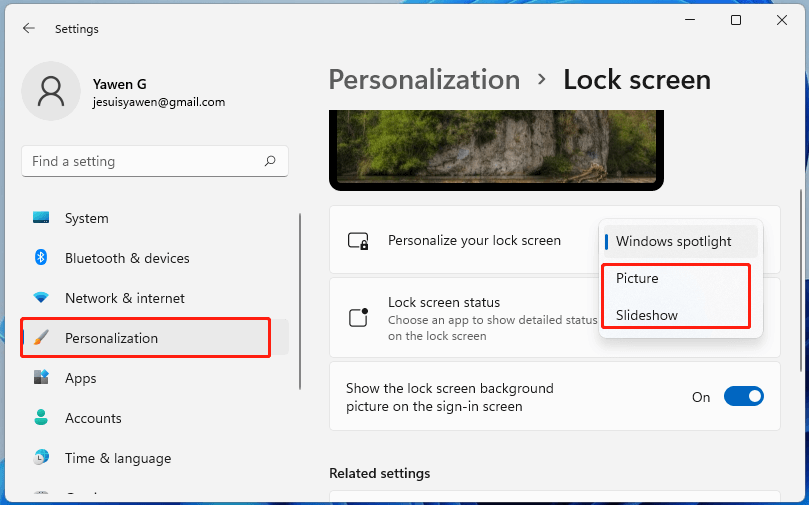
Step 3. Navigate back to the Lock screen section, and then change back to Windows Spotlight from the Personalize your lock screen drop-down menu. After that, press Win + L keys to the lock screen and see if the issue gets solved.
Fix 7. Delete Spotlight Cache
Sometimes, the Spotlight not working on Windows 11 issue can be caused by corrupted Spotlight cache. In this case, you can clean the cache and re-register the Spotlight app.
Step 1. Press Win + R keys to open the Run dialog box, and then type cmd in it and hit Ctrl + Shift + Enter to open the elevated Command Prompt window. Click on Yes in the UAC window.
Step 2. In the pop-up window, type the following commands in order and hit Enter after each one.
- DEL /F /S /Q /A “%USERPROFILE%/AppDataLocalPackagesMicrosoft.Windows.ContentDeliveryManager_cw5n1h2txyewyLocalStateAssets”
- DEL /F /S /Q /A “%USERPROFILE%/AppDataLocalPackagesMicrosoft.Windows.ContentDeliveryManager_cw5n1h2txyewySettings”

Step 3. Open the Windows PowerShell with admin right and run the following command to register the Spotlight app again.
Get-AppxPackage -allusers *ContentDeliveryManager* | foreach {Add-AppxPackage “$($_.InstallLocation)appxmanifest.xml” -DisableDevelopmentMode -register }
Once done, restart your PC and check if the Windows 11 lock screen Spotlight not working issue is gone.
Fix 8. Run System Maintenance Troubleshooter
The system maintenance troubleshooter is a fix utility that can apply a series of automatic fixes related to common issues affecting the lock screen, desktop icon, and other components. It’s worth trying.
Step 1. Open your Control Panel via the search box, and then change the View by type to Large icons and select Troubleshooting.
Step 2. In the Troubleshooting window, click on System and Security.
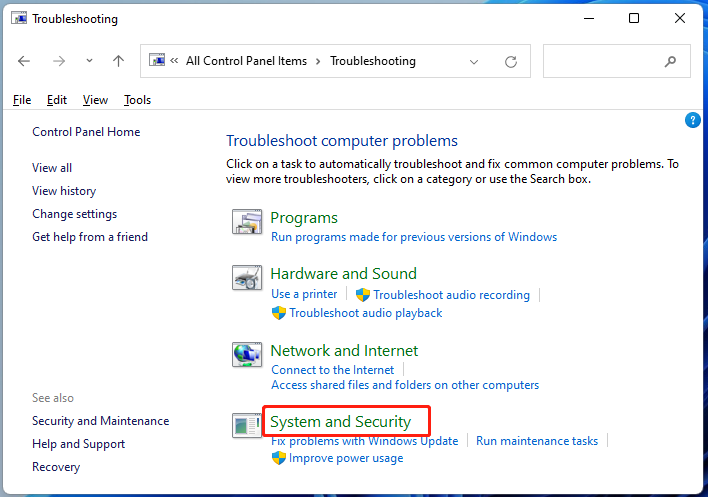
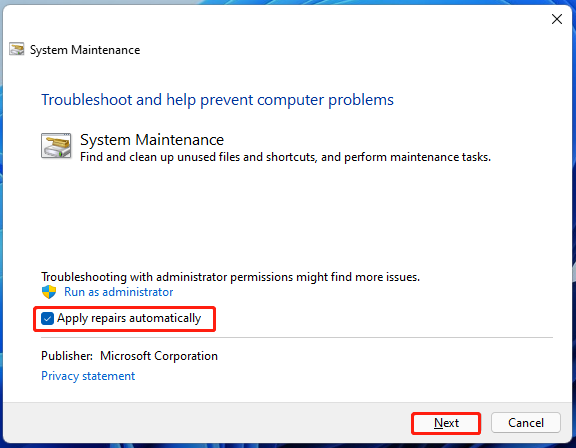
Step 3. Click on System Maintenance.
Step 4. Once you are on the first screen of the System Maintenance tab and click on the Advanced link, and tick the checkbox for Apply repairs automatically, and click on Next. Then this troubleshooter will automatically detect issues and apply the recommended fixes.
Fix 9. Clear Spotlight Assets
Some users reported that the Windows 11 lock screen Spotlight not working issue can be resolved by clearing the assets. Here’s how to do that:
Step 1. To do so, you need to disable the Spotlight feature first by Steps 1 to 2 in Fix 6.
Step 2. Once disabled, press Win + E keys to open the File Explorer, and then go to the following directory.
C:Users<USERNAME>AppDataLocalPackagesMicrosoft.Windows.ContentDeliveryManager_<Package ID>LocalStateAssets
Kindly remind:
You need to replace the Username section with the actual name of your active account. Alternatively, you can try executing the command below in the Run dialog box to open the Assets directory. %USERPROFILE%/AppDataLocalPackagesMicrosoft.Windows.ContentDeliveryManager_cw5n1h2txyewyLocalStateAssets
Step 3. Click on View > Hidden Items from the top menu to make sure all hidden files are visible. Then press Ctrl + A to select everything inside the Assets folder and delete them.
Step 4. Follow step 3 in Fix 6 to re-enable the Windows Spotlight feature.
Now, restart your PC and check if the Windows 11 Spotlight can work properly.
Fix 10. Reset Spotlight Settings
If the Spotlight is still not working, you can try resetting your Windows 11 Spotlight settings. For that:
Step 1. Open the Settings app and select Personalization from the left pane, and then select Lock screen from the right pane.
Step 2. Toggle off the switch next to Show lock screen background picture on the sign-in screen and select Picture from the background drop-down menu.
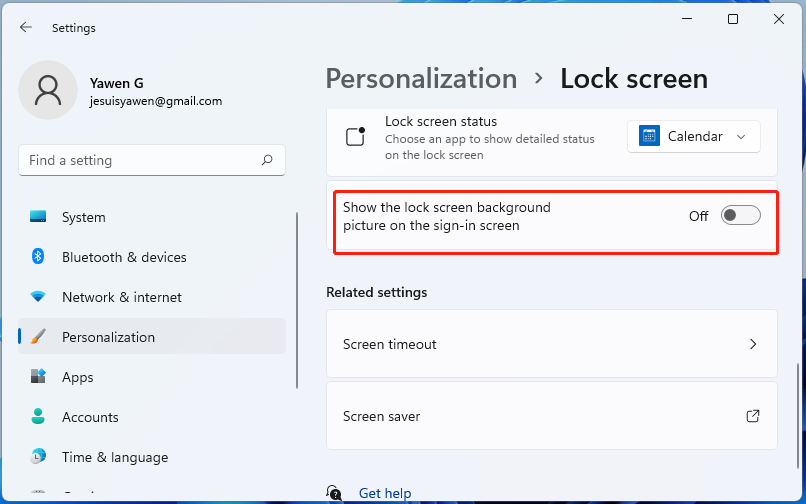
Step 3. Press Win + R keys to open the Run box, and then type %LocalAppData%PackagesMicrosoft.Windows.ContentDeliveryManager_cw5n1h2txyewySettings in it and hit Enter.
Step 4. In the pop-up folder, rename the roaming.lock and settings.dat files to roaming.lock.bak and settings.dat.bak. If you worry about this operation, you can copy and paste the 2 files to another location first.
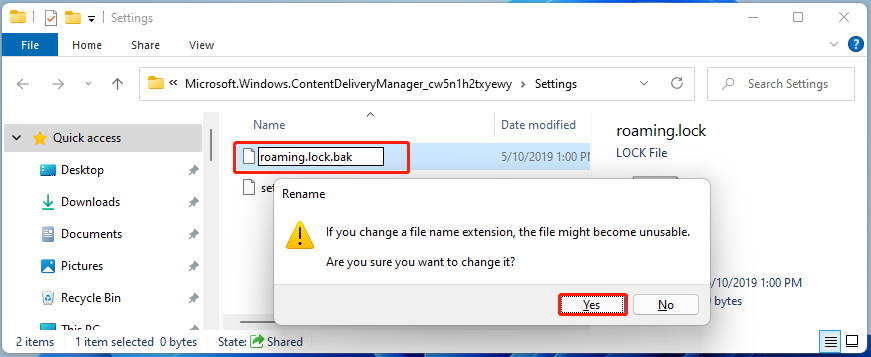
Step 5. Reboot your computer and navigate back to the Lock screen in the Settings window like in Step 1. Then toggle on the switch for Show lock screen background picture on the sign-in screen.
After that, you can press Win + L keys to lock your screen and see if the issue is fixed.
Fix 11. Run an SFC Scan
If none of the above methods work, then the Windows 11 Spotlight not working issue could be caused by system file corruptions. System File Checker is a Windows system utility that’s often used to scan and repair corrupted system files. You may have a try.
Step 1. Type cmd in the search box on the taskbar, and then right-click the Command Prompt app and select Run as administrator.
Step 2. Type sfc /scannow command in the elevated command prompt. This process may take you much time to scan, please wait patiently.
Once this repairing process completes, restart your PC and see if the problem is gone.

![MSI Dragon Center Not Working in Windows 10/11? [5 Proven Ways]](https://images.minitool.com/partitionwizard.com/images/uploads/2021/12/msi-dragon-center-not-working-thumbnail.jpg)
User Comments :