Are you experiencing slow performance due to insufficient storage space on your Galaxy Book 2 Pro laptop? It's time to upgrade your computer with an SSD. This article from Partition Magic will show you how to do a Galaxy Book 2 Pro SSD upgrade. Let’s get started!
Why Upgrade Galaxy Book 2 Pro Hard Drive?
Samsung Galaxy Book 2 Pro is a thin, high-performance laptop equipped with Intel 12th generation Core processors (Core i5 or Core i7). It meets the needs of users who want to handle tasks efficiently, as well as multitasking and daily work.
However, over time, even the best computers will see a significant decline in performance and storage space due to the increasing amount of data stored.
Upgrading it is an easy and cost-effective way to improve system performance and speed without buying a new computer.
There are many benefits to doing a Galaxy Book 2 Pro hard drive upgrade, including:
- Improve performance and work efficiency: Larger SSD capacity usually means better performance, and upgrading to a larger SSD can improve system response speed and storage speed. Larger SSD storage not only provides more space but also improves the speed of multitasking and file transfer, thereby greatly improving work efficiency.
- Reduce dependence on external storage devices: If your built-in storage is insufficient, you may need to use an external hard drive or cloud storage to expand the space. But by upgrading to a larger SSD, you can reduce your dependence on these external devices.
- Longer SSD lifespan: The lifespan of an SSD is related to the number of writes, and choosing a larger capacity SSD can help reduce the overwriting of individual storage cells, thereby extending the lifespan of the drive.
- Improve resale value: If you plan to sell this laptop in the future, having a larger capacity SSD will increase its appeal.
How to Upgrade Galaxy Book 2 Pro Hard Drive Without Losing Data?
After clarifying the benefits of the Galaxy Book 2 Pro SSD upgrade, we will introduce you to how to complete the process. The following section will explain the whole Galaxy Book 2 Pro SSD replacement process in detail. Please continue reading the article.
Part 1: Before the SSD Upgrade
Some basic prerequisites to upgrade Galaxy Book 2 Pro SSD:
- Buy a new SSD: The size of the SSD should be large enough and compatible with the Galaxy Book 2 Pro laptop.
- Prepare a SATA to USB cable: This is used to connect the prepared SSD to the computer as an external drive.
- Prepare a suitable Phillips screwdriver: Use a Phillips screwdriver to open the computer case and remove the original SSD.
Part 2: Initialize a New SSD
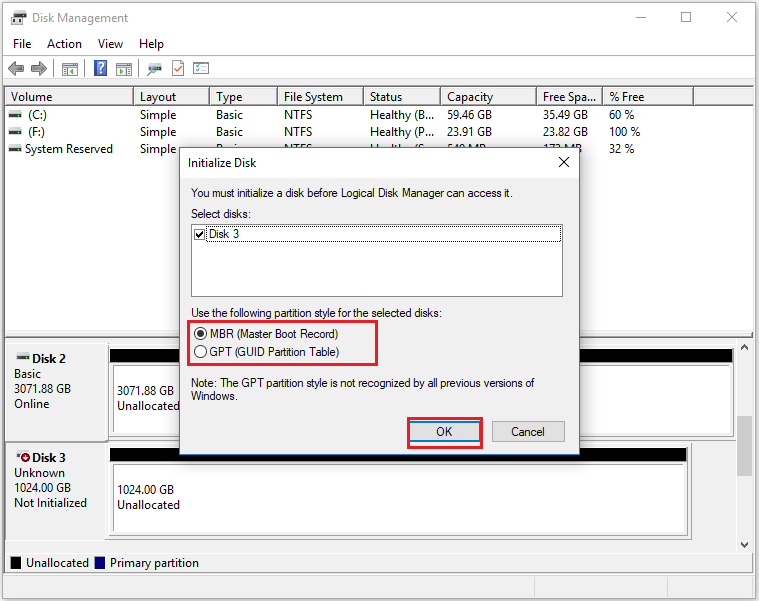
A new SSD needs to be initialized to MBR or GPT before it can be used. Based on this, you can choose to use the Windows built-in tool Disk Management. Here are the steps:
Step 1: Connect a new SSD to your Galaxy Book 2 Pro via a SATA to USB cable.
Step 2: Press the Win + R keys to open the Run box. Then input diskmgmt.msc and click OK to open Disk Management.
Step 3: Right-click the new SSD hard drive and select Initialize Disk.
Step 4: In the pop-up window, set the partition style as MBR or GPT and click on OK to confirm. Then follow the on-screen instructions to finish the operation.
Part 3: Clone Data to the New SSD
After completing the above preparations, you can use the methods and steps described in this section to help you migrate your data.
Based on my personal experience, MiniTool Partition Wizard is very suitable for migrating data from the original SSD to the new SDD. The Migrate OS to SSD/HD feature of the software can help you migrate OS to SSD without reinstalling OS, and the Copy Disk feature can help you clone all data without data loss.
Not only that, this software can also help you to extend/create/resize/copy/delete partitions, format FAT32, recover data from hard drive, data recovery SSD, and more.
If your SSD doesn’t come with a built-in program for cloning the drive, you can use MiniTool Partition Wizard instead. Let’s go over how to use it to upgrade Galaxy Book 2 Pro SSD.
MiniTool Partition Wizard DemoClick to Download100%Clean & Safe
Option 1: Use the Copy Disk Feature
The Copy Disk feature in MiniTool Partition Wizard copies all partitions and data from one disk to another, ensuring that the partitions on the target disk work properly. You can even boot your computer from the duplicated disk.
Step 1: Connect the new SSD to your Galaxy Book 2 Pro with the SATA-to-USB adapter.
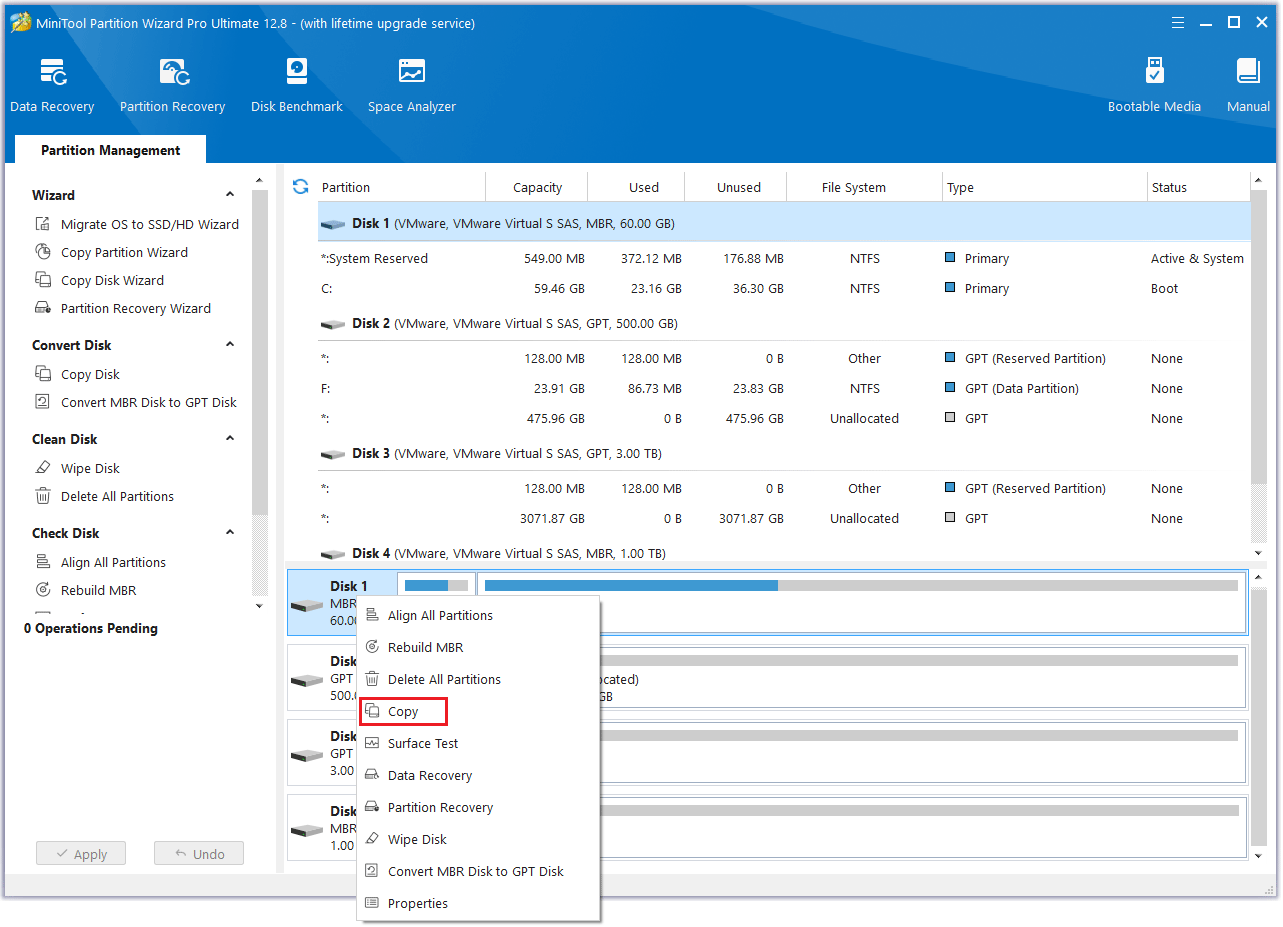
Step 2: Next, open MiniTool Partition Wizard to its main interface, right-click on the disk, and select Copy. Alternatively, you can click the Copy Disk Wizard feature from the action panel on the left.
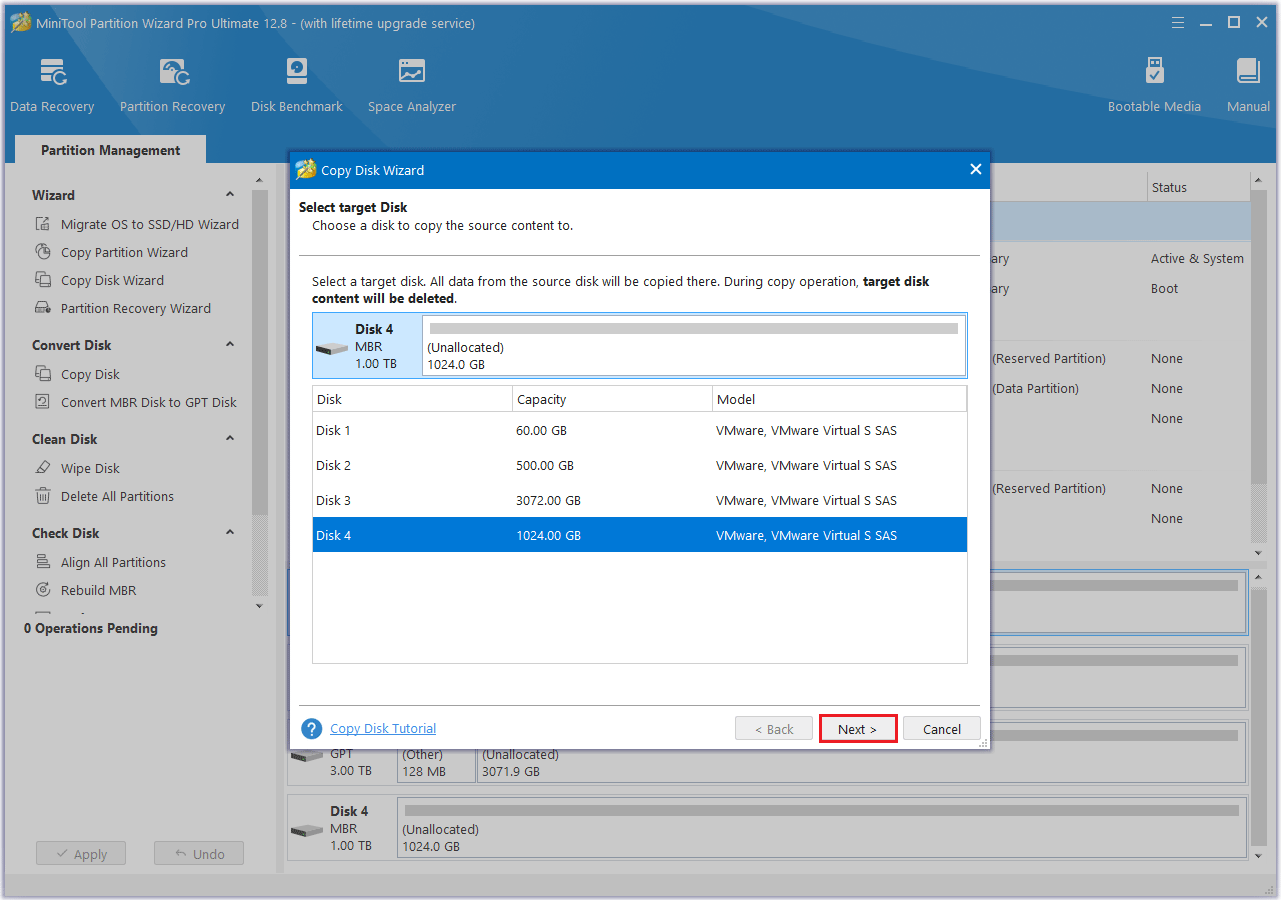
Step 3: In the window that appears, choose the new SSD as the destination disk, then click Next. If you receive a warning that all data on the disk will be destroyed, click Yes to confirm.
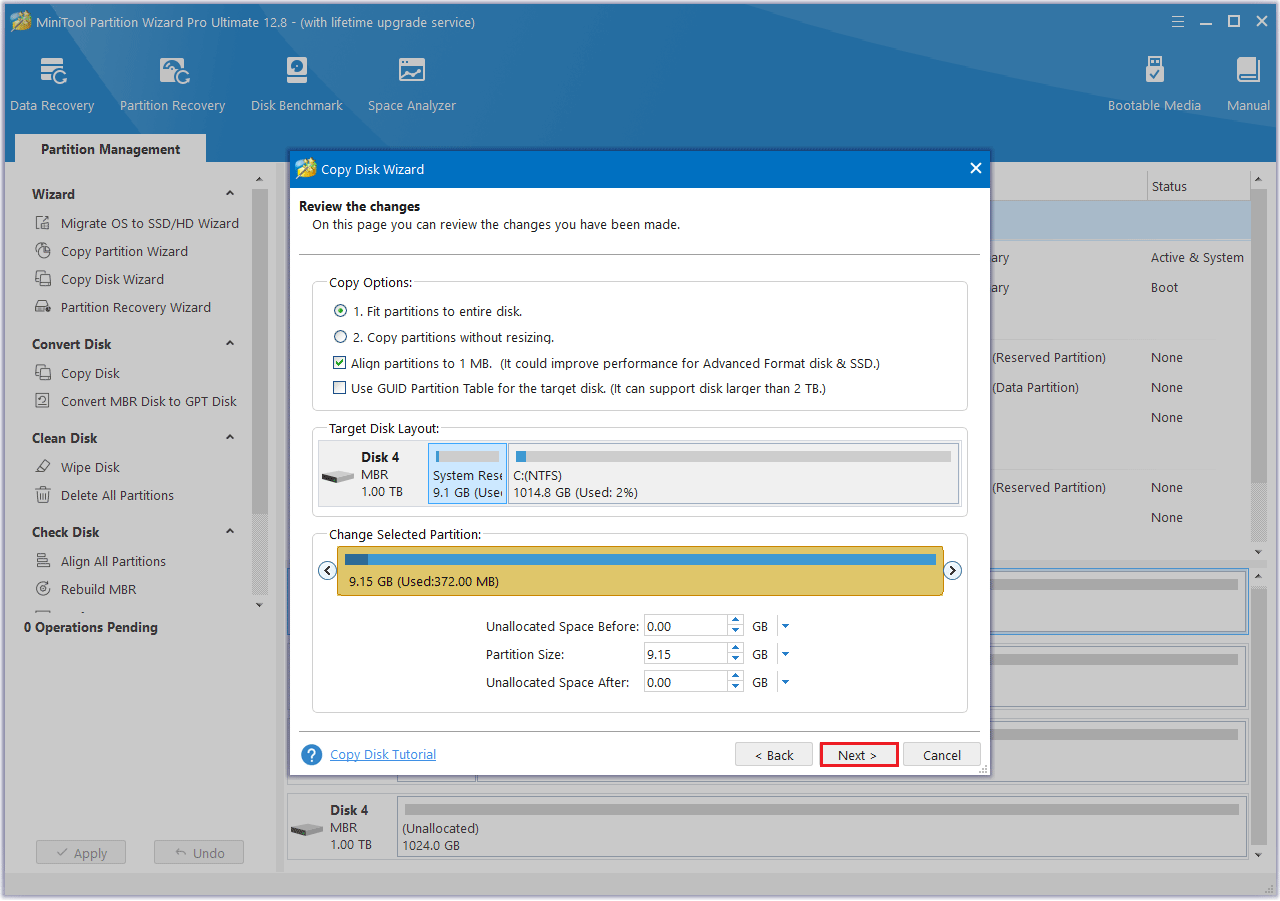
Step 4: In the Review the Changes window, select a copy option and click Next.
- By default, the options to “Fit partitions to entire disk” and “Align partitions to 1 MB” will be enabled. The first option will resize the partitions from the original hard drive to fit the new SSD, while the second option ensures 4K alignment on the SSD.
- If the original disk is an MBR disk and you want the cloned SSD to be a GPT disk, you can choose the option to “Use GUID Partition Table for the target disk.”
- In the “Change Selected Partition” section, you can resize or move the partition to meet your needs.
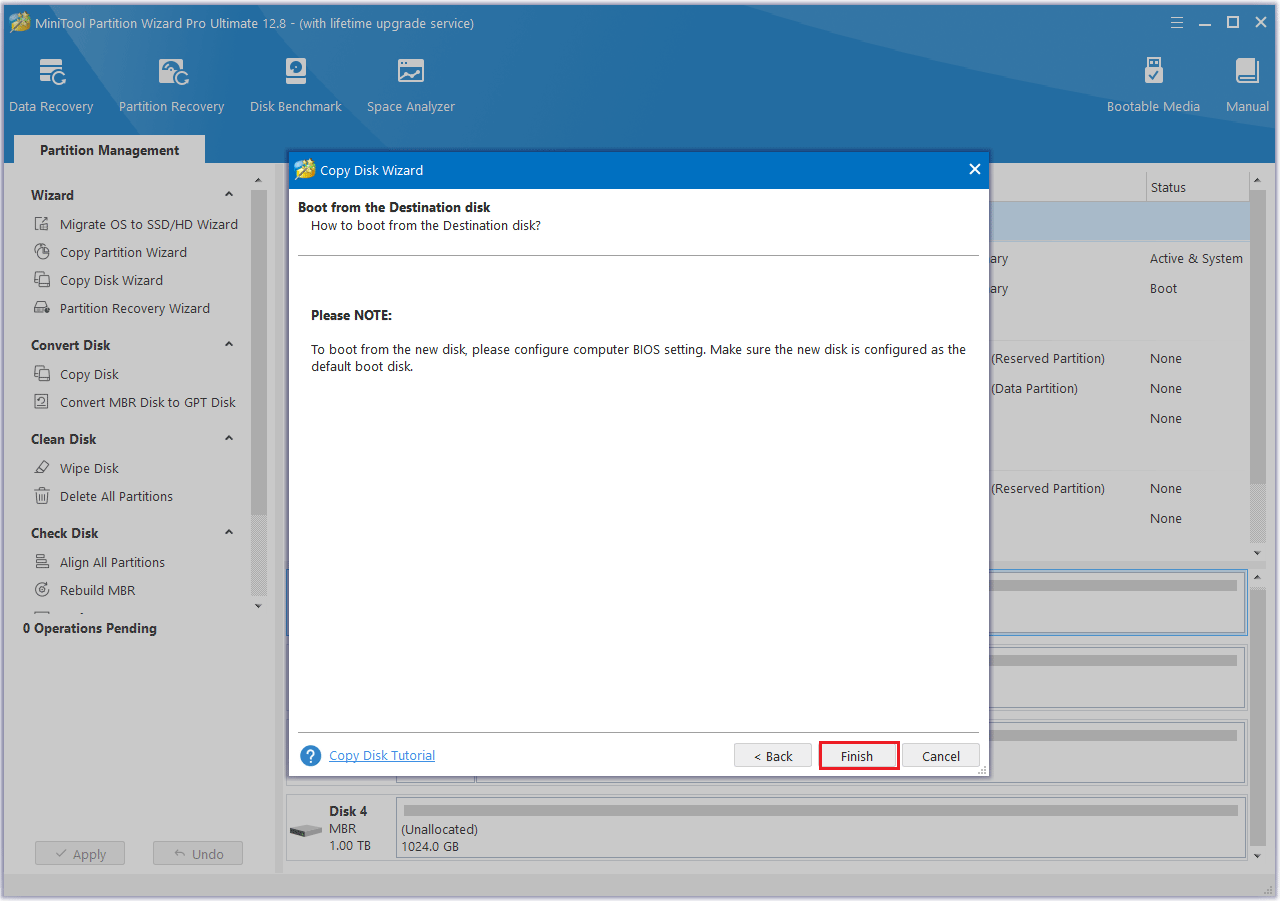
Step 5: Read the note carefully for instructions on how to boot from the target disk, then click Finish to return to the main interface.
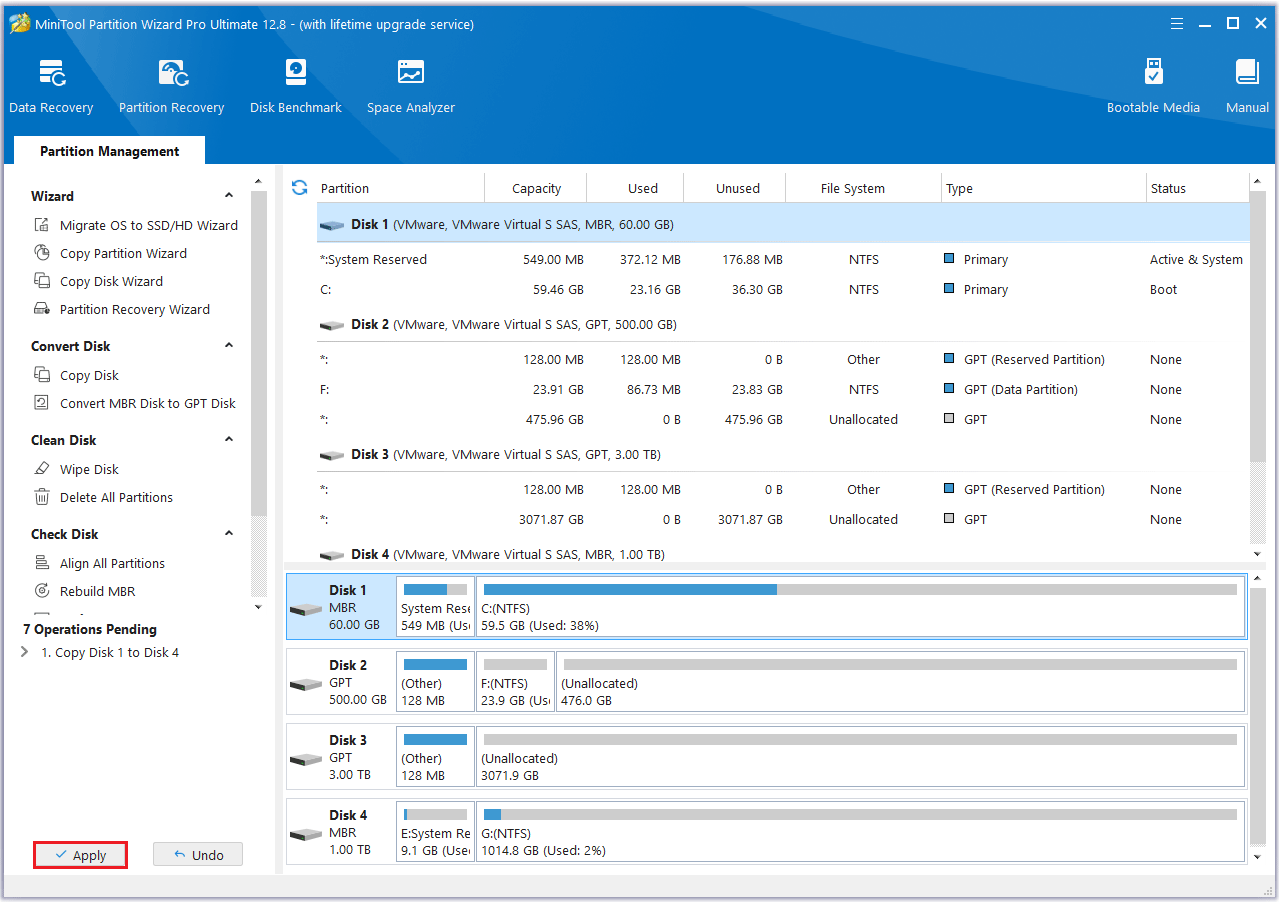
Step 6: Click the Apply button to execute the pending operation and wait for the cloning process to complete.
Option 2: Use Migrate OS to SSD/HD Feature
If you only want to move the operating system to another drive, you can use the Migrate OS to SSD/HD feature of MiniTool Partition Wizard. Here are the steps below:
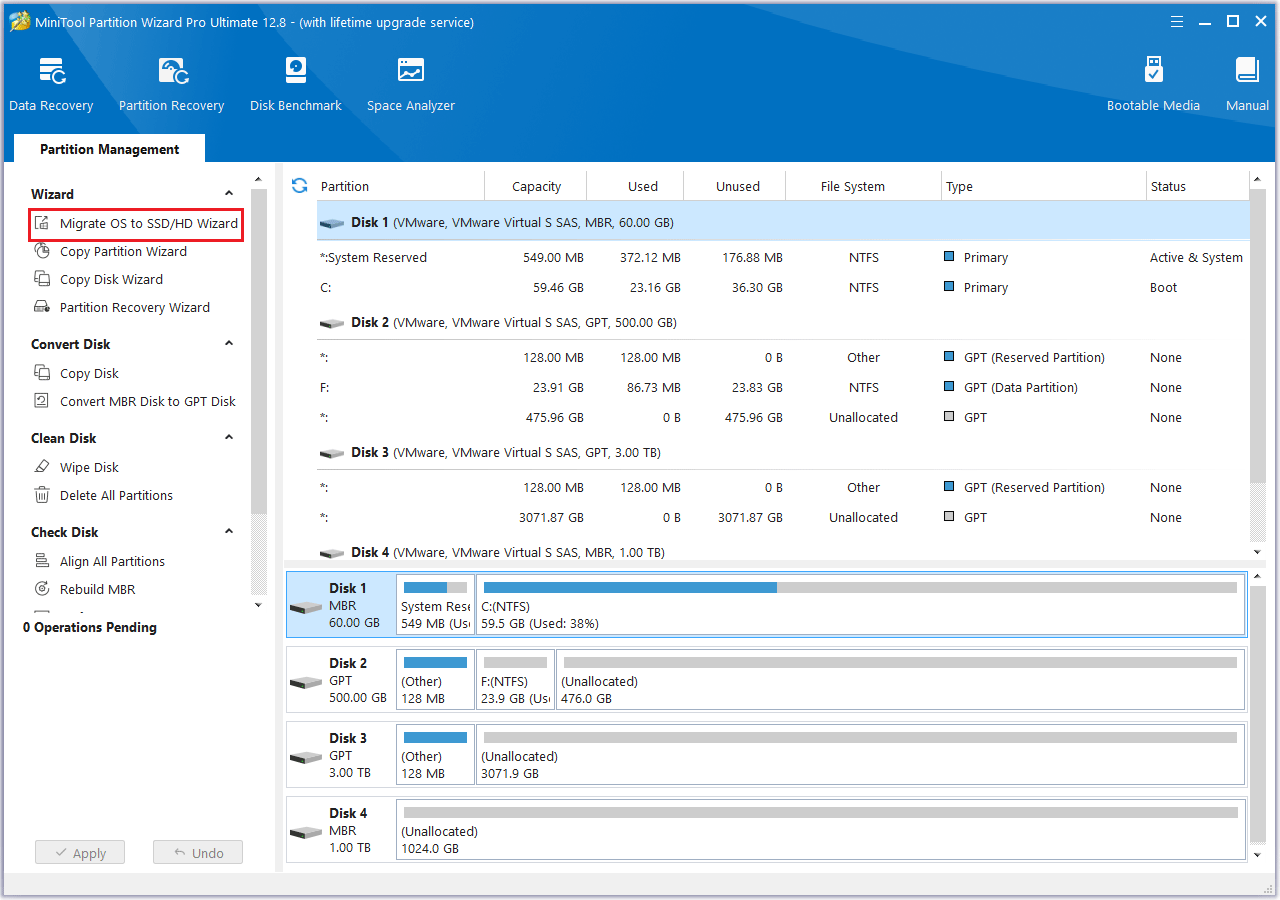
Step 1: Connect the new SSD to your computer, then open MiniTool Partition Wizard to access its main interface. Click on the Migrate OS to SSD/HD Wizard feature from the left action panel.
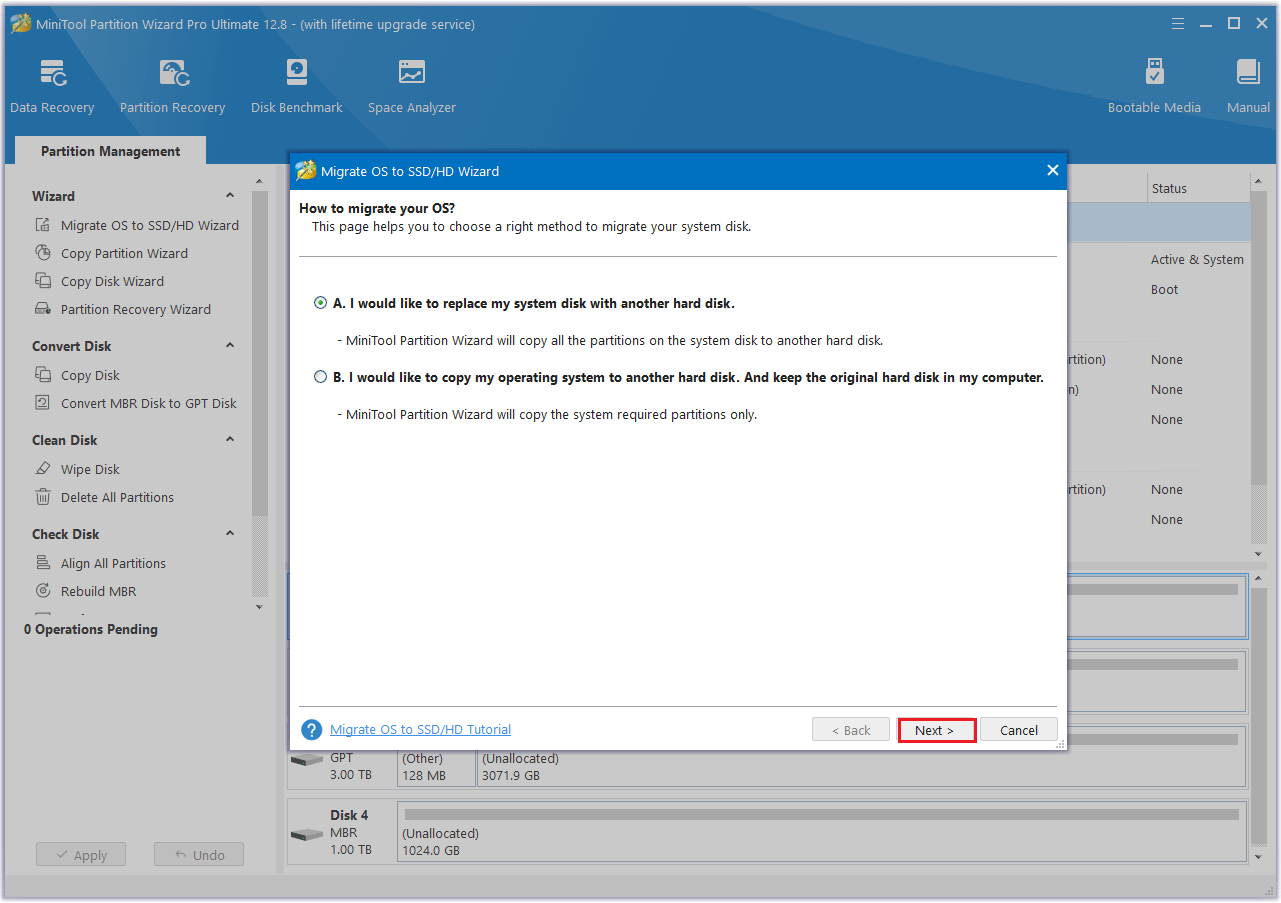
Step 2: In the pop-up window, select the option that suits your needs for migrating the OS, then click Next.
Step 3: Choose the new SSD as the destination disk, then click Next. A warning message will appear, read it and click Yes to proceed.
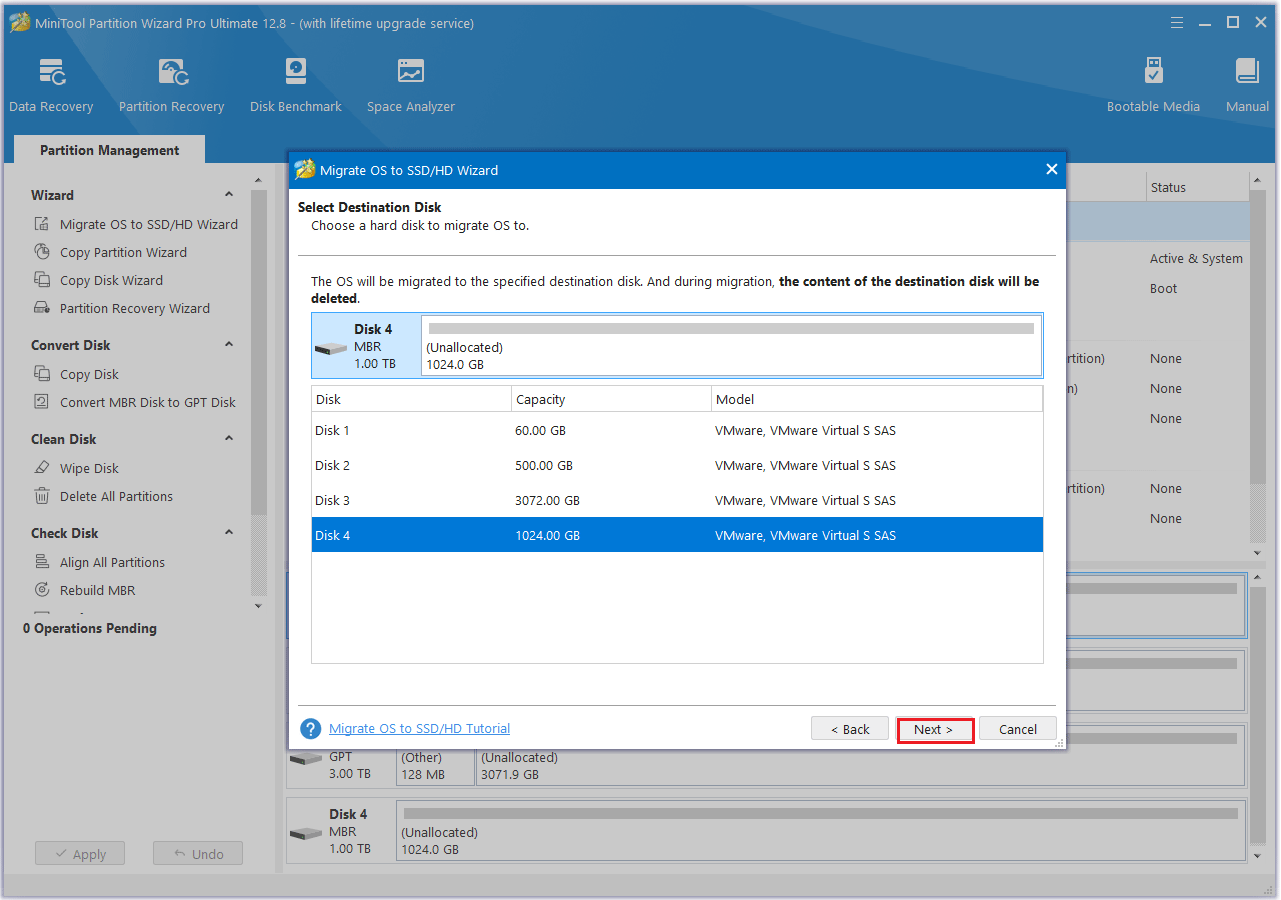
Step 4: After that, choose the desired copy options and click Next.
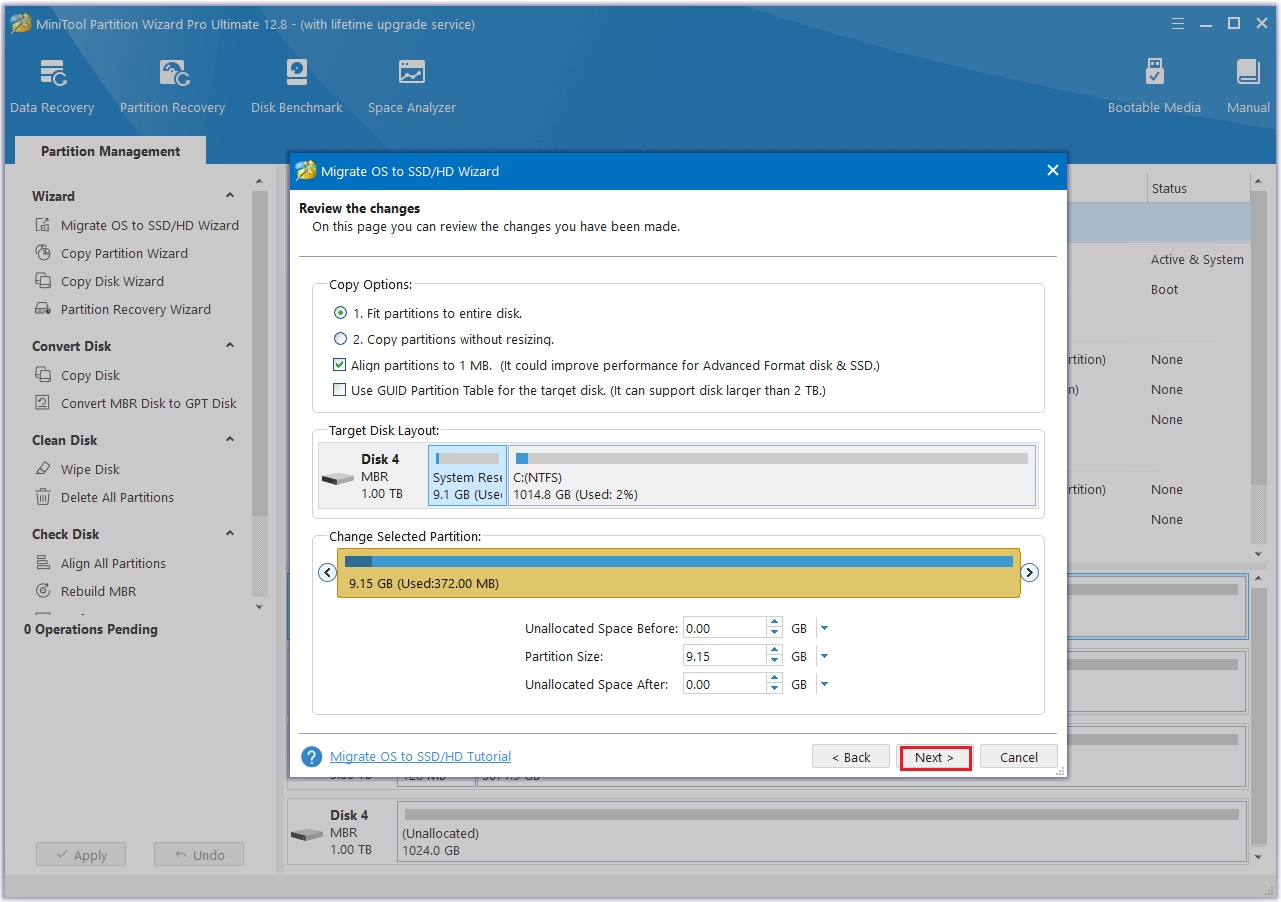
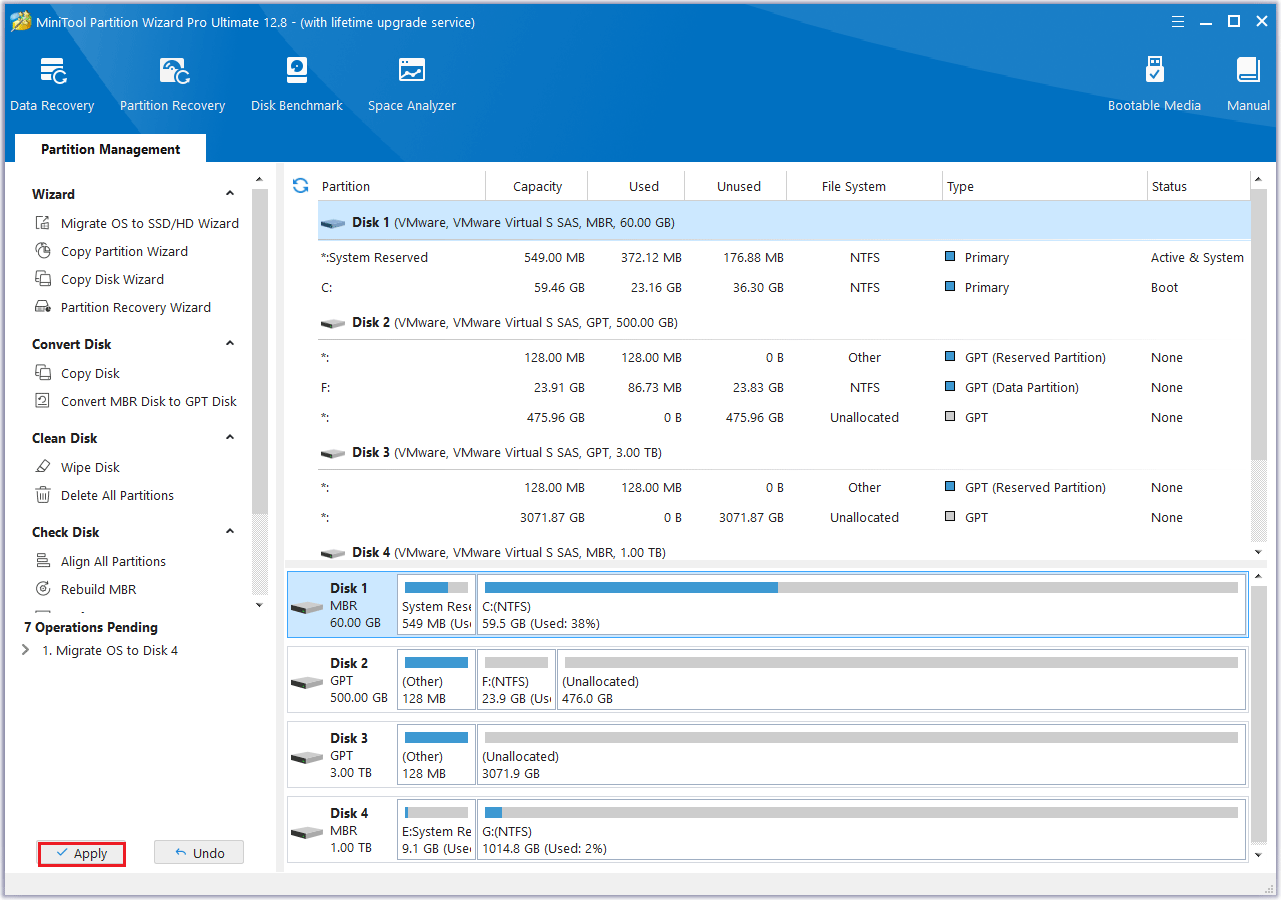
Step 5: Finally, click Finish > Apply to complete the pending operation.
Part 4: New Galaxy Book 2 Pro SSD Replacement
Well, after migrating data from the old SSD to the new SSD, you need to replace the old hard drive with the cloned SSD on the Galaxy Book Pro laptop, you can refer to the steps below.
Step 1: Disconnect the power cable of the laptop and turn off the Galaxy Book Pro laptop.
Step 2: Turn the bottom of the laptop upwards and use a screwdriver to remove all the screws on the back of the laptop.
Step 3: Use a crowbar to remove the bottom cover of the computer, if possible, wear an anti-static wrist strap while doing this to ensure the safety of the device.
Step 4: Use a screwdriver to remove the screws that are fixed on the SSD, then tilt the computer and carefully remove the SSD.
Step 5: Install the new SSD and then secure it.
Step 6: Now you need to put the cover of the SSD back in place and install all the screws as they were.
Part 5: Set the New SSD as the Boot Drive on the Galaxy Book Pro
After installing a new SSD on your computer, do you need to set up the new SSD as a boot drive? If so, refer to the following guide:
Step 1: If your computer is on, you’ll need to turn it off first.
Step 2: Click the Power button and then immediately press the BIOS key (F1 or F12) to enter the firmware.
Step 3: Use the arrow keys on your keyboard to navigate to the Boot menu.
Step 4: Use the up or down arrows to select the new SSD.
Step 5: Press the “+” or “–” key to move the SSD to the top of the boot list.
Step 6: Press the F10 key to save the boot order and exit the BIOS setup.
Bottom Line
This article introduces you to the complete guide to Galaxy Book 2 Pro SSD upgrade. Whether you want a faster SSD or want to upgrade to a larger drive, MiniTool Partition Wizard can help you complete it and ensure that all your data is seamlessly transferred during the operation. I hope this article will be of great help to you.
If you have any questions or suggestions while using the MiniTool Partition Wizard, you can contact us via [email protected] to get a quick reply.
Galaxy Book 2 Pro SSD Upgrade FAQ
Step 1: Launch MiniTool Partition Wizard to get into the main interface. Right-click the disk you want to wipe then select Wipe Disk.
Step 2: Then select a wipe method and click OK to continue.
Step 3: After the process is complete, the selected disk will appear as unallocated. Click Apply to execute the operation.

![How Can ASUS ROG Zephyrus G14 Replace Hard Drive [Full Guide]](https://images.minitool.com/partitionwizard.com/images/uploads/2024/10/asus-rog-zephyrus-g14-ssd-upgrade-thumbnail.png)

User Comments :