Wondering if you can upgrade the SSD on your Fujitsu laptop and how to do it? Why do you need to do this? If these questions are on your mind, you've come to the right place. In this post, Partition Magic provides the answers and offers step-by-step guidance to help you do the Fujitsu SSD upgrade.
Fujitsu is a world-renowned technology company headquartered in Japan, founded in 1935. Its business covers multiple fields, including information technology services, computer hardware, etc.
Fujitsu has laptops and desktops. Its laptops are usually durable and stable in performance. The Lifebook series is one of its popular notebook products.
After using your Fujitsu laptop for a while, the hard drive may run out of space, stop working, or run slowly. Then, it is necessary to do the Fujitsu SSD replacement. Now, let’s keep reading to know the detailed steps.
Why Do You Need to Do the Fujitsu SSD Upgrade?
As we all know, SSD has better durability, faster read and write speed, and better security than HDD. When you use SSD as a system disk, it can improve PC performance. Now, more and more people want to do the HDD to SSD upgrade on Fujitsu laptop.
There are several reasons to do the Fujitsu laptop SSD upgrade:
- Faster boot speed: After upgrading to SSD, the boot time of the computer will be greatly shortened.
- Increase storage capacity: As the computer is used for a long time, the original hard disk space may become smaller and smaller. SSD upgrades can provide you with more storage space.
- Reduce the risk of mechanical failure: Traditional mechanical hard disks have many moving parts and are prone to failure, while SSDs have no moving parts and are more durable.
- Improve battery life: SSDs have relatively low power consumption. Using SSD instead of HDD can extend the battery life of laptops.
- Protect data security: Many SSDs provide hardware encryption support to help improve data security.
- Limited budget: You don’t have enough money to buy a brand-new computer.
Preparation Before Upgrading Fujitsu SSD
Before upgrading your Fujitsu SSD, you need to make some preparations, such as backing up your computer data in advance, choosing a suitable SSD, and checking hardware compatibility.
- Back up data: When upgrading your SSD, all existing data will be cleared. To prevent data loss, you need to back up important data before upgrading.
- Choose a suitable SSD: You need to check whether the interface type (SATA, M.2, PCIe, etc.) and size (e.g. M.2 2280, 2.5 inches, etc.) of the SSD match your computer. And you can choose some big brands of SSDs, such as Samsung, Intel, Western Digital (WD), etc.
- Disassembly tools: You need to prepare some tools to remove the back cover of the laptop. For example, screwdrivers, pry bars, suction cups, etc.
- Check the operating system: You need to check whether the operating system needs to update the hardware drivers, especially for newly installed SSDs, some drivers may need to be updated to ensure optimal performance.
Fujitsu SSD Upgrade
How to do the Fujitsu SSD replacement? Here is a step-by-step guide.
There are two ways to upgrade the Fujitsu laptop SSD. One is to directly replace the old SSD with a new one. This method requires you to reinstall the operating system, applications, etc. The second is to use the data cloning method to migrate the data of the old SSD to the new SSD, and then replace the old SSD with the new one.
This article will introduce you to the second method in detail, which uses a third-party tool – MiniTool Partition Wizard.
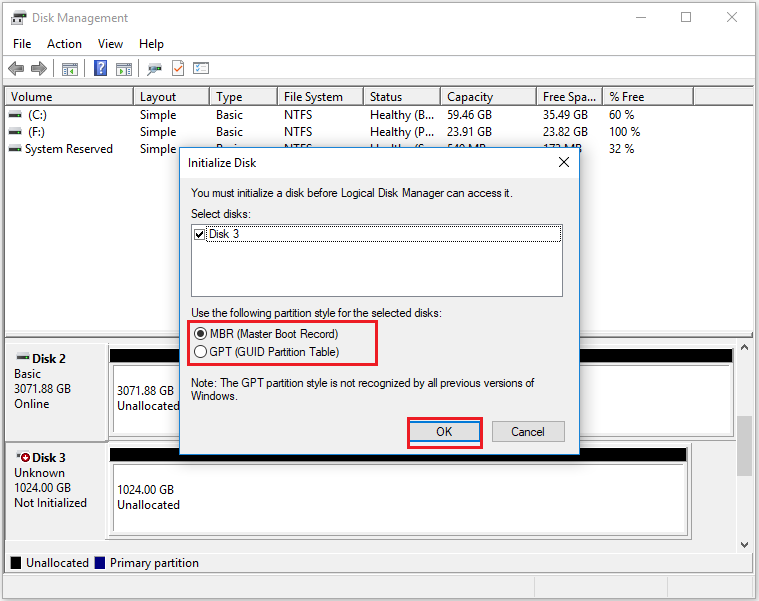
Part 1: Initialize a New SSD
For a new SSD, you need to initialize it to MBR or GPT before you can use it. Here are the steps:
Step 1: Connect the new SSD to your Fujitsu laptop.
Step 2: Press the Win + R keys together to open the Run box. Then, input diskmgmt.msc and click OK.
Step 3: Right-click the new SSD disk and select Initialize Disk.
Step 4: In the pop-up window, set the partition style the same as the source SSD disk (MBR or GPT) and click on OK to confirm.
Part 2: Clone Old SSD to New SSD
I suggest using MiniTool Partition Wizard to clone your entire SSD to the new one. It’s a reliable and professional disk cloning software.
It provides the Migrate OS to SSD/HD feature and the Clone Disk feature to help you migrate all the data.
In addition, this multifunctional tool can also help you rebuild MBR, change cluster size, convert MBR to GPT, create/resize/delete/extend partitions, format FAT32, wipe disk, recover data from external hard drive, and more.
MiniTool Partition Wizard DemoClick to Download100%Clean & Safe
Here are two ways to help you clone the entire SSD:
Use Migrate OS to SSD/HD Feature
Step 1: Launch MiniTool Partition Wizard to its main interface. Click on the Migrate OS to SSD/HD Wizard feature from the left action panel.
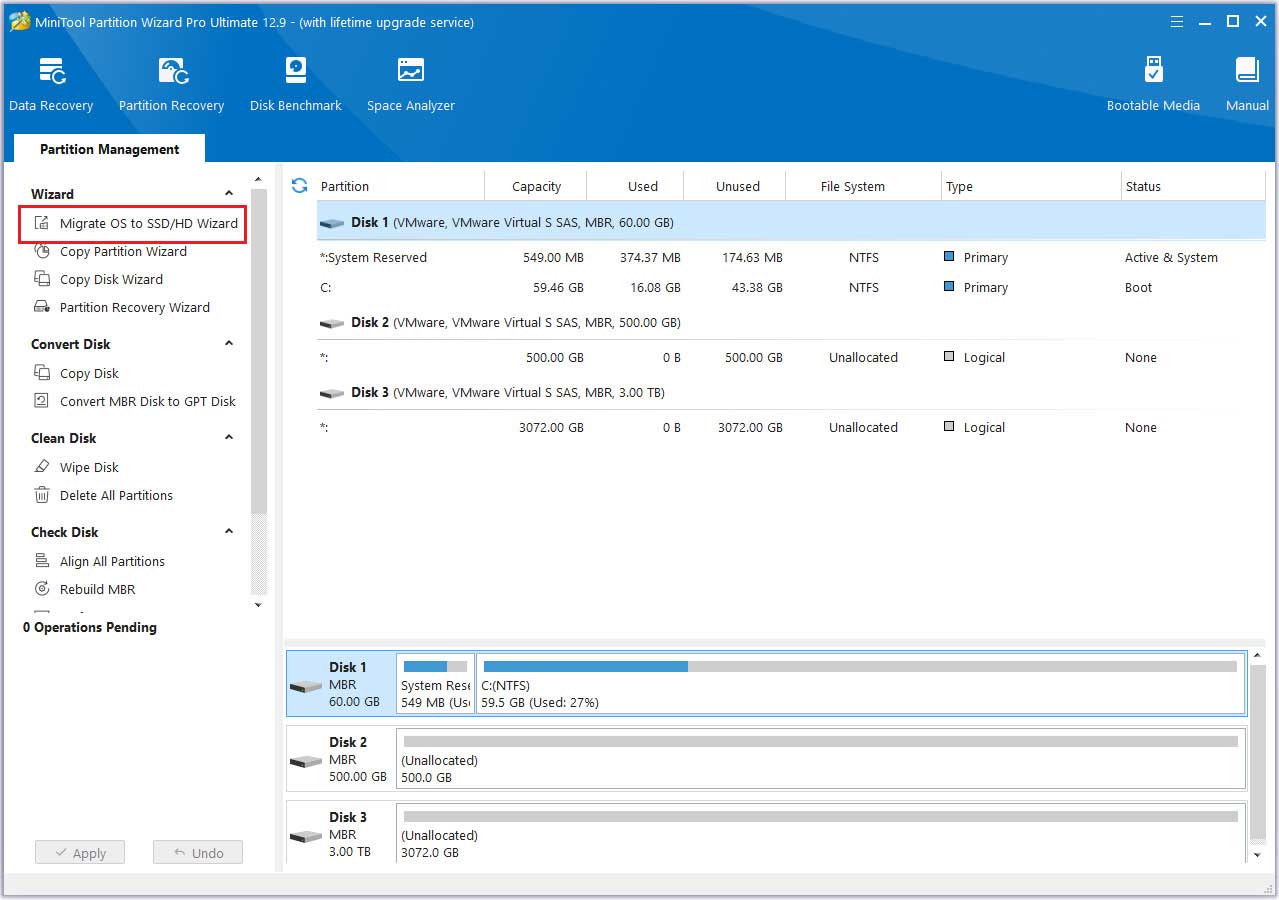
Step 2: In the pop-up window, choose the option that best fits your OS migration needs, then click Next.

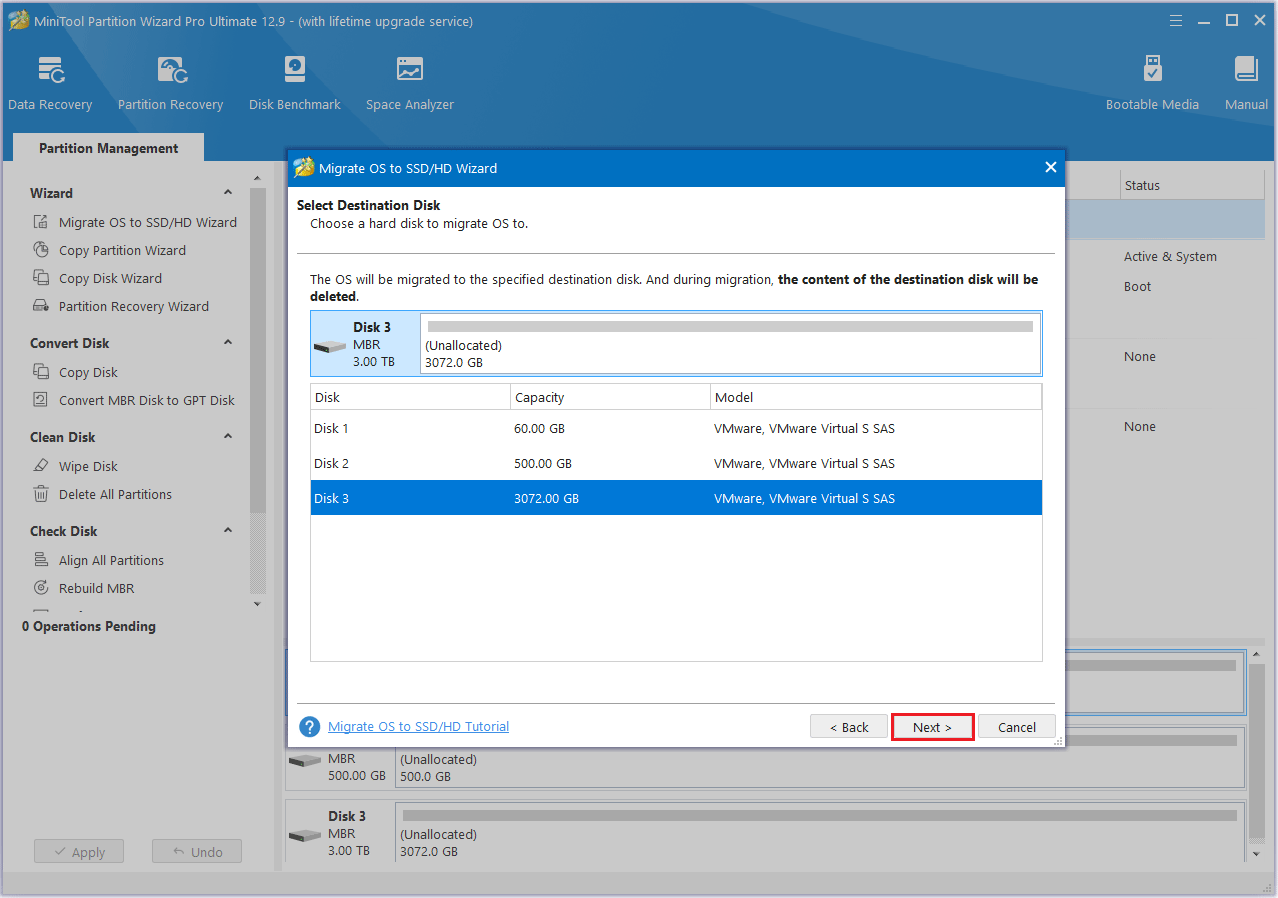
Step 3: Select the new SSD as the destination disk, then click Next. A warning message will pop up; review it and click Yes to continue.
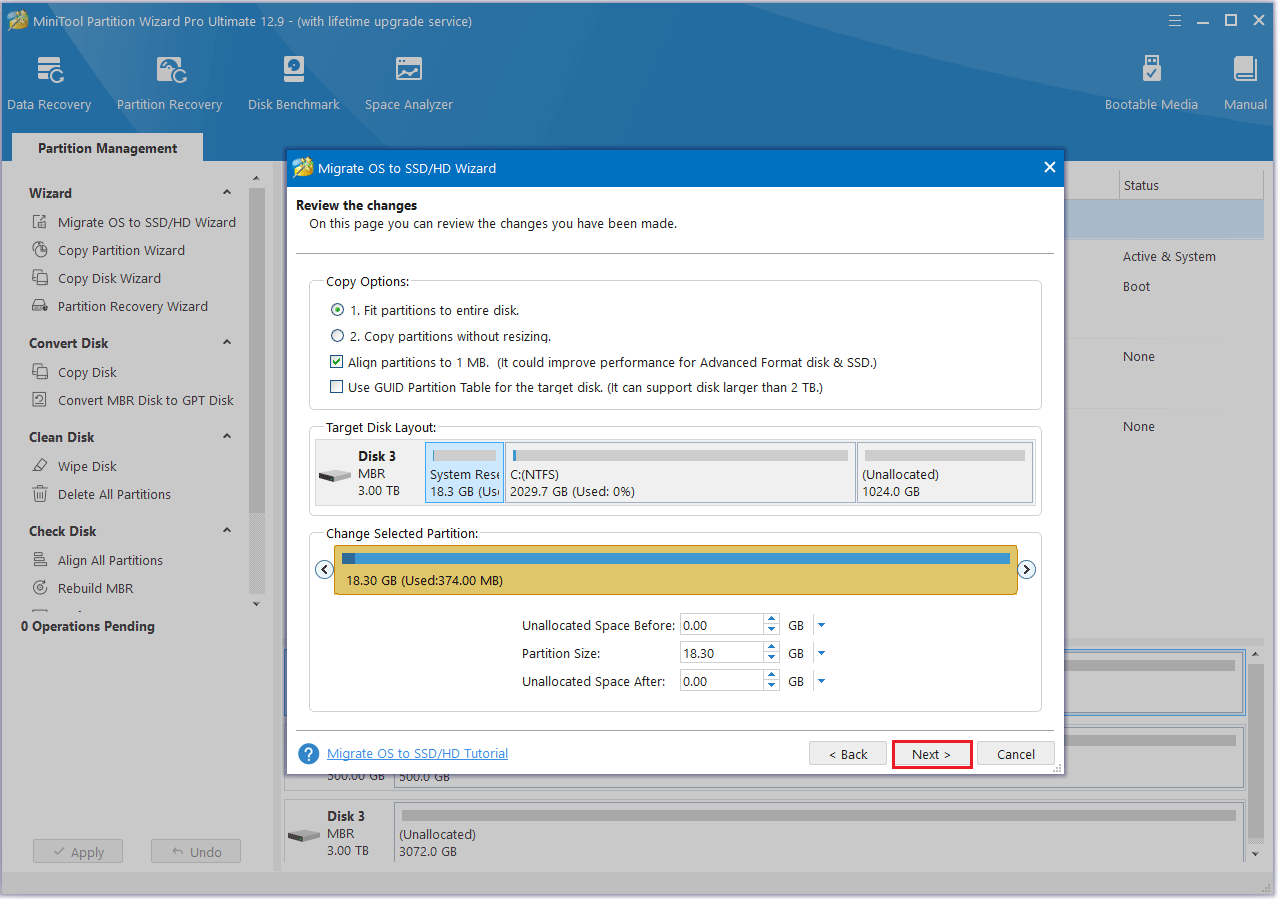
Step 4: Modify the disk layout in the Review the Changes window and then click Next.
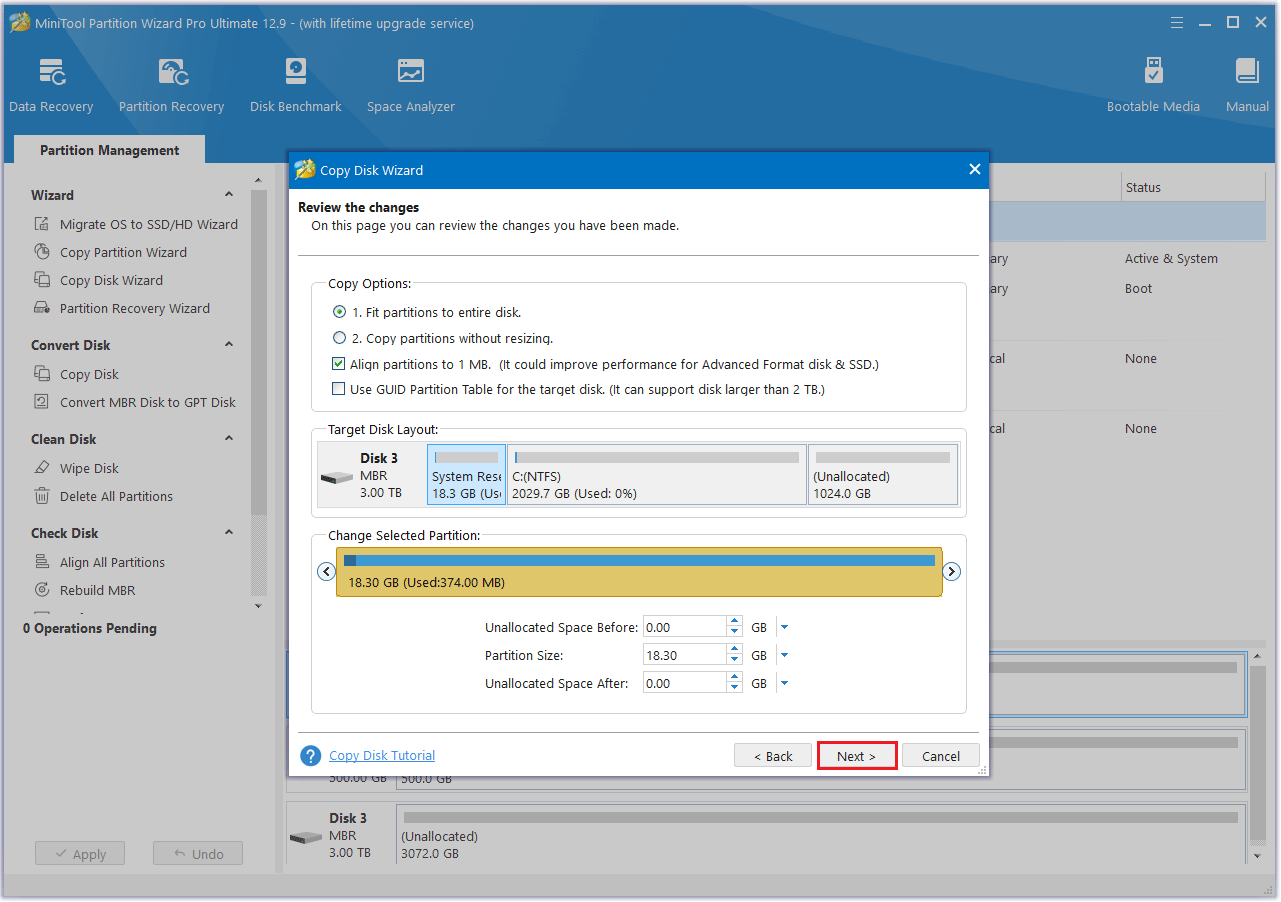
- Fit partitions to entire disk: The partitions on the source disk will be extended by an equal proportion to fill the entire new SSD.
- Copy partitions without resizing: All the partitions on the source disk are copied into the new SSD without changes in size or location.
- Align partitions to 1 MB: The Align partitions to 1 MB option will apply 4K alignment on the SSD.
- Use GUID partition table for the target disk: The Use GUID partition table for the target disk option will apply GPT on the SSD, but it only appears when the source disk is an MBR disk.
- Change Selected Partition: You can resize or move the partition according to your needs.
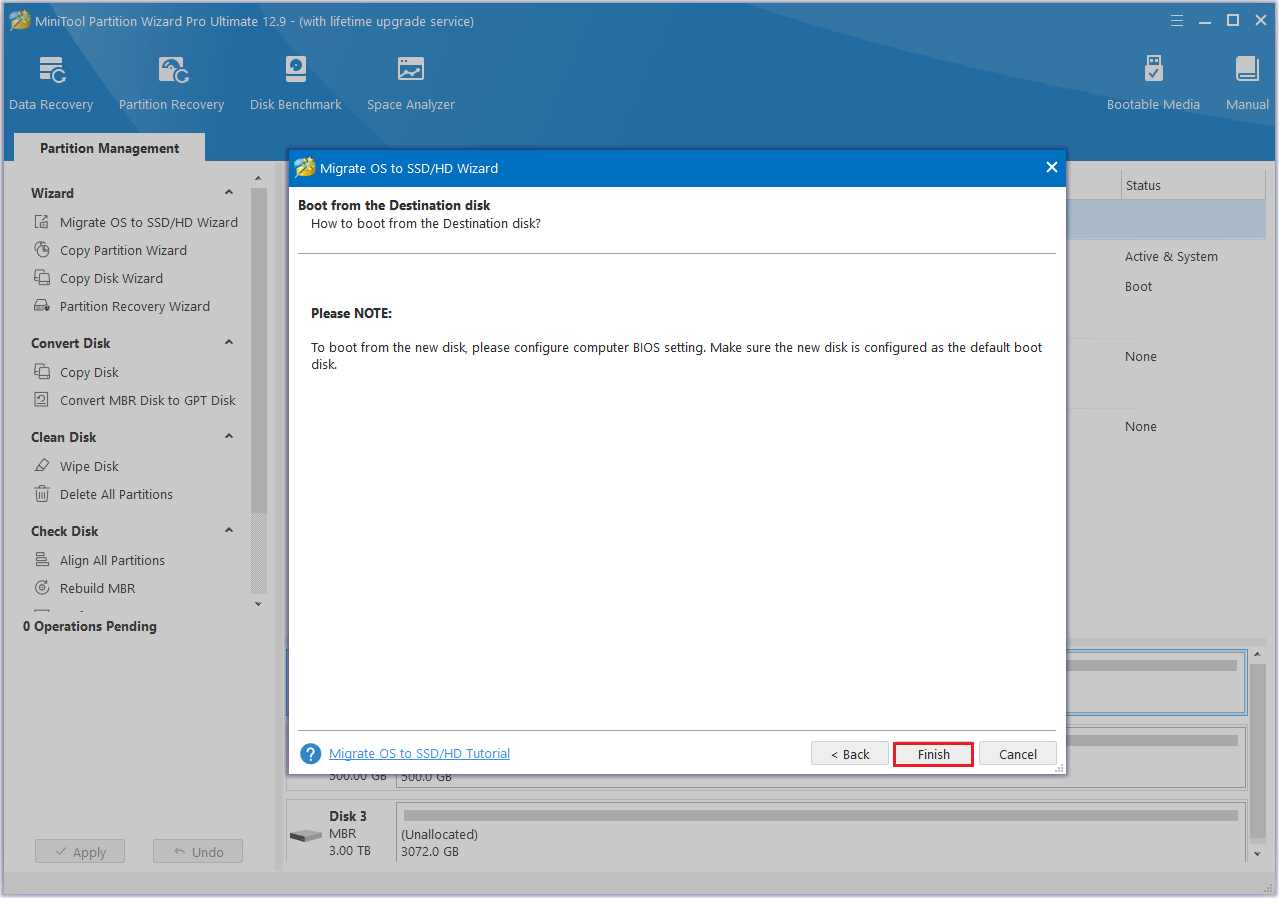
Step 5: A warning message “How to boot from the Destination disk?” will pop up, and click Finish to continue.
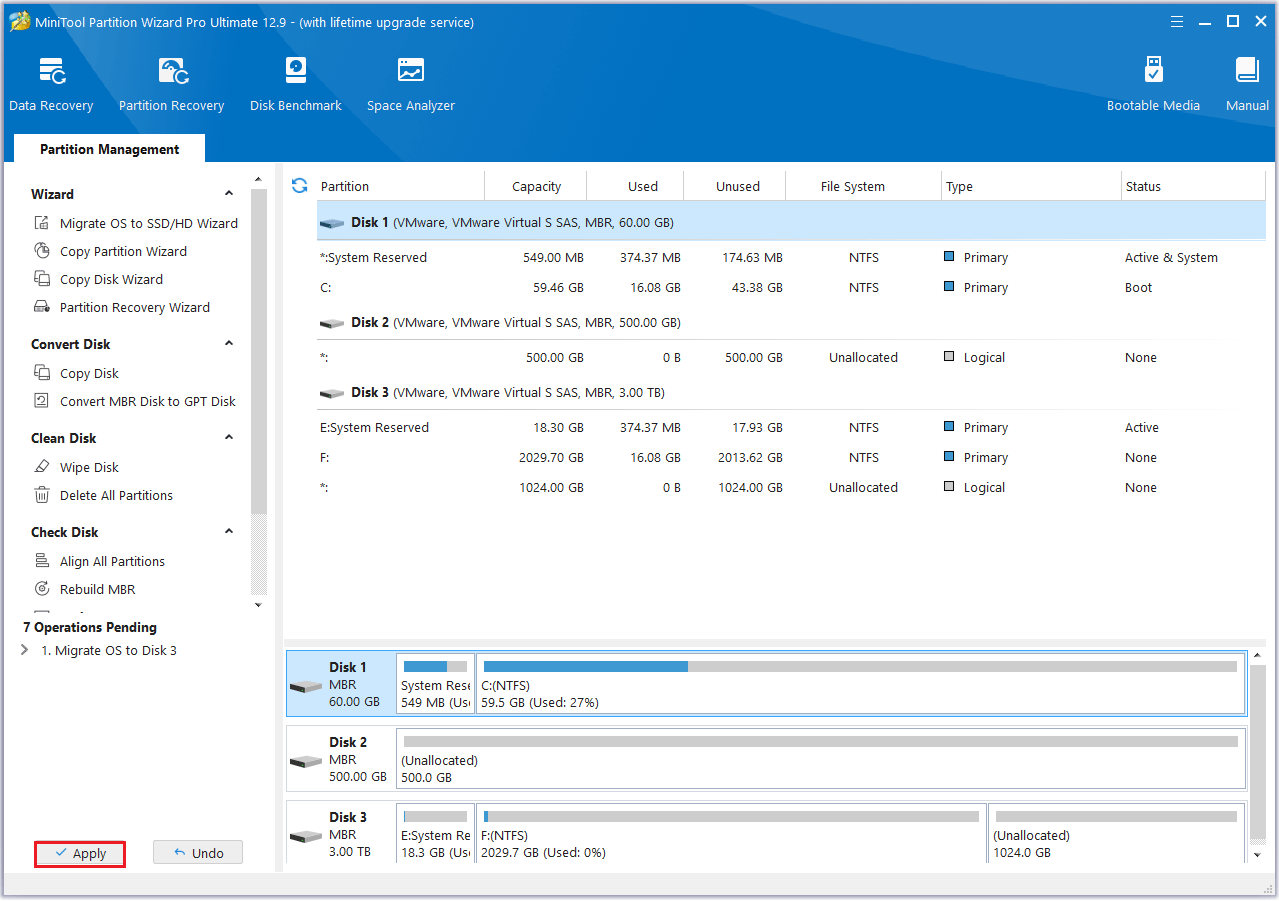
Step 6: Next, click the Apply button to carry out the pending operation.
Use Copy Disk Feature
Step 1: Launch MiniTool Partition Wizard to its interface. Right-click the disk and then select Copy from the menu. Also, you can click the Copy Disk feature from the left action panel.
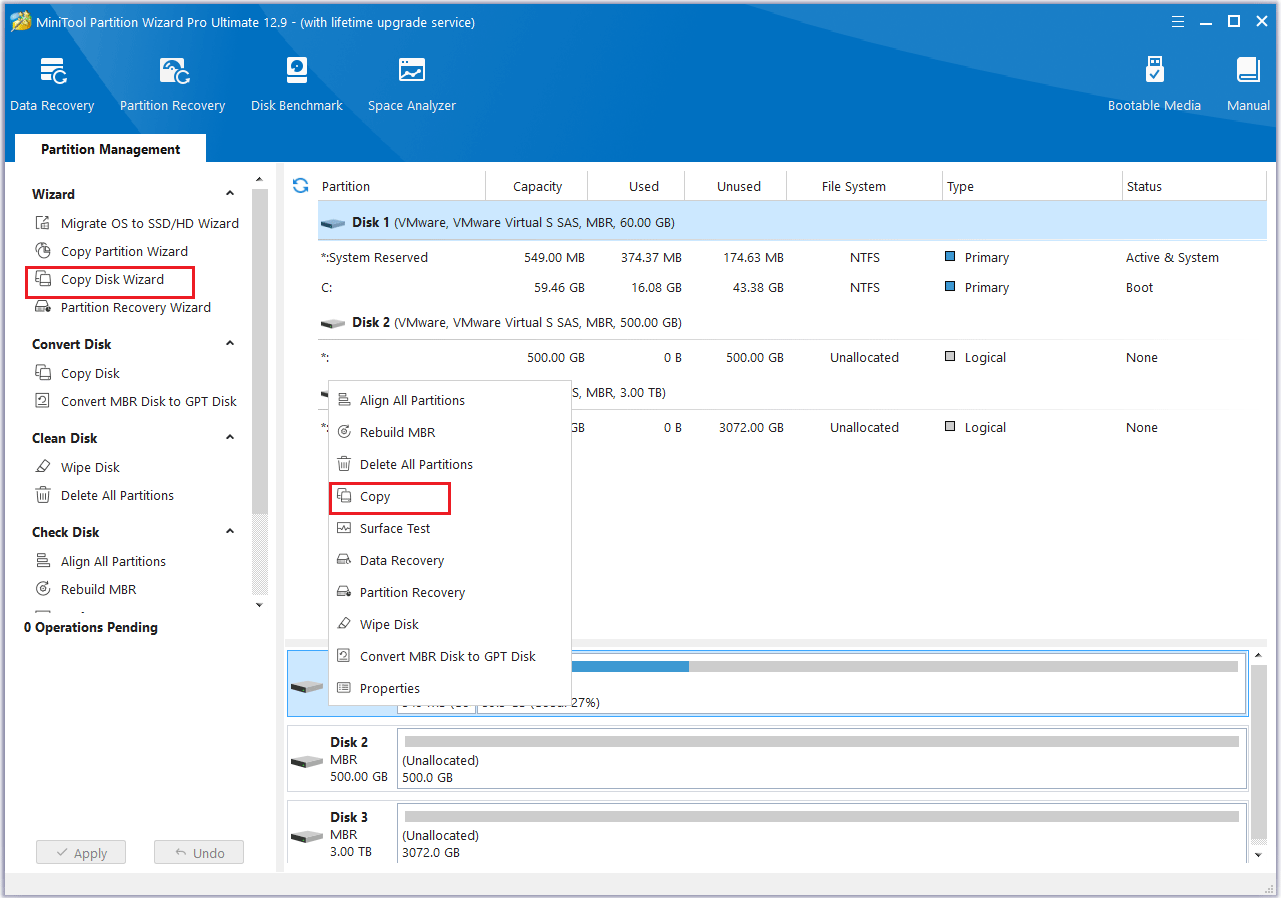
Step 2: In the pop-up window, select the new SSD as the target disk, then click Next.
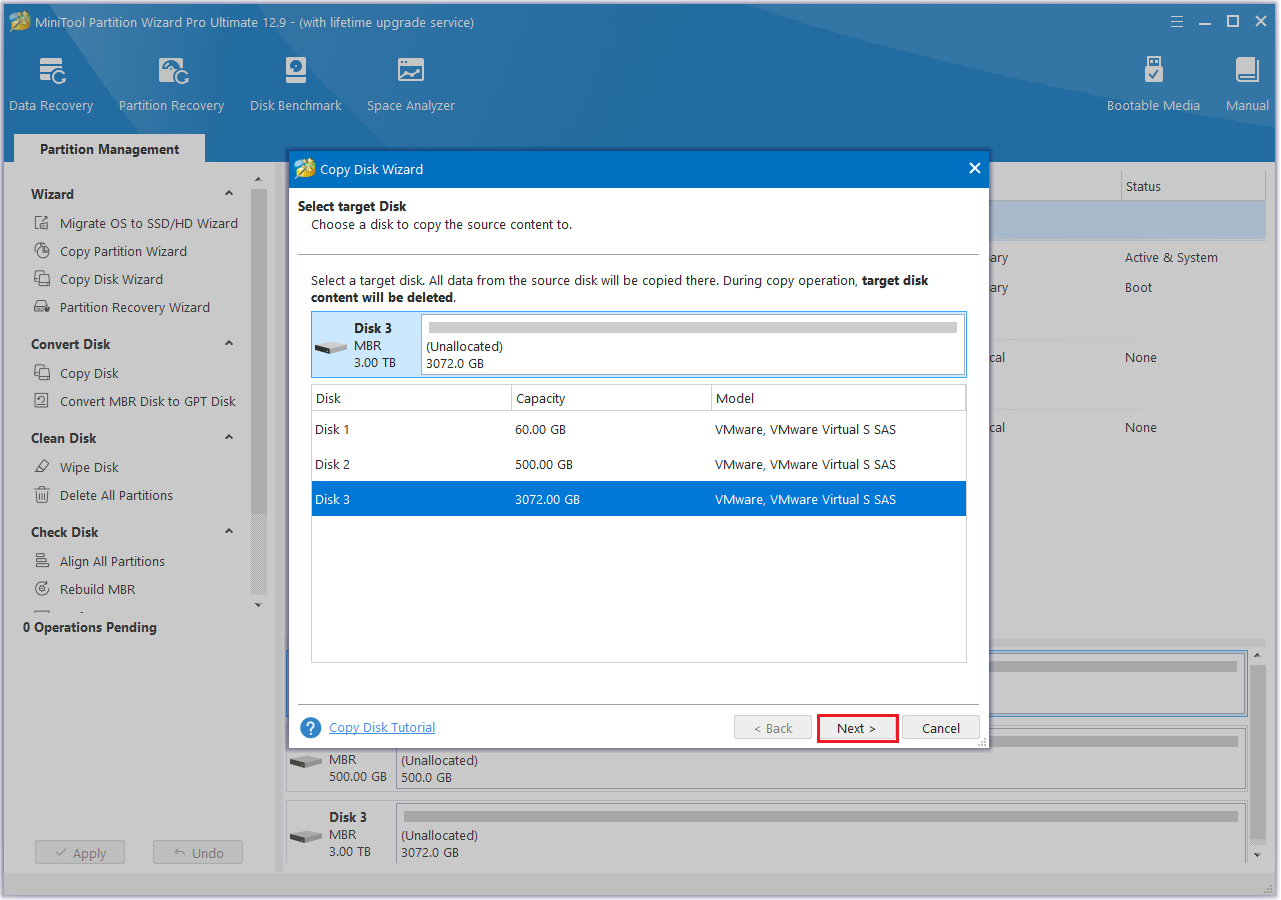
Step 3: Set the copy options and change the disk layout according to your preferences. Then, click Next.
Step 4: Take a moment to review the note for instructions on booting from the target disk, then click Finish to go back to the main interface.
Step 5: Click the Apply button to start the pending operation and wait for the cloning process to complete.

Part 3: Replace Your Old SSD
Once the disk data migration is complete, you can now replace the old SSD with the new one. Here are the steps:
Step 1: Turn off the Fujitsu computer and unplug all power, USB external devices. Turn the computer bottom up.
Step 2: Use a screwdriver to remove the screws, and then use a crowbar to remove the bottom cover. If possible, wear an anti-static wrist strap while doing this to ensure the safety of the device.
Step 3: Use a screwdriver to remove the screws that secure the SSD, and then use tweezers to carefully pull the SSD out of the connector.
Step 4: Place the new SSD into the slot, then put the SSD cover back in place and install all screws and parts as they were.
New SSD Not Detected/Recognized on Windows
After installing a new SSD on my Fujitsu computer, what should I do if I encounter a situation where Windows cannot detect the new SSD? How can you solve this problem? Don’t worry about it. Below, I will list the possible causes and corresponding methods.
Cause 1. Problem with SSD connection
If your SSD connection is problematic, you can easily run into the SSD not being detected problem. In this case, you need to check if all the cable connections are working properly.
Cause 2: Outdated drivers
Outdated SSD drivers can also cause the SSD to not be detected in Windows. Then you need to open a browser on your computer, download the latest version of the driver for the brand of SSD you purchased, and then follow the on-screen instructions to install the latest version of the driver.
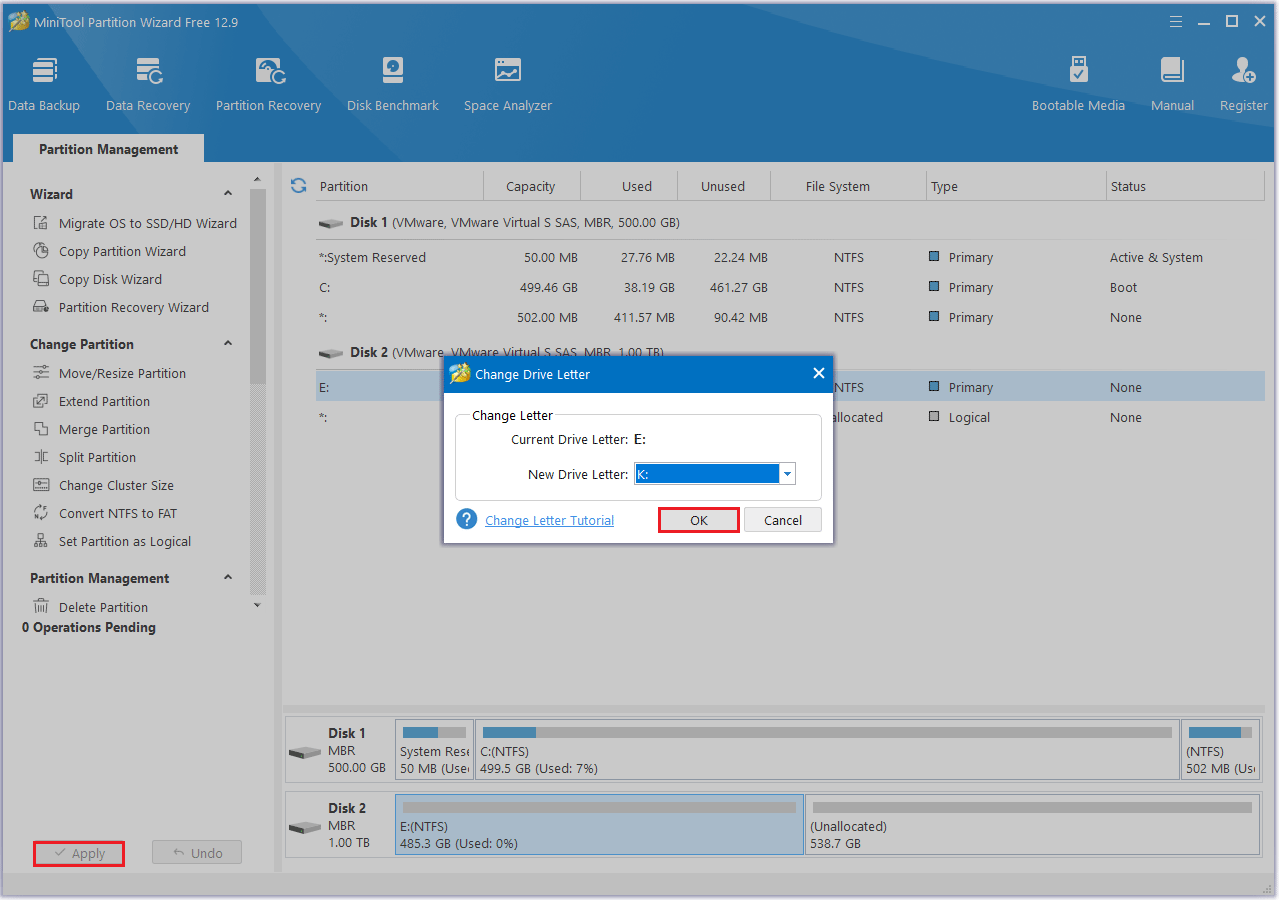
Cause 3: Missing drive letter
SSD not showing up in Windows can also be caused by a conflicting or missing drive letter. In this case, you can try to assign or change the letter of the SSD partition to fix this error.
You can use MiniTool Partition Wizard to do this.
- Open the MiniTool Partition Wizard to its main interface and find the new SSD.
- Select one of the partitions on the new SSD and right-click that partition to choose Change Letter.
- In the next window, choose a new drive letter and click OK.
- Once done, click the Apply button to apply the changes.
Bonus Tip: What to Do with the Old SSD
The old SSD you replaced still has the previous data on it, which will affect your resale or gift to others. So, what should you do? You can use MiniTool Partition Wizard to erase its data. Here are the detailed steps:
MiniTool Partition Wizard FreeClick to Download100%Clean & Safe
Step 1: Right-click on the disk you wish to wipe and choose Wipe Disk, or select the target disk and click Wipe Disk from the left action panel.
Step 2: A pop-up window will appear as shown below. Select a method to wipe, then click the OK button to move on to the next step.

Step 3: After the process is complete, you will be returned to the main interface, where you can see that the target Disk 2 is labeled as “Unallocated” and does not have a partition letter. To apply the changes, you must click the Apply button.
Bottom Line
This article gives you a detailed introduction to why you need to do the Fujitsu laptop SSD upgrade and how to upgrade it. If you need it, please refer to the steps in this article.
If you have any questions or suggestions while using MiniTool Partition Wizard, you can contact us via [email protected] to get a quick reply.
About The Author

Position: Columnist
Cecilia is a new member of MiniTool. She works as an English editor on the MiniTool team. She likes to learn articles about computers and is passionate about partition management and Windows operating systems. She is committed to allowing readers to use simple, efficient, and fast methods to solve the computer problems they encounter. To provide more professional solutions, she will continue to learn and master computer knowledge.
User Comments :