What to do when you receive the error message “file record segment is unreadable”. What causes this problem? In Partition Magic, you will learn about the causes of file record segment unreadable and its solutions.
Have you ever encountered the error “file record segment is unreadable” when you check SSD, Western Digital or other disks using the CHKDSK command line? If so, don’t worry. The following content will show you several ways to solve it.
Before trying the following methods, let’s understand what a file record segment is. Each file on an NTFS volume is represented by a record in the Master File Table (MFT). The total number of File Record Segments (FRS) depends on the number of files stored on the NTFS partition, which in turn determines how many File Record Segments there are in the MFT.
Reason Why the File Record Segment Is Unreadable
The following are some possible reasons why a file record segment is unreadable:
- Bad sectors on the hard drive: Bad sectors can cause CHKDSK segment unreadable error when performing a CHKDSK scan.
- Damaged FAT (File Allocation Table) or MFT: Physical or logical damage to both will cause Windows to be unable to read the file record segments.
- Power outage on the computer: Sudden power outages can adversely affect the data stored on the hard drive and can cause the corrupt file record segment error.
- Attacked by viruses or malware: Viruses or malware can affect the integrity of the file structure, including the file record segments.
- Improper deletion of the hard drive: If the hard drive is improperly deleted, it can cause inconsistencies in the file structure, leading to related errors such as unreadable file record segments.
- Damaged partition table: Damaged partition table can cause unreadable file record segments.
How to Fix File Record Segment Is Unreadable
It is annoying when you encounter the problem of corrupt file record segment. And it is crucial to explore effective solutions. Below it will tell you four practical ways to fix this problem. You can try them one by one until the error gets solved.
Way 1: Run the CHKDSK
CHKDSK is a Windows built-in utility that scans and repairs errors on your disk. When your disk has CHKDSK segment unreadable problem, you can run chkdsk /f /r /x command to fix this problem. Follow the steps below step by step.
Step 1: Type Command Prompt in the Search box, and right-click it to choose Run as administrator to open.
Step 2: Type chkdsk e: /f/r/x (e is the drive letter of the partition having the unreadable file record segment issue) in the CMD interface and hit the Enter key.
The different parameters have different meanings:
- chkdsk /f – Find any drive errors and try to fix them.
- chkdsk /r – Locate bad sectors on the drive and try to recover any and all readable information from them.
- chkdsk /x – Force the volume you’re about to check to be dismounted.
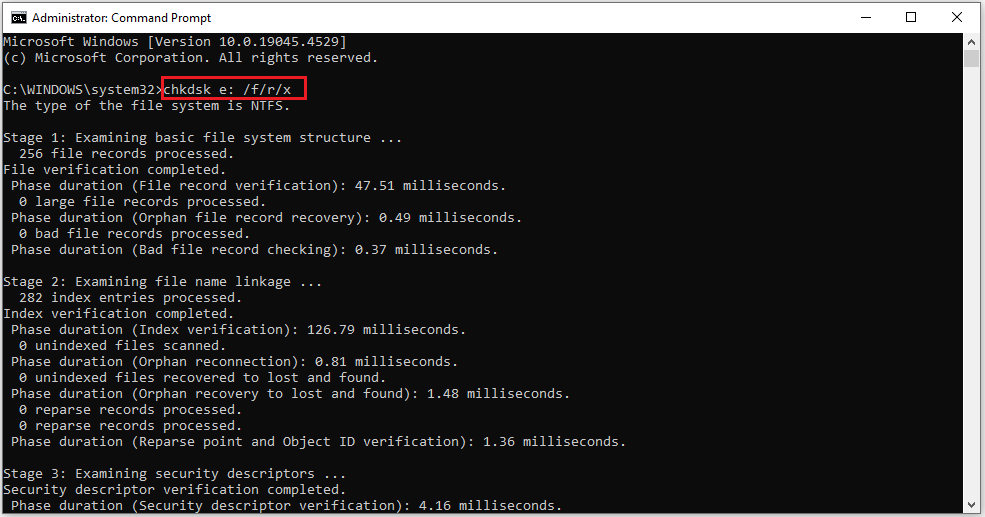
Step 3: After completing the scan and repair, the bad sectors have been masked. Close all applications and restart your computer to initiate CHKDSK.
Alternatively, you can also try to use the Surface Test and Check File System feature of MiniTool Partition Wizard to check if the hard disk has errors and repair it. You can refer to the short steps below.
MiniTool Partition Wizard FreeClick to Download100%Clean & Safe
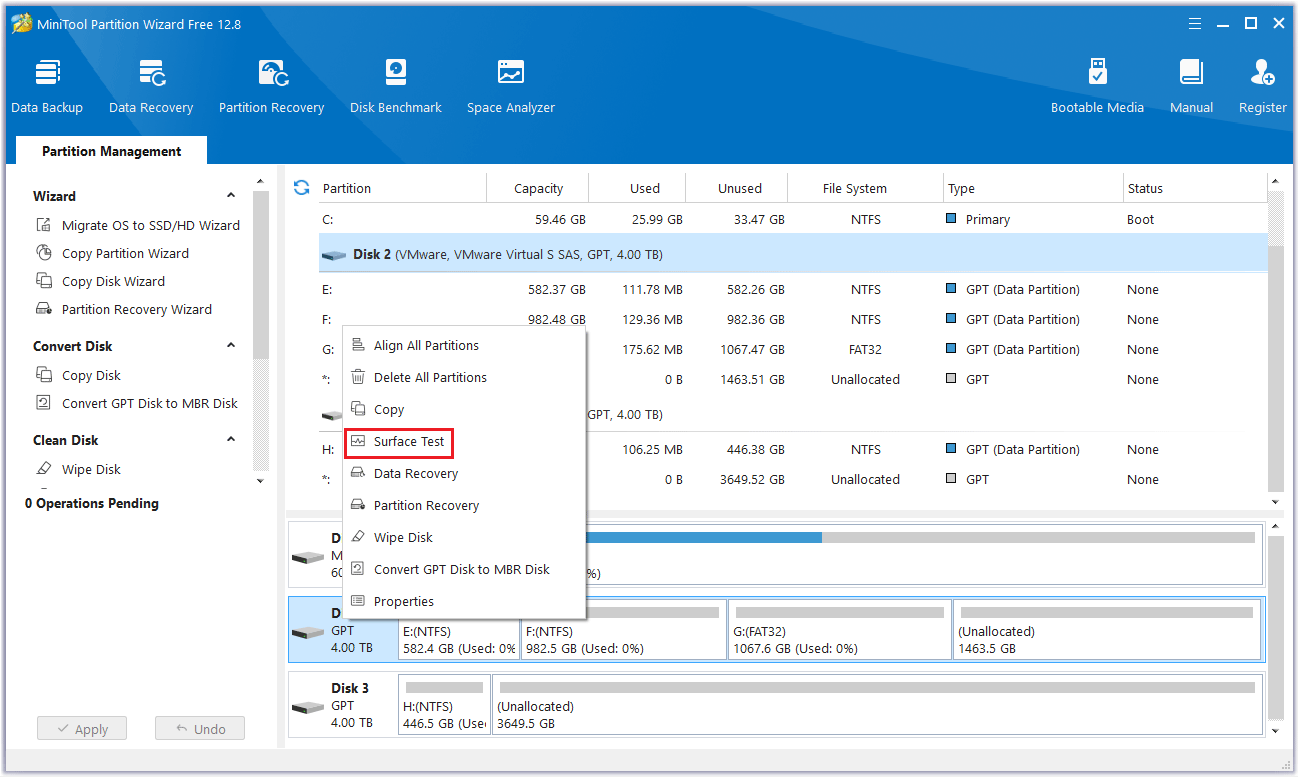
Step 1: Launch MiniTool Partition Wizard to its main interface. Right-click the target disk and select Surface Test from the drop-down menu.
Step 2: Click the Start Now button in the new window to start the disk surface test. The software will then automatically test the disk surface and display the results.
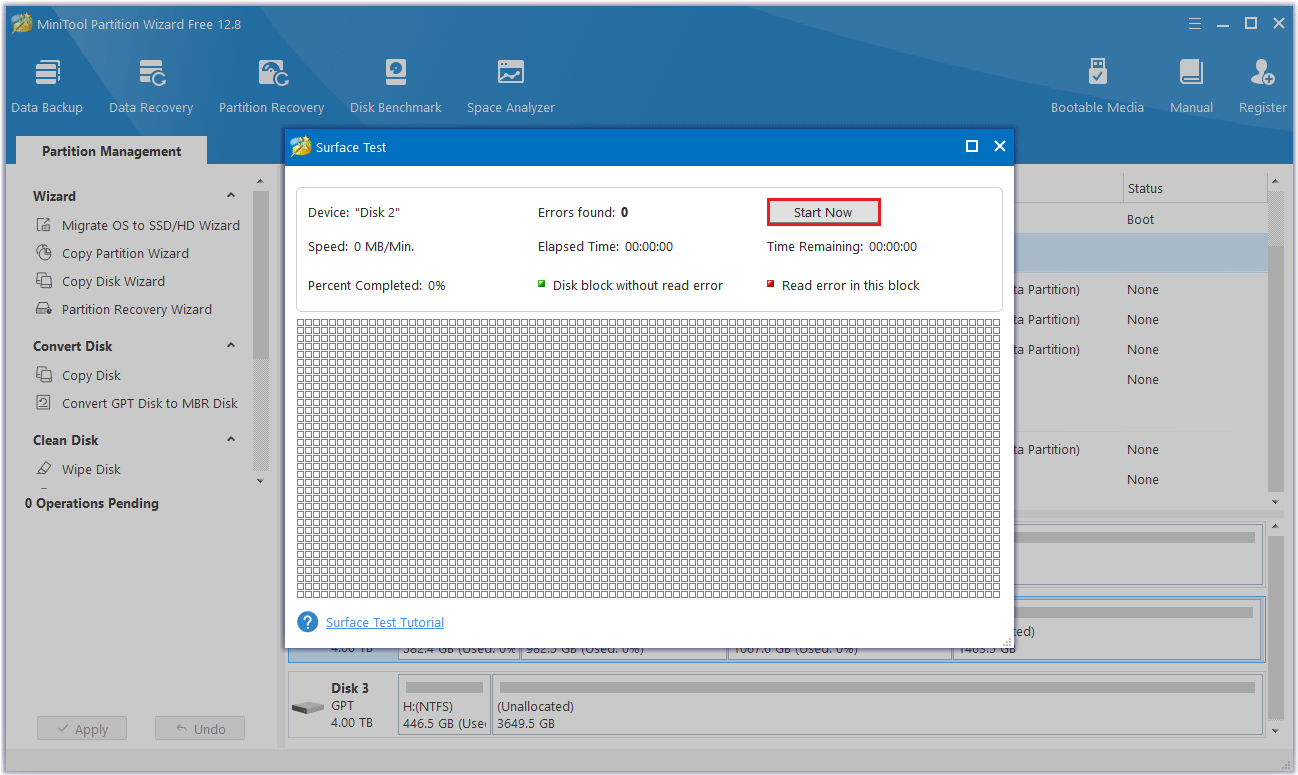
Step 3: After scanning, the disk blocks without read errors will be marked green, and the disk blocks with read errors will be marked red.
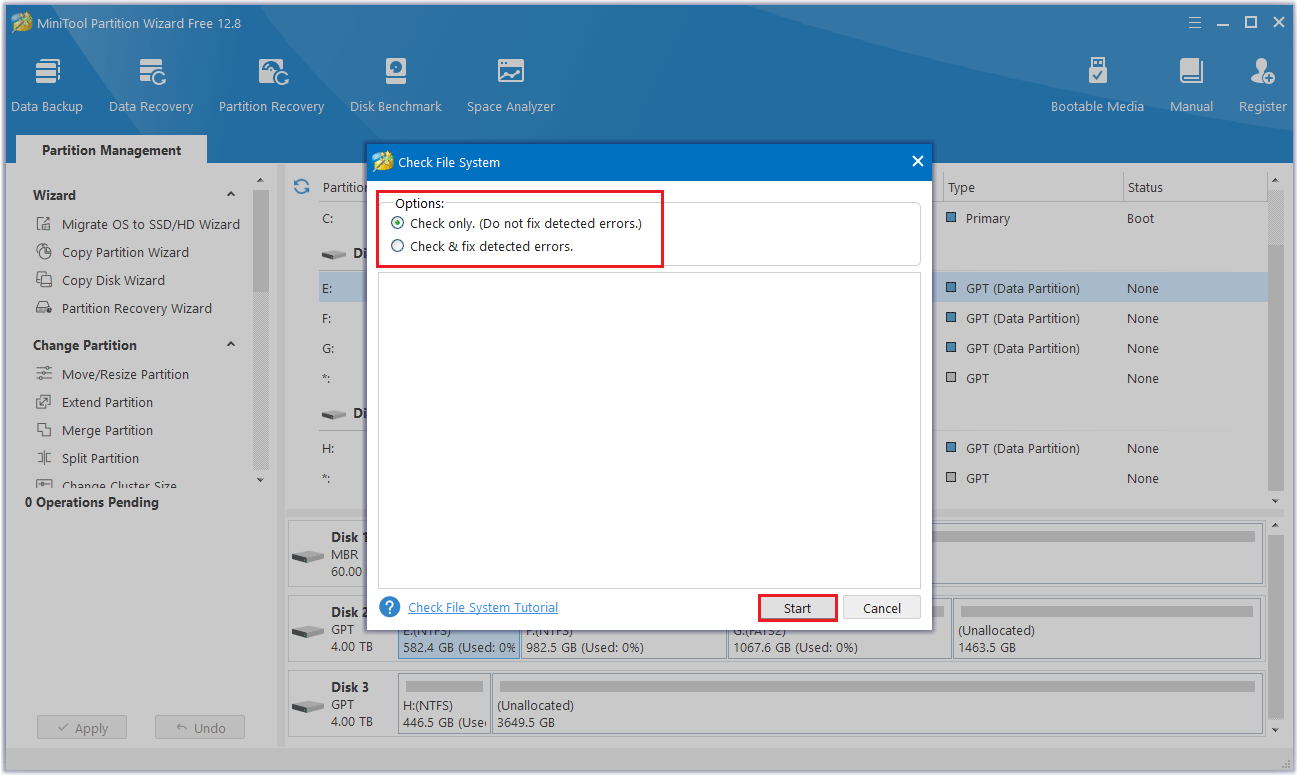
Step 4: Then select the target partition and choose Check File System from the operation panel.
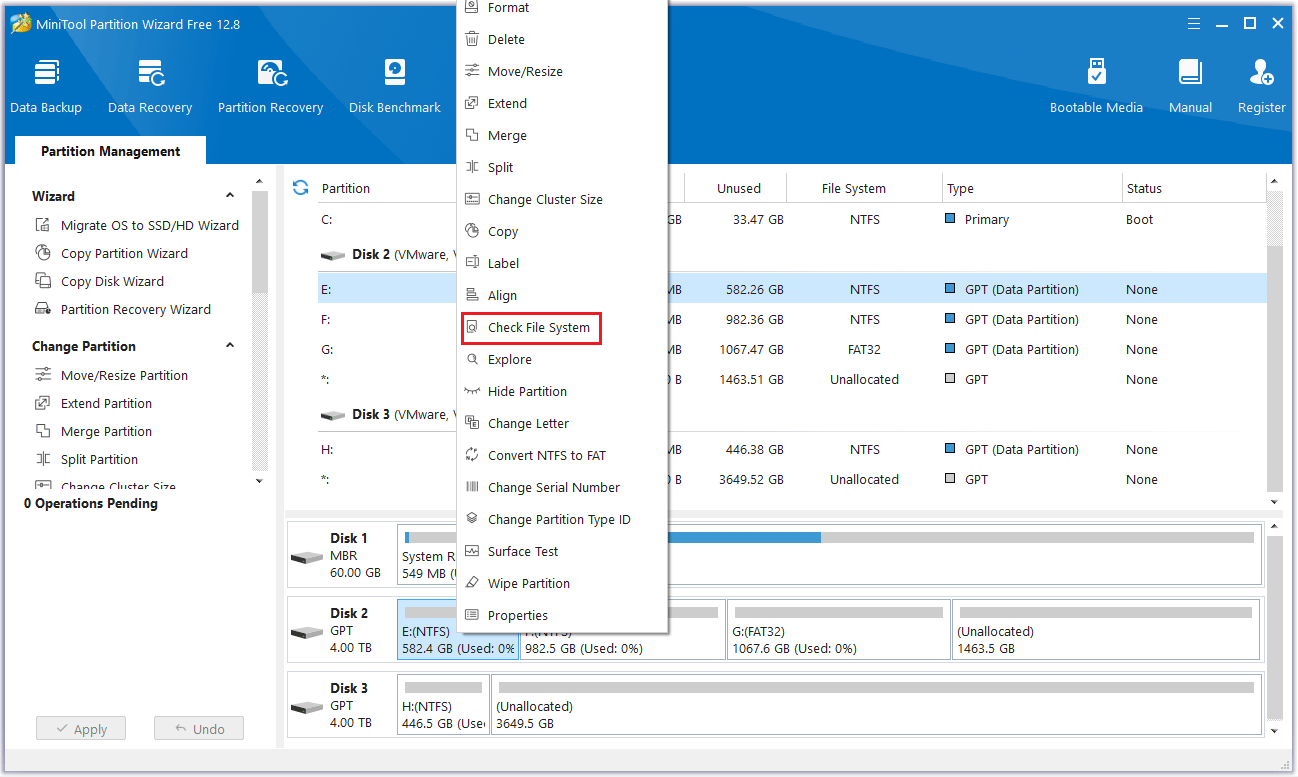
Step 5: A new window pops up and choose Check & fix detected errors. Then click the Start button and MiniTool Partition Wizard will check and repair the file system errors immediately.
Way 2: Clone the Corrupted Drive
When a drive is damaged and the file record segments cannot be read, the possibility of data loss increases significantly. Any operation on the affected drive may aggravate the situation, causing further damage.
If the hard drive is damaged to a certain extent and you have already shielded the bad sectors, it is necessary to back up the disk data so that the original data can be mentioned.
Usually, a hard disk cloning software is needed to complete this operation. MiniTool Partition Wizard can achieve this operation. It is a professional partition manager. With this tool, you can manage your disks well.
It is specially designed to clone system disk as well as data disk to another hard disk. In addition, it not only supports create/format/split/merge partition but also provides functions such as clone a hard drive, hard drive recovery, USB drive formatter.
To clone the corrupted hard drive, first click the button below to get MiniTool Partition Wizard, and install it on your PC.
MiniTool Partition Wizard DemoClick to Download100%Clean & Safe
1. The target disk does not store any important data because the cloning process will delete all data on the target disk.
2. The free space on the destination disk should be greater than or equal to the used disk space on the source disk.
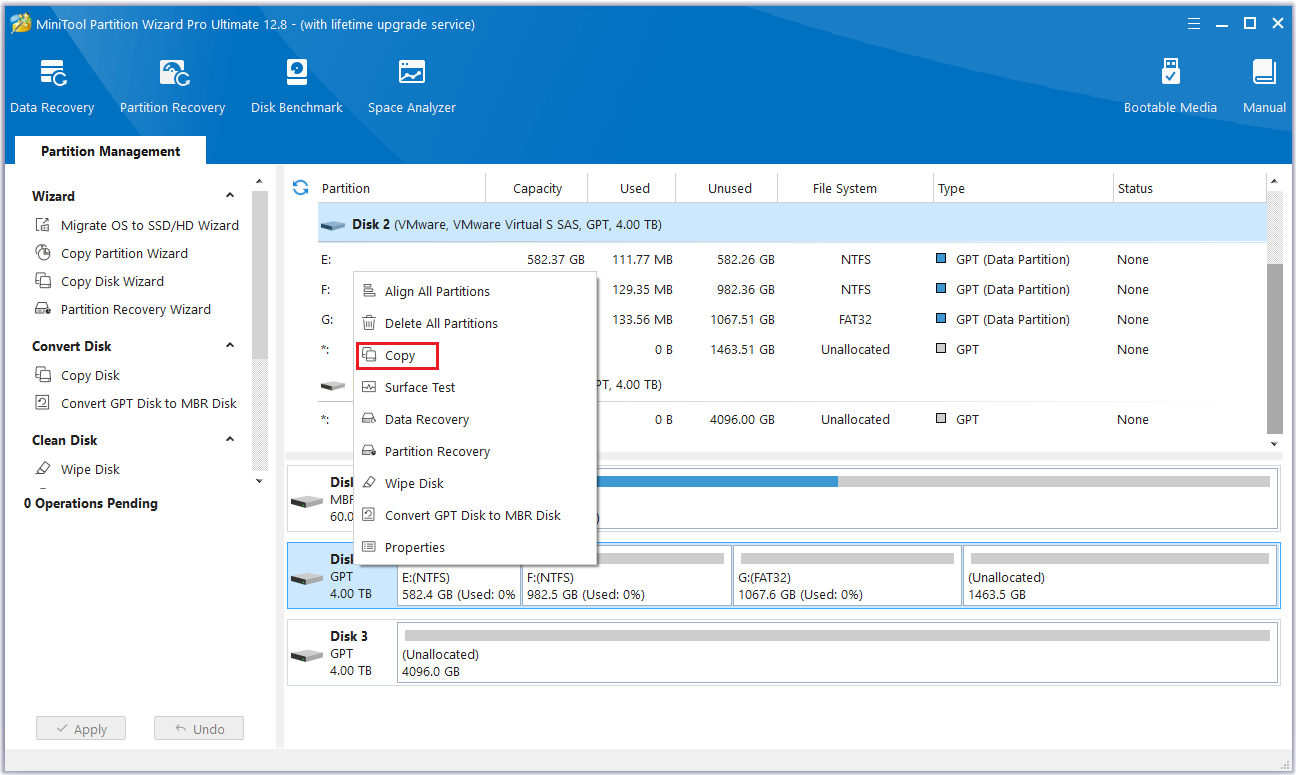
Step 1: Run MiniTool Partition Wizard to its main interface. Right-click on the disk that needs to be cloned and select Copy.
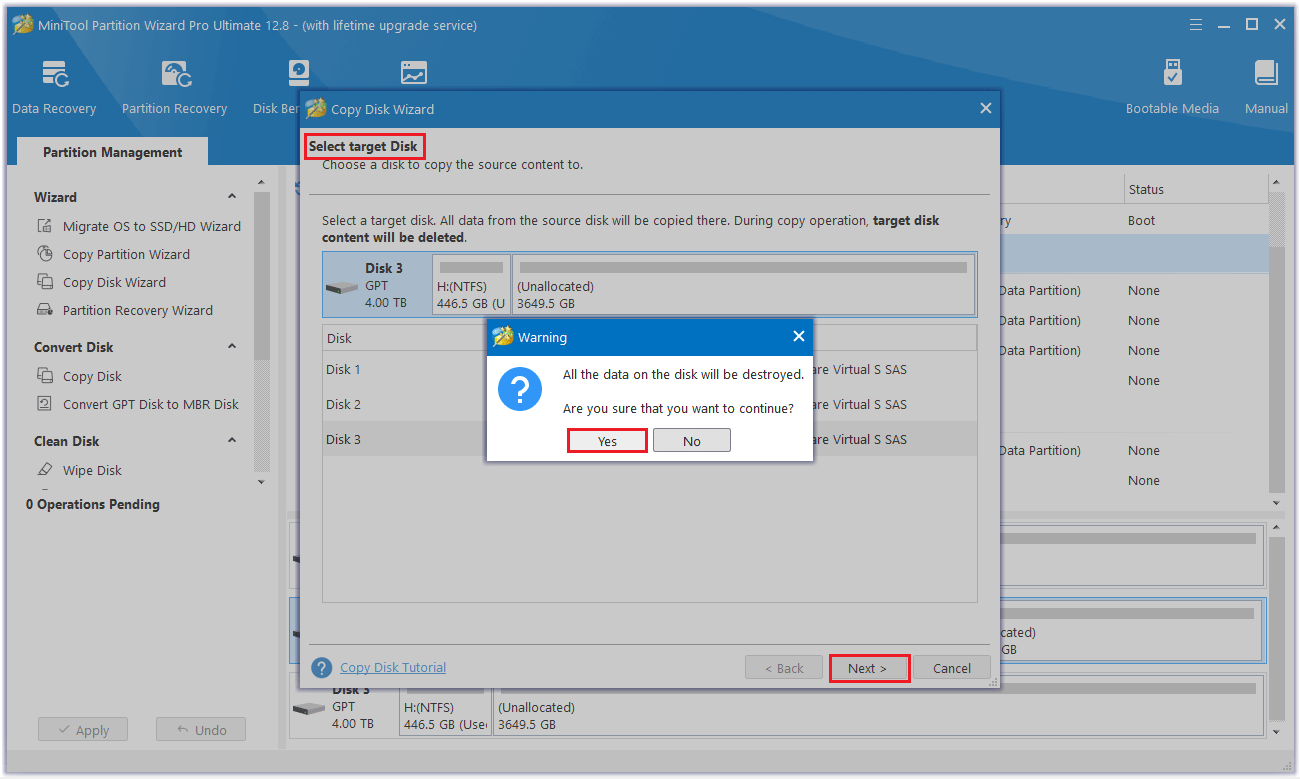
Step 2: In the new pop-up window, select the target disk where the copied data will be saved. Then click the Next button. A warning will appear telling you all the data on the disk will be destroyed. To perform the cloning operation successfully, click the Yes button.
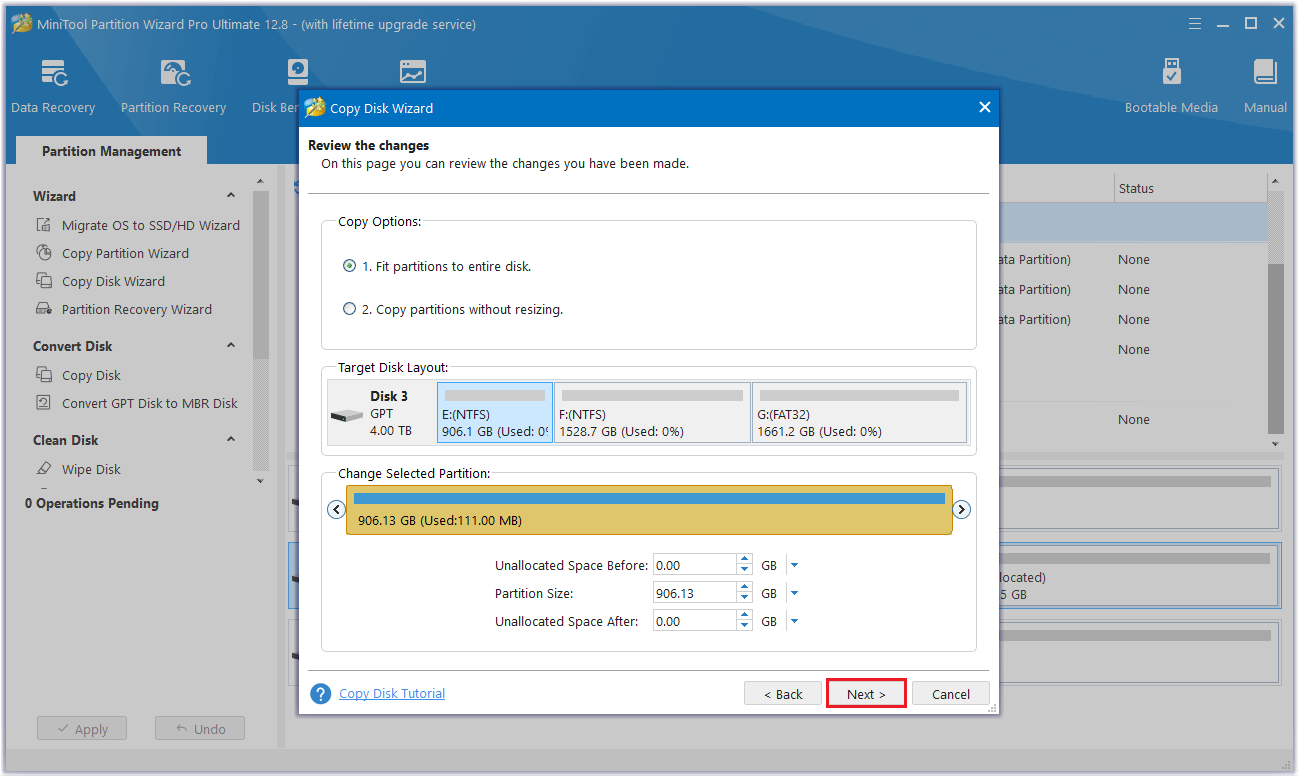
Step 3: In this interface, you can see two options for cloning disk. Select one copy option and click Next. Whichever you choose, you can resize each partition by dragging the sliders below.
- Fit partitions to entire disk: Make the destination disk fully occupied by all partitions cloned from the source disk.
- Copy partitions without resizing: Keep the original partition sizes.
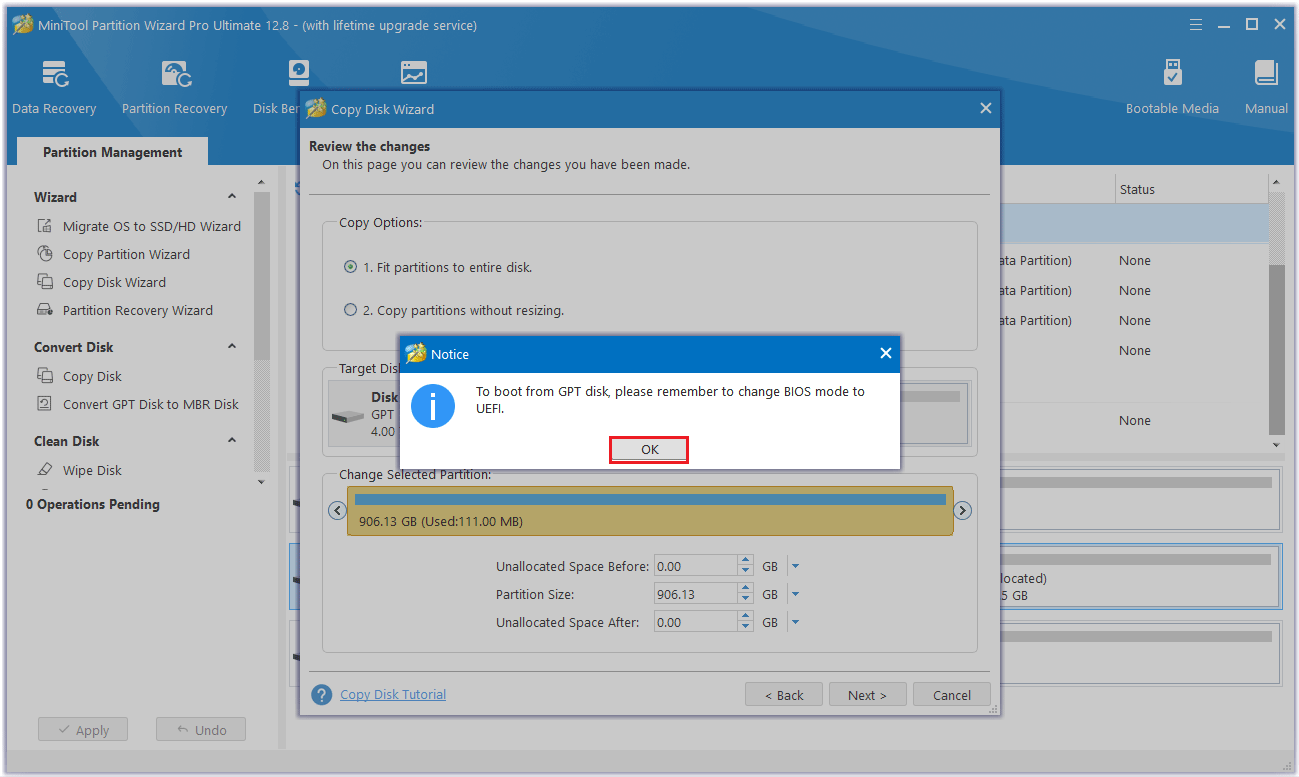
Step 4: On this interface, you can see the “To boot from GPT disk please remember to change BIOS mode to UEFI” message,click OK. This message only appears when copying a GPT disk.
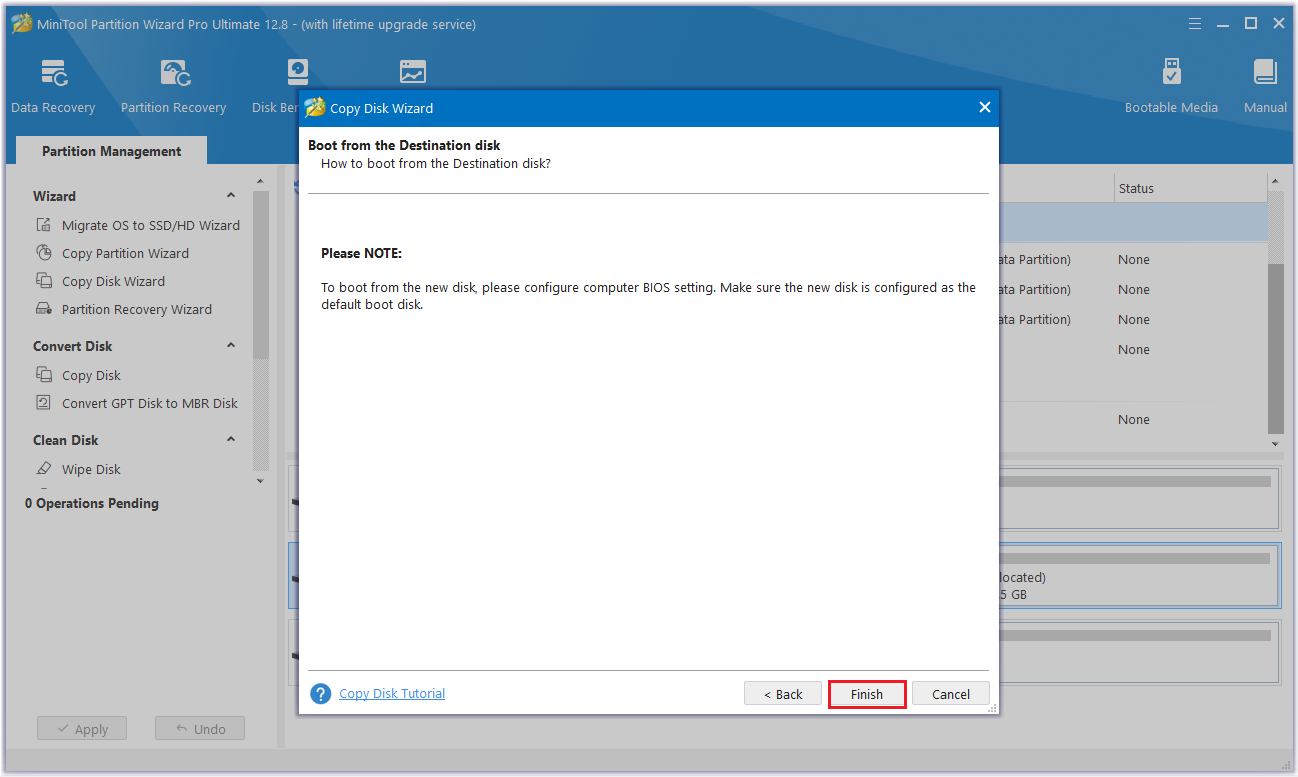
Step 5: Read the note carefully which shows how to boot from the target disk, and click Finish to go back to the main interface.
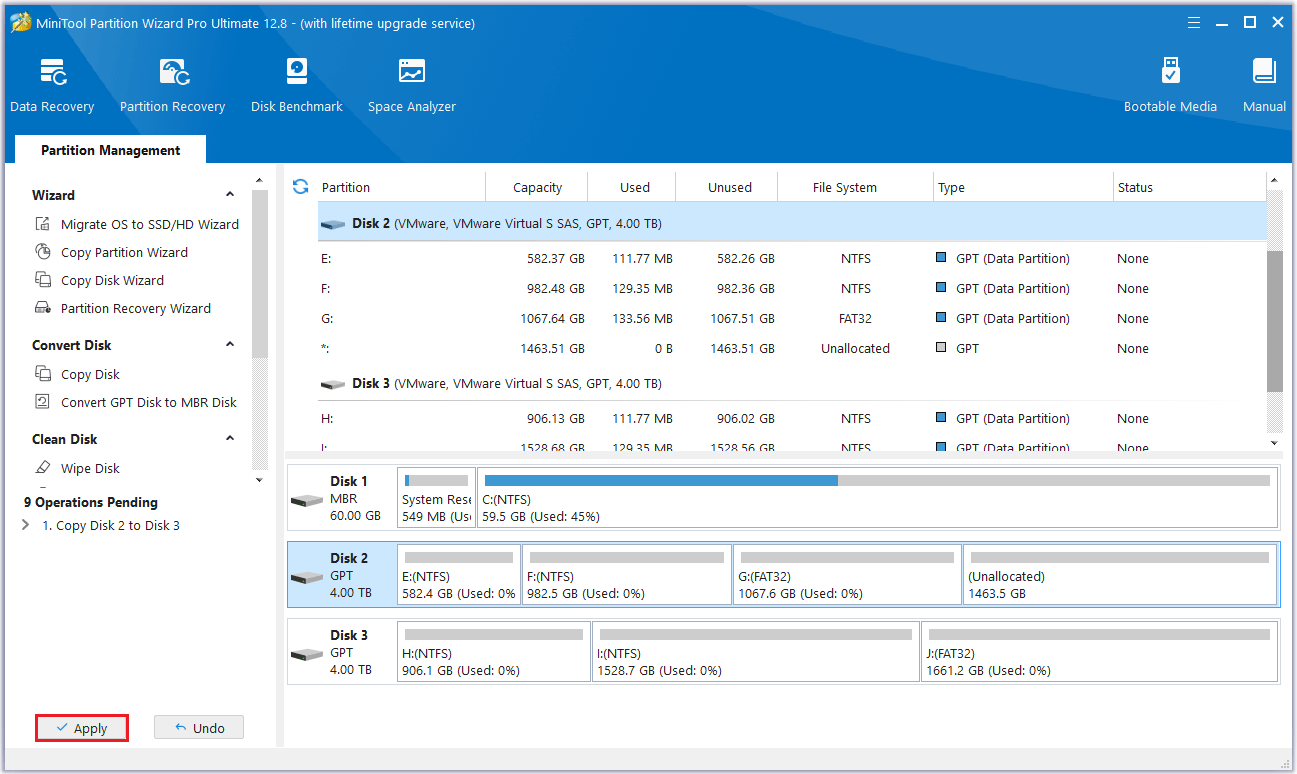
Step 6: MiniTool Partition Wizard will return to its main interface. Here you can preview all the changes you want to clone disk. Click Apply to make the operation effective.
After successfully cloning the problematic disk, you can shut down the computer. Make sure to replace the original disk with the unreadable file record segmentation error with the new target disk. Then, check if the file is available.
Way 3: Recover Lost Data
When file record segment is unreadable, it may cause some file loss. Don’t worry, you can use the Data Recovery function of MiniTool Partition Wizard to recover data.
The software is designed to enable you to effectively retrieve lost files, pictures, videos, audios, documents, etc. from the damaged drive without damaging the original data. Here are the steps.
MiniTool Partition Wizard DemoClick to Download100%Clean & Safe
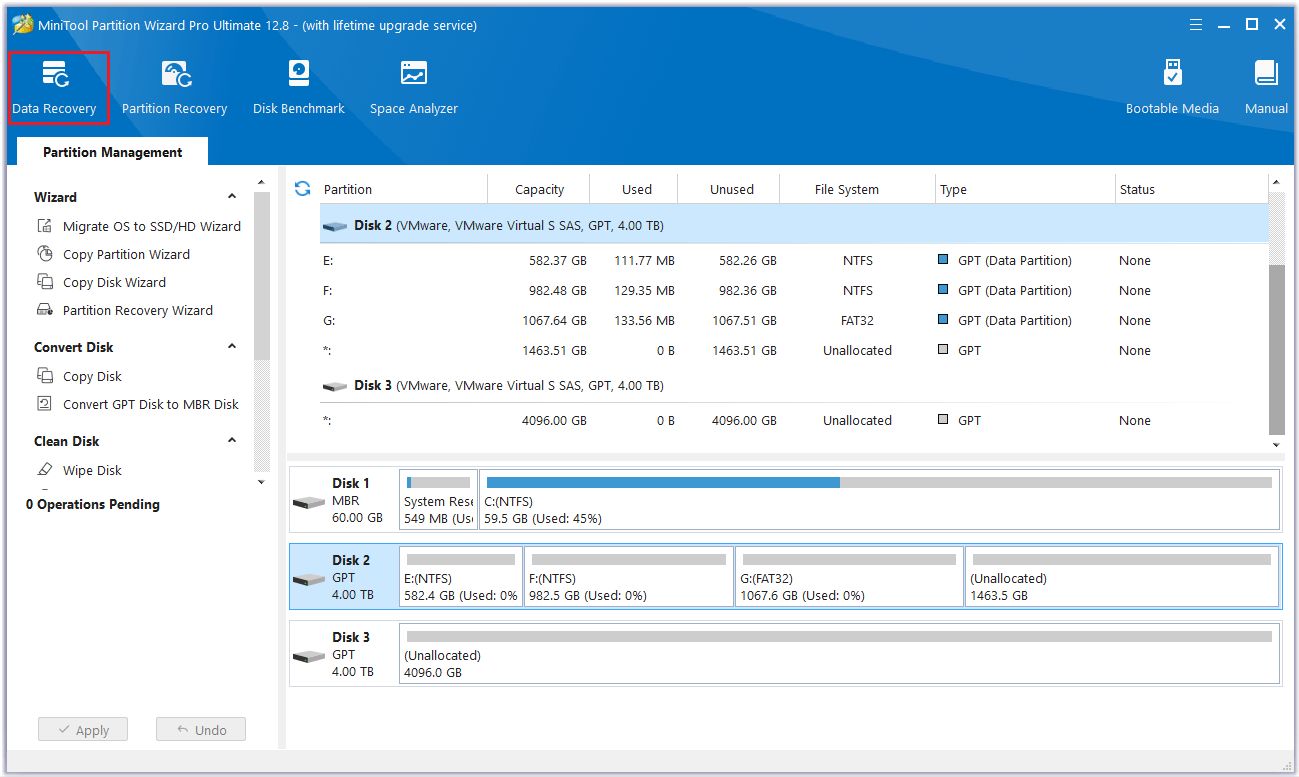
Step 1: Launch MiniTool Partition Wizard to get its main interface. To recover files from hard drive, click Data Recovery on the top toolbar.
Step 2: In the following interface, all detected storage devices on the computer are listed along with the specific location for data recovery.
- Logical Drives: This section displays lost partitions, unallocated space, and all existing partitions on the PC, including removable devices like USB drives.
- Devices: This section lists all hard disks connected to the computer.
- Recover from Specific Location: This section allows users to scan and recover lost files from three specific locations (Desktop, Recycle Bin, and Folders).
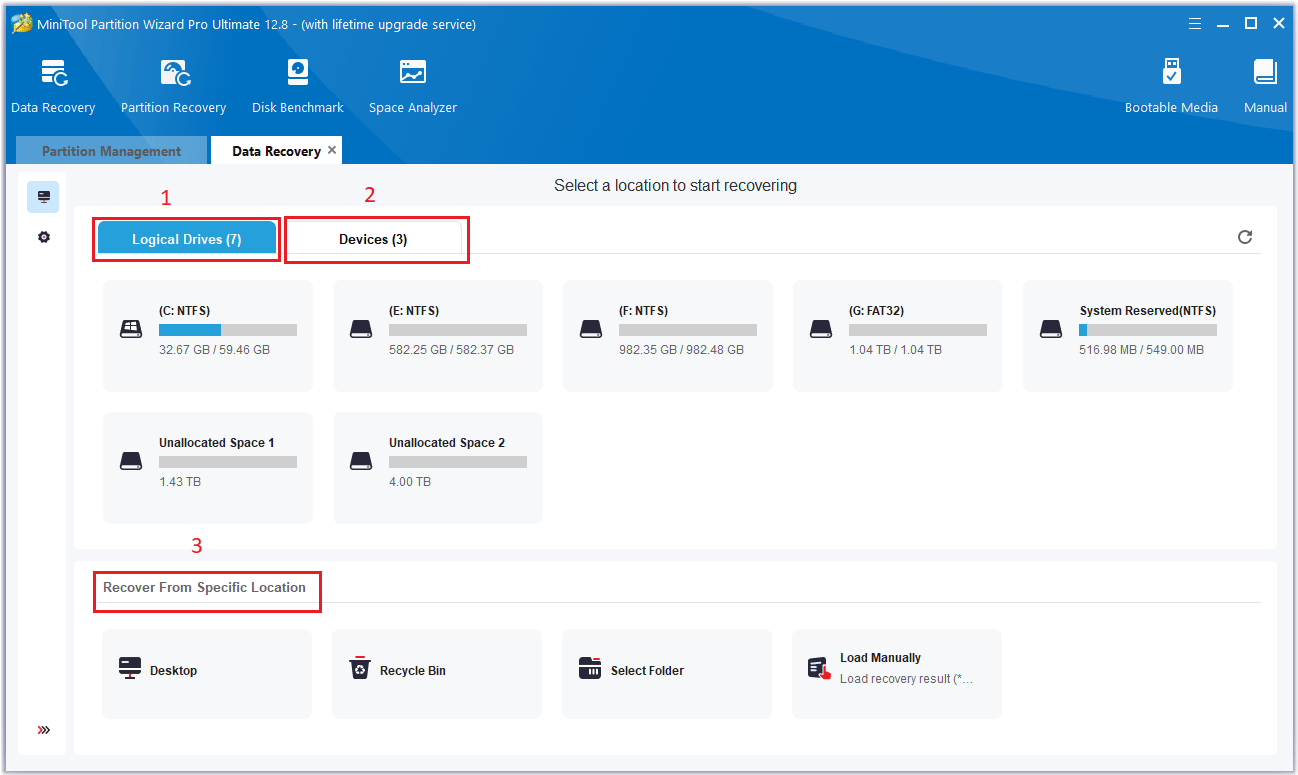
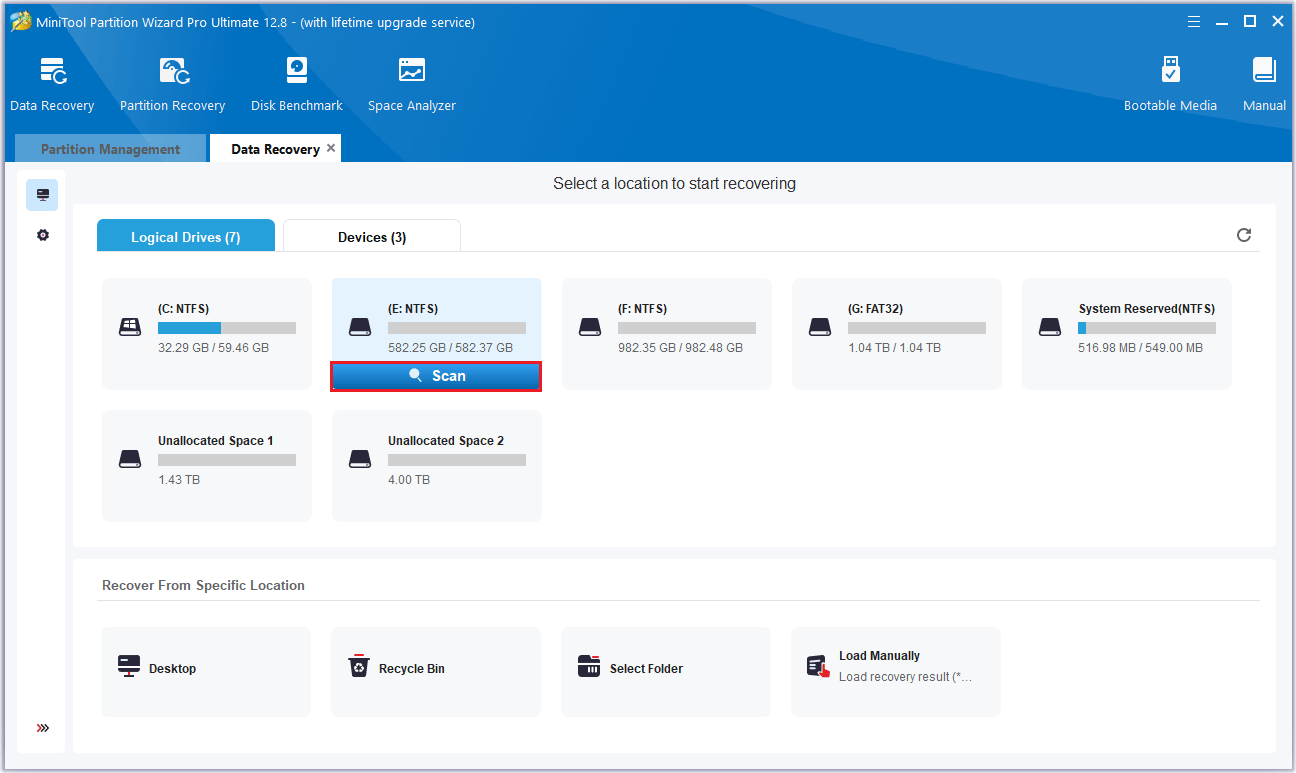
Step 3: Move the cursor to the partition where you want to recover data and click Scan.
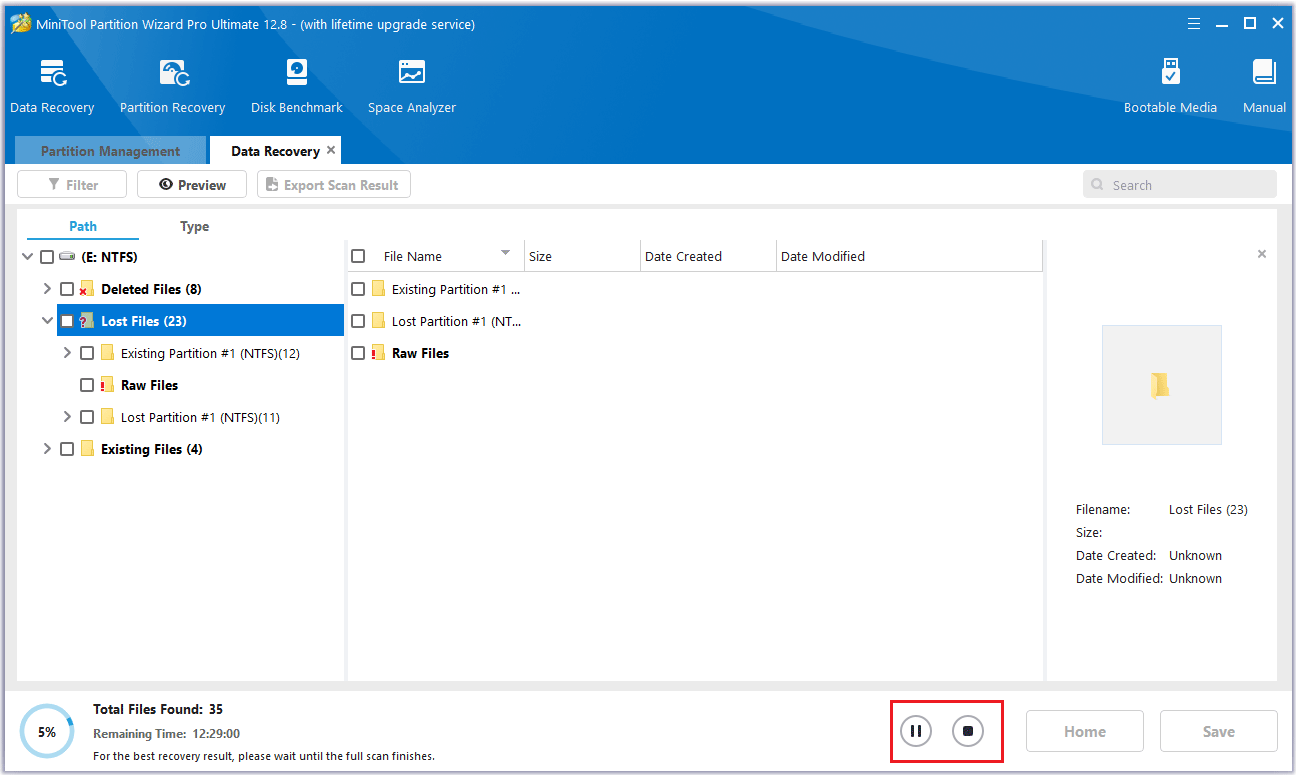
Step 4: Then this software starts scanning the selected partition and the scanning process may take a long time. When you have found the critical data, you can click the Pause or Stop to pause or end the scan and save the data.
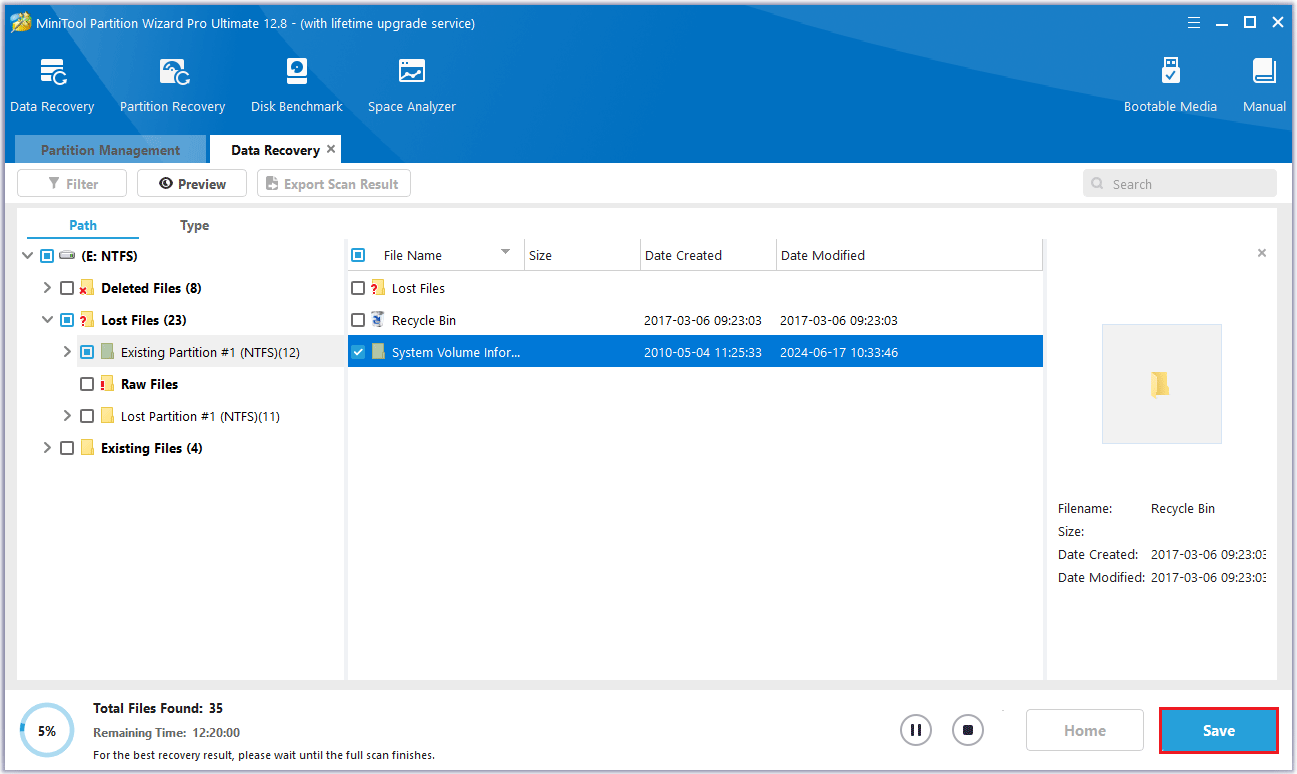
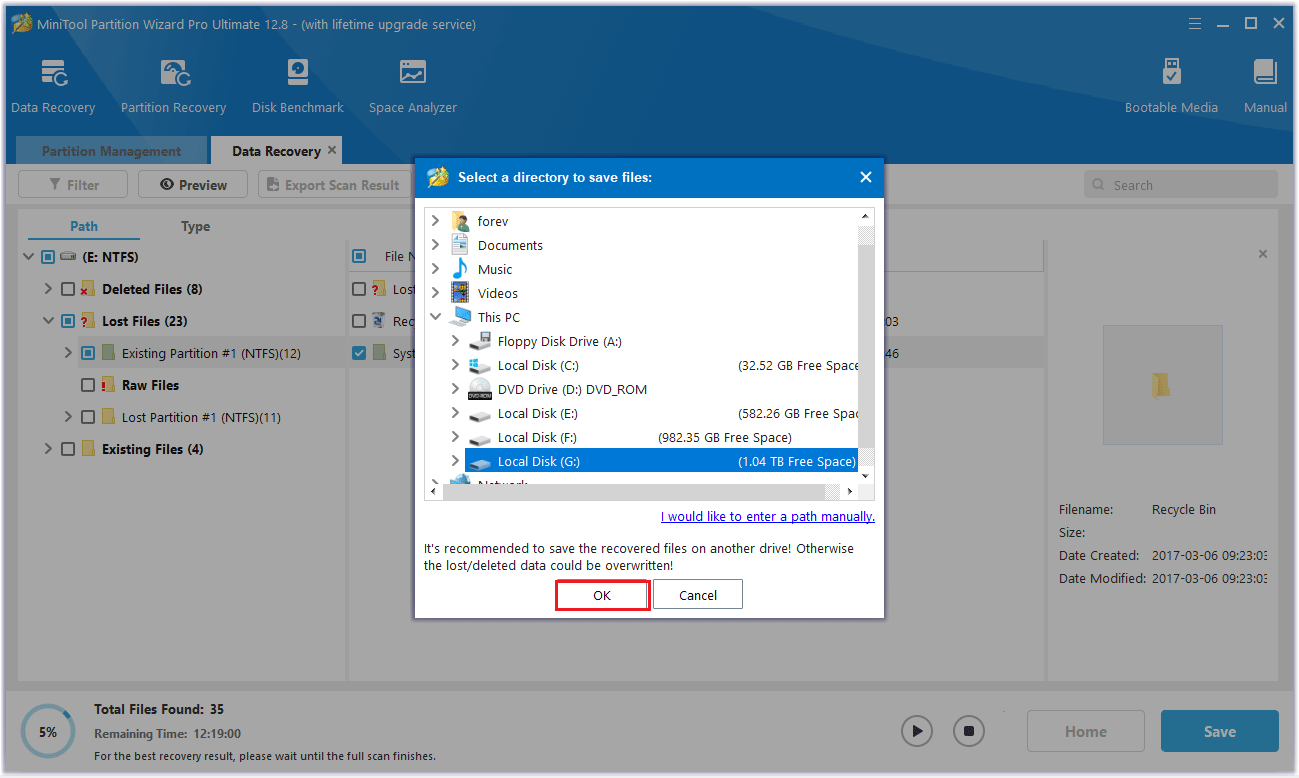
Step 5: Check all the files you want to recover and then click the Save button.
Step 6: Finally, choose a directory to save the selected files and click OK. It is recommended to save the recovered files on another drive. Otherwise, the lost/deleted data may get overwritten.
Way 4:Connect the Hard Drive to Another PC
In addition to the above-mentioned disk cloning and data recovery, you can also connect the damaged drive to another computer to recover file data in the case of unreadable CHKDSK file record segment. Please follow the steps below.
Step 1: Keep the second computer powered off before connecting the damaged drive.
Step 2: Use an external drive enclosure, USB to SATA/IDE adapter to link the damaged drive to the second computer.
Step 3: Turn on the second computer.
Step 4: Open File Explorer to check if the damaged drive is accessible on the second computer. If it is, copy the required data from the damaged drive to the second computer.
Step 5: Open CMD as an administrator on the second computer and run CHKDSK on the damaged drive using the chkdsk /f command.
Step 6: Disconnect the damaged drive from the second computer.
Bottom Line
This article ends here. To solve the problem of the “file record segment is unreadable” error, this article introduces 4 methods. The first one uses CHKDSK to mask the bad sectors, but cannot really repair the physically damaged disk.
In this case, you should back up the data you need by using any of the following three methods. Please choose the solution that suits you according to your needs.
If you have any questions or suggestions while using MiniTool Partition Wizard, you can contact us via [email protected] to get a quick reply.
File Record Segment Is Unreadable FAQ

User Comments :