A great many players complain about the Fallout New Vegas out of memory issue when playing the game. What causes this vexing problem? How to fix it? This post of MiniTool will provide you with some Fallout New Vegas out of memory fixes.
About Fallout New Vegas Out of Memory
As a revolutionary shooting role-playing game on Windows and some gaming platforms, Fallout New Vegas attracts a large number of game fans. However, some bugs and issues emerge on the Windows PC. Fallout New Vegas out of memory is one of the most common issues among them.
The New Vegas out of memory problem often occurs during game playing, while will lead to your game crashes at once. Some users suspect whether the game playing lacks
enough dedicated graphics card memory.
In fact, Fallout New Vegas out of memory Windows 10 is caused by a bug that blocks the game from using more than 2GB of RAM. Here we explore some useful methods to stop this error on Windows 10.
How to Fix Fallout New Vegas Out of Memory
This error indicates that the game is not able to use more than 2GB of RAM by default. For that, you can try the following 2 Fallout New Vegas out of memory fixes.
Fix 1. Use the Fallout New Vegas 4GB Patch
The first solution is to use the 4GB Fallout New Vegas patch. It is a practical tool that can help you load with large address executable file, which enables the game to use more than 4GB of virtual memory address space.
Here’s how to fix Fallout New Vegas out of memory Windows 10 using this tool.
Step 1. Click here to open the download page of the 4GB Fallout New Vegas patch.
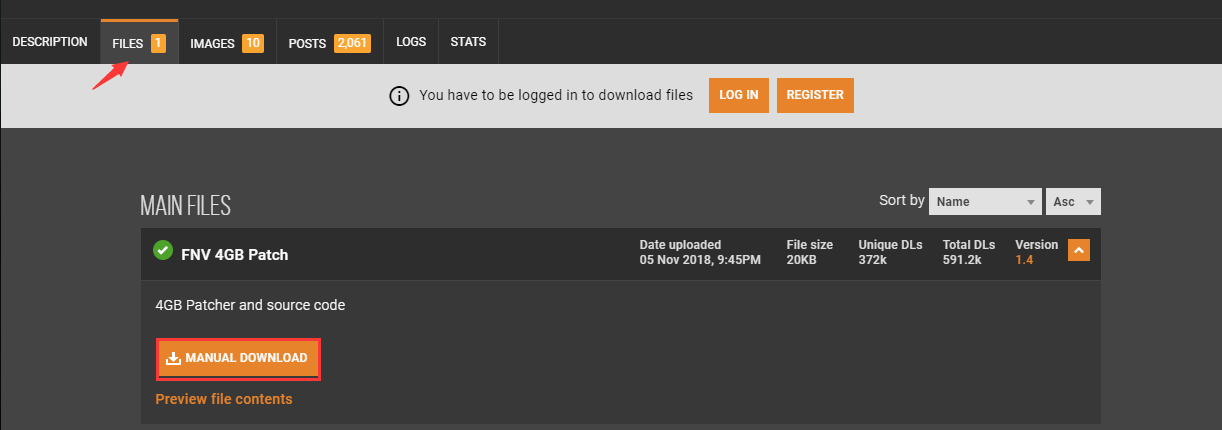
Step 2. In the download page, navigate to the Files tab and click on the Manual Download button to download the patch and save it to your computer.

–image from https://www.nexusmods.com/
Step 3. Exact the download patch file and exact it to the C:/ProgramsFiles(x86)/Steam/SteamApp/common/falloutnewvegas location.
Step 4. Find the FalloutNVpatch.exe file in the exacted folder, right-click it and select Run as administrator. Then it will execute this patch and make a backup of the game’s original file.
Step 5. In the New Vegas installation folder, locate to the ini file. Then right-click the file and select Properties.
Step 6. Locate the General tab, tick the checkbox of Read-only, and then click on Apply and OK to save the changes.
Step 7. Set all the ini files in the folder by repeating the above steps.
Now, you can relaunch the game through Steam and see if the Fallout New Vegas out of memory Windows 10 issue still persists.
Fix 2. Use the Stutter Removal Tool for Fallout New Vegas
If the above method fails to work, you can try using the stutter removal tool for Fallout New Vegas. This solution is suitable for lower performance computers when playing the game. Here’s how:
Step 1. Click here to open the download page of the removal tool, and click on the Manual Download button to download the patch to your computer.
Step 2. Navigate to the Data folder that you just downloaded, and then locate the Data > NVSE > Plugins.
Step 3. Copy all the files in the Plugins folder and go the following path.
C:/ProgramsFiles(x86)/Steam/SteamApp/common/falloutnewvegas
Step 4. Open the Data folder again in the Fallout New Vegas folder, and create a new folder and name it as NVSE in the Data folder.
Step 5. In the NVSE folder, create a new folder called Plugins, and then paste all the files that you copied previously to the folder.
Now, you can open the Steam and run Fallout New Vegas to check if the “Out of Memory” is fixed.

![How Do I Fix State of Decay Error Code 1006 [4 Ways]](https://images.minitool.com/partitionwizard.com/images/uploads/2020/06/state-of-decay-2-code-1006-thumbnail.jpg)
![How Do I Fix Red Alert 2 Issues in Windows 10 [Complete Guide]](https://images.minitool.com/partitionwizard.com/images/uploads/2020/06/red-alert-2-win10-thumbnail.jpg)
User Comments :