Have you come across system crash or even disk crash? It’s annoying to lost important data because of these failures. Take it easy, there is a powerful disk imaging software that enables you to back system, files, and even the whole disk with ease.
What Is Disk Imaging Software
Disk imaging software is a kind of backup software that is professional in copying the contents of a data storage device and then put them to another similar device (local drive, external hard drive, CD/DVD, network) with compressed file format. These original contents can be system, programs, setup and personal files. Disk imaging software is most commonly used in case of system crash or even disk crash where data recovery is the urgency.
A good disk imaging software should be the one that not only makes the process easy, but lets you choose which file/folder/partition/disk you want to clone or mount, schedule a backup, and make an encryption. Besides, some welcomed imaging software even allows customizing command line scripts, letting you have great control over your data.
Why You Need an Imaging Software
Today disk imaging software is widely used by people from different occupations. To sum up, the reasons can be the follows:
- Natural disasters, power outage, and improper operations happen without a warning, which may lead to system failure or hard drive empty. By making an image of your computer’s hard drive, you won’t be troubled by reformatting and reinstalling the operating system, since imaging software offers you the ability to restore an image to your hard drive within a short time.
- With professional disk imaging software, you’ll have the flexibility to schedule your backup task. In this way you avoid repeating backup and can enjoy playing your computer without worry.
- Some disk imaging software offers Universal Restore feature, which is a time-saving choice when you are faced with dozens of computers – even with dissimilar hardware – to be installed in a limited time.
Notification:
MiniTool is going to release professional disk imaging software in the coming days. Users who are interested in this aspect can follow the social accounts of MiniTool to get the hot news
Reliable Disk Imaging Software You Can Get
Since disk imagining is important and useful, here we recommend 2 disk imaging software to help you back up.
Solution 1. MiniTool ShadowMaker
MiniTool ShadowMaker, a brand new disk imaging solution put forwarded by MiniTool Software Ltd., is designed to deal with all kinds of imaging issues such as system imaging and disk imaging. Although it is a new emergency, it does offer rich features like incremental/differential backup, scheduled backup, backup encryption, etc.
MiniTool ShadowMaker TrialClick to Download100%Clean & Safe
See how it works:
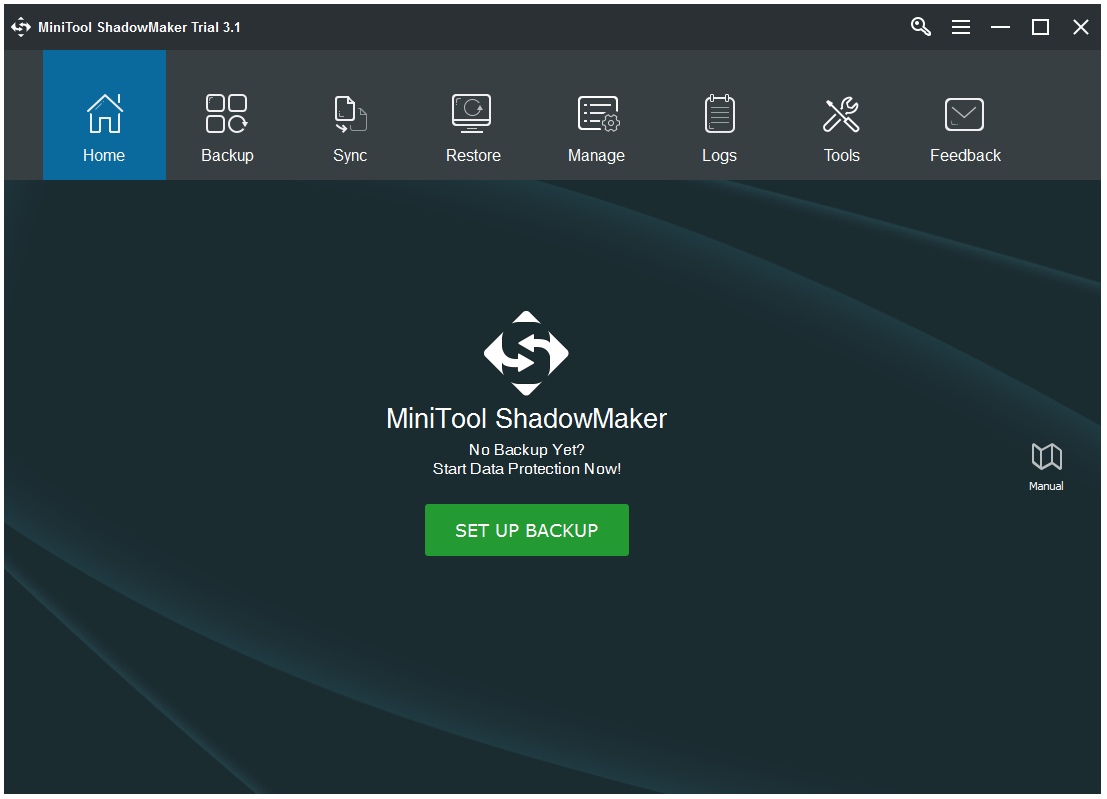
Step 1. After installing this disk imaging software, you will see the following interface. Click SET UP BACKUP to begin.
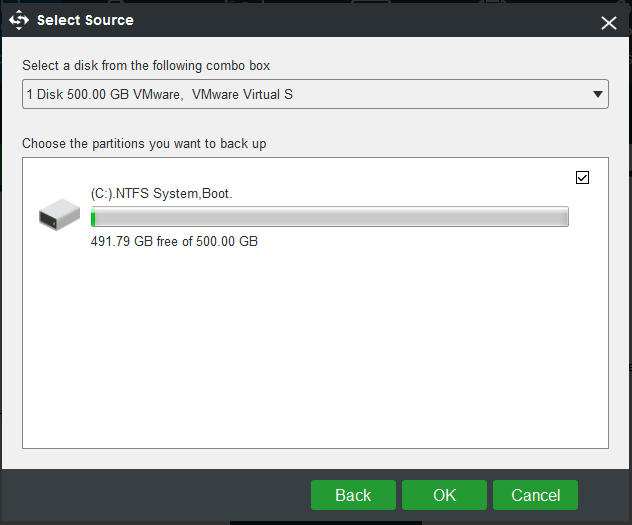
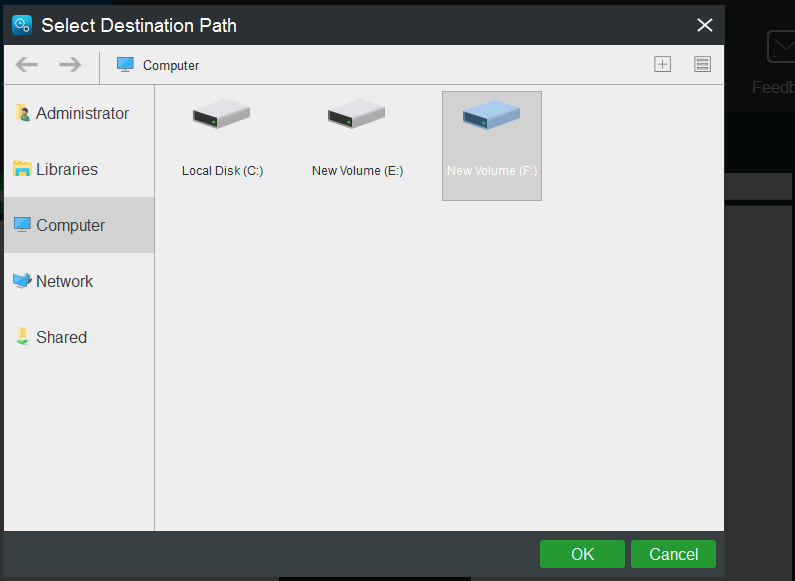
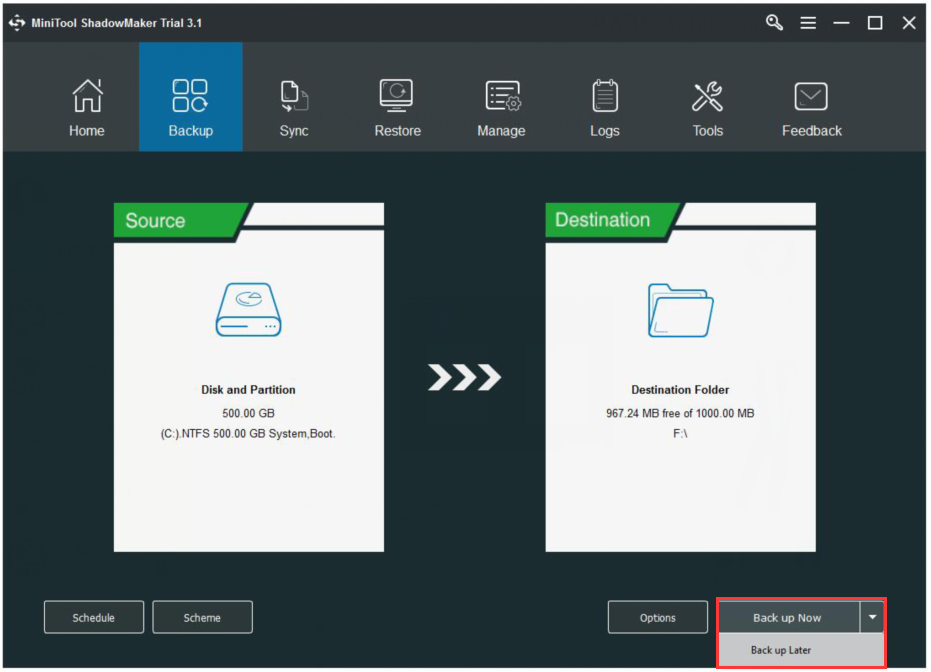
Step 2. Immediately you can see the backup page which requires you to select the source content and the destination location.
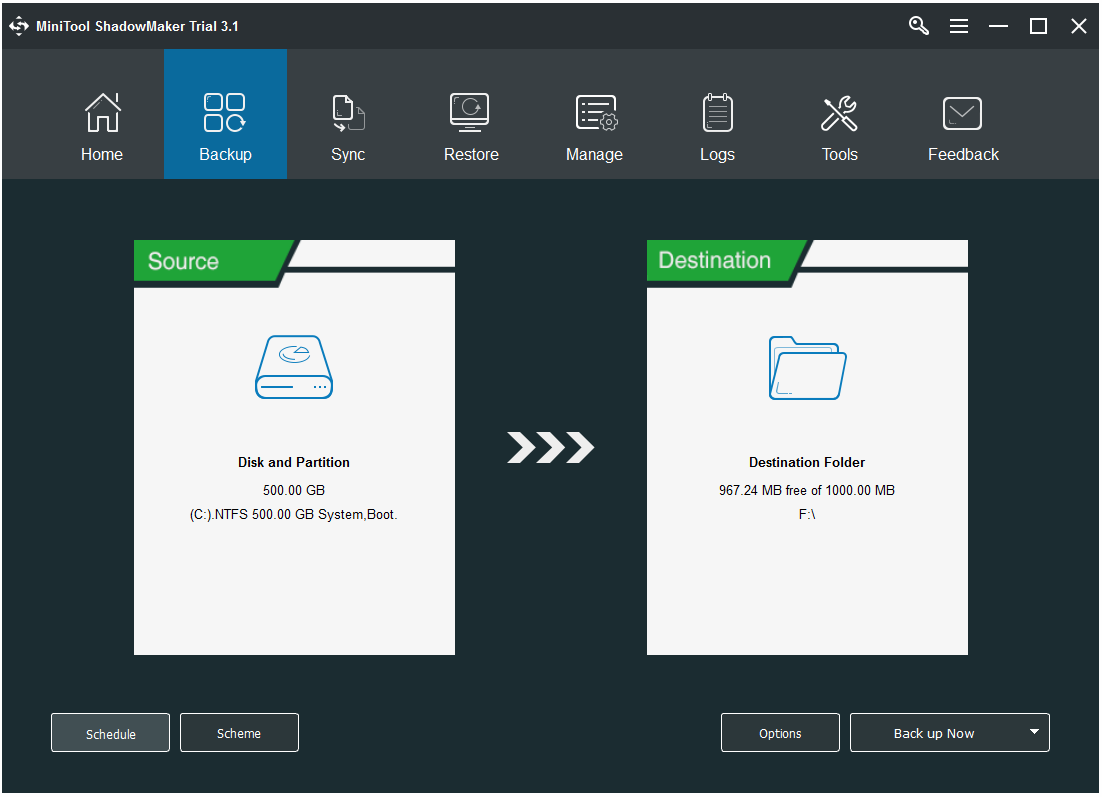
Step 3. Then choose Back up Now or Back up Later. If you choose Back up Now, MiniTool ShadowMaker will immediately deal with the backup task. If you choose Back up Later, you can manage the backup task later under Manage tab.
That’s how to image hard drive using MiniTool ShadowMaker. Then let’s see how to restore the disk image.
- How to create a bootable media using MiniTool Media Builder?
- How to boot from the bootable USB flash drive or CD/DVD disk?
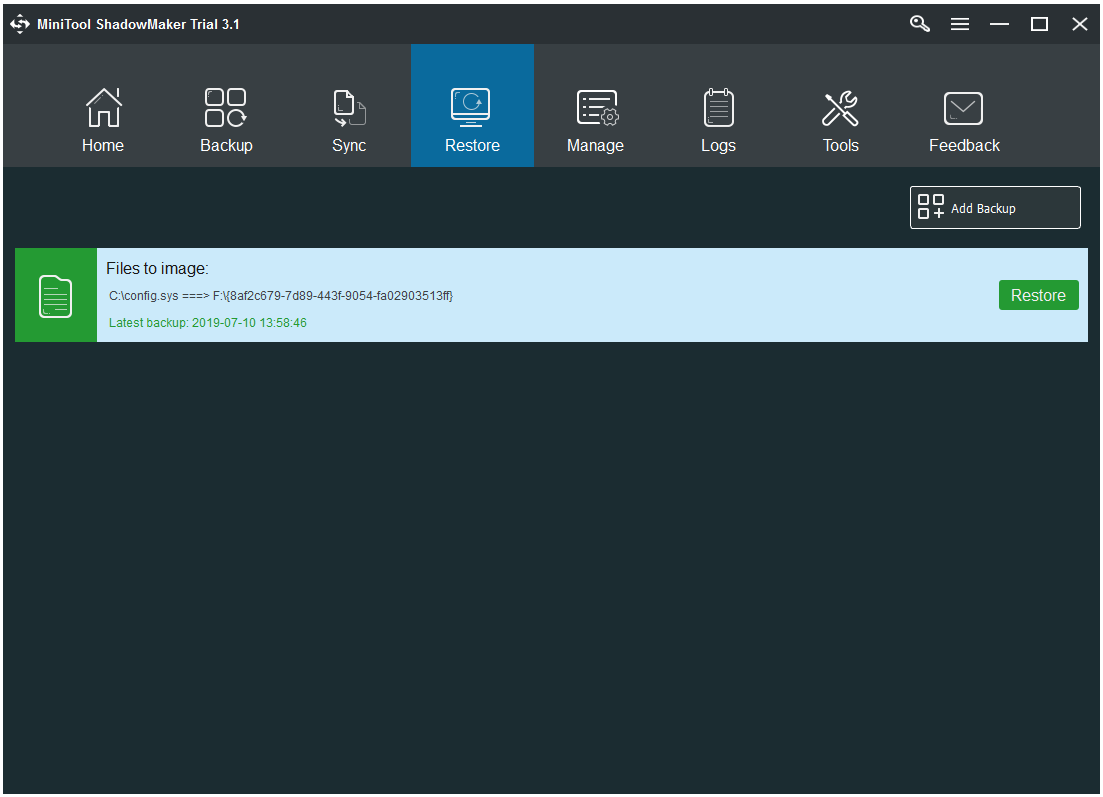
Step 1. Navigate to Restore and select the backup task which needs restoring.
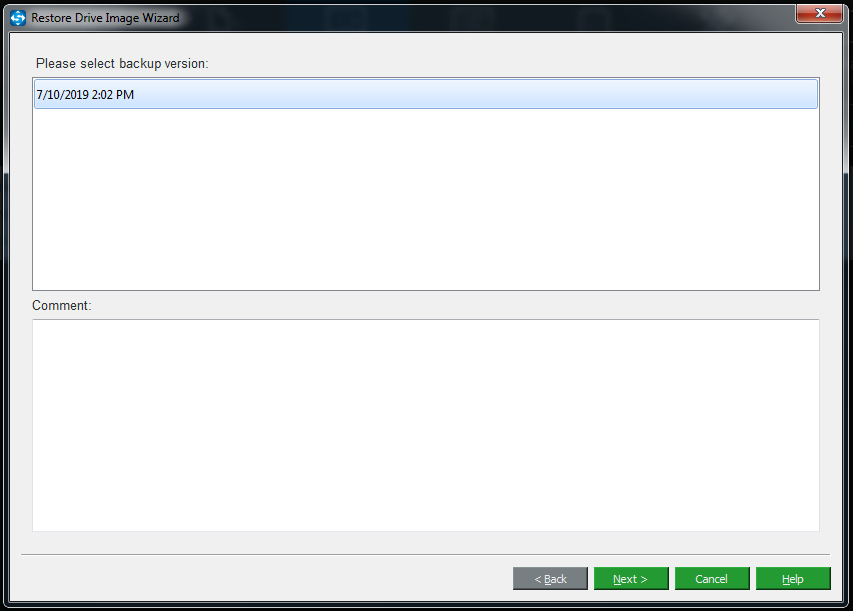
Step 2. Select a backup version and click Next.
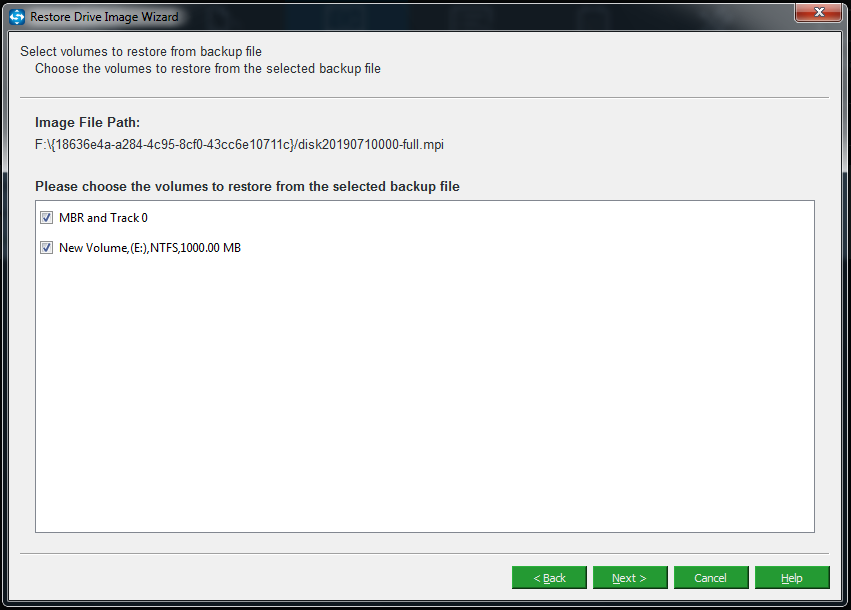
Step 3. Then select the volumes to restore from the backup file. Note that the MBR and Track 0 should be chosen altogether. Then click Next to continue.
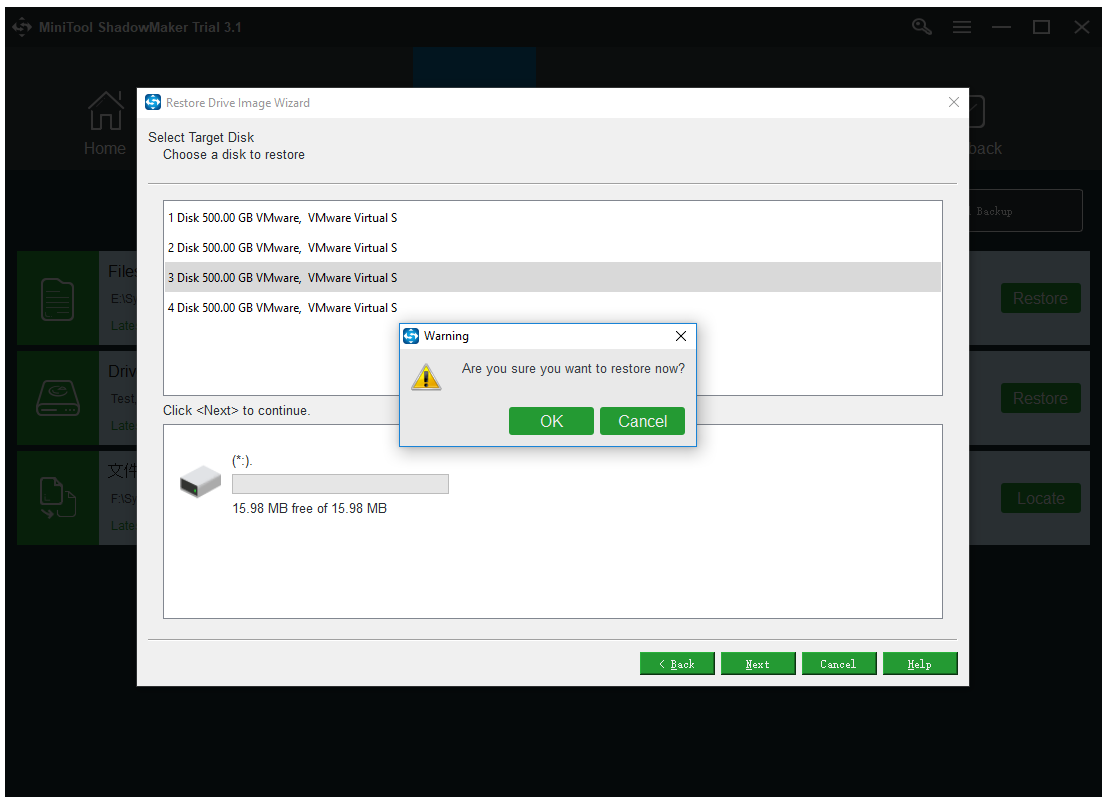
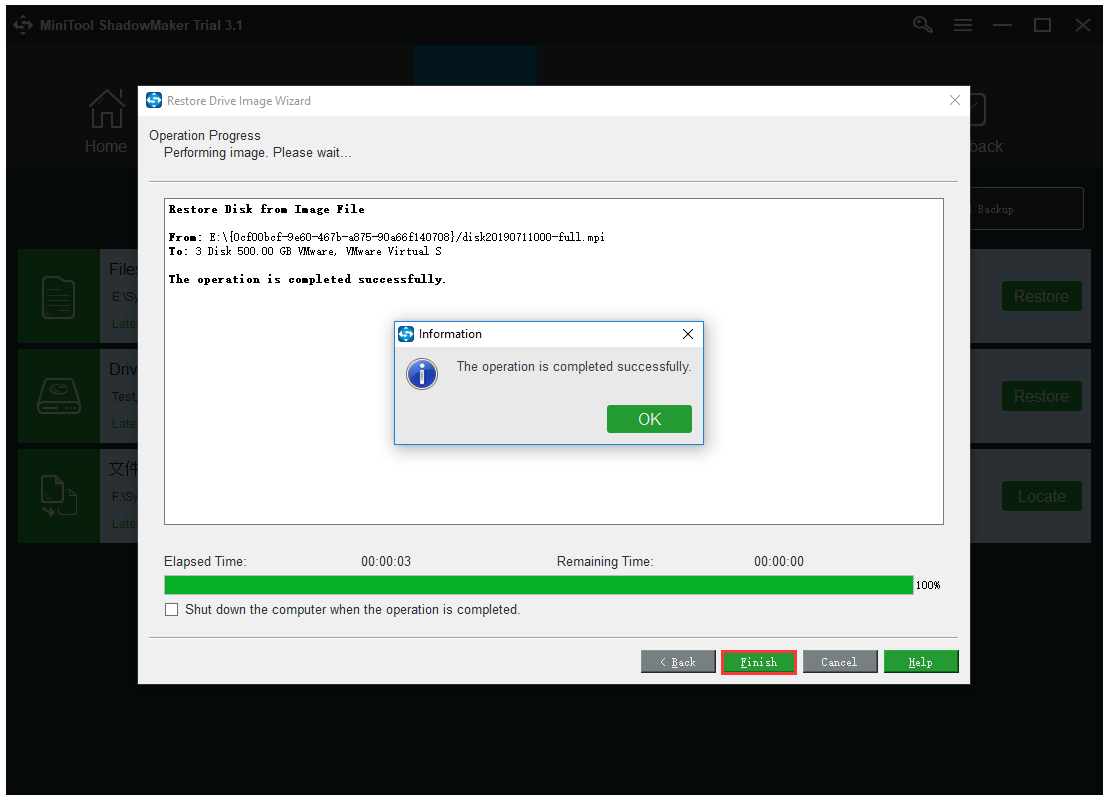
Step 4. Now select a disk for restoration. If the selected disk contains partitions, MiniTool ShadowMaker will inform you which partition will be deleted. Please be careful when selecting the target disk. Finally, you can click Start button and wait until MiniTool ShadowMaker tells you all is done.
Solution 2. Windows Backup and Restore
Well, despite MiniTool ShadowMaker is competent as a disk imaging software, many suers stick using Windows built-in Backup and Restore to do disk imaging. Here let’s have a look at how to back up a disk using Windows Backup and Restore.
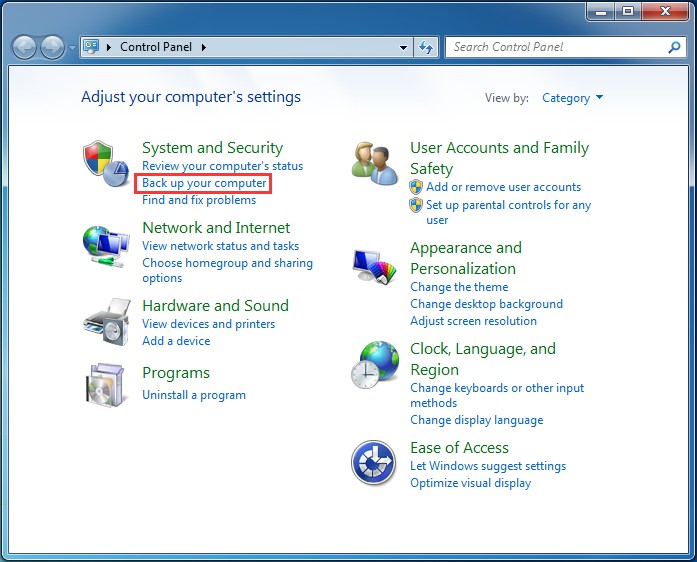
Step 1. Open Control Panel and find Back up your computer under System and Security.
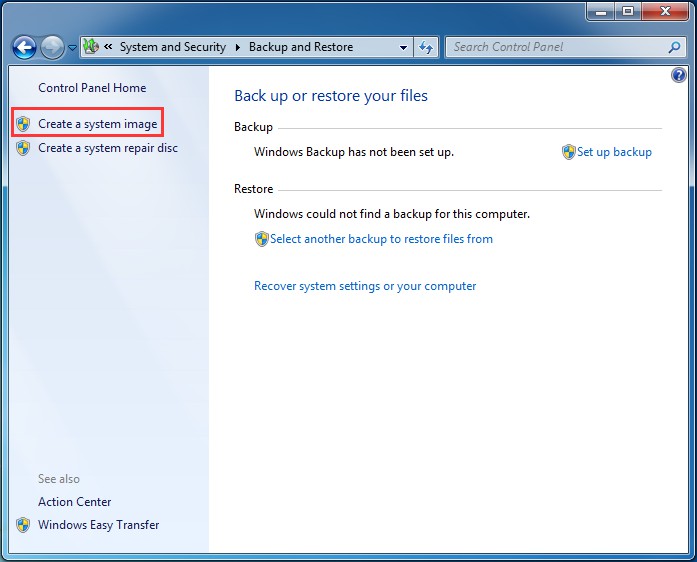
Step 2. Select Create a system image from the left panel.
Step 3. Now select a location to save the backup file. It is recommended to choose On a hard disk and select an external hard disk.
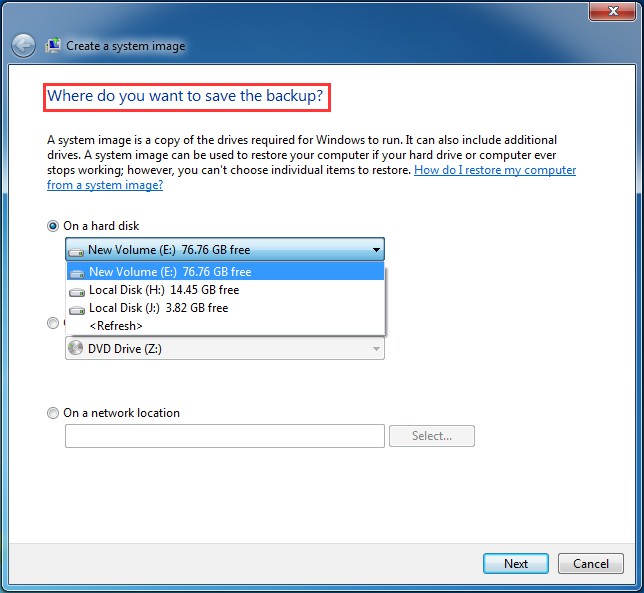
Step 4. Choose which drives to back up. Since we are doing disk imaging, choose all partitions on the disk (system partitions are selected by default).
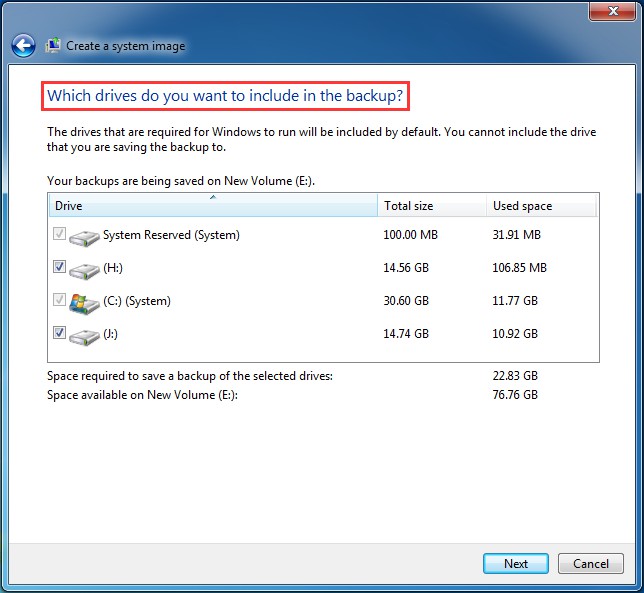
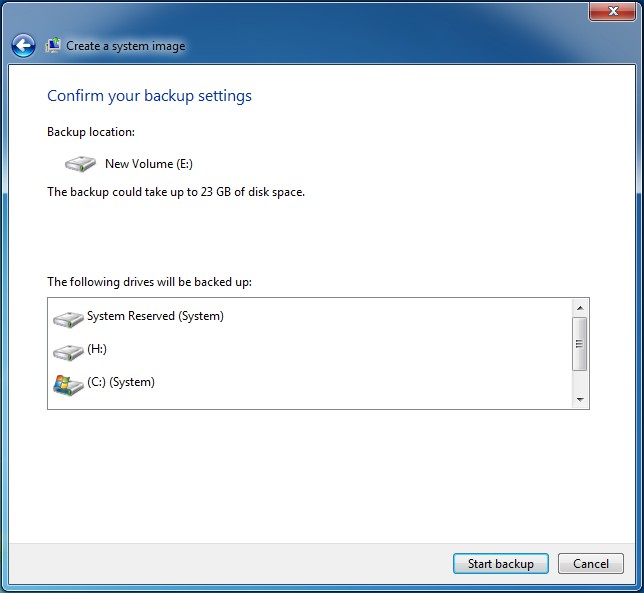
Step 5. Finally, confirm your backup settings and hit Start backup if everything is alright.
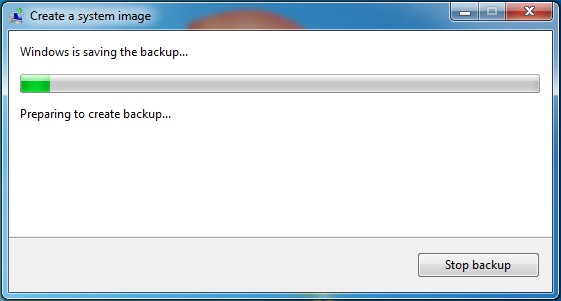
Windows is saving the backup.
You may also like: How to Restore Windows from a System Image?
Disk Cloning Software – MiniTool Partition Wizard
There is another kind of backup software that is more straightforward than disk imaging software, and it is disk cloning software. Compared with disk imaging software, disk cloning software gets rid of the restoration process, which means you can use the backup copy immediately after the cloning. In this part, we would like to introduce a piece of free yet powerful backup software you can get.
The recommendation here is called MiniTool Partition Wizard. This is a powerful partition manager than can be used to do a lot of things, such as move partition, resize partition, break FAT32 limit, convert MBR to GPT to support 3TB disk, etc…MiniTool Partition Wizard is also a disk cloning program that can be used to clone disk, migrate system, and copy partitions. The reason why we recommend it is that it is not only ease of use, but also ensures that when you have finished disk cloning or system cloning, the destination disk is bootable. Thus, Partition Wizard is a reliable way for disk upgrading or disk backup.
Then how can Partition Wizard clone a hard drive?
MiniTool Partition Wizard DemoClick to Download100%Clean & Safe
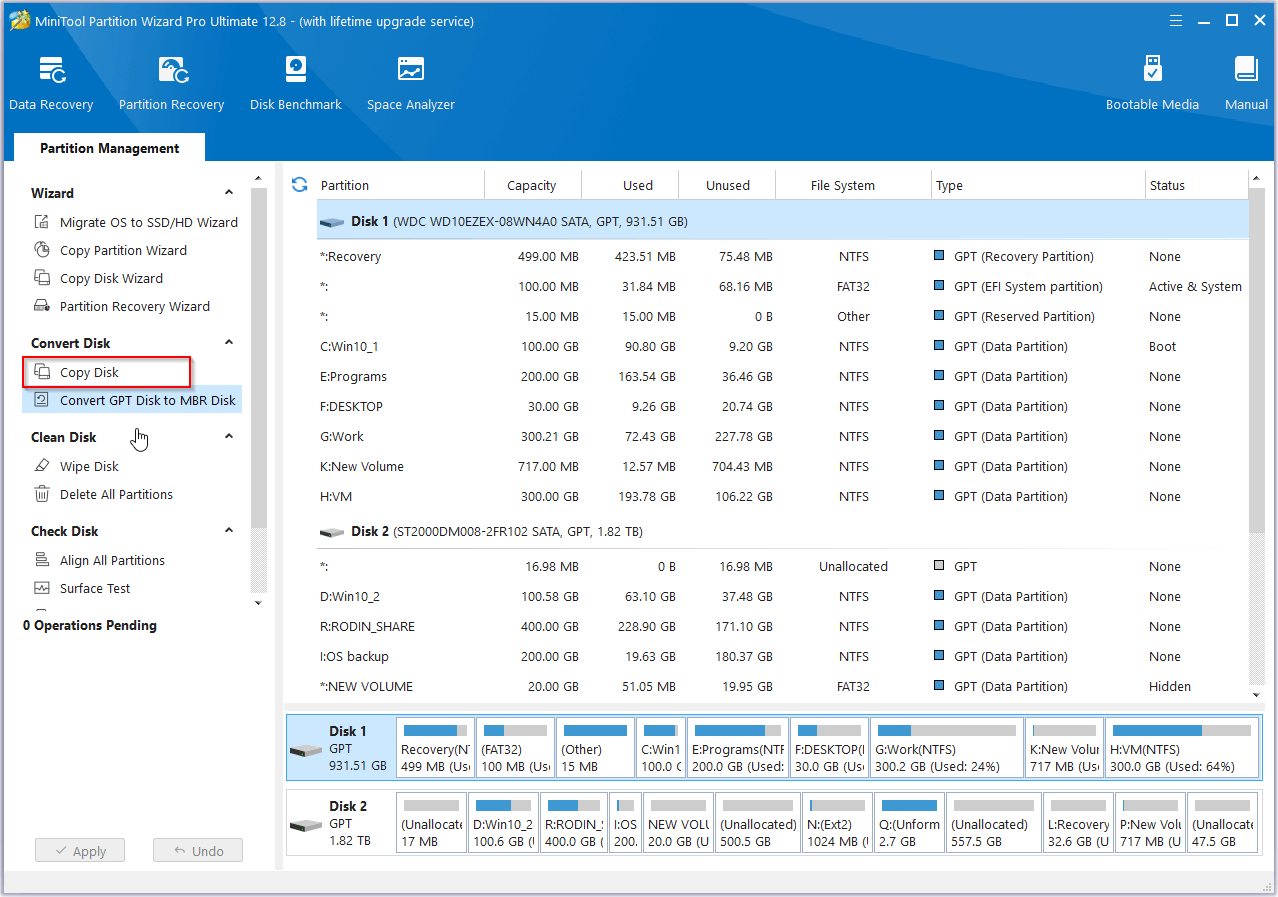
Step 1. Launch this hard drive cloning software. In the main interface, you should choose the source disk and select Copy Disk from action panel or from the menu bar.
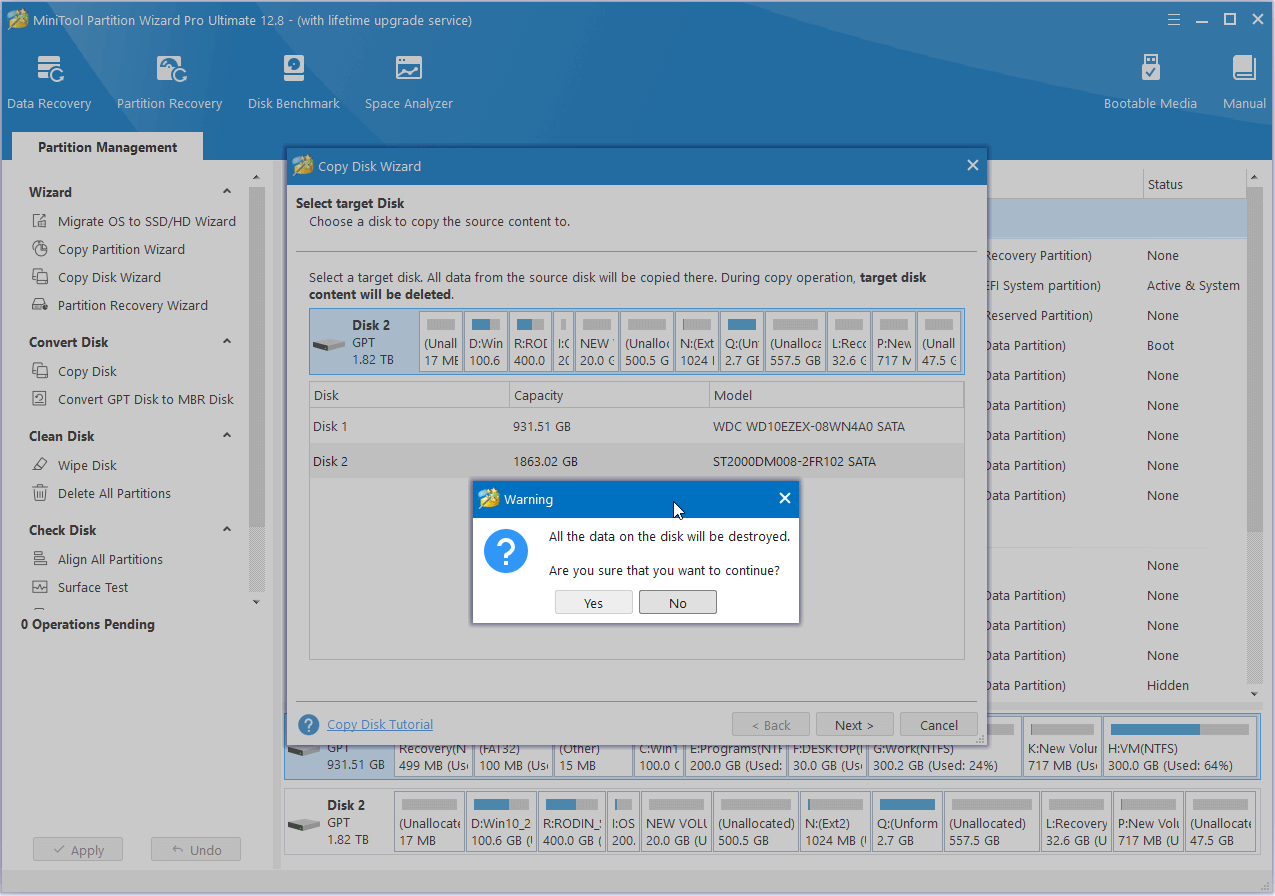
Step 2. Here choose a hard drive that can hold all data on the source drive and click Next to continue. Please note that the target drive will be cleaned, so a backup in advance may be helpful.
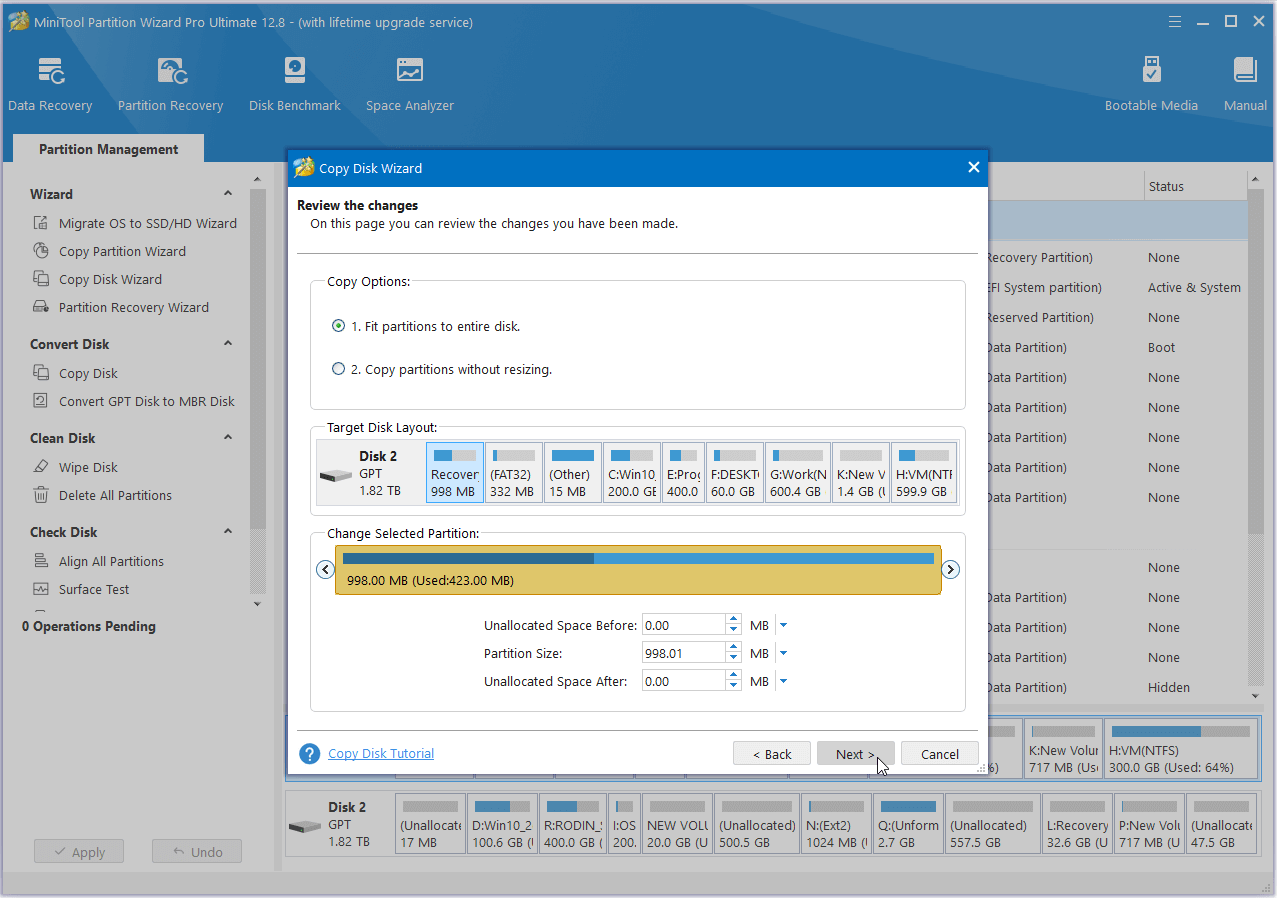
Step 3. Now choose a copy option and click Next to go on.
- Fit partitions to entire disk: this option will copy all partitions to cover the storage space of the target drive in proportion.
- Copy partitions without resize: this option will copy the partitions to your target disk without making any change on their sizes. Works only when the target disk is equal to or larger than the source disk.
- Align partitions to 1 MB (appears when the source disk is an MBR disk): this will improve the performance of the target drive if it is an SSD or advance format drive.
- Use GUID Partition Table for the target disk (appears when the source disk is an MBR disk): this is useful when the target disk is larger than 2TB but is a paid feature not available in the free edition (view edition comparison).
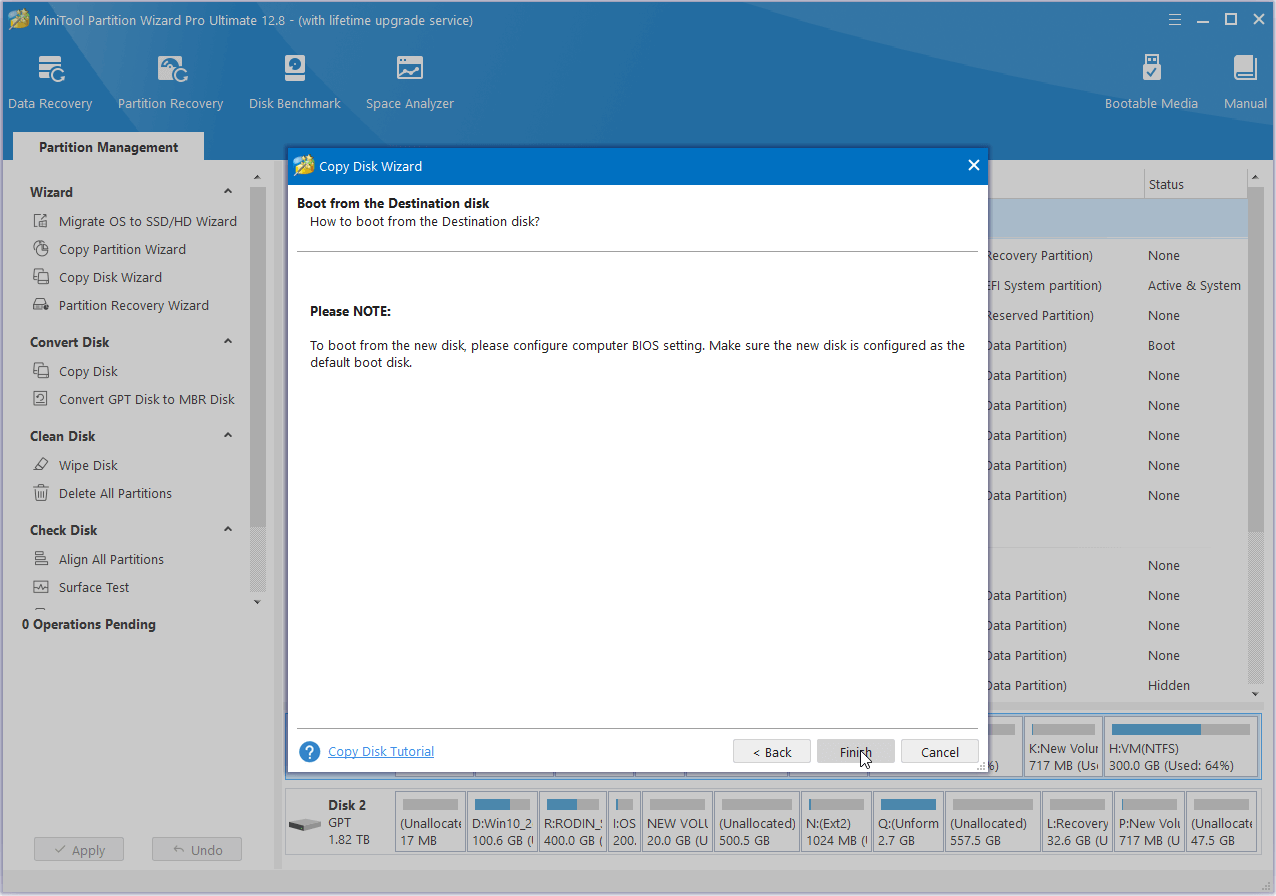
Step 4. You will see the “how to boot from destination disk notice”. Please read this message carefully before you click Finish to go back to the main interface.
Step 5. Finally, press Apply to execute disk cloning. When it completes, you will get an exact copy of your source disk.
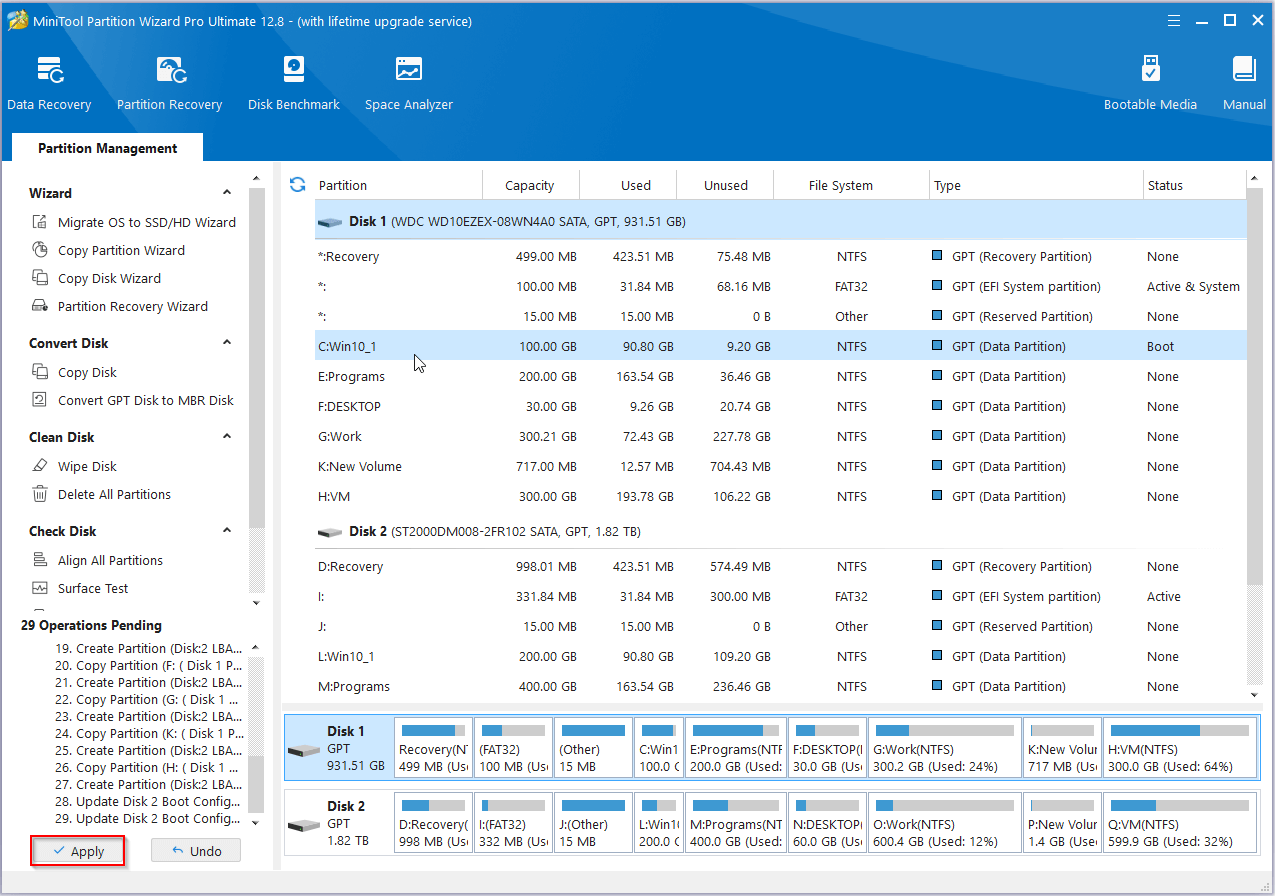
This is the end of hard drive cloning by using MiniTool Partition Wizard. When all is done, you can use this copy directly. And if there is an OS on the drive, you can even boot your computer from that drive as long as you set it as the boot disk in BIOS.
Further Reading: Disk Imaging VS. Disk Cloning VS. Copy & Paste
Now you know imaging software and cloning software are great choices when you need to carry out data protection. However, there are many users who are not clear about the differences among copy & paste, clone, and image. After all, all of them can be regarded as backup methods. Thus they may choose an improper way to do system and application backup. Next, we will talk about their differences and in what situation should they be applied respectively.
Copy & Paste
Copy & paste is most commonly used to back up small amount of personal files, such as pictures, excels, movies. When you copy and paste files from one location to another, you only copy the files but abandon their additional data like the master boot record and the file allocation table, leading to some applications unable to run. Most important of all, a copy & paste system backup won’t boot.
Disk Cloning
Disk cloning is most suitable for transferring the whole disk data to do hard drive upgrading. The reason? Disk copy will copy the entire contents of one hard drive to another including all the information that enables you to boot the operating system from the destination drive. Besides, data on the destination drive will be identical to the source drive when it was created.
It is worth mentioning that when you clone a hard drive, the target drive will be wiped usually and the drive can only be shared by only one cloning. If you need more copies, you should prepare more hard drives.
Disk Imaging
Disk imaging is a great prevention solution on backup issue. The process of making an image backup is very similar with that of disk cloning. However, one more step is carried out – file compression. Thus, a disk image needs to be opened and installed on the drive by using an imaging program before they can be used, which means you can’t restore a hard drive by simply placing original data with disk image files. Moreover, unlike disk cloning, a single hard drive can be shared with multiple disk images.
In a nutshell, copy & paste, disk imaging and disk cloning are three ways to do a backup. Nevertheless, the latter two are more reliable ways, and it’s hard to tell which one is better. But here is one point you can refer to: when backing up drive A to B, if B is used to replace drive A, then disk cloning is more straight forward, you just clone A and use B; if you only backup A to B in case of an emergency, consider disk imaging software, for it is space-saving and more personalized.
Bottom Line
In this post, we mainly explain what is disk imaging software, why an imaging software is needed, differences among most commonly used backup methods and a piece of available disk imaging software. Hope these are helpful to deal with your backup issues.
Now it’s your turn. Please try using MiniTool ShadowMaker to help back up data when there is a necessity. If you have any questions or suggestions towards using MiniTool software, please leave us comments below or email to [email protected]. Thanks for your cooperation.

User Comments :