When trying to launch a virtual machine in VMware Workstation, lots of users encounter an error “The CPU has been disabled by the guest operating system. power off or reset the virtual machine.” Don’t worry. This post of MiniTool summarizes several effective ways to fix it.
According to user reports, the “CPU has been disabled by the guest operating system” error often occurs when they launch a virtual machine, including Windows 10, Linux, and macOS. The issue is often related to improper VT-X settings. In addition, a disk configuration problem, file corruptions, and invalid CPU ID are responsible for the error. Here we provide corresponding solutions. Let’s try them one by one.
Fix 1. Enable VT-X in BIOS
Virtual Technology is an architecture that allows users to run multiple and isolated operating systems on a single server. Once the VT is disabled, you will encounter various problems like VirtualBox no 64 bit and VMware the CPU has been disabled. So, make sure that the Virtualization technology is enabled.
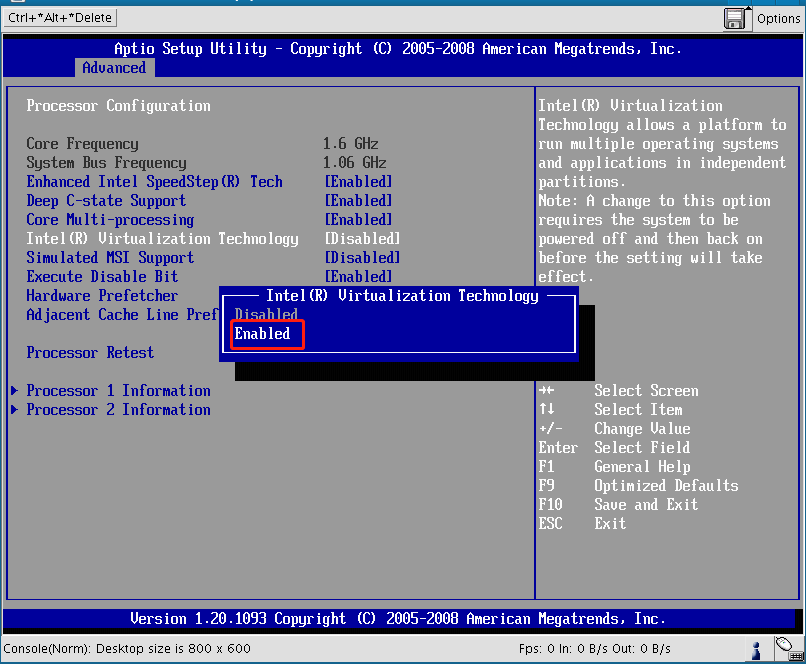
Step 1. Restart your computer and press the Delete or F2 key when the startup screen appears to enter BIOS.
Step 2. Navigate to the Advanced tab, and then select the Intel Virtualization Technology or VTx or VTd option and change it to Enabled using the arrow keys.

Step 3. Press the F10 key to save changes and exit the BIOS. Then your computer will restart.
Now, you can relaunch your virtual machine and see if “the CPU has been disabled by the guest operating system. power off or reset the virtual machine” error gets solved.
Fix 2. Mask Your CPU ID
Some users report that the error is related to a security function that can disable an unsupported or unverified CPU. In this case, you can try masking the CPU ID to bypass the inadequacy. Since VMware Workstation provides no masking function, you need to use a note editor like Notepad++. Here’s how:
Step 1. Download and install a note editor if you don’t have one. Here we take Notepad++ for example.
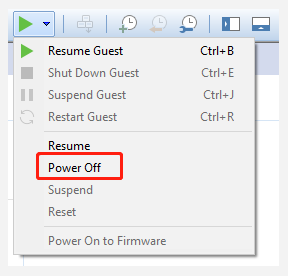
Step 2. Launch the note editor, and then open your VMware Workstation and change the VM ISO image state to Powered Off.

Step 3. Select your guest virtual machine and click on Edit virtual machine settings.
Step 4. In the Hardware tab, select the Hard Disk (SCSI) device from the left pane and copy the exact path of the Disk file from the right pane.
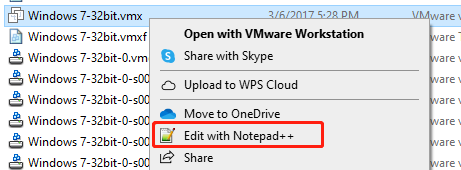
Step 5. Press Win + E keys to open the File Explorer and locate the Disk file path. Now, find a file that has the .vmx extension, and then right-click it and select Edit with Notepad++.

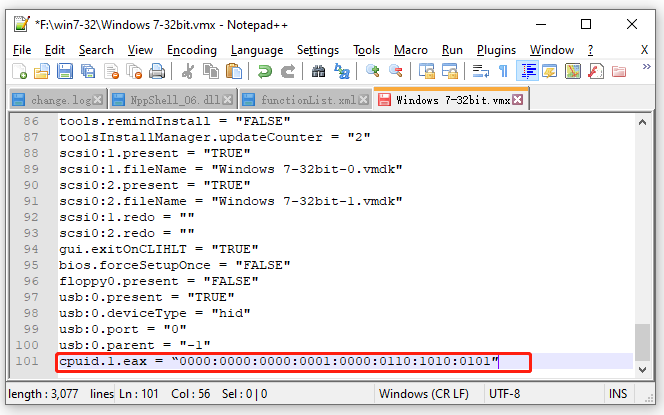
Step 6. When the vmx file opened with Notepad++, scroll down to the bottom of the configuration file and type the following code line. Then press Ctrl + S to save the change and close Notepad++.
cpuid.1.eax = “0000:0000:0000:0001:0000:0110:1010:0101″

Now, you can start the virtual machine from VM and check if “The CPU has been disabled by the guest operating system. power off or reset the virtual machine.” error is fixed.
Fix 3. Create a New Virtual Machine
The VMware the CPU has been disabled by the guest operating system error can be caused by a corrupted virtual machine. In this case, you need to create a new guest machine. But this operation also means that you will lose any data on the guest virtual machine. So, make sure that you make a backup beforehand. If you don’t know how to create a new virtual machine, you can refer to this guide.
MiniTool Partition Wizard DemoClick to Download100%Clean & Safe
Fix 4. Upgrade Your VMware Workstation
If you still receive “The CPU has been disabled by the guest operating system. power off or reset the virtual machine.” error after trying the above methods, you may consider upgrading your VMware Workstation. Some people have proven that the VMware Workstation Pro 15.5 version can fix the error. It’s worth having a try.

![Your Computer’s Trusted Platform Module Has Malfunctioned [FIXED]](https://images.minitool.com/partitionwizard.com/images/uploads/2021/11/your-computers-trusted-platform-module-has-malfunctioned-thumbnail.png)
User Comments :