Some users want to use a new hard drive as the primary hard drive on Windows 10 but don’t know how to complete that. This post from MiniTool Partition Wizard offers a quick tutorial on how to change primary hard drive Windows 10.
I want to buy an SSD, install it on my computer as the primary drive and move my current hard drive to secondary, to use it for a data drive.answers.microsoft.com
How to make another hard drive primary? This post walks you through that.
Before Changing Primary Hard Drive
When a hard drive is far small for storing a large amount of data or delivers poor performance, it is wise to change it. But before changing, choose the right hard drive!
How to choose a new primary hard drive? Generally, decide the hard drive type: HDD or SSD. If you prefer large capacity and low price, an HDD is what you need. But if you pursue high performance, an SSD should be your top choice.
Then, when picking up a drive, you should note that the disk interface should be compatible with your computer.
Once getting the hard drive, you can start to change your primary hard drive on Windows 10.
Start to Change Primary Hard Drive
Generally, there are two steps to change primary hard drive on Windows 10. One is installing Windows 10 on the device that you expect to use as the primary hard drive. The other one is changing the boot order in BIOS. Now follow the guides below to complete the two steps.
Install Windows 10
Use a Migration Tool
You can use the traditional way to install Windows 10. However, using a migration tool like MiniTool Partition Wizard is much easier and quicker as you do not need to reinstall Windows 10. How easy and quick is that? The migration process is below.
Step 1: Get the migrate tool (MiniTool Partition Wizard).
MiniTool Partition Wizard is a safe partition manager for Windows operating system. With it, you can not only migrate OS but also test hard drive health and speed, recover lost data, and more.
MiniTool Partition Wizard DemoClick to Download100%Clean & Safe
Step 2: Connect your hard drive where you want to install Windows 10.
Step 3: Launch the migrate tool and the connected hard drive should be loaded on the interface of the migration tool. If not, click the Reload Disk option under the General tab.
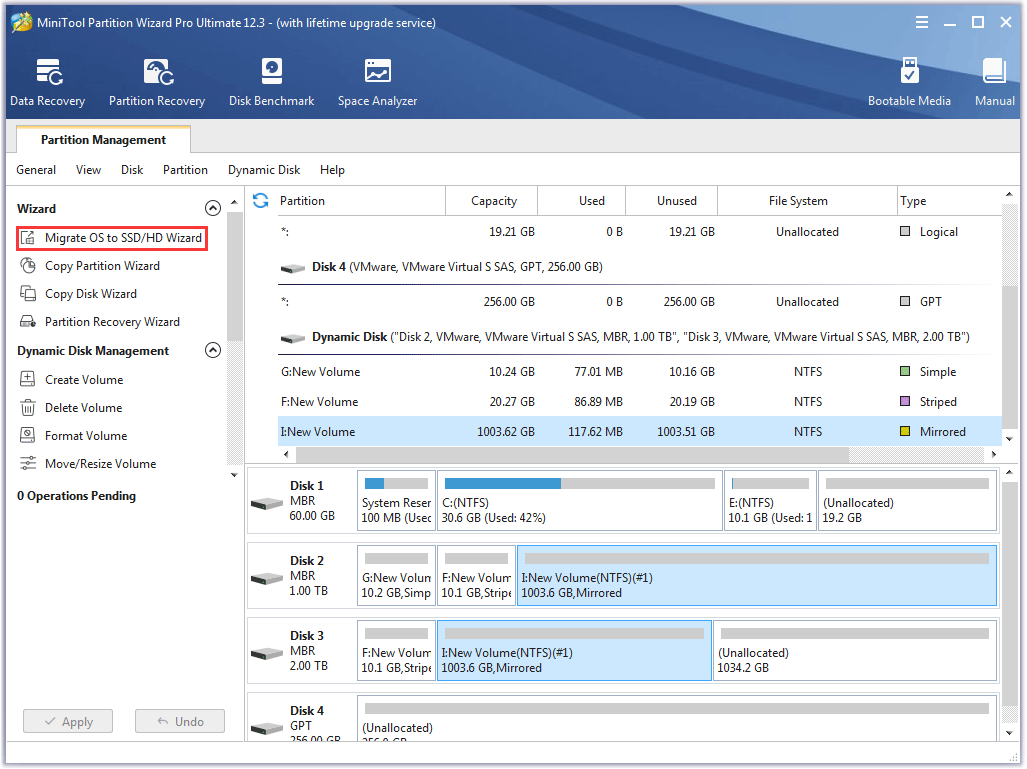
Step 4: Click the Migrate OS to SSD/HD feature from the left side of the software interface.
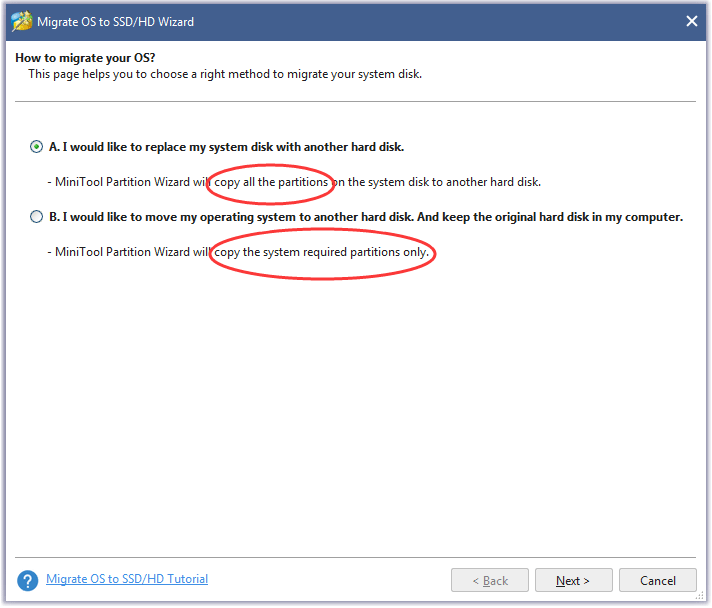
Step 5: Choose the way to migrate the system disk and click the Next button to continue.
On the software window, you will see two migrate methods: Option A and Option B. If you just want to move the operating system, please choose Option B; if you want to remove all data, please choose Option A.
Step 6: Select the hard drive you want to use as the primary hard drive as the target drive and then click the Next button to continue.
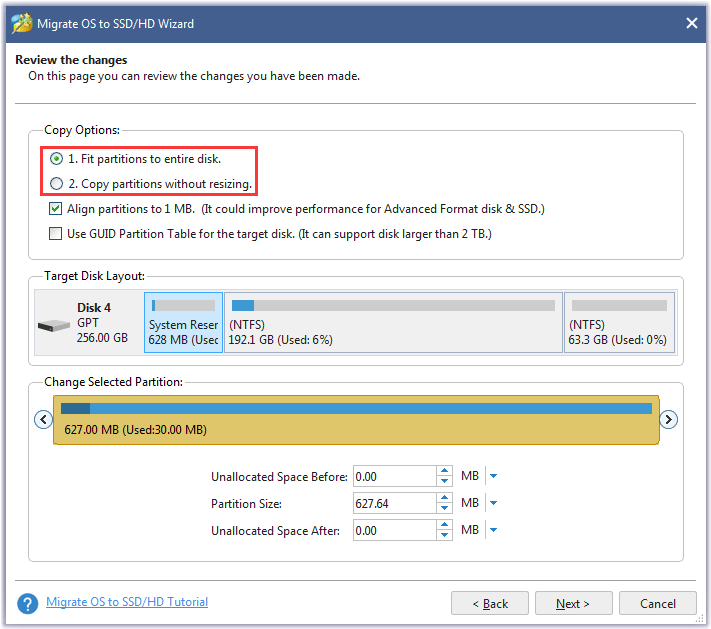
Step 7: Choose the copy method to decide whether to change the target disk layout and then click the Next button.
- Option 1: Fit partitions to entire disk
- Option 2: Copy partitions without resizing
Step 8: Read the note on the current window, click the Finish button, and click the Apply button on the main interface to execute the pending operation.
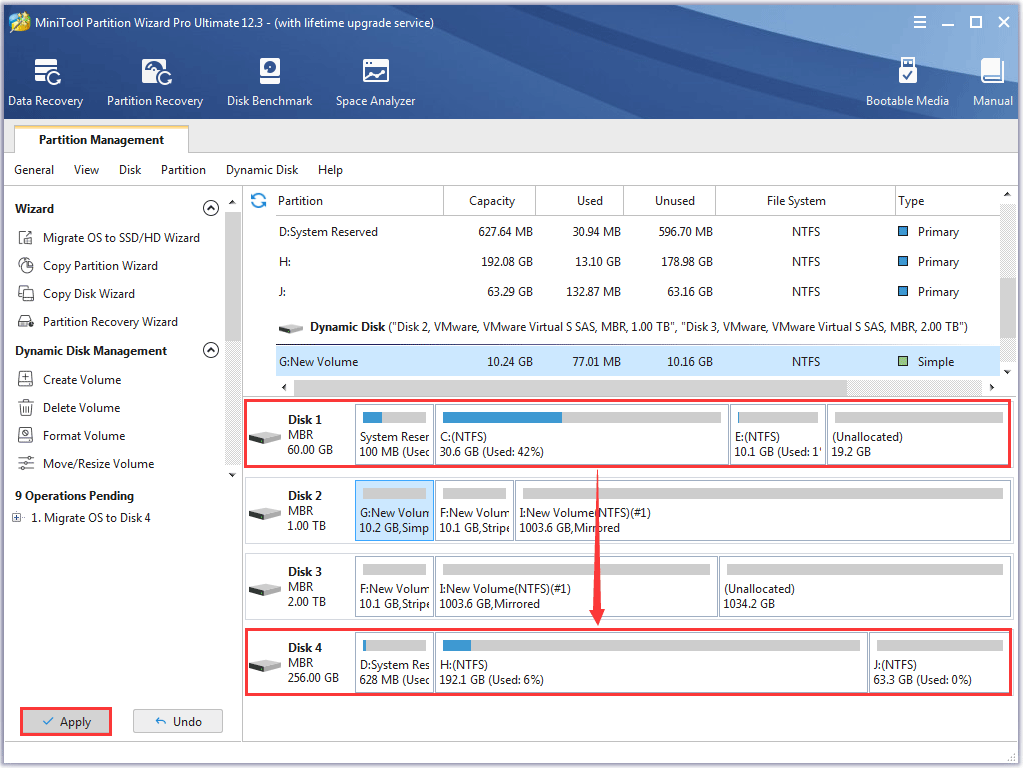
Step 9: Click the Yes button on the mini window.
The process will be completed in several minutes. In the disk map of the migration tool, you can see that the system partition or the whole hard drive has been migrated to the new primary hard drive.
Try Fresh or Clean Installation
The traditional way to install Windows 10 is also displayed below. Compared to the first way, this way is more complex.
Preparation:
Before clean installing Windows 10 on the new primary hard drive, you need to prepare an empty USB flash drive no smaller than 8GB (It will be formatted to a Windows installation media).
Then, you can follow the guide below to clean install Windows 10 on the target hard drive.
Step 1: Disconnect unnecessary peripherals and connect the empty flash drive to your computer
Step 2: Go to the Microsoft page to download Windows 10 installation media.

Step 3: Launch the downloaded file and click the Accept button on the Windows 10 Setup window to agree to the terms.
Step 4: Choose the Create installation media (USB Flash drive, DVD, or ISO file) for another PC option and click the Next button.
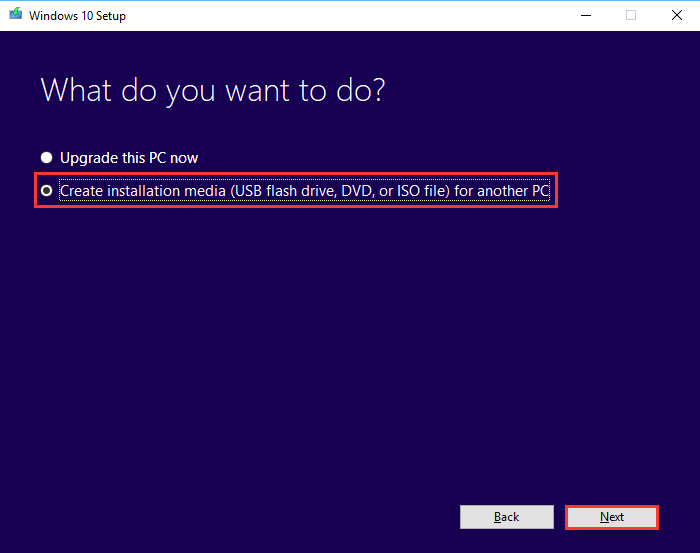
Step 4: Select the correct language, architecture, and edition of Windows 10 and then click the Next button to continue.
Step 5: Select the USB flash drive option under Choose which media to use and the Next button.
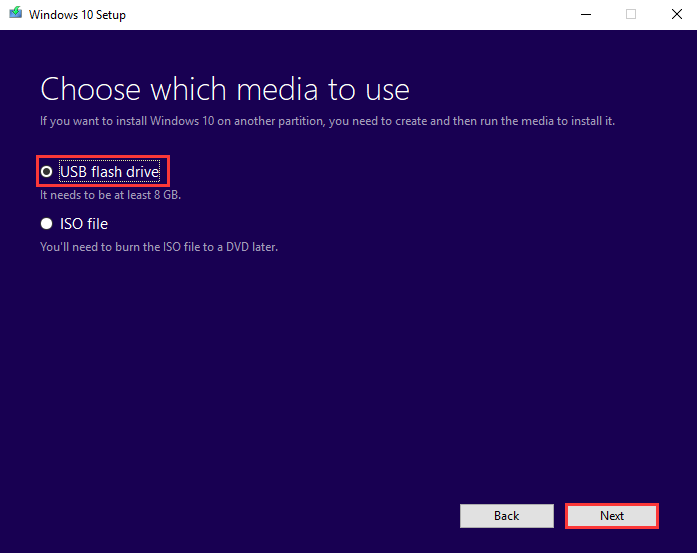
Step 6: According to the drive letter, choose the USB flash drive you connect to create a bootable drive for installation and click the Next button.
Step 7: When the process is completed, click the Finish button.
Step 8: Safely remove the old primay hard drive from your computer and install the new primary hard drive on the computer.
Step 9: Reboot your computer, enter BIOS (the steps are detailed below) and change the boot order to boot your computer from the installation media.
Step 10: You will be taken to the Windows 10 setup window once your computer boots from the installation media. On this window, set language, time, and input method. Then, click the Next button to continue.
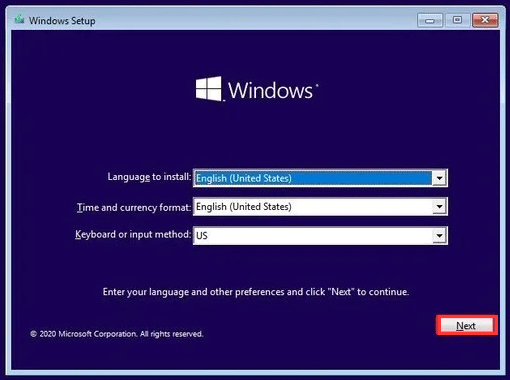
Step 11: Click the Install now button. Then, follow the on-screen wizard to finish the clean installation.
Enter BIOS
After installing Windows 10, you should enter BIOS to change the boot order to make the hard drive the primary hard drive.
On Windows 10, it is easy to enter BIOS. The steps go like this:
Step 1: Press Windows + I to access Windows Settings.
Step 2: On the Settings window, choose the Update & security option.
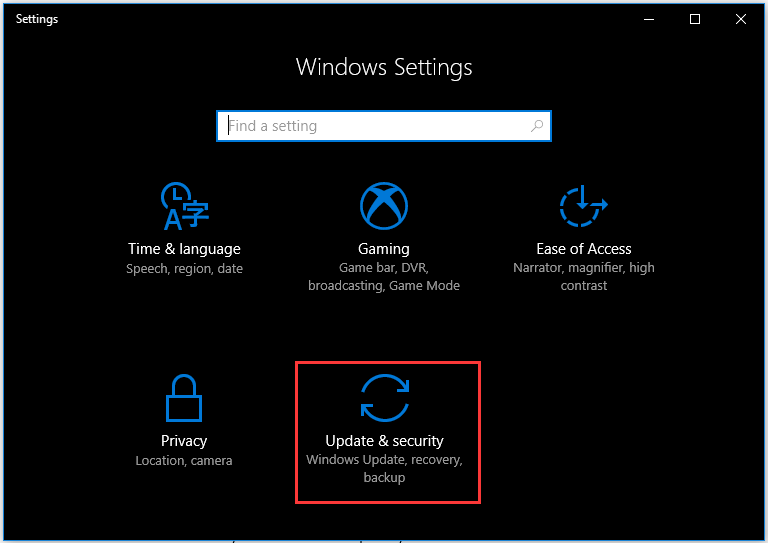
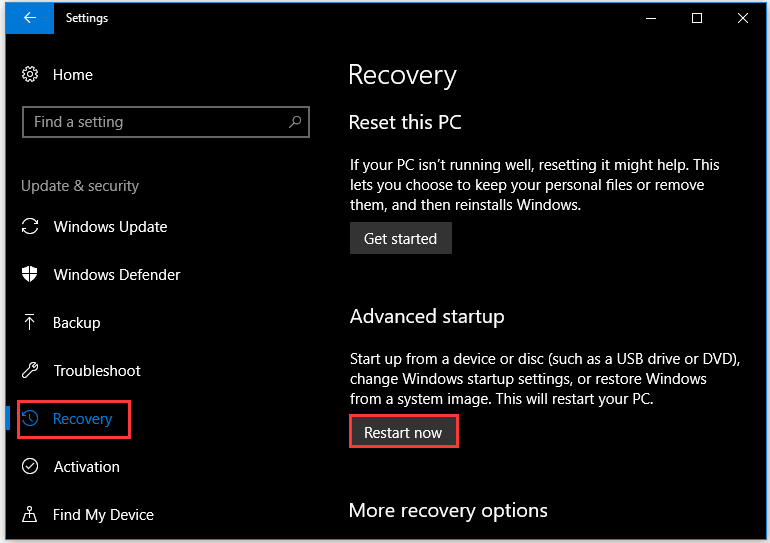
Step 3: Switch to the Recovery option in the left pane and then click the Restart now button under Advanced startup.
Step 4: On the BIOS menu, all connected hard drives should be listed under the Boot tab. Switch to the hard drive that you want to set as the primary hard drive.
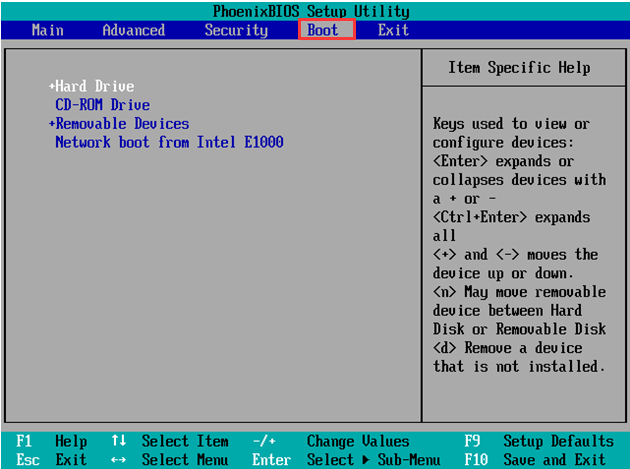
Step 5: Hit the F10 to save the change and then exit from the BIOS menu.
Well, now restart your computer and it will boot from the hard drive you have chosen. If your computer boots successfully, you have changed the primary hard drive. You can store more data or enough a better computer experience.
How to change primary hard drive on Windows 10? Follow the quick guide.Click to Tweet
After changing the primary hard drive, you may wonder how to deal with the original primary hard drive. The post What to Do with Old Hard Drives? Reuse, Sell, or Destroy Them shows you how to do that.
Verdict: How to Change Primary Hard Drive Windows 10
That’s all about “how to change primary hard drive Windows 10”. Have you changed your primary hard drive successfully? Tell us that in the comment zone below. You are also welcome to leave your doubts about this post in this zone and we will reply to you soon enough.
MiniTool Partition Wizard is a professional disk manager for Windows computers. If you have some doubts about or suggestions for the software, please contact us via [email protected]. We will reply to you as soon as possible.
How to Change Primary Hard Drive Windows 10 FAQ
Apart from the two methods, you can also try a migration tool to complete the transfer.
Go to BIOS and change the boot order – making D drive as the first boot order. The steps on Windows 10 go like this:
- Press Windows + I to access Windows Settings.
- On the Settings window, choose the Update & security option.
- Switch to the Recovery option in the left pane and then click the Restart now button under Advanced startup.
- On the BIOS menu, all connected hard drives should be listed under the Boot tab. Switch to D drive and make it be the first boot order.
- Hit the F10 to save the change and then exit from the BIOS menu.
- Restart your computer and it will be booted from the D drive.

User Comments :