What is CDPUserSvc? Should it be disabled? A great many users are unclear about the nature of CDPUserSvc and its functionality. This post of MiniTool will introduce CDPUserSvc and the way to disable it.
What Is CDPUserSvc
Many users find the CDPUserSvc in the service configuration list. Its executable file is located at the C:WINDOWSsystem32svchost.exe -k UnistackSvcGroup path. In fact, it is a component of Microsoft service that’s used for Connected Devices and Universal scenarios.
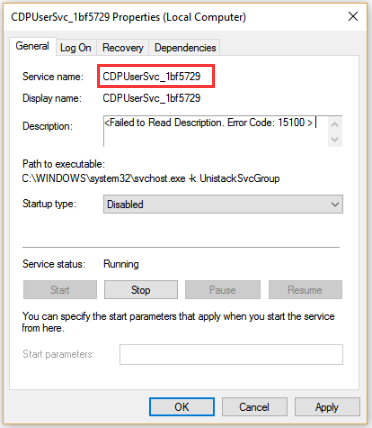
Usually, this service has a random tag at the end of the name such as CDPUserSvc_1bf5729. The random tag is often used by viruses to attack the computer, which confuses many users if the nature of the CDPUserSvc service is safe.
The fact is that service host CDPUserSvc is totally safe. Sometimes, the random tags will be used by the developers to name the service. What’s the functionality of CDPUserSvc? It’s used to make a connection with Bluetooth devices easier. It is a new service that has only been found in Windows 10 so far.
Right now, I believe that you already have an overall understanding of the CDPUserSvc service. Is it safe to disable the service? Please keep reading.
Is It Safe to Disable CDPUserSvc
Lots of users are wondering whether it is safe to disable CDPUserSvc. The answer depends on what connection devices your computer is using. If you are not using a Bluetooth device with the computer, it is safe to the CDPUserSvc service. Besides, disabling the service can help fix the Wi-Fi disconnection issues or other related issues.
How to Disable CDPUserSvc in Windows 10
To help you disable the CDPUserSvc service in Windows 10, we will walk you through 2 common methods. Now, let’s see how to disable CDPUserSvc.
Method 1. Disable CDPUserSvc in Services Manager Window
The first and simplest way to disable CDPUserSvc is to use the Services manager. To do so, follow the steps below:
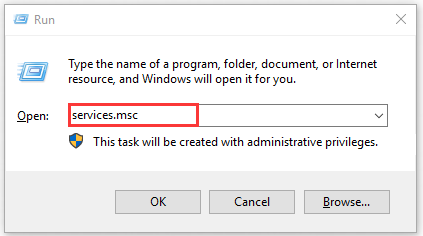
Step 1. Press the Win + R keys to open the Run dialog box, and then type services.msc in the box and hit Enter.
Step 2. Navigate to the Connected Devices Platform User Service from the list, right-click it, and select Properties.
Step 3. Click on the Stop button and change the Startup type to disabled.
Step 4. Click on OK and Apply buttons to execute this change.
Method 2. Disable CDPUserSvc Using Registry Editor
You can also disable the service host CDPUserSvc by changing the registry key. Here is a simple guide for you.
Step 1. Press the Win + R keys to open the Run dialog box, and then type regedit in the box and hit Enter.
Step 2. Then navigate to the following path.
HKEY_LOCAL_MACHINESYSTEMCurrentControlSetServicesCDPUserSvc
Step 3. Double click the Start value and change it value date from 2 to 4.
Step 4. Restart your computer and check if the CDPUserSvc service has been disabled
The above 2 methods are commonly used to disable the CDPUserSvc service. If the 2 methods fail to get rid of the error code, you can try isolating the process. You can open the Windows PowerShell (Admin) and run the sc config cdpusersvc type=own command in it to isolate the service.


User Comments :