How do you upgrade the ASUS ZenBook Pro SSD? If you are seeking a guide for this question, you can focus on this post. Here, Partition Magic will show you the step-by-step guide on the ASUS ZenBook Pro SSD upgrade.
Why Need to Upgrade the ASUS ZenBook Pro SSD?
ASUS is a multinational technology company founded in 1989. Its main products are desktops, laptops, tablets, motherboards, graphics cards, monitors, storage devices, peripherals, mobile phones, wearable devices, projectors, network communication equipment, workstations, and servers.
Currently, ASUS has been rated as one of the best laptop brands in the world. ASUS offers many excellent laptop series, such as the ZenBook series with high-end design and quality, the affordable and reliable VivoBook series, and the ROG series with extreme gaming performance.
Among them, the ASUS ZenBook Pro is a popular series of laptops, known for its stylish design and good performance.
However, after using the ASUS ZenBook Pro for a while, the hard drive may run out of space, stop working, or run slowly. Therefore, it is necessary to upgrade the ASUS ZenBook Pro SSD to a better one. Here are some common reasons:
- Faster boot times: Upgrading to an SSD can reduce your boot times and make your laptop more responsive.
- Fast application loading times: Upgrading to an SSD can greatly enhance your workflow by loading applications and programs at extremely fast speeds.
- Better PC performance: Upgrading to an SSD can make your PC run smoother. From browsing the web to launching games, everything will feel smoother and faster.
How to Choose the Suitable SSD for ASUS ZenBook Pro?
Before you start upgrading the ASUS ZenBook Pro SSD, you need to choose a proper SSD for your computer first. Here are the main aspects that you need to notice:
#1. Form Factor
The ASUS ZenBook Pro laptop can use M.2 2280 PCIe 4.0×4 NVMe SSDs.
#2. Capacity
The capacity you choose depends on your storage needs. Consider how much space you currently use and how much space you anticipate you will need in the future.
#3. Performance
In addition to the above aspects, you should also choose a disk with ideal performance based on your needs, including capacity, rotation speed, read and write speeds, cache, vibration, etc. Before you try to buy a drive, you should carefully read the drive’s product description to learn more about these features.
There are many well-known SSD brands on the market. Among them, Samsung SSD is a great choice for most people due to its excellent performance, but the price is relatively expensive. Considering the price, you can choose other brands you like, such as Kingston, Intel, WD, etc.
After choosing a new compatible SSD for ASUS ZenBook Pro, you can continue reading below to start upgrading your ASUS ZenBook Pro SSD.
How to Upgrade the ASUS ZenBook Pro SSD?
How to perform an ASUS ZenBook Pro SSD replacement? The section below will illustrate the whole process in detail. Please keep reading the post.
Part 1: Before SSD Upgrade
There are some basic prerequisites for the ASUS ZenBook Pro SSD upgrade:
- Prepare a USB adapter: With it, you can connect the prepared SSD to the computer as an external drive.
- Prepare a suitable Phillips screwdriver: With it, you can open the computer case and remove the original SSD.
Part 2. Initialize the New SSD
Since the SSD is brand new, it needs to be initialized to MBR or GPT so that you can create partitions on the disk to use it. You can initialize SSD in Windows Disk Management.
Step 1: Connect the new SSD to your laptop with a USB adapter.
Step 2: Press the Win + R key to open the Run dialog box. Then input diskmgmt.msc and click on OK to open Disk Management.
Step 3: In the Disk Management window, right-click on the new disk and select Initialize Disk.
Step 4: In the pop-up window, select MBR or GPT according to your needs and click on OK. Then follow the on-screen instructions to finish the operation.
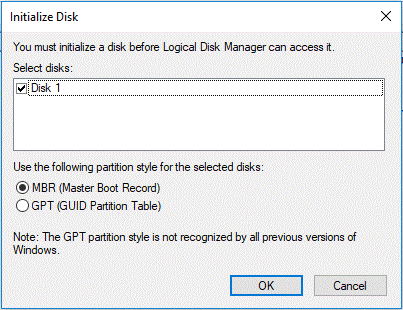
After initializing the disk, you can keep the new disk connected to your computer and then go to Part 3 to migrate data and system to the new SSD.
Part 3. Migrate Data to the New SSD
Before performing the ASUS ZenBook Pro SSD upgrade, you need to migrate the data and system from the original hard drive to a new larger/faster SDD.
To do that, you can use MiniTool Partition Wizard, which is a very professional and reliable partition disk manager. It provides the Migrate OS to SSD/HD feature to help you migrate OS to SSD without reinstalling OS, and the Copy Disk feature to clone all data easily.
In addition, this feature-rich tool can also help you format SD card FAT32, rebuild MBR, change cluster size, convert MBR to GPT, resize/move partition, partition a hard drive, check disk for errors, recover data from hard drives, and more.
Now you can follow the steps below to use MiniTool Partition Wizard to migrate data to the new SSD. Before that, you should download and install this software on your PC.
MiniTool Partition Wizard DemoClick to Download100%Clean & Safe
Way 1. Use the Migrate OS to SSD/HD Feature
The Migrate OS to SSD/HD feature can also help you migrate your OS and data to an SSD with ease. Here’s how to do that:
Step 1: Launch MiniTool Partition Wizard to enter its main interface.
Step 2: Select Migrate OS to SSD/HD Wizard from the left action panel. In the pop-up window, choose an option to migrate the OS based on your needs. Then click Next.
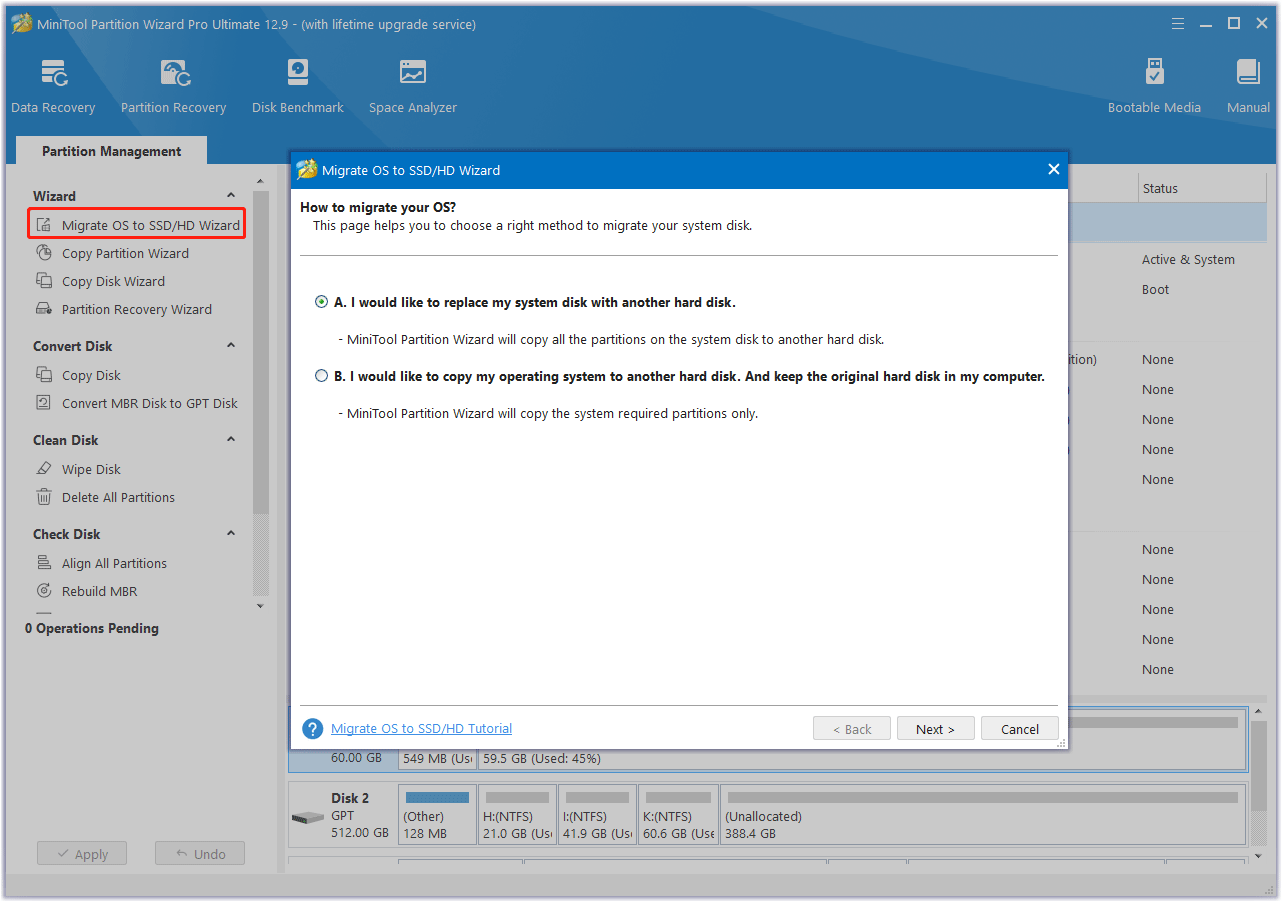
Step 3: In the next window, select the new SSD and click Next. When prompted, click Yes to continue.
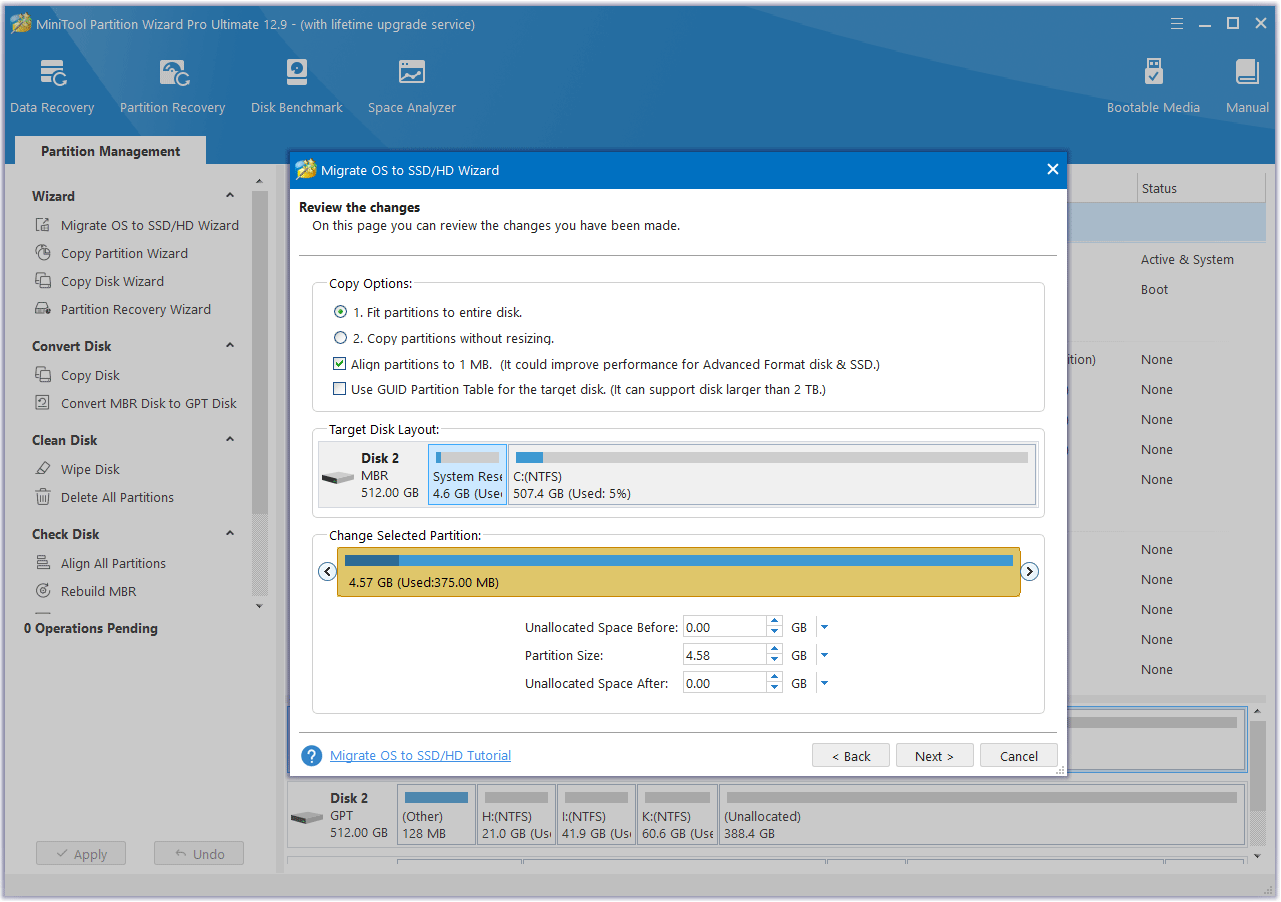
Step 4: After that, choose the desired copy options and change the Disk Layout. Then, click Next.
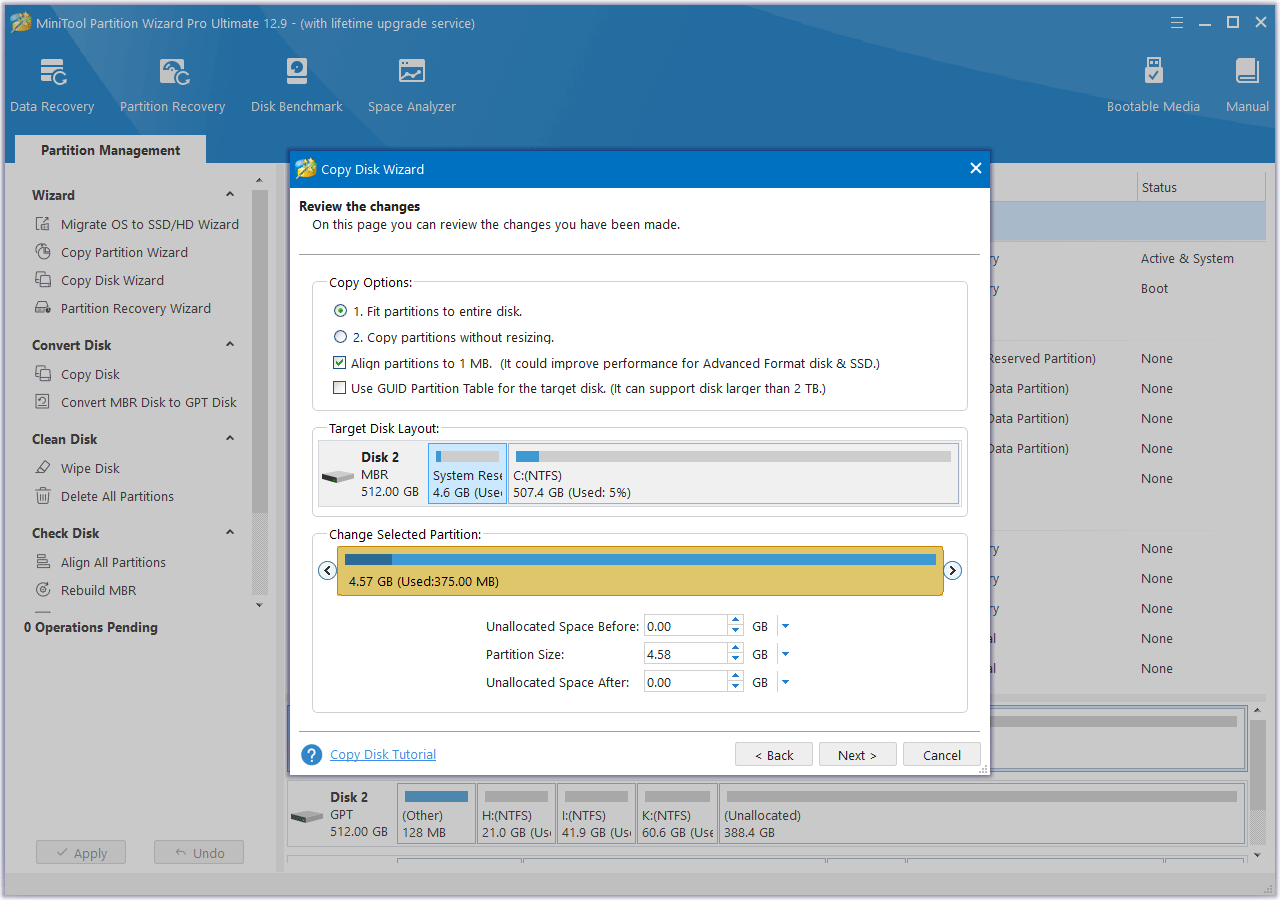
- Fit partitions to entire disk: All the partitions on the original disk will be extended by an equal proportion to fill the entire hard drive.
- Copy partitions without resizing: All the partitions on the original disk are copied into the hard drive without changes in size or location.
- Align partitions to 1 MB: It is recommended for improving the read and write performance of the SSD.
- Use GUID partition table for the target disk: This option only appears when your original disk is an MBR disk, which can only use 2TB disk space at most.
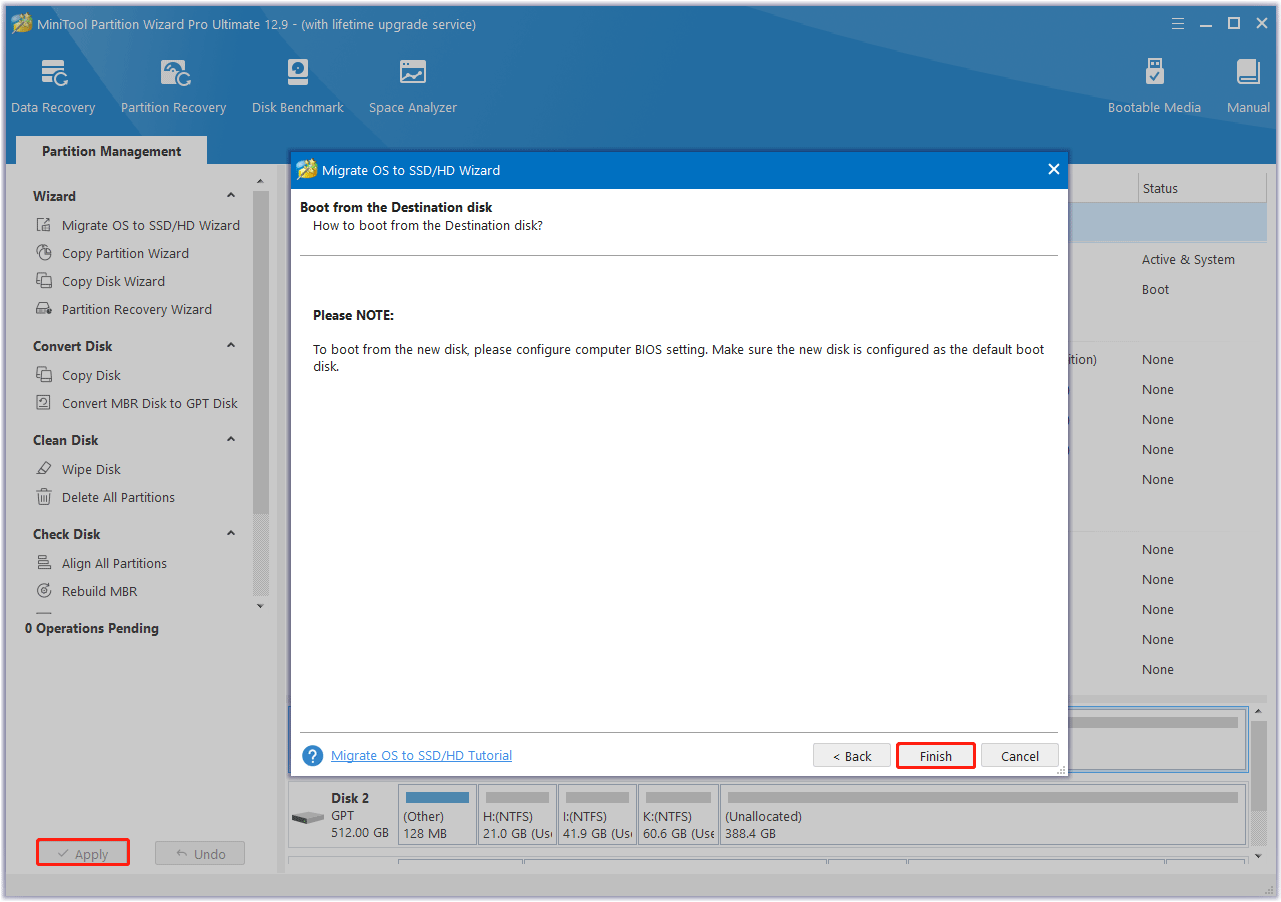
Step 5: Finally, click Finish and Apply to complete the pending operation.
Way 2. Use the Copy Disk Feature
The Copy Disk feature can help you clone the original drive data to the new SSD. So, you can try this feature to achieve your goals. Here’s the guide:
Step 1: Launch MiniTool Partition Wizard to enter its main interface.
Step 2: Select Copy Disk Wizard from the left action panel. Then click on Next to continue.
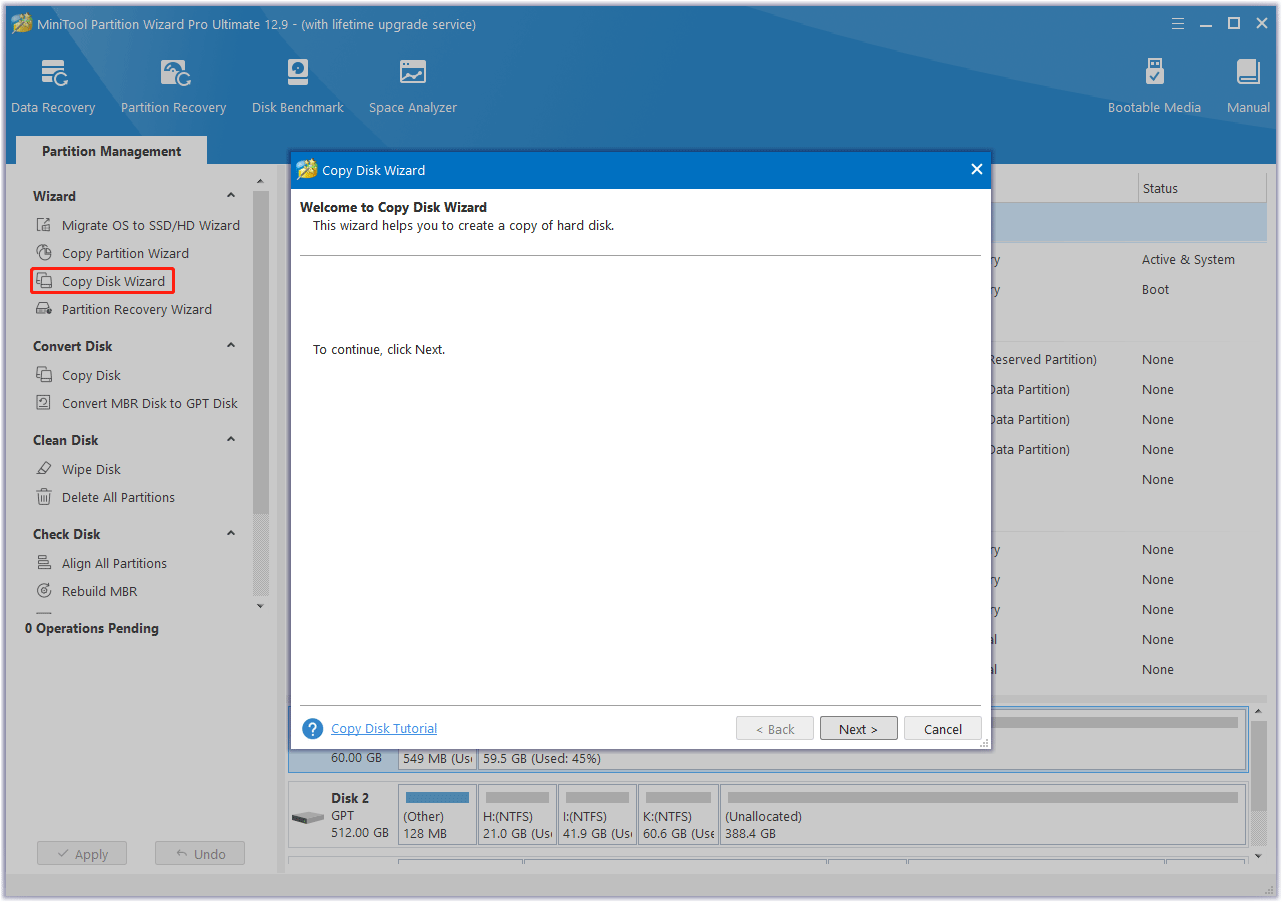
Step 3: In the next window, choose the original disk to copy and click on Next.
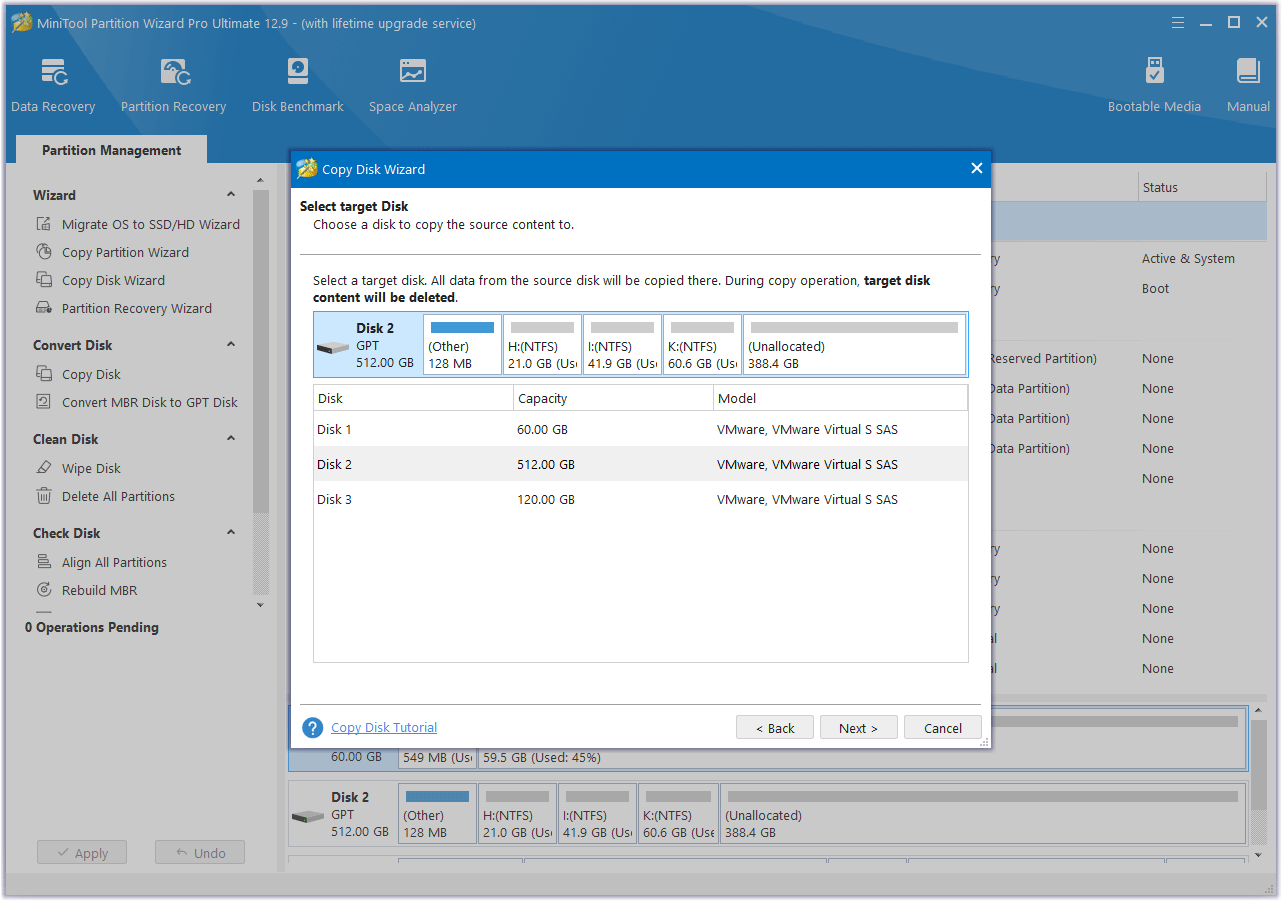
Step 4: After that, select the new SSD as the destination disk and click on Next. If you are warned that all the data on the disk will be destroyed, click on Yes to confirm.
Step 5: In the Review the changes window, choose the preferred copy options. Also, you can configure the target disk layout according to your needs. Once done, click on Next.
Step 6: Finally, click on Finish and Apply to complete the pending operation.
Part 4. Replace the Old Hard Drive with the New SSD
After cloning the data and system on the original drive to the new SSD, now it is time to replace the original drive with the new SSD. The replacement process is complicated and risky, so you need to be careful when doing it.
You can refer to the following steps to perform the ASUS ZenBook Pro SSD replacement.
- Disconnect the laptop from the power source and turn it off.
- Use a Phillips screwdriver to remove all the screws on the back of the laptop. Remember the location of these screws so you can put them back in place, as these screws can be different lengths.
- Remove the entire back cover of the laptop and locate the M.2 SSD.
- Unscrew the fasteners on the end of the SSD and pull the old M.2 SSD out of the slot at an angle.
- Insert the new M.2 SSD into the slot and screw in the fasteners.
- Put the bottom plate back in and secure it.
How to Deal with the Old ASUS ZenBook Pro SSD
What should you do with the old ASUS ZenBook Pro hard drive? To reutilize the old hard drive, you can consider repartitioning it. If you want to sell the old hard drive, you should wipe all the data to prevent someone from stealing your data.
For that, you can try MiniTool Partition Wizard. It can help you repartition and wipe the old hard drive. Before that, you should connect the old hard drive to your PC.
MiniTool Partition Wizard FreeClick to Download100%Clean & Safe
Repartition Old Hard Drive
- Launch MiniTool Partition Wizard to get the main interface. Right-click on the old hard drive, and choose Delete All Partitions from the menu. Then click on Yes to confirm the operation.
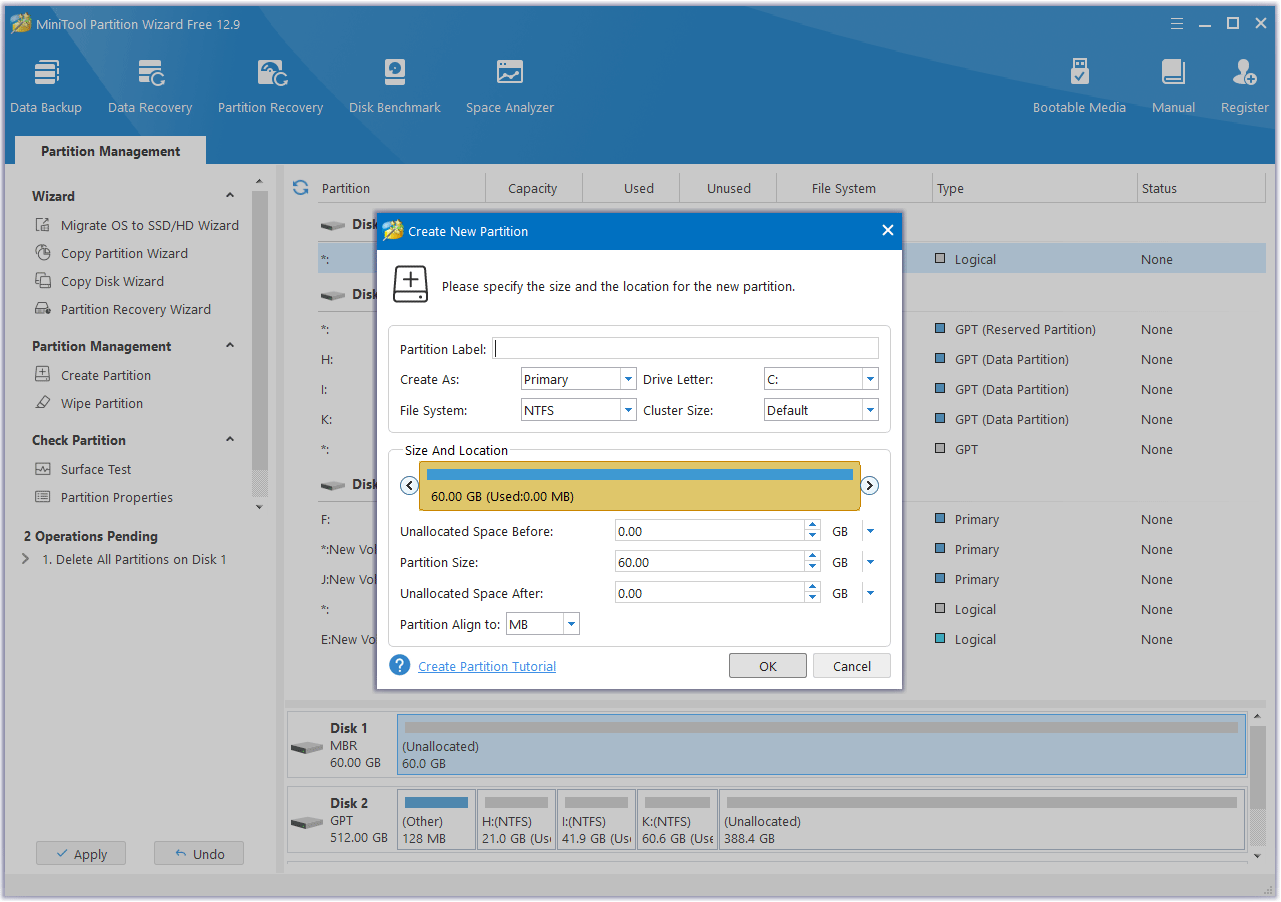
- Now you can preview the unallocated space on the old hard drive. Right-click on the unallocated space and choose Create.
- Customize the partition you will create based on the on-screen prompt. Then, click on OK.
- Finally, click on Apply to execute all the pending operations.
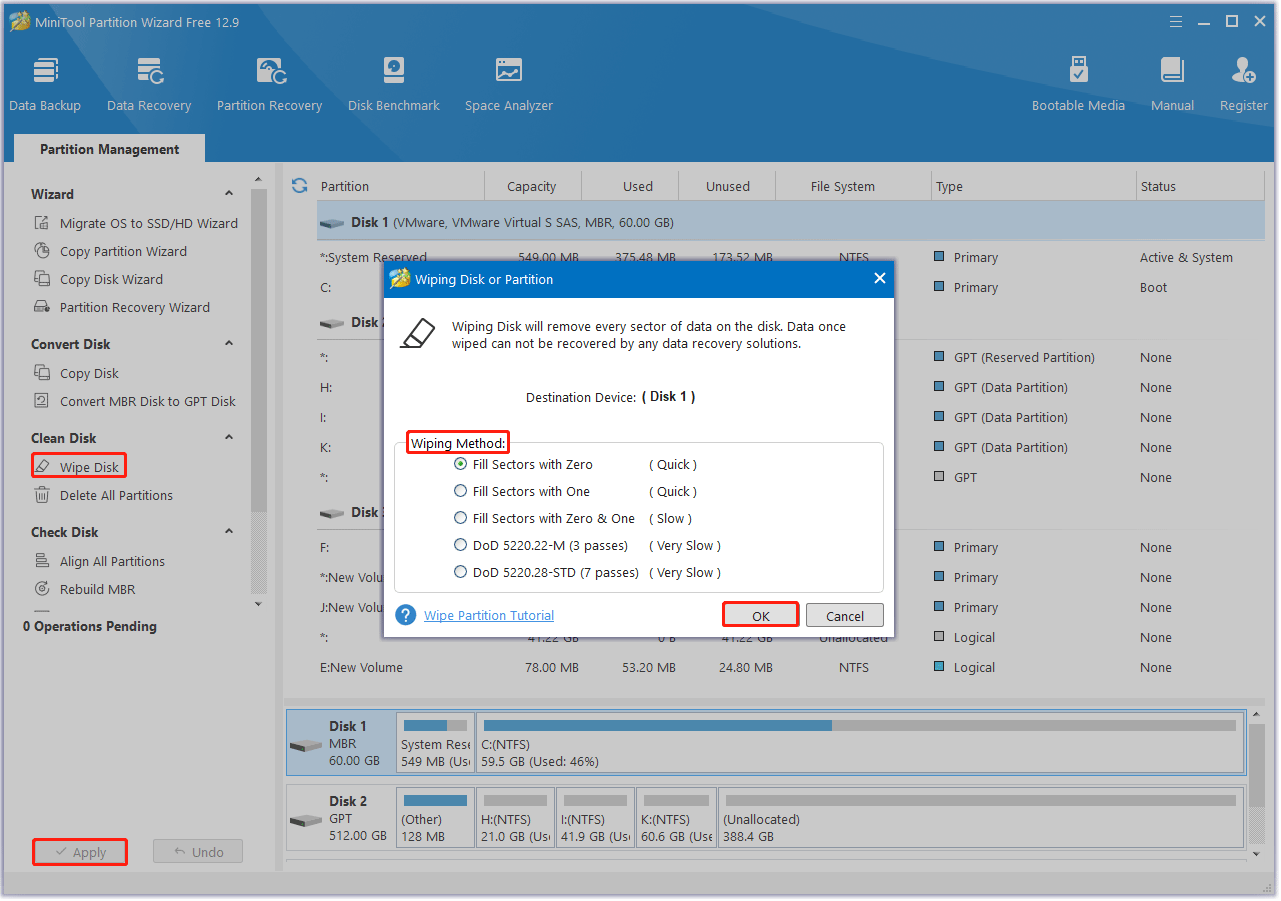
Wipe the Old Hard Drive
- In the main interface of MiniTool Partition Wizard, select the old drive that you want to wipe and choose Wipe Disk from the left action panel or the right-click menu.
- Choose one of five wiping methods listed on the pop-up window and click on OK. The more time it costs, the higher security you will have.
- Click on Apply to carry out the operation. Then the wiping process starts automatically and you just need to wait patiently until the process ends.
Bottom Line
Upgrading the SSD in your ASUS ZenBook Pro is an easy and cost-effective way to significantly improve the performance of your laptop. By following this guide, you can confidently perform an ASUS ZenBook Pro SSD upgrade yourself and enjoy a faster, more responsive laptop.
If you encounter certain issues while using MiniTool Partition Wizard, you can send us an email via [email protected] to get a quick reply.



User Comments :