Is ASUS ROG Zephyrus G14 SSD upgradeable? Why upgrade SSD in ASUS ROG Zephyrus G14? How to upgrade the SSD? This post from Partition Magic introduces a step-by-step guide on the ASUS ROG Zephyrus G14 SSD upgrade. You can take a look!
Is ASUS ROG Zephyrus G14 SSD Upgradeable?
The ASUS Republic of Gamers (ROG) Zephyrus G14 is an AMD Advantage gaming laptop. It uses ASUS’s AniMe Matrix and vapor chamber cooling as well as AMD’s Smartshift and Smart Access Memory technologies.
Some users want to do ASUS ROG Zephyrus G14 SSD replacement to improve the performance of this computer, but they don’t know if the SSD of this computer can be upgraded. After all, some computers’ SSDs are directly soldered to the motherboard, which makes the SSD unable to be upgraded.
After investigation, the answer is yes, the SSD of this computer can be upgraded. Please continue reading for detailed steps.
Preparations Before Upgrading the ASUS ROG Zephyrus G14 SSD
There are two reasons why you might want to do ASUS ROG Zephyrus G14 hard drive upgrade. The first is to get more storage space; the second is to get faster read and write speeds for the SSD.
So, what should you do before upgrading your laptop? Here are some tips:
- Buy the right SSD: You should buy the right SSD to replace the old SSD on your Zephyrus G14. First, the new SSD should be compatible with the laptop, and second, it is best to have more memory than the old SSD.
- Prepare the right tools: Refurbishing the G14’s SSD requires access to its M.2 SSD slot. You will need the right tools, such as a Phillips screwdriver, an anti-static wrist strap, and a plastic pry tool.
- Back up your files: Before installing a new SSD, it is best to back up your important files in advance. Here we recommend using MiniTool Partition Wizard to back up your data.
ASUS ROG Zephyrus G14 Hard Drive Upgrade Without Data Loss
How to do an ASUS ROG Zephyrus G14 SSD replacement? Here is a step-by-step guide for you to do that.
There are two ways to upgrade ASUS ROG Zephyrus G14 SSD. One is to replace the old SSD with a new one, and then you need to reinstall a new Windows. The second is to migrate the operating system, you need to clone the entire computer to the new SSD, and then replace the old SSD with the new one.
Here we will introduce you to the second method to upgrade ASUS ROG Zephyrus G14 SSD without losing data. But the second method requires the help of third-party software – MiniTool Partition Wizard.
Part 1: Initialize a New SSD
Because the SSD is new and unused, you need to initialize it to MBR or GPT before you can use it. Here’s how to do this using Windows’ built-in tool – Disk Management.
Step 1: Connecting a new SSD to your ASUS ROG Zephyrus G14 computer via a USB adapter.
Step 2: Press the Windows logo key + R to open the Run box. Then input diskmgmt.msc and click OK to open Disk Management.
Step 3: Right-click the new SSD disk and select Initialize Disk.
Step 4: In the pop-up window, set the partition style the same as the source SSD disk (MBR or GPT) and click on OK to confirm. Then follow the on-screen instructions to finish the operation.
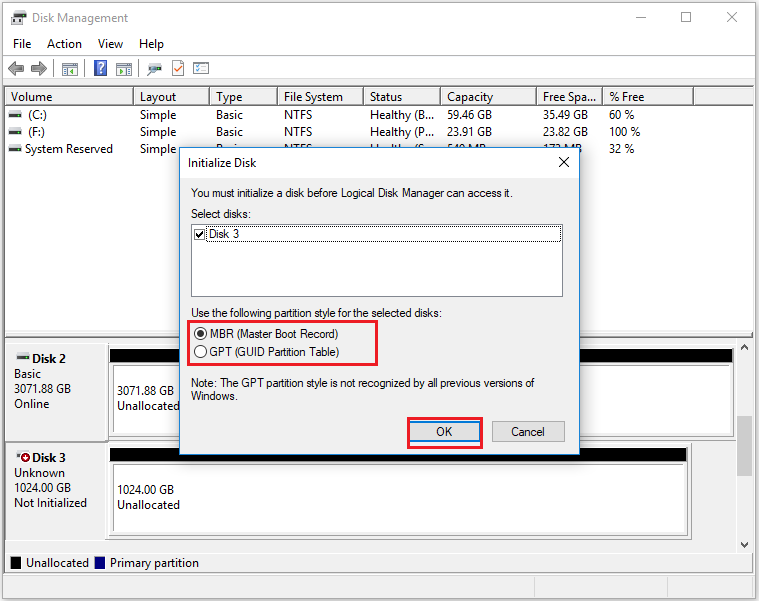
Now move on to part 2 to clone the old disk to the new one.
Part 2: Clone Old SSD to New SSD
When you use the second method to upgrade the SSD, you need to use a third-party tool — MiniTool Partition Wizard. The Copy Disk or Migrate OS to SSD/HD feature of MiniTool Partition Wizard can help you do this.
MiniTool Partition Wizard not only can help you create/delete/resize/extend partitions, but also help you convert MBR to GPT, rebuild MBR, recover data from hard drive, change cluster size, format SD card FAT32, and more.
Here’s how to utilize the Copy Disk feature to duplicate the entire disk:
MiniTool Partition Wizard DemoClick to Download100%Clean & Safe
Step 1: Connect the new SSD to your ASUS ROG Zephyrus G14 laptop via a USB adapter. Then launch MiniTool Partition Wizard to its main interface, right-click the disk, and choose Copy. You can also click Copy Disk Wizard from the left action panel.
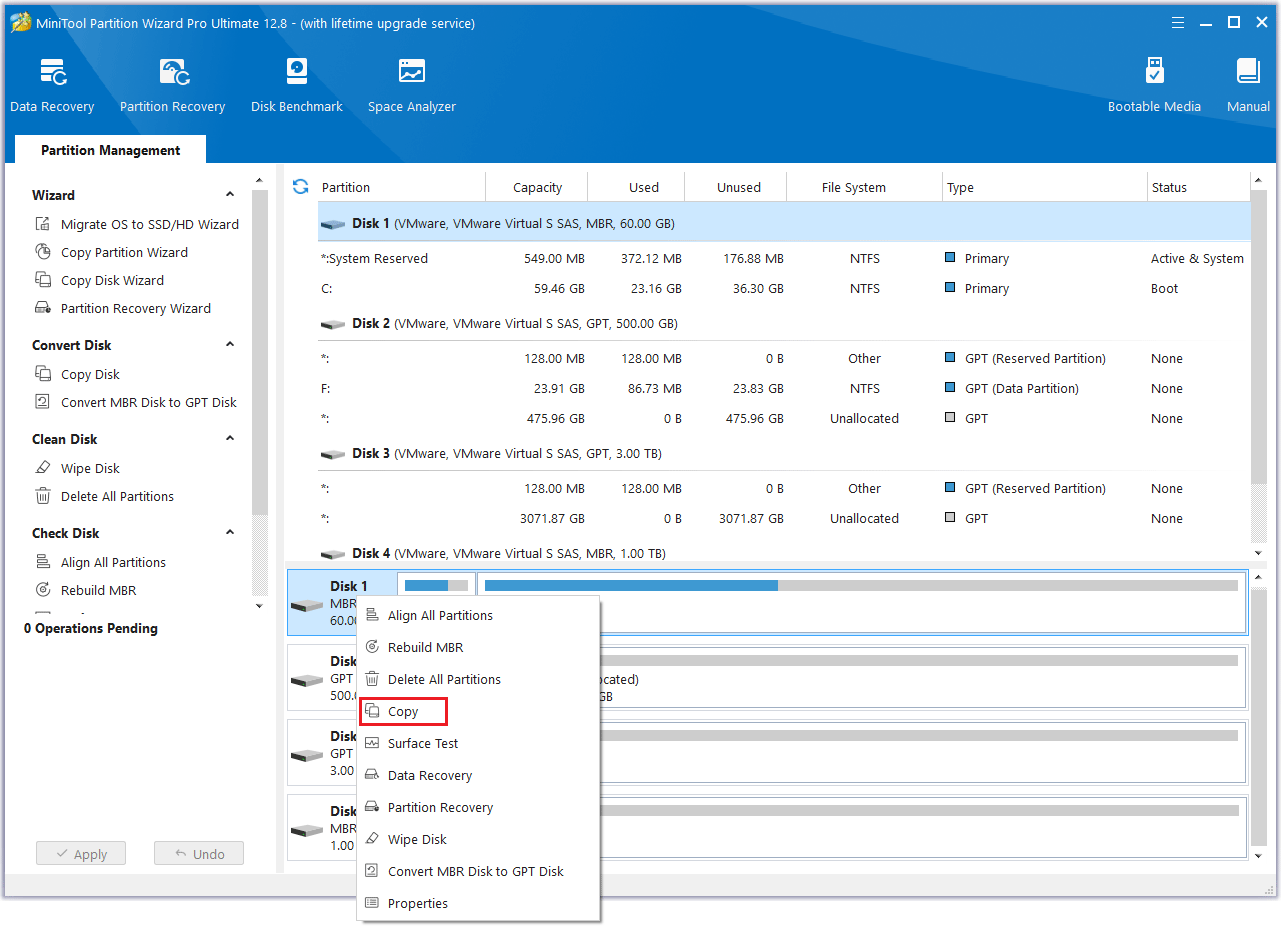
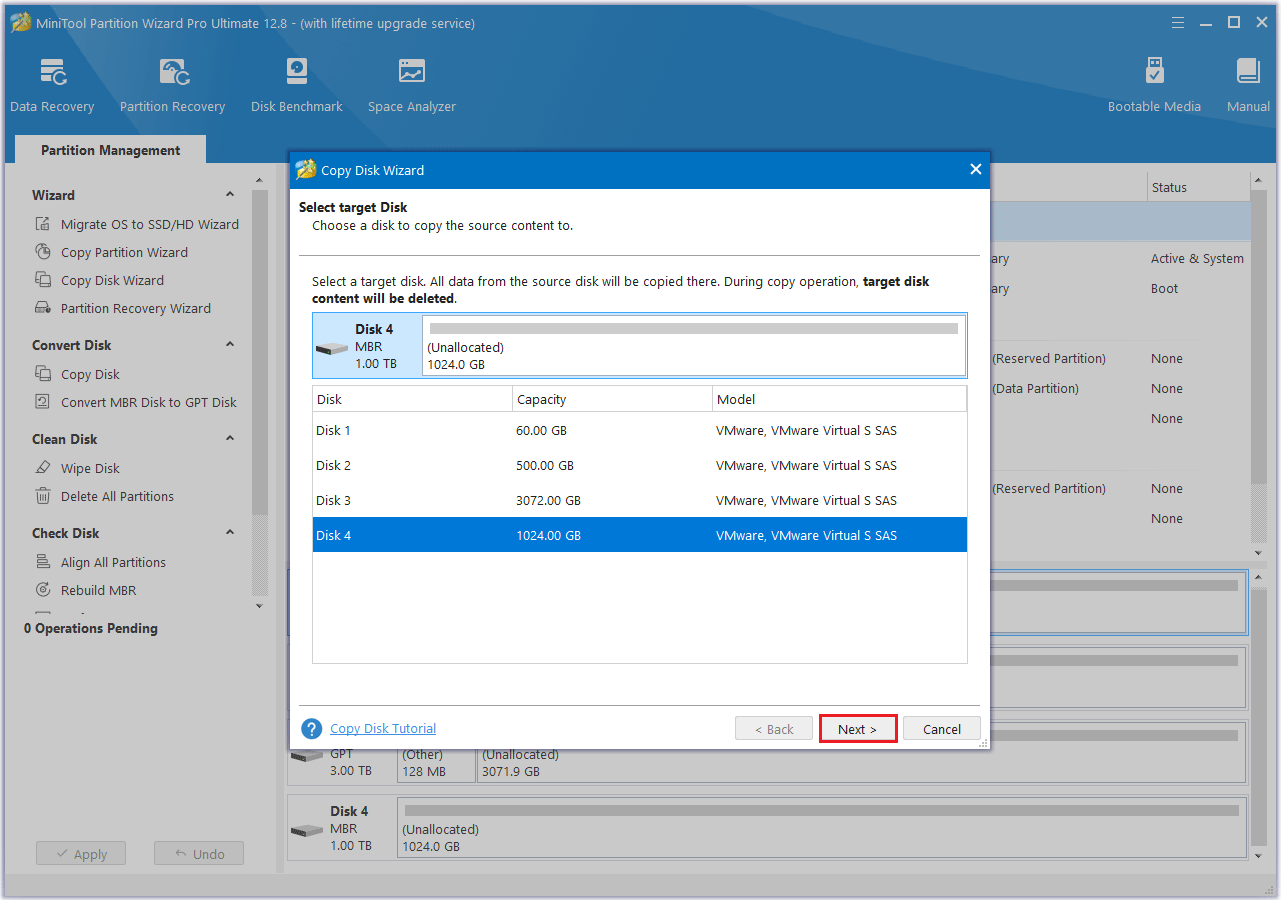
Step 2: In the pop-up window, select the new SSD as the target disk and then click Next.
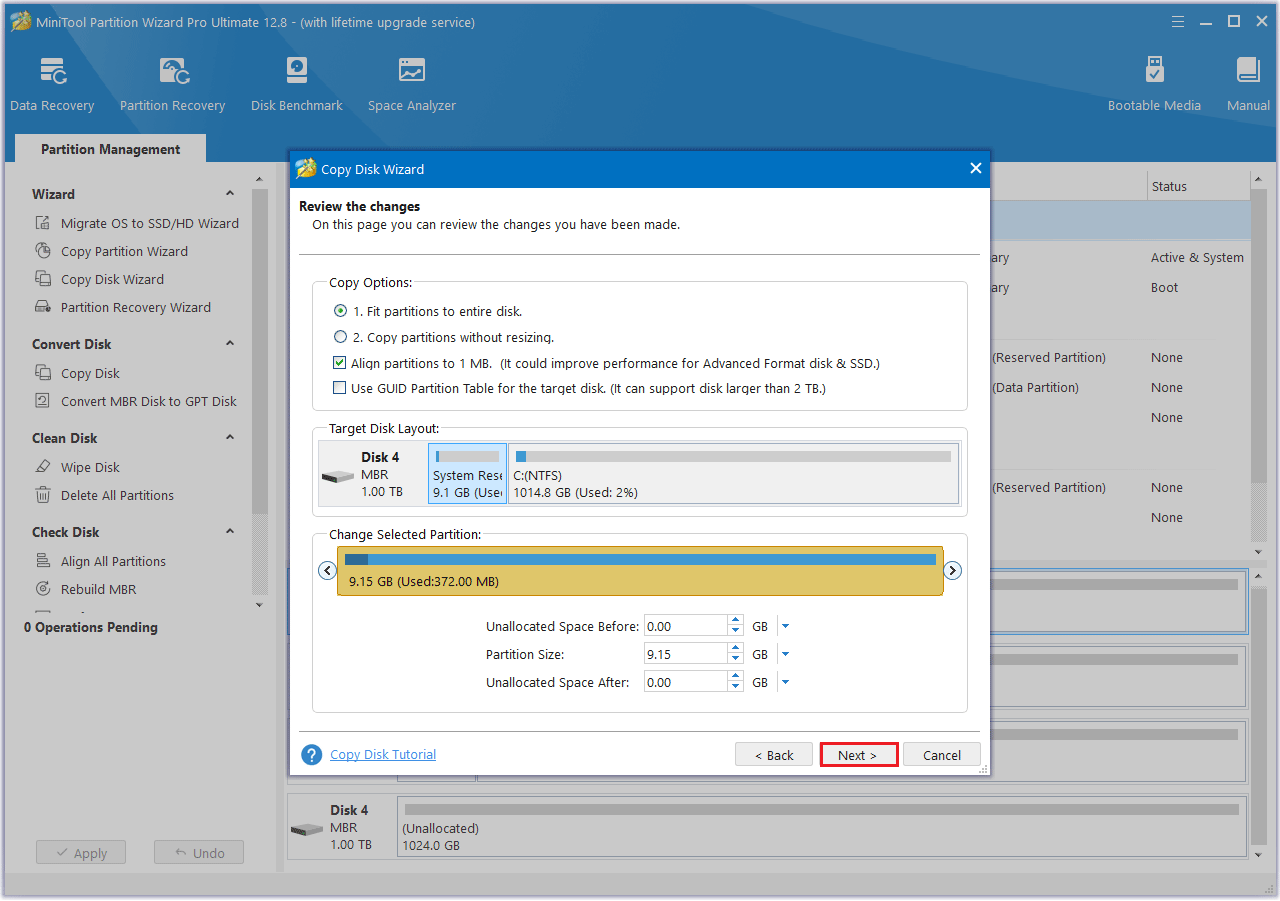
Step 3: In the Review the changes window, choose one copy option and click Next.
- The options to Fit partitions to entire disk and Align partitions to 1 MB will be enabled by default. The first option will adjust the partitions from the original hard drive proportionally to occupy the new SSD, while the second option will ensure 4K alignment on the SSD.
- If the original disk is an MBR disk and you want the cloned SSD to be a GPT disk, you can select the option to Use GUID partition table for the target disk.
- In the Change Selected Partition section, you can adjust the size or relocate the partition to fit your requirements.
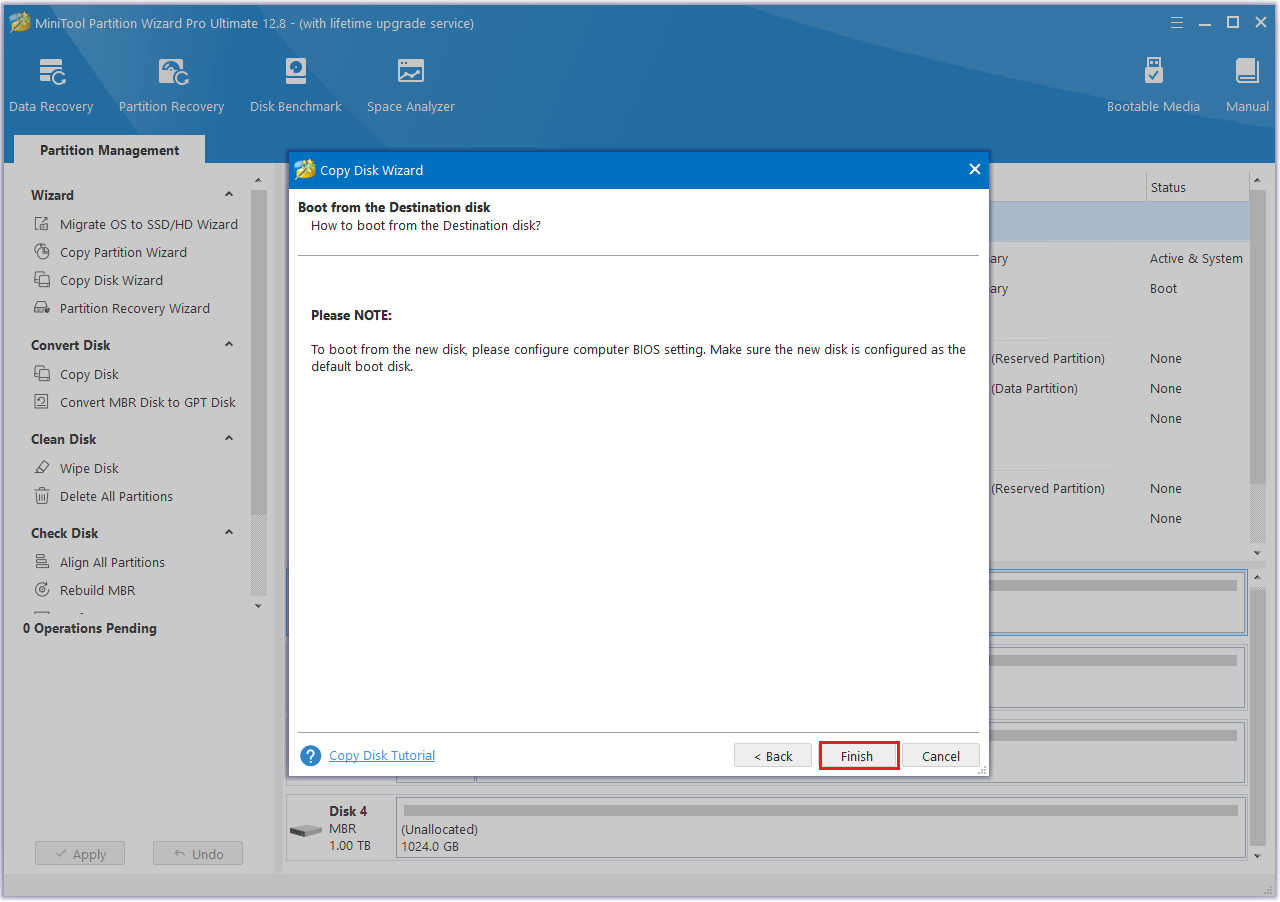
Step 4: Carefully read the note that explains how to boot from the target disk, then click Finish to return to the main interface.
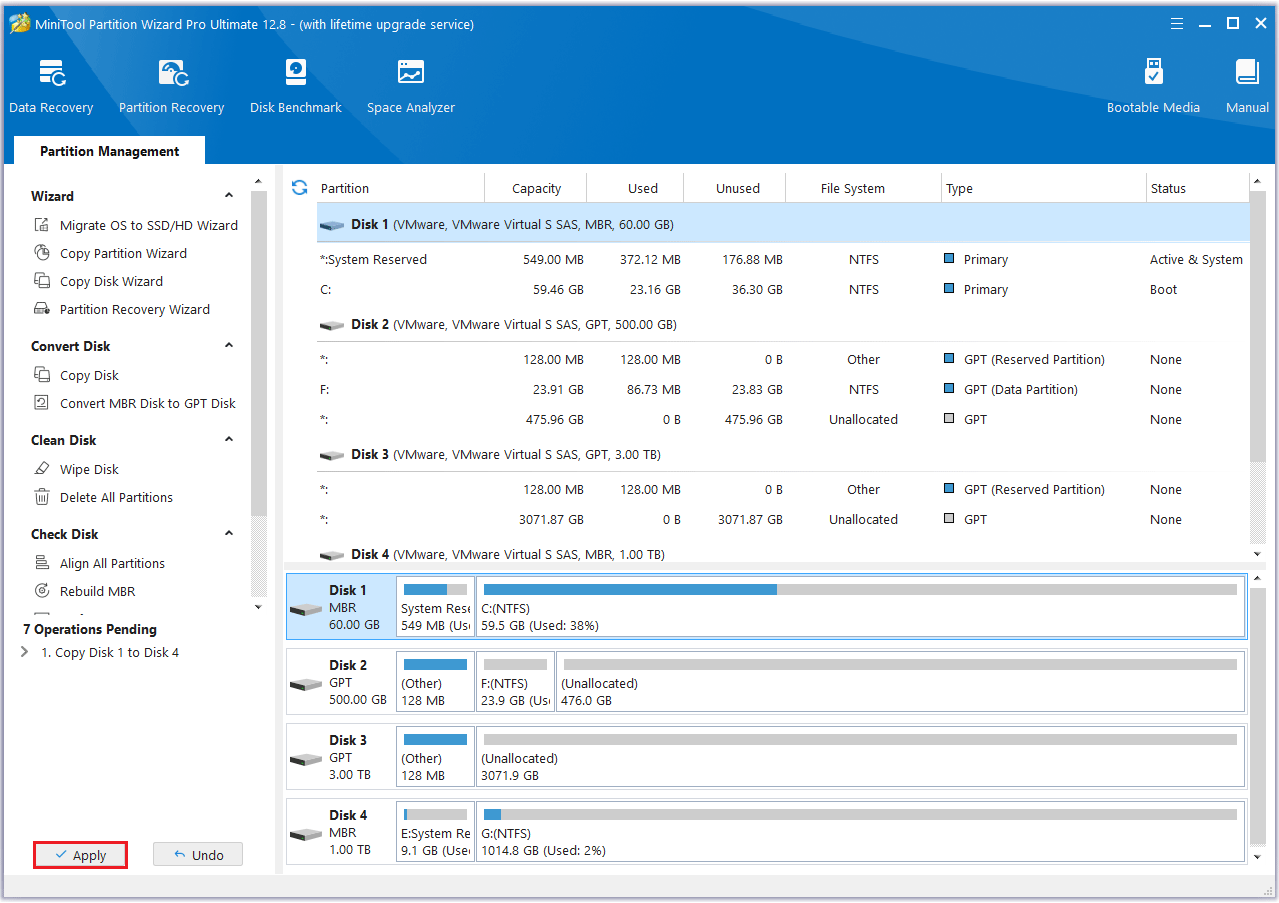
Step 5: Click the Apply button to carry out the pending operation. Wait for the cloning process to finish.
Here’s how to use the Migrate OS to SSD/HD feature to migrate your entire operating system:
MiniTool Partition Wizard DemoClick to Download100%Clean & Safe
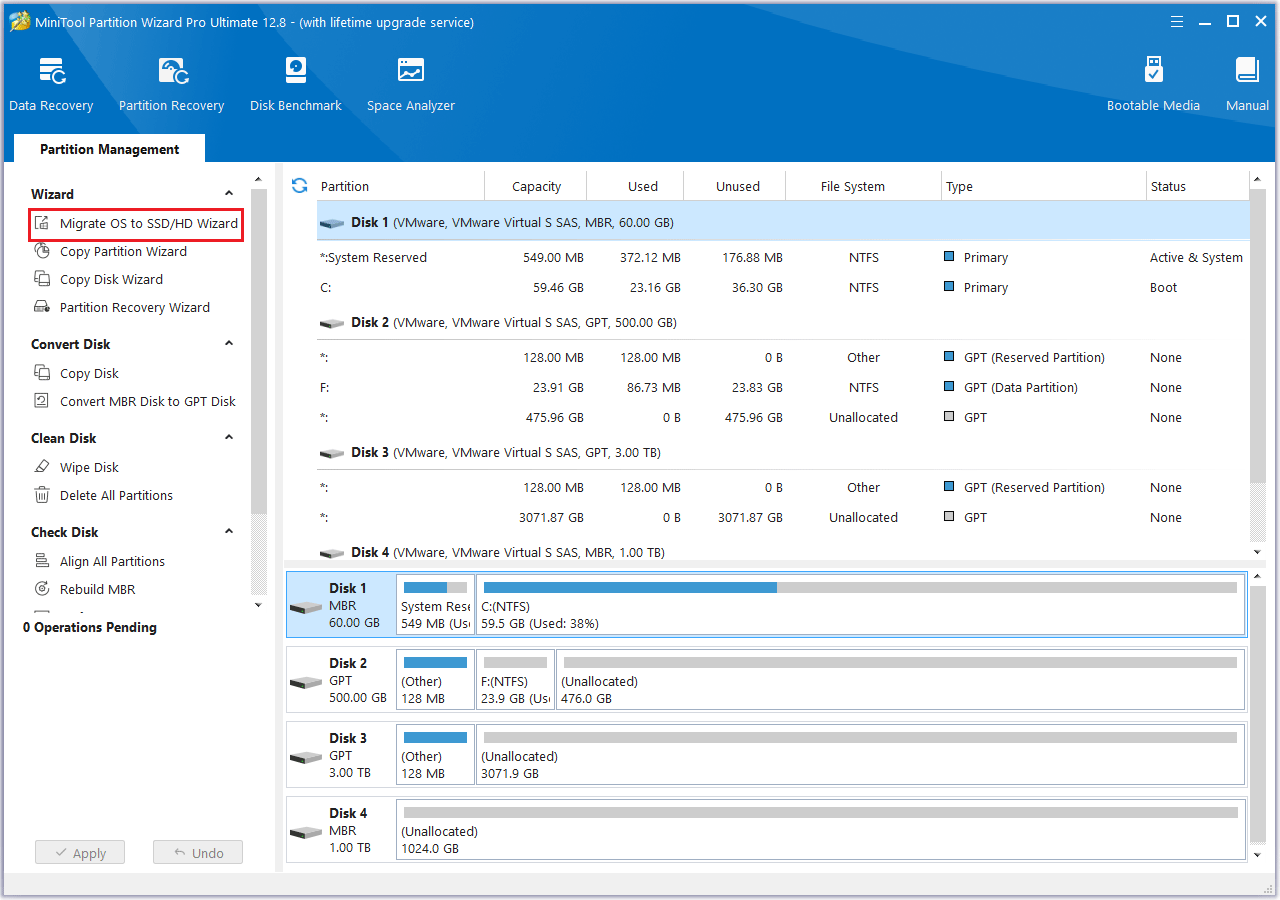
Step 1: Run the MiniTool Partition Wizard to its main interface. Click on the Migrate OS to SSD/HD Wizard feature from the left action panel.
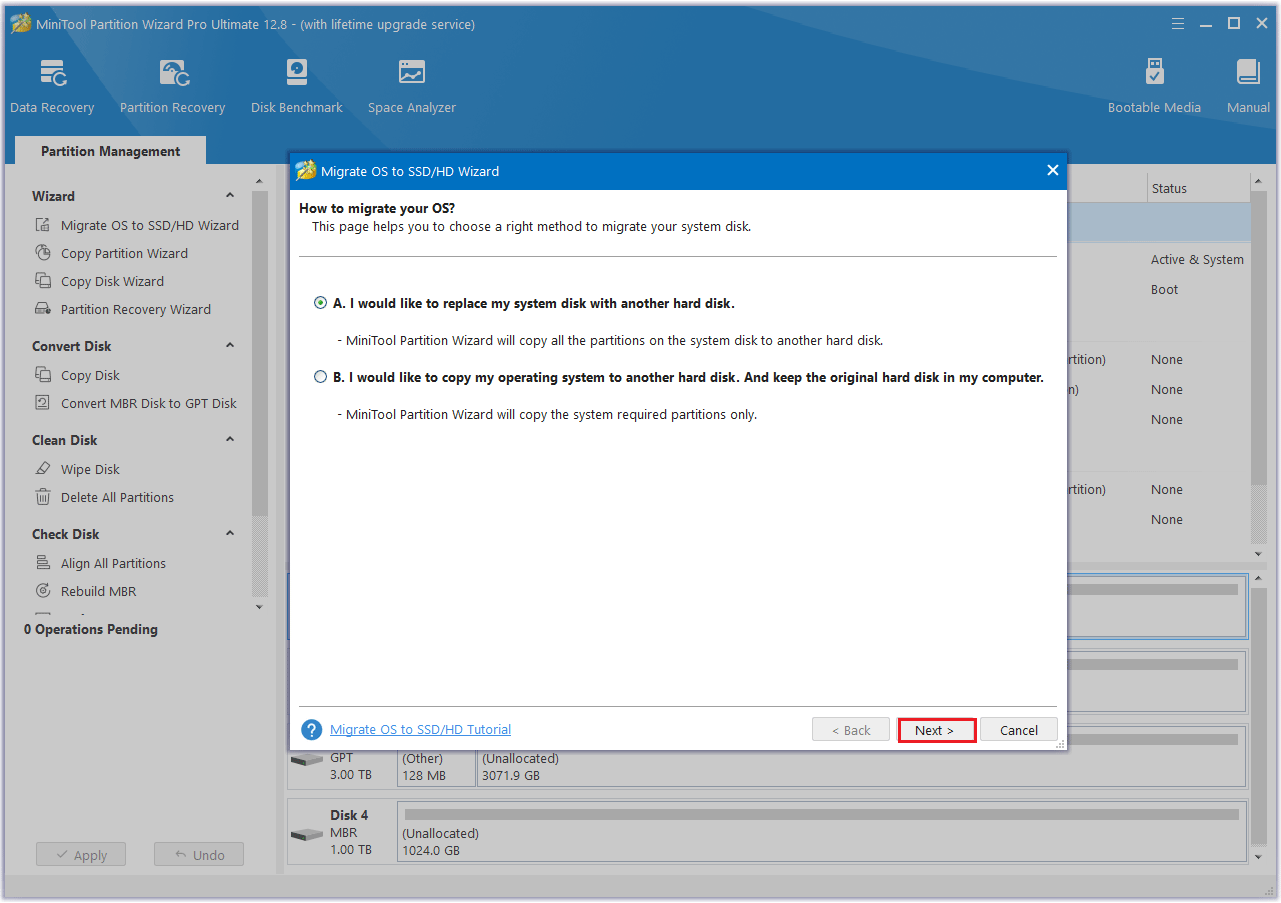
Step 2: In the Migrate OS to SSD/HD Wizard window, choose “I would like to replace my system disk with another hard disk” and click on Next.
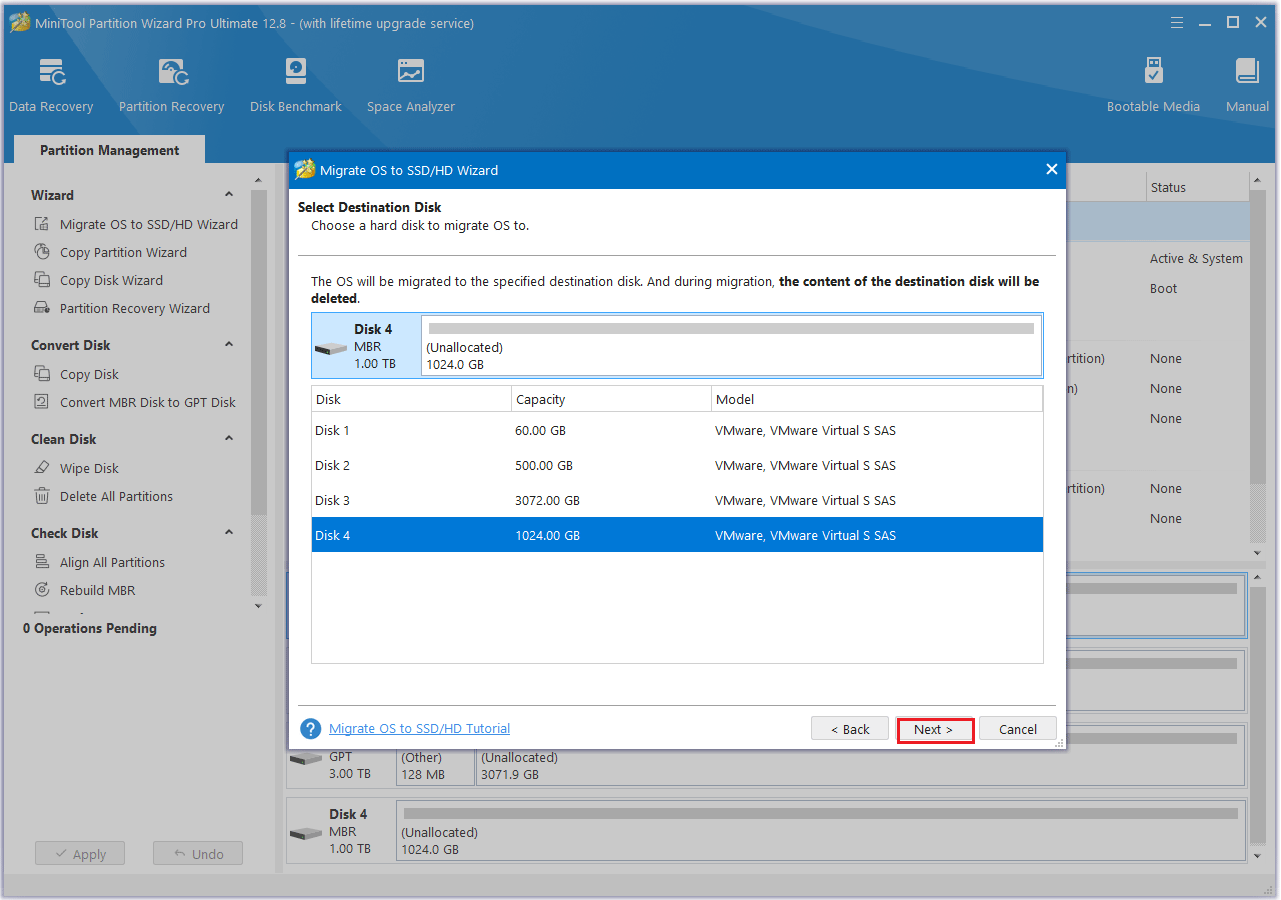
Step 3: Select the new SSD as the destination disk and then click Next. A warning window will pop up. Read it and click Yes to continue.
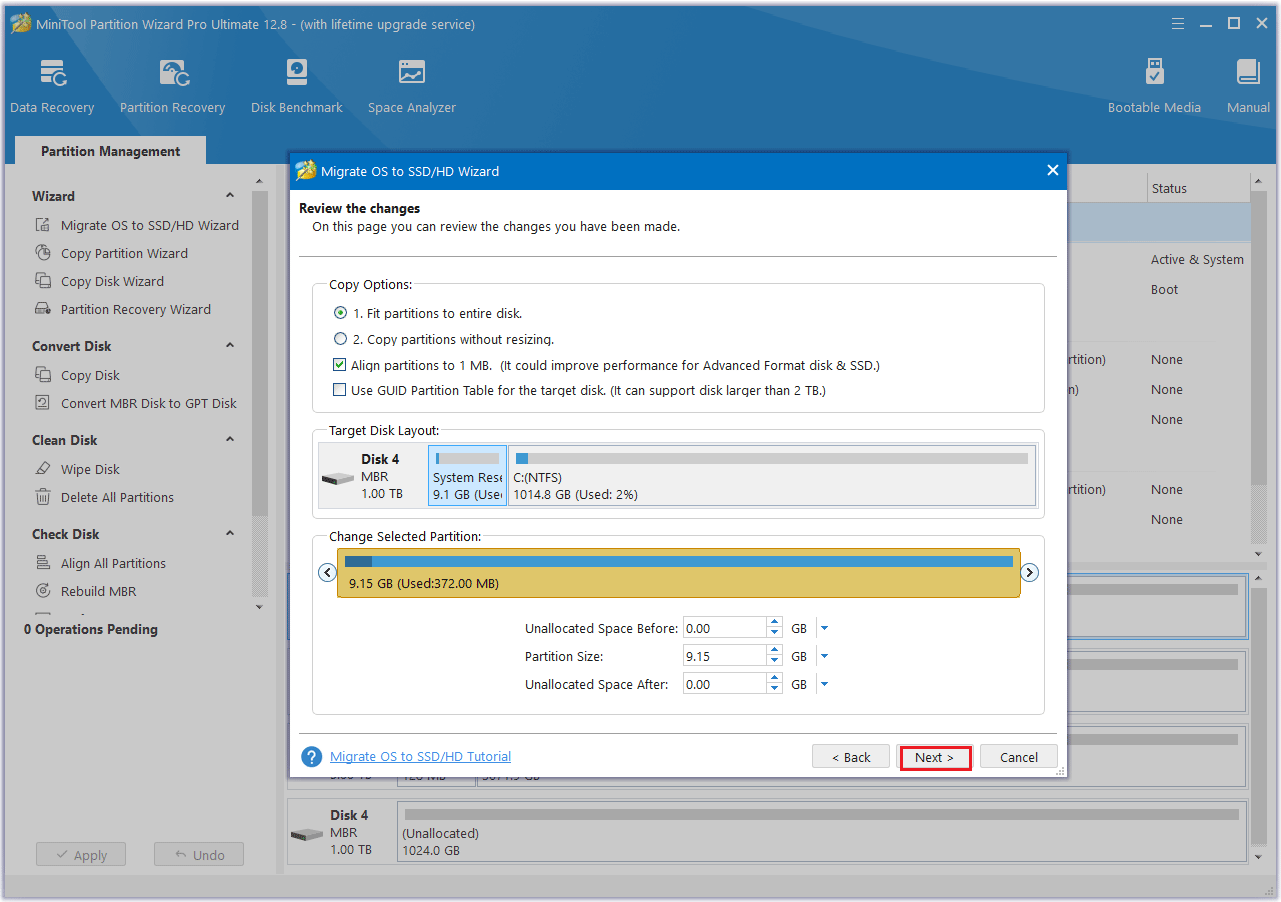
Step 4: After that, choose the desired copy options and click Next.
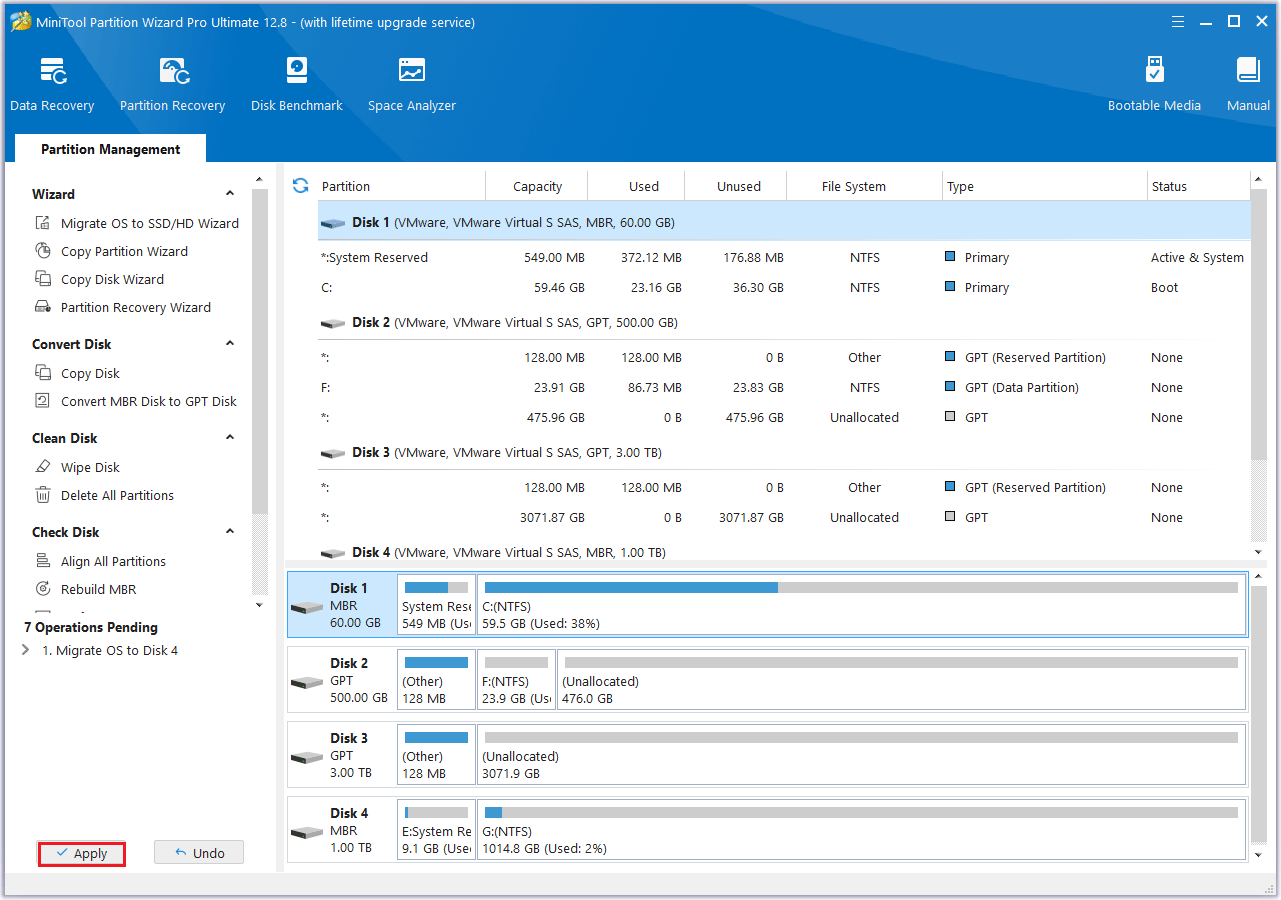
Step 5: Review the Note information, then click Finish. Then, click the Apply button to begin the OS migration process.
After the data migration is complete, you need to replace the old SSD from the computer. Here are the specific steps.
Part 3: Replace Your Old SSD
After migrating your operating system and data to the new SSD, you can now replace the old SSD with the new SSD. Here are the steps:
Step 1: Shut down your computer and unplug all external devices.
Step 2: Place the ASUS ROG Zephyrus G14 on a table with the bottom facing up.
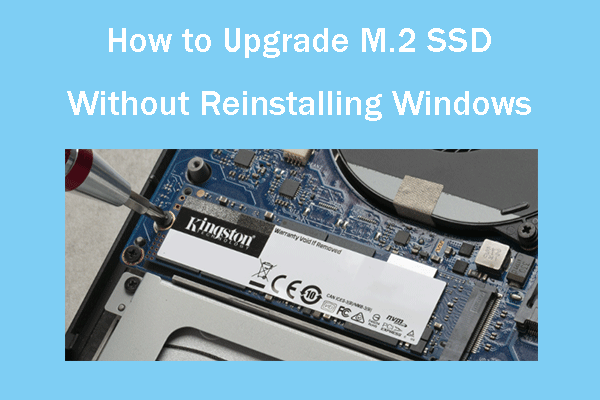
Step 3: Remove the screws using a screwdriver and put them in a safe place. Then use a crowbar to remove the bottom cover, and if possible, wear an anti-static wrist strap while doing this to ensure the safety of your device.
Step 4: Use a screwdriver to remove the screws that secure the SSD, and then you need to carefully pull the SSD out of the connector.
Step 5: Place the new SSD into the slot, paying attention to the alignment of the interface.
Step 6: Now you need to put the cover of the SSD back in place and install all the screws and parts as they were originally.
Once you have replaced the old SSD, you will need to boot from the new one. Here are the steps to do that.
Part 4: Set the New SSD as Boot Drive on the ASUS ROG Zephyrus G14 PC
To successfully boot your computer from a new SSD, you should set the new SSD as the boot drive. Here is the guide:
Step 1: If your computer is powered on, you will need to shut down your computer first.
Step 2: Click the Power button and then immediately press the BIOS key (F1 or F12) to enter the firmware.
Step 3: Use the left or right arrows to navigate to the Boot menu.
Step 4: Use the up or down arrows to select the new SSD.
Step 5: Press the “+” or “–” key to move the SSD to the top of the boot list.
Step 6: Press the F10 key to save the boot order and exit the BIOS setup.
Bonus Tip: What to Do with a Replaced ASUS ROG Zephyrus G14 Hard Drive
If you want to give the old SSD away or sell it again, you need to erase the data on it to prevent someone from stealing your data. The following is to use the third-party software – MiniTool Partition Wizard to complete this operation.
MiniTool Partition Wizard FreeClick to Download100%Clean & Safe
Step 1: Launch MiniTool Partition Wizard to get into the main interface.
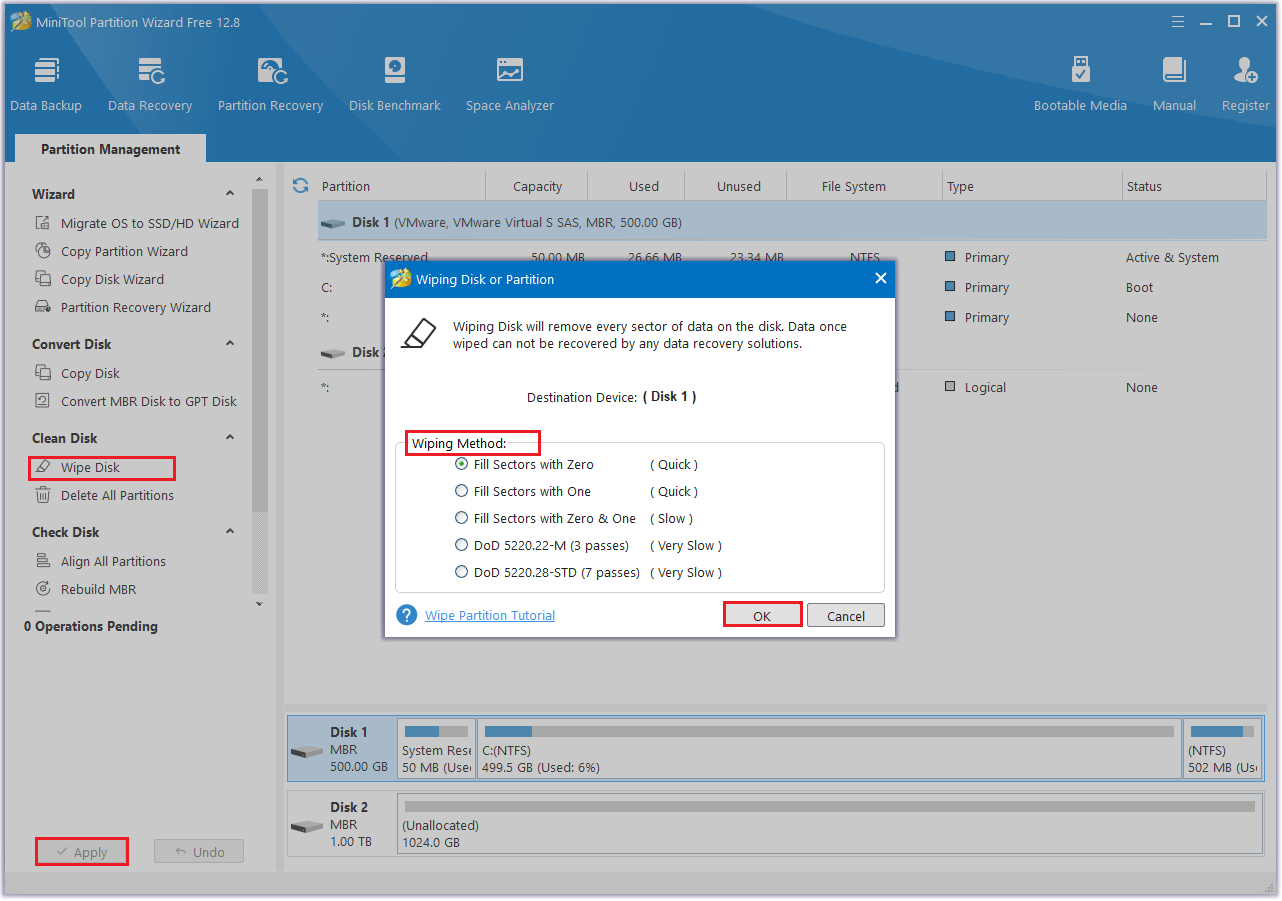
Step 2: Right-click the disk you want to wipe then select Wipe Disk.
Step 3: Then select a preferred wiping method and click OK to continue. To ensure your data isn’t accessed by third-party software, it’s advisable to opt for the last two methods. While they may take longer, they offer a high level of security for your data.
Step 4: After the process is complete, the selected disk will appear as unallocated. Simply click Apply to execute the operation.
Bottom Line
How to upgrade ASUS ROG Zephyrus G14 SSD to get better SSD performance? This article introduces a full guide for you.
It introduces you to the preparations you need to make before upgrading the SSD, 2 methods on how to clone the disk, and how to boot from the new SSD. Finally, it also introduces how to deal with the old SSD after migrating data to the new SSD. I hope this article is helpful to you.
If you have any questions or suggestions while using the MiniTool Partition Wizard, you can contact us via [email protected] to get a quick reply.


![[Tutorial] How to Clone M.2 SSD to Larger M.2 SSD on Windows](https://images.minitool.com/partitionwizard.com/images/uploads/2024/09/clone-m2-ssd-to-larger-m2-ssd-thumbnail.png)
User Comments :