Apex Legends is a very popular game, but some people may encounter Apex Legends low FPS issue. In this post, MiniTool Partition Wizard offers 4 effective Apex Legends FPS boost ways to improve gaming experience.
Apex Legends Low FPS Issue
Apex Legends is a free battle royale multiplayer online role-playing first-person shooter game developed by Respawn Entertainment and published by Electronic Arts. It follows the world view of the “Titan” series. The game was released for Microsoft Windows, Xbox One and PS4 on February 4, 2019, and the Nintendo Switch version was launched on March 10, 2021.
Many people like to play this game, but some people may find the FPS is a little low. If you also play this game, you can use the following methods to show FPS in Apex Legends.
How to show FPS in Apex Legends Origin:
- Open up Origin.
- Click on Origin in the top left of the client and press Application Settings in the drop menu.
- The Origin client will open a new interface. Head over to the Origin In-Game
- In the During Gameplay section, choose the place where to Display FPS Counter.
Now, you can see the FPS in real-time during gameplay.
How to show FPS in Apex Legends Steam:
- Open up Steam.
- Click on Steam in the top left of the Client, and press Settings.
- A new pop-up window will appear. Click on the In-Game tab to access in-game settings.
- The Steam In-game FPS counter is located in the middle left of the window. Choose where to place the Steam FPS counter and check High contrast color to make the counter stand out while you play any Steam game.
Of course, you can also use other software (like MSI Afterburner) to show FPS in gameplay. What to do if you find the FPS is very slow? If the PC meets the game system requirements, you can try the following methods to boost Apex Legends FPS.
Apex Legends FPS Boost Methods
When you encounter the Apex Legends low FPS issue, you can try the following methods to relieve it.
Method 1. Configure Best Apex Legends Settings
Improper in-game settings may consume a lot of resources and cause slow FPS. Some people have concluded best Apex Legends settings and you can refer to following steps:
Step 1: Launch Apex Legends, click the gear icon on the bottom right corner, and choose the Settings button to open the Apex Legends settings window.
Step 2: Choose the Video tab and set the following parameters:
- Display Mode: Full Screen — this allows your system to only focus on rendering Apex and nothing else. Therefore, it can give you a marginally faster frame rate overall.
- Aspect Ratio: 16:9 (native) — this will avoid stretching the game image.
- Resolution: 1920×1080 (native) — this will give you a good screen quality. But if you have tried almost every method and you still don’t get the desired Apex Legends FPS boost, you can try lowering the resolution. Note that 720p is usually a solid compromise between quality and performance.
- Brightness — this has no effect on FPS and you can choose whatever works for your eyes.
- Field of View: 90 —a higher field of view (FOV) offers a wider vision but increases the number of frames that need to be rendered and causes low FPS. 90 FoV offers the best of both worlds. Usually, lower values will improve your performance and you can set it according to your needs.
- Sprint View Shake: Minimal — this has no effect on FPS but setting it at normal may make it harder to stop enemies while running.
- V-Sync: Disabled — enabling this feature will introduce input lag but disabling it may cause screen tearing. You can make a decision accordingly.
- Adaptive Resolution FPS Target: 0 — this feature will dynamically lower rendering resolution to try to maintain the specified frame rate. Constantly changing resolution looks terrible and I would recommend you to set it to 0 to disable this feature.
- Adaptive Supersampling: Disabled — this feature will dynamically raise rendering resolution if the game is running faster than the target frame rate. But for Apex Legends FPS boost, it’s good to disable it.
- Anti-aliasing — this feature can smooth the image, reducing jagged lines and sparkles. It’s very useful in a battle royale when you’re scouting for enemies on the horizon. You don’t want to get rid of AA unless you have no other choice.
- Texture Streaming Budget: equal to your GPU VRAM — this feature controls the amount of VRAM reserved for texture streaming. It has little effect on FPS but greatly improves the picture quality.
- Texture Filtering: Anisotropic 2x — this feature deals with texture errors caused by the tilt of the 3D object surface due to the viewing angle change. The smaller the value, the smaller the filtering range, and the less performance it takes.
- Ambient Occlusion Quality: Disabled —this feature handles the light that reflects from or shines on the objects scattered around the map. Disabling it can get more FPS.
- Sun Shadow Coverage: Low — this feature controls the coverage of shadows from the sun.
- Sun Shadow Detail: Low — this feature controls how detailed shadows are from the sun.
- Spot Shadow Detail: Low — this feature controls how detailed shadows are from lights in the environment.
- Volumetric Lightning: Disabled — this feature controls whether sunbeams are enabled to simulate light scattering in the air.
- Dynamic Spot Shadows: Disabled —this feature controls whether lights in the environment can move.
- Model Detail: Medium —this feature controls how detailed objects and legends are. Setting it to low may have a significant impact on your gaming experience.
- Effects Detail: Low —this feature controls how detailed visual effects like explosions are. These visual effects arrive in the midst of a fight. At these moments, you need rock-solid FPS. Therefore, please set it to low.
- Impact Marks: Medium —this feature controls where and how many impact marks show up.
- Ragdolls: Low — this feature adjusts how the character models behave after receiving fatal damage. Setting it to high may cause some FPS drops if you’re taking down a squad.
After configuring the above settings, you should then configure the videoconfig.txt. Please press Win+R and navigate to %USERPROFILE%Saved GamesRespawnApexlocal. Then, edit the videoconfig.txt as follows:
- Set “cl_ragdoll_self_collision” to “0“. This removes ragdoll physics.
- Set “mat_depthfeather_enable” to “0“. This removes the depth of field effect when you aim down sight.
- Change “r_lod_switch_scale” to “0.3” or “0.4“. This will change the distance at which the game displays the higher quality models.
- Set “csm_enabled” to “0“. This removes all shadows.
Method 2. Remove FPS Cap (Steam and Origin)
If you want to get the absolute maximum number of frames from your rig, you can remove the FPS cap.
To remove the FPS cap on Steam, you just need to go to Steam Library, right-click Apex Legends, go to Properties > General tab, un-check “Enable Steam Overlay while in-game“, then go to the Advanced Launch Options tab, type in” +fps_max unlimited” and save it.
To remove the FPS cap on Origin, you just need to choose My Game Library, right-click Apex Legends, go to Game Properties > Advanced Launch Options, type “+fps_max unlimited” into the command line arguments and then save changes.
Method 3. Close Unnecessary Programs
One of reasons for Apex Legends low FPS is that you have opened many other programs during gameplay, for example, Google browser, various in-game overlays, etc. Turning down these programs may give you a nice Apex Legends FPS boost.
Method 4. Run Game on SSD
This method is an additional method for Apex Legends FPS boost. If you are running the game on an HDD, switching to an SSD may improve your gaming experience greatly. To upgrade the hard drive to SSD, you can try MiniTool Partition Wizard if you don’t want to reinstall the OS and games. Here is the guide:
MiniTool Partition Wizard DemoClick to Download100%Clean & Safe
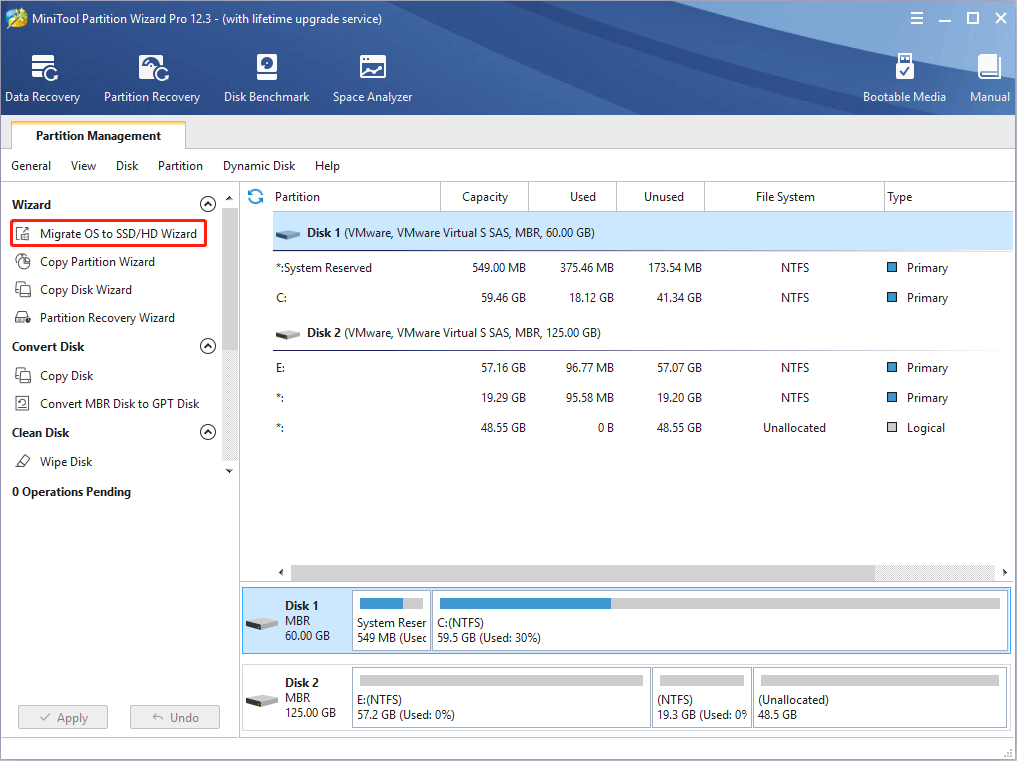
Step 1: Connect the SSD to PC via a USB adapter. Launch MiniTool Partition Wizard and go to its main interface. Click Migrate OS to SSD/HD Wizard in the action panel.
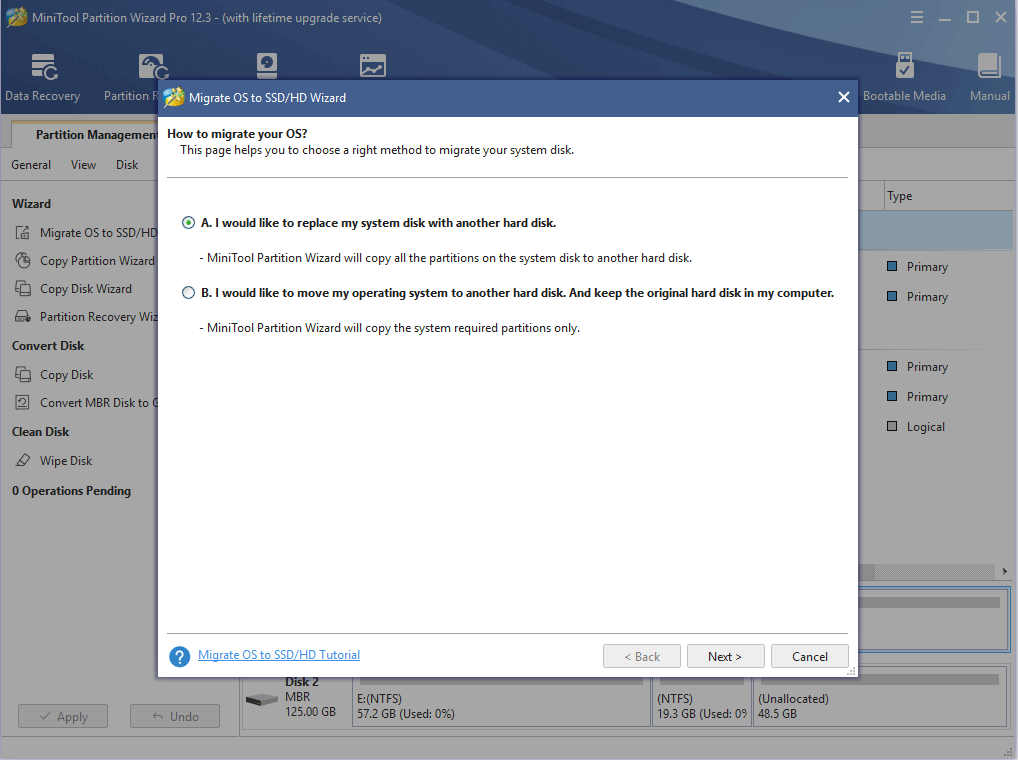
Step 2: Choose a migrating method. Option A is recommended because you need to copy game files to the SSD as well.
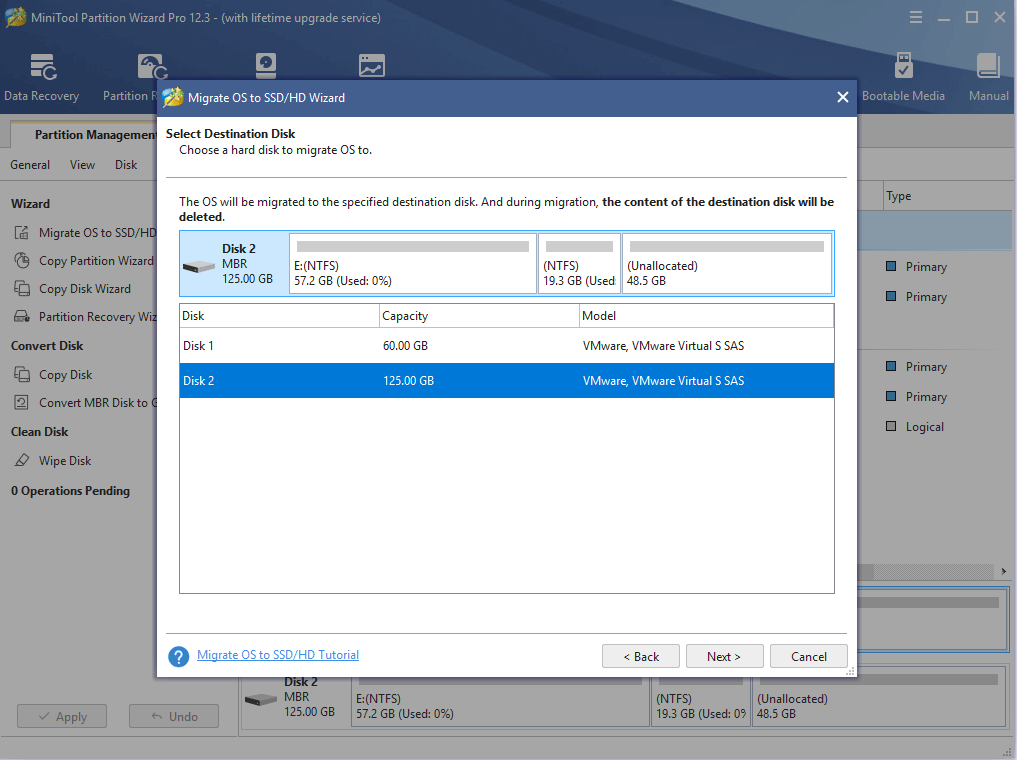
Step 3: Select the new SSD as the destination disk and then click the Next button. MiniTool Partition Wizard allows you to choose a smaller drive as the destination disk as long as the new drive is larger than the used space of the origin disk.
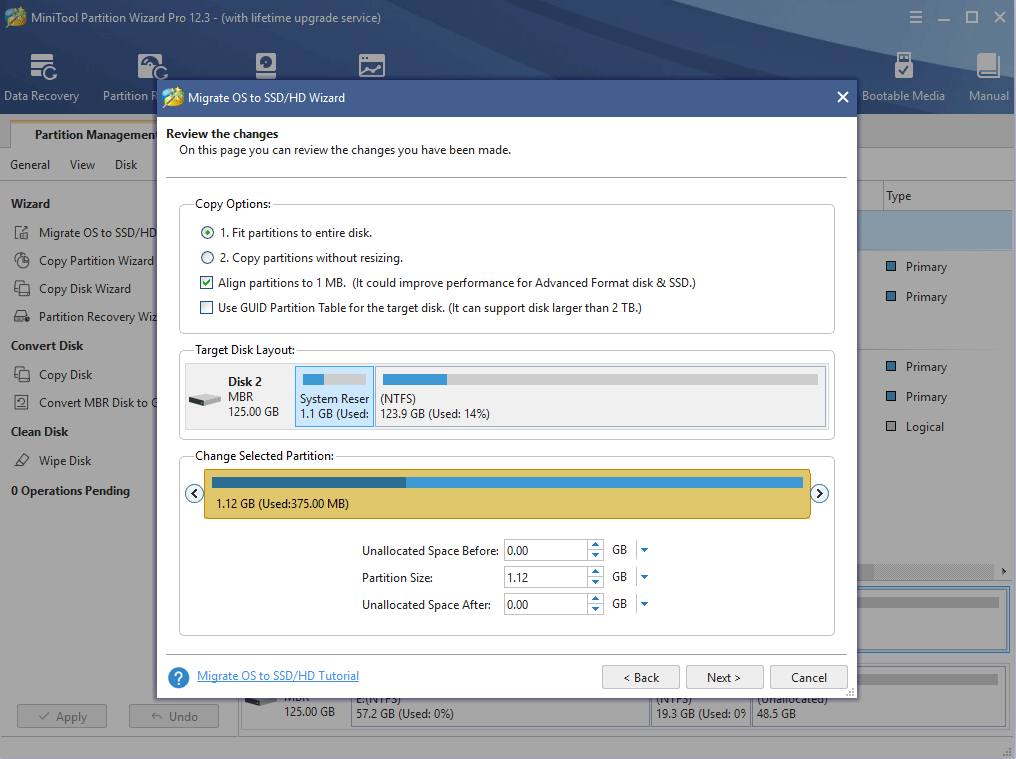
Step 4: Review the changes. MiniTool Partition Wizard will clone every partition on the origin disk to the destination disk. If all is OK, please click the Next button.
Step 5: Read the note page and click the Finish button. Click the Apply button to execute the pending operation.
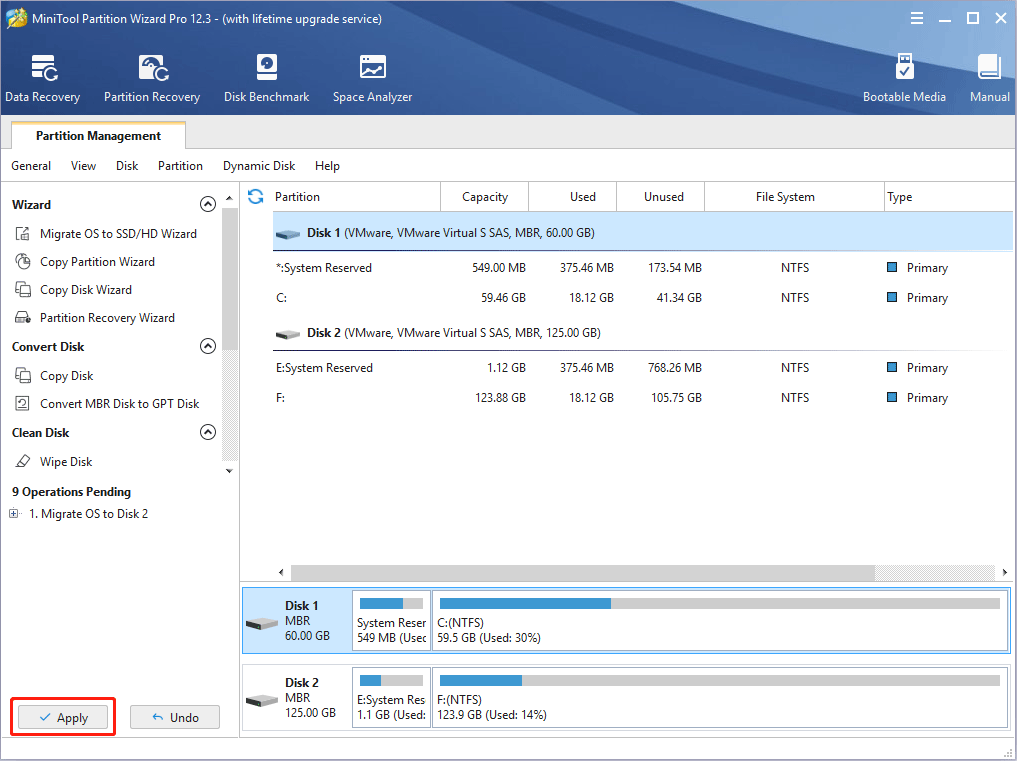
Step 6: Replace the HDD with the new SSD and then you can boot the PC from the new drive.
Apart from the above methods, you can also try other ways like updating drivers, cleaning up temporary files, and changing graphics card settings. But the above ways are the most effective ways and you should consider them first.
Bottom Line
Is this post helpful to you? Do you have other ideas about Apex Legends FPS boost? Please share your ideas with us in the following comment zone. In addition, if you have difficulty in migrating the disk, please feel free to contact us via [email protected]. We will get back to you as soon as possible!
Apex Legends FPS Boost FAQ
There are many reasons for the Apex Legends low FPS issue, for example:
- Too many programs are running at the same time.
- The game settings are good for screen quality, but not so good for FPS.
- The FPS is limited by the game launcher.
- Other reasons.


User Comments :