What should you consider when choosing an SSD for Alienware Alpha? How to perform an Alienware Alpha SSD upgrade? If you are searching for answers to these questions, you have come to the right place. Here, Partition Magic offers a complete guide on that.
Overview of Alienware Alpha
The Alienware Alpha is a gaming PC released by Dell, which has two versions: the Alienware Alpha R1 (released in 2014) and the Alienware Alpha R2 (released in 2016). The R1 is equipped with Windows 8.1, while the R2 comes with Windows 10. Dell discontinues all of them.
Released in 2014, the Alienware Alpha R1 combines the features of a gaming PC with those of a living room console, inspired by the concept of Steam Machine prototypes. It has a compact design, measuring approximately 2.25 by 8 by 8 inches (height, width, depth). Although it is smaller than the PlayStation 4, it offers performance that rivals both the PS4 and the Xbox One. Additionally, the Alienware Alpha package includes a wireless Xbox 360 controller.
In 2016, Dell introduced the Alienware Alpha R2, which retains the small, console-like dimensions but is equipped with a powerful Core i7 processor and robust Nvidia graphics. This version also supports more gaming platforms than the R1, including GOG Galaxy, Uplay, Battle.net, and Origin, in addition to Steam. Furthermore, it offers a variety of multimedia options.
Advantages of Alienware Alpha SSD Upgrade
Why should you consider upgrading SSD in Alienware Alpha? Here are some compelling reasons:
- Upgrading to an SSD boosts the loading time faster loading time and enhances system responsiveness.
- SSDs are generally more reliable and durable than traditional HDDs.
- They are more energy-efficient, which extends the battery life for your Alienware Alpha.
- Moving from a limited HDD to a larger SSD can significantly increase your storage capacity.
- The noise generated when SSDs operate is lower than HDDs.
What Should You Consider When Choosing an Alienware Alpha SSD
When you choose an SSD for upgrading SSD in Alienware Alpha, you need to consider these important factors:
1. Size And Form Factor
Different Alienware Alpha devices have different storage slots. For Alienware Alpha R1, there is only one 2.5 SATA slot for a hard drive or SSD. For Alienware Alpha R2, there is one 2.5 SATA slot and a 2280 M.2 slot.
Therefore, you need to make sure which Alienware Alpha model you have and which kind of SSD you want to add to your device.
2. Price
You also need to consider the SSD price when you choose an Alienware Alpha SSD. Different SSD brands have different prices. You can make a comparison among them to choose the best one according to your budget.
3. Storage Capacity
When selecting an SSD, it’s important to evaluate the storage capacity based on your gaming requirements and the size of your game library or multimedia files. If your game library is extensive or you frequently handle multimedia files, opting for an SSD with a larger storage capacity is advisable.
4. Performance Specifications
When you choose the Alienware Alpha SSD, you’d better look for SSDs with high read and write speeds to ensure faster data transfers. Besides, advanced error correction, wear-leveling algorithms, endurance, etc., are also necessary to be checked and compared.
5. Warranty and Customer Support
In addition to the above factors, you also need to consider the warranty period offered by the SSD manufacturer. The SSD manufacturer can give you reliable customer support when you get in trouble with the SSD during its warranty.
Compatible SSD for Alienware Alpha
After searching online for compatible SSDs for the Alienware Alpha, I have compiled a list of options below. You can choose one SSD from this list based on your device requirements.
- Kingston KC600 2.5-inch SSD
- Samsung 870 EVO 2.5-inch SSD
- Samsung 980 M.2 NVMe SSD
- Crucial P3 Plus M.2 NVMe PCIe SSD
- Kingston NV3 M.2 NVMe PCIe SSD
- Crucial T500 M.2 NVMe PCIe SSD
- Kingston KC3000 M.2 NVMe PCIe SSD
How to Perform Alienware Alpha SSD Upgrade
Once you have chosen which SSD for Alienware Alpha, you continue to perform the Alienware Alpha SSD upgrade. Then, how to perform Alienware Alpha SSD upgrade? In this section, I outline the whole process in detail. No matter whether you want to upgrade SSD in Alienware Alpha R1 or R2, you can follow the guide here to complete the process.
Stage 1. Make Some Preparations Before Alienware Alpha SSD Upgrade
Before you perform the Alienware Alpha SSD upgrade, you need to do some preparation first. Here are the things you need to prepare:
- a Phillips Screwdriver
- an anti-static wristband
- a compatible SSD (2.5 SATA SSD or M.2 SSD)
- an SSD closure for M.2 SSD or 2.5 SATA SSD (depending on which SSD you want to add to Alienware Alpha)
- a plastic scribe
Stage 2. Clone the System and Data to a New SSD
After preparing everything necessary, you can clone the system and data to the new SSD. To do that, I highly recommend MiniTool Partition Wizard. It is a professional disk clone software that offers the Migrate OS to SSD/HD feature to help you clone your system and data from one disk to another without reinstalling the OS.
Besides, this feature-rich tool can also help you partition hard drive, check disks for errors, format SD card FAT32, rebuild MBR, convert MBR to GPT, recover data from various devices, and more. Here’s the tutorial:
Step 1. Connect the new SSD to your Alienware Alpha using an external enclosure.
Step 2. Click the Download button to get the MiniTool Partition Wizard installation package, run the executable file, and follow the setup wizard to install it on your device.
MiniTool Partition Wizard DemoClick to Download100%Clean & Safe
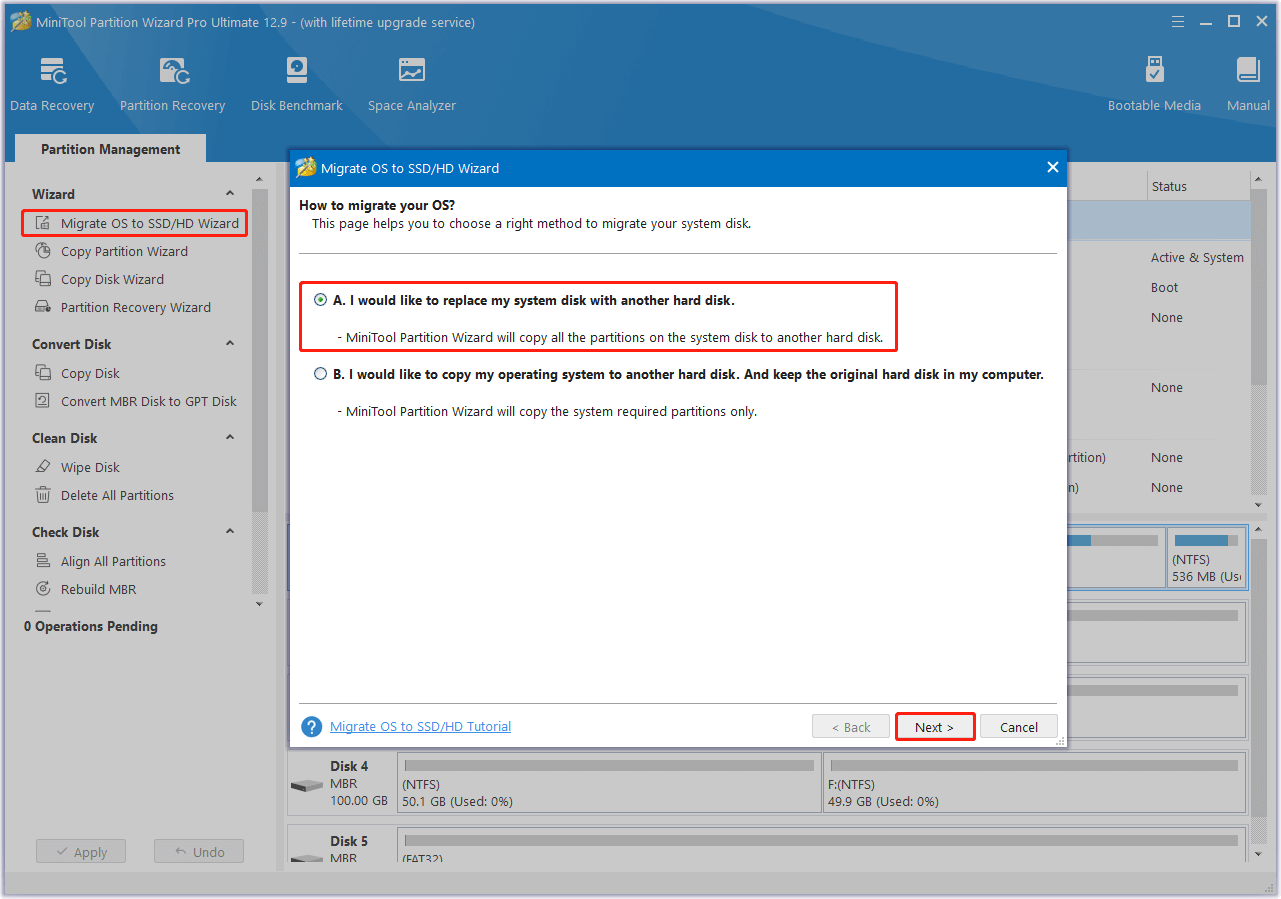
Step 3. Launch MiniTool Partition Wizard to enter its main interface, and select the Migrate OS to SSD/HD Wizard feature from the left panel.
Step 4. In the pop-up window, choose option A. I would like to replace my system disk with another disk, and click Next.
Step 5. Select the new SSD from the disk list and click Next to continue.
Step 6. On the next page, set Copy Options and adjust Target Disk Layout. Then click Next to proceed.
- Fit partitions to entire disk: If you choose this option, the target disk partition size will be adjusted automatically to fit the entire disk.
- Copy partitions without resizing: If you choose this option, the size of the source disk partitions will be used.
- Align partitions to 1MB: This option could help improve performance for SSD and advanced format disks, so please keep it checked if users are using such devices.
- Use GUID Partition Table for the target disk: This option allows you to use all the space on a hard disk larger than 2TB, but UEFI boot should be enabled in the BIOS.
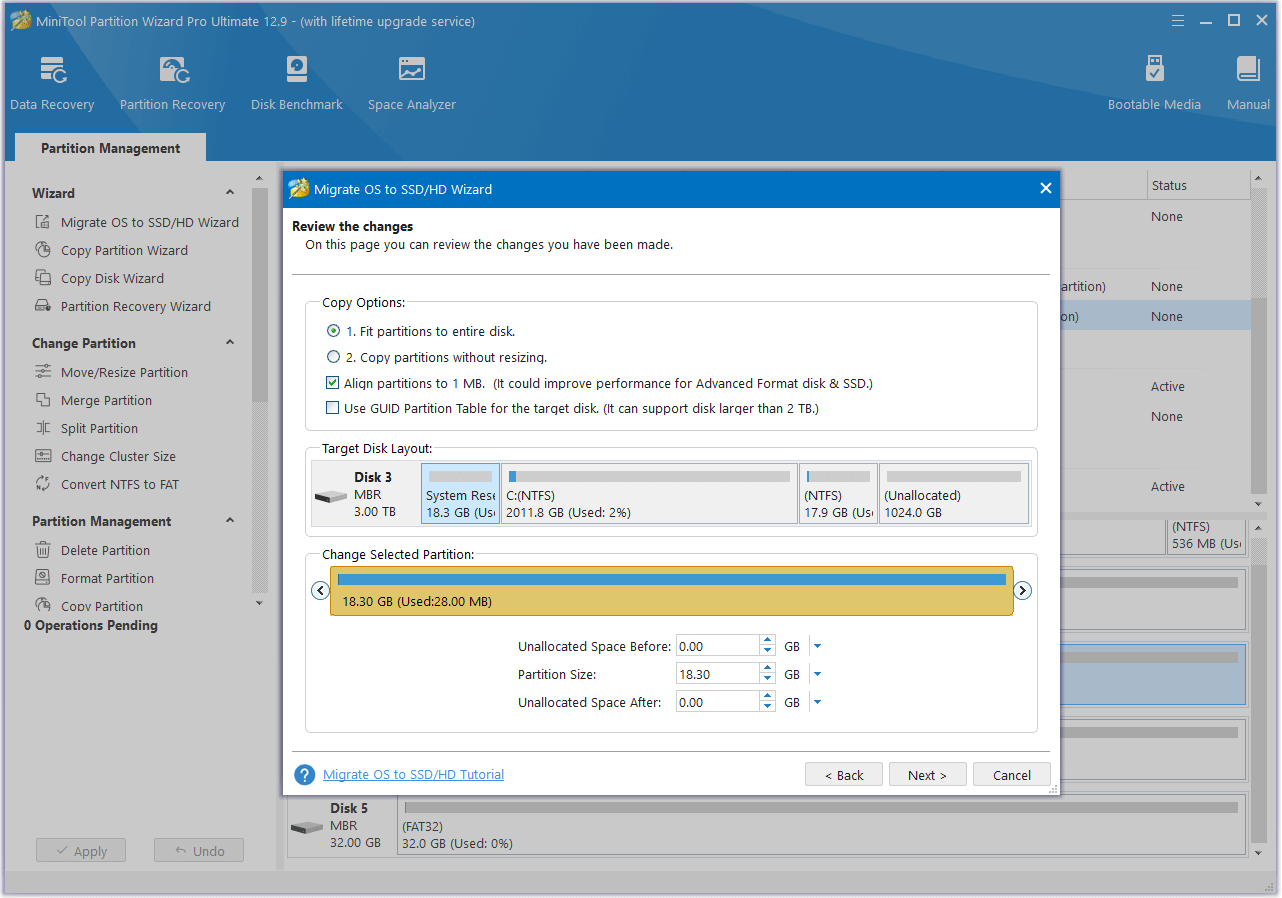
Step 7. Next, read the Note and click Finish to return to the main interface.
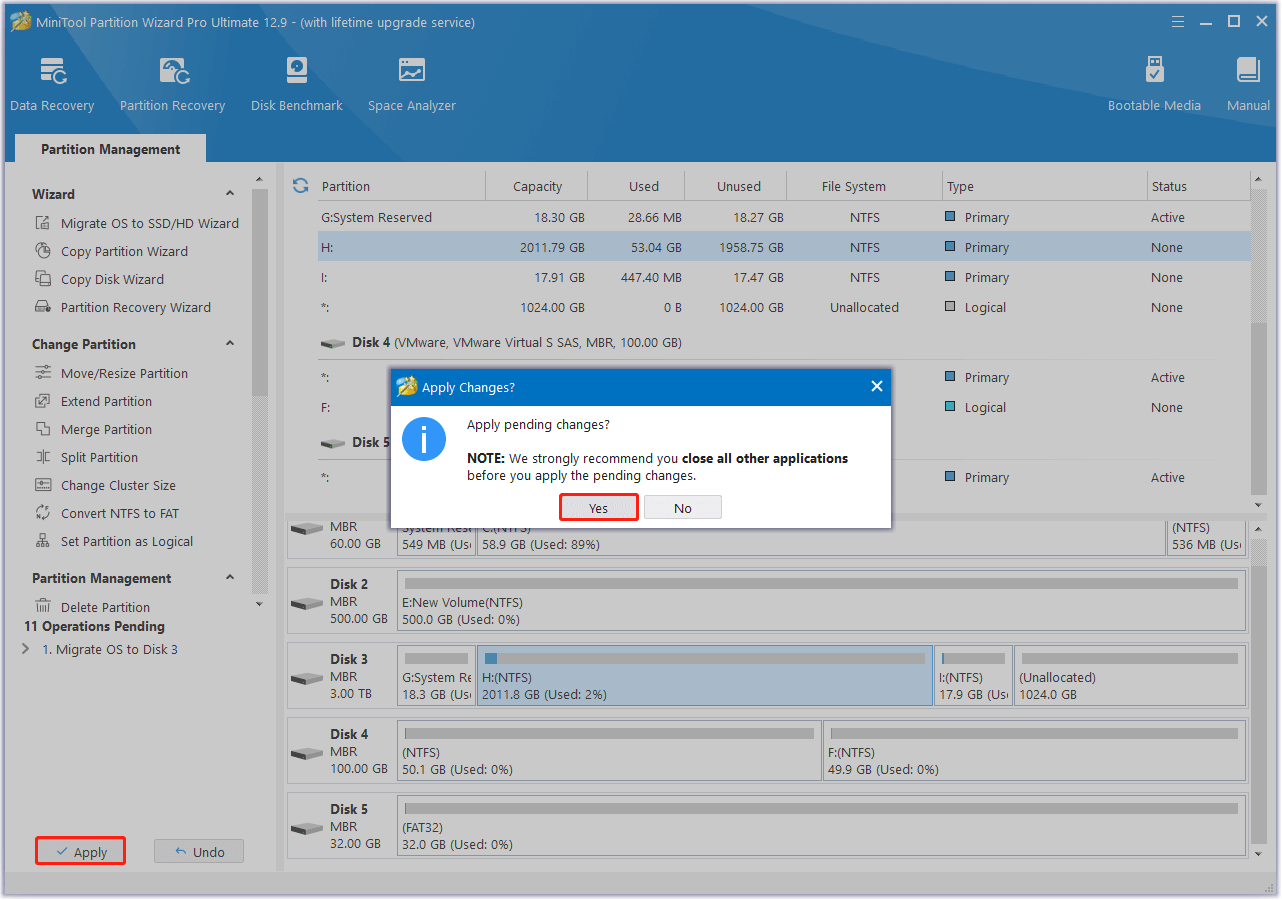
Step 8. Click Apply and Yes to execute all the changes. Once done, click OK to confirm.
Stage 3. Install the New SSD in the Alienware Alpha
Once you’ve cloned your OS and data to the new SSD, you can continue to install the new SSD to your Alienware Alpha. Here’s how to do that:
# 1. Replace the Hard Drive with a 2.5 SATA SSD
If you want to upgrade SSD in Alienware Alpha R1 or R2 by replacing the hard drive with a 2.5 SATA SSD, you can do the following steps:
Step 1. Power down your Alienware Alpha, then unplug it and all connected devices from their electrical outlets.
Step 2. Detach all cables and peripherals from your PC. Next, press and hold the power button for 5 seconds to discharge any remaining power from the system board.
Step 3. Flip the computer over and remove all screws holding the base cover to the top cover.
Step 4. Using a plastic scribe, carefully pry the base cover away from the top cover. This will expose the hard-drive assembly.
Step 5. Remove the screw that secure the hard-drive assembly to the chassis.
Step 6. Slide the hard-drive assembly towards the back of the computer to disconnect the hard drive from the system board. Then, lift the hard-drive assembly off the chassis.
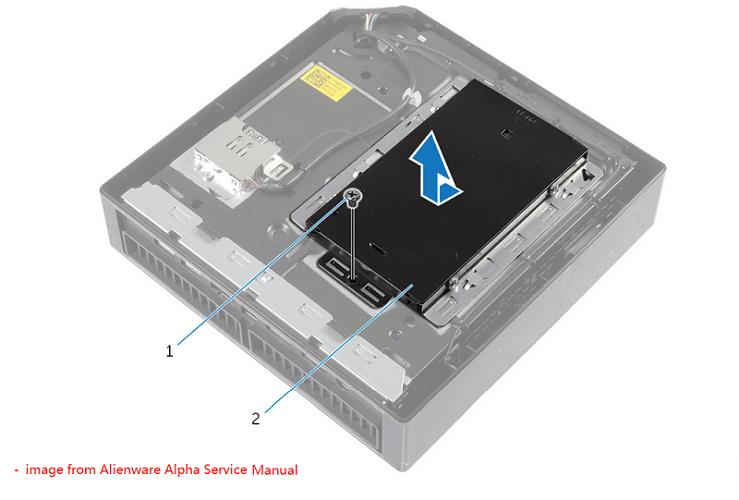
Step 7. Remove the screws securing the hard-drive bracket to the hard drive.
Step 8. Lift the hard drive away from the bracket.
Step 9. Now, install the new 2.5 SSD into the hard-drive bracket and secure it using screws.
Step 10. Next, place the SSD assembly back onto the chassis and fasten it with screws as before.
Step 11. After reassembling everything, use the 4 screws you removed earlier to secure it all in place.
Step 12. Reconnect all cables and power the device on to verify that the Alienware Alpha recognizes the new SSD.
# 2. Replace the M.2 SSD with a New M.2 SSD
If your Alienware Alpha is an R2 model, it might include an M.2 slot on the motherboard, allowing for an upgrade to an M.2 SSD. Here’s a guide on how to install a new M.2 SSD in your Alienware Alpha:
Step 1. Begin by powering off your Alienware Alpha and removing the four screws from the base cover.
Step 2. Next, flip the device over and lift the top half of the case to detach the cover from the rest of the PC.
Step 3. You will then see the CPU and GPU fans.
Step 4. Press the two tabs on either side of the CPU fan cover and lift the fan upward to detach it.
Step 5. Then, disconnect the GPU fan cable from its socket on the motherboard. Press the side tabs of the GPU fan case and simultaneously lift the fan cover up and forward to remove it.
Step 6. Carefully pry the tabs on either side of the RAM holder apart with your fingers, then lift the RAM forward and upward to take it out of its slot on the motherboard.
Step 7. Position the SSD upwards and align the pins with the M.2 slot on the motherboard. Gently push the SSD into the slot until the pins align and press the SSD towards the motherboard.
Step 8. Finally, secure the SSD in place by screwing in the retaining screw using a Phillips screwdriver.
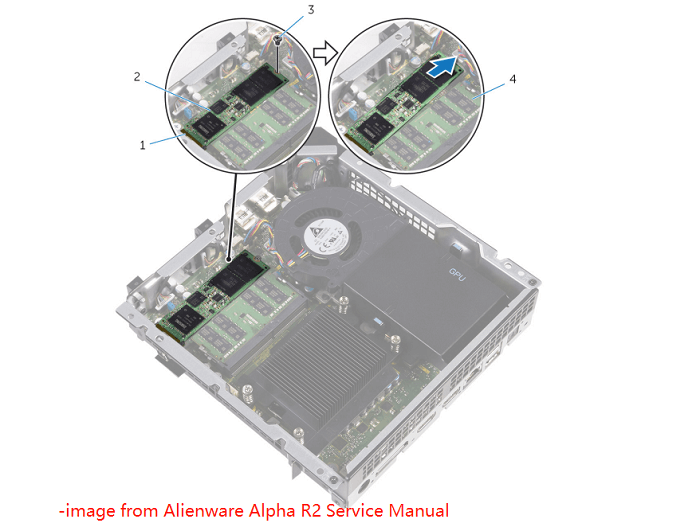
Step 9. Once done, assemble all the components back and power on your Alienware Alpha to test whether the new M.2 SSD is recognized.
In Conclusion
If you want to upgrade the SSD in your Alienware Alpha, this post provides a complete guide. Whether your device is the Alienware Alpha R1 or R2, you can refer to the instructions in this guide.
If you encounter any issues or have suggestions while using MiniTool Partition Wizard, please contact us at [email protected]. We will respond as soon as possible.


User Comments :