A large number of people want to upgrade RAM in their Acer Nitro 5 laptops. How to upgrade Acer Nitro 5 RAM? Which RAM is suitable for your gaming computer? This post of MiniTool provides a full guide for the Nitro 5 Acer RAM upgrade.
Are you using Acer Nitro 5 gaming laptop? It provides an easy access panel to replace and upgrade RAM. This series of laptops are designed with a single 8GB SODIMM RAM together with a second slot that you can add RAM. If you want to add more RAM space, this Nitro 5 Acer RAM upgrade is very suitable for you.
How to upgrade Acer Nitro 5 RAM? Here we provide a complete guide for the entire process of replacing RAM. Let’s keep reading carefully.
Before You Do
What should you do before the Acer Nitro 5 memory upgrade? RAM upgrade is a relatively complex process. To avoid any unexpected situations, make sure that you have read the following preparations carefully.
- Don’t exceed 32GB total memory. Compared to the rest of the hardware, Acer Nitro 5 gaming laptop can get an excellent performance within 32GB.
- Working in an anti-static environment. During the entire process of replacing Acer Nitro 5 RAM, make sure that you work in a fully anti-static environment. For this, you need to prepare an anti-static wristband. Also, make sure that your Acer Nitro 5 gaming laptop is powered off.
- Back up all important data on your laptop. It’s highly recommended that you back up your computer before performing any hardware upgrades.
MiniTool Partition Wizard FreeClick to Download100%Clean & Safe

Are you ready for the Acer Nitro 5 RAM upgrade? Now, let’s move on to the following part to upgrade RAM in Acer Nitro 5 laptop.
Acer Nitro 5 RAM Upgrade
Make sure that you have set up in an environment devoid of static and hold tools at hand. Here is a complete instruction for the Acer Nitro 5 RAM upgrade. Now, follow the steps below carefully:
Step 1. Place your Acer Nitro 5 laptop on a flat surface, and then flip your laptop to its back and locate the small vented access panel on the bottom of your laptop.
Step 2. Use a Philips- head screwdriver to unscrew all the small fasteners on the vented access panel.
Step 3. Take off the vented panel with the help of your fingers or a pry tool. Then you will see a single stick of RAM and a free memory slot above it.
Step 4. Then you can install the new stick of RAM on the memory slot. During the process, make sure that the notch of the new RAM is lined up with the ridge in the memory slot.
Step 5. Press down the new RAM to click it into place. Once it’s inserted properly, you should see the small metal holders on either side hold the memory in place.
Step 5. Take the vented access panel back into its place. Make sure all the small teeth are seated properly.
Step 6. Screw all the fasteners on the panel.
Now, you can power on your Acer laptop to check if the Acer Nitro 5 RAM upgrade is successful. To verify if the new RAM is recognized by your system, you can follow the steps below.
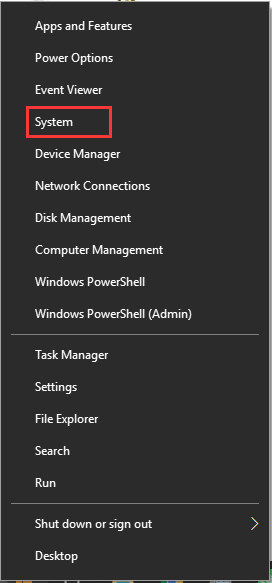
Step 1. Right-click the Start menu and click System from the context menu.

Step 2. Scroll down the right sidebar to locate the Device specifications section. If it matches the total install RAM, which means Acer Nitro 5 memory upgrade is a success.


User Comments :